

Brief History
It has always amazed me, how long the V.W. Beatle was in production and how fundamentally has never really changed from the first production to the last one the shape and concept have remained the same.
The idea of the Beetle had been conceived in 1931 when Ferdinand Porsche and Zundapp developed the Porsche Type 12, or “Auto fur Jedermann” (translated as “Car for Everyone”). Porsche had already developed the flat 4-cylinder air-cooled motor, and Zundapp was developing a Radial 5-cylinder water-cooled power plant. Porsche had chosen to use a “swing-axle” type rear suspension, previously invented by Edward Rumpler.
By 1932, three prototypes were running, and a fourth, the Porsche Type 32, built by the NSU motorcycle factory, joined the line-up in 1933.
In 1933 Adolf Hitler commissioned Porsche to develop a “Peoples Car” (literally a Volks Wagen), the car was to be able to seat 2 adults and 2 children, with room for their luggage, and be able to cruise at 100km/h (62mph). The term “Volks” had been applied to various Nazi party-sponsored consumer products such as the Volksradio.
The Volkswagen name however wasn’t to become official until a few years down the line. The new car was initially tagged the Porsche Type 60, then christened the KdF-Wagen, KdF being the initials of the leisure arm of the Third Reich (Kraft Durch Freude or Strength through Joy). October 1935 saw the first Type 60 prototype, known as the "V1" ready. By 1936, testing of the first three "V3" prototypes, built-in Porsche's Stuttgart shop, began. By 1937 Thirty "W30" pre-production models, manufactured by Daimler-Benz, had undergone 1,800,000 mi (2,900,000 km) of further testing.
All cars already had a distinctive round shape and an air-cooled, rear-mounted engine. Hitler had planned that the new car would be affordable to everyone and introduced a form of partial payment for them, not dissimilar to that of the “Green-Shield” system. Consumers would purchase a “Sparkarte” (a savings card) for 1 Reichsmark, the equivalent of about 30p, or around 40 US cents.
Following the purchase of the Sparkarte, they were obliged to buy at least 5 Reichsmark of stamps per week, this worked out at roughly £1.35 or USD 2. The average Germans salary at the time was around 32 Reichsmark a week. The sum payable for the basic car was 990 Reichsmark.
In 1938, the Stadt des KdF-Wagens had been built around the village of Hesslingen, as a town to house workers at the KdF-Wagen factory.
By the outbreak of World War 2 in 1939, only a handful of consumer cars had been produced, and all customer orders had been cancelled as production was switched from civilian vehicles to those military vehicles.
The main two vehicles produced during the war period were both Beetle-based variants, the flat 4 air-cooled engine and rugged suspension being ideal for the harsh desert environments of Africa.
The first was the Type 82 Kubelwagen, a utilitarian off-road vehicle of very basic construction. German military officials had stipulated that the fully laden Kubelwagen (including 4 battle-dressed troops) shouldn’t weigh more than 950kg, this left the unladen vehicle with a maximum weight of 550kg. The experienced military coachbuilder Trutz was subcontracted by Porsche to assist with the body design.
Initial testing began in 1938, with successful results, and continued in Poland in 1939. The resulting tests had the German military request some important changes. Whilst the vehicle had impressive off-road credentials, even when compared to some of the existing 4x4s already in service, it was felt it could still be improved, and the vehicle’s slowest speed of 5mph needed to be reduced to that of marching troops, around 2.5mph.
Porsche responded to these requests by installing “reduction boxes” (effectively a 2nd gearbox, resulting in more torque), larger wheels, and revised suspension. The reduction boxes alongside the self-locking ZF differentials increased the vehicles’ off-road ability, as well as allowed a lower speed to stay level with the troops. Kubelwagens were mass-produced as soon as the factories in Stadt des KdF-Wagens had been completed.
The second vehicle produced during the period was the Type 166 Schwimmwagen, based on prototype 4x4 Kubelwagens, the Schwimmwagen was produced as an off-road amphibious vehicle, utilizing an extended crankshaft to drive a folding propeller mounted to the rear of the vehicle. Due to the simple nature of the propeller coupling, the Kubelwagen could only use propeller power for forwarding motion, reversing was done by either rowing or using the land wheels to slowly reverse the vehicle. Steering was controlled by the steering wheel on both land and water, with the front wheels acting as rudders when in boat mode.
The basic 4x4 system was only available to use in 1st gear (and on some models reverse). There was a third military variant of the Beetle, which was called the Kommandeurwagen, or Type 87. This was the rarest of the military models, reserved for German Military VIPs with only 669 rumoured to have been produced. The Kommandeurwagen was a hybrid of a 4x4 Kubelwagen and Beetle, using the Kubelwagen chassis, with a conventional Beetle body on the top.
The final Volkswagen Beetle was on July 30, 2003, the last of 21,529,464 Volkswagen Beetles built since World War II rolls off the production line at Volkswagen’s plant in Puebla, Mexico. One of a 3,000-unit final edition, the baby-blue vehicle was sent to a museum in Wolfsburg, Germany, where Volkswagen has its headquarters.
Review
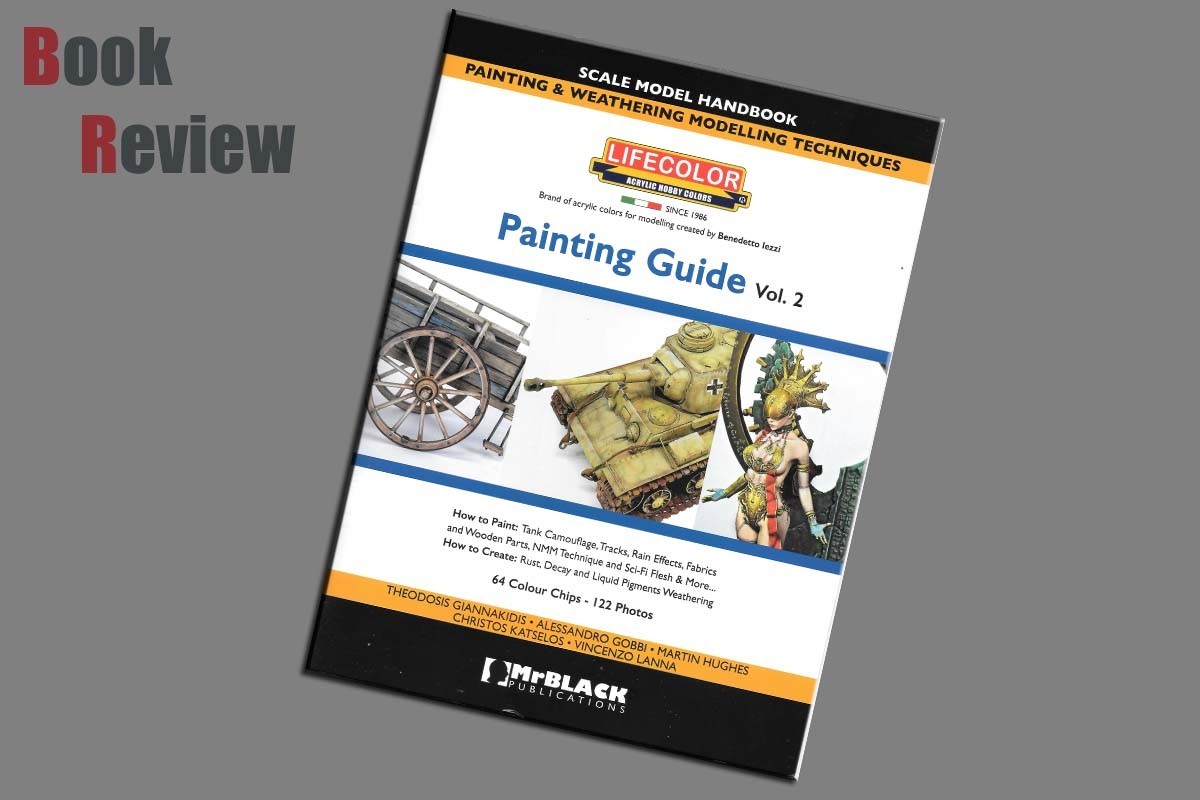
The guidebook comes with softback covers laid out in a way that it is easy to see what is within the guide, high gloss, hi-res, glossy pictures three of them give a welcoming feeling and certainly for me making me want to open and start reading. Pagination runs to thirty-six including the covers with a stapled spine and is produced by Mr Black Publications in collaboration with LifeColor paints.
The preface is often a section scanned over or ignored within seconds to open to the main feature and I am one of those who skips past it. Having finally read the preface of this guide I will be reading it all in future books and may have to go back and read the preface in my books within my library. Editor/Publisher Stelios Demiras does give insight into the book and the history of how LifeColor worked on a set of non-metallic paints for years before being happy to release their latest non-metallic gold metallic paint set.
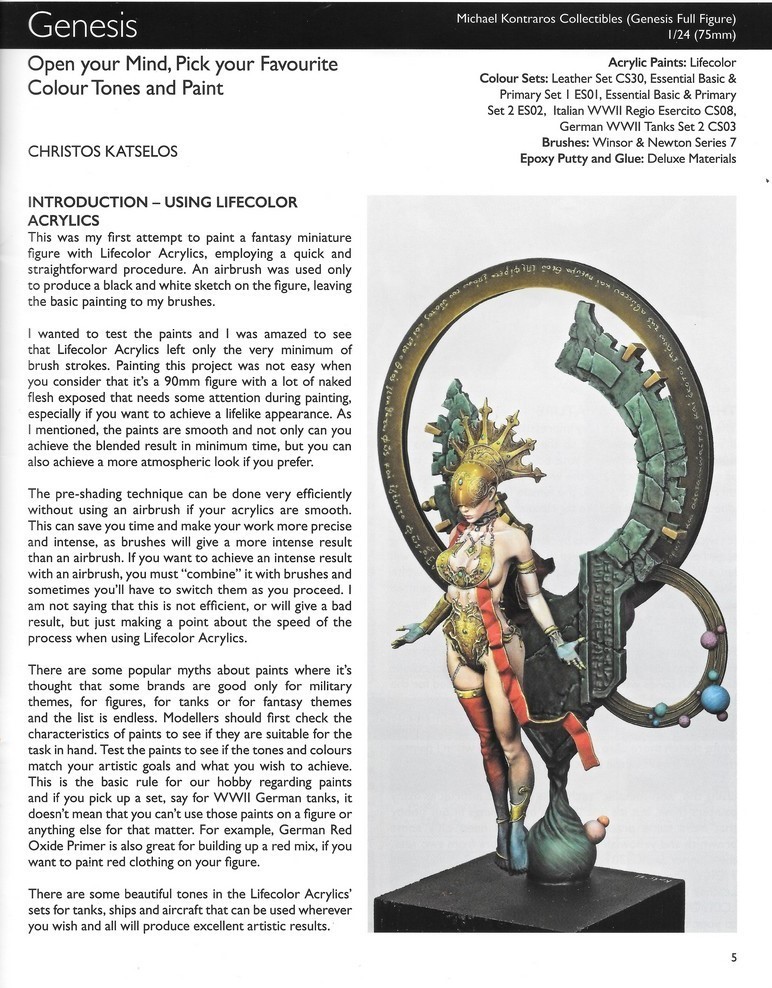
So on to the review, to start with, Genesis a stunning mythical figure, it was a figure that LifeColor Painting Guide Vol. 1 started with, that of a Russian female sniper which set the scene for me and had me thinking of those braves, possibly barking mad women whose shooting ability picked off Germans one by one. This new book also has started with a figure as I have already said Genesis the mythical figure who is this figure full of mystic intrigue. One of the things that inspired me in the last book was the way it was laid out, and nothing was left out. Open your mind, pick your favourite colour, tones and paint including this simple sentence that says it all. Christos Katselos in my humble opinion is a remarkable modeller and figure painter who takes us through the work involved in bringing this fantastic fantasy figure, Genesis, to life. As with the first LifeColor painting guide in collaboration with Mr Black everything used is listed right down to the paintbrush size in this case, size 7.
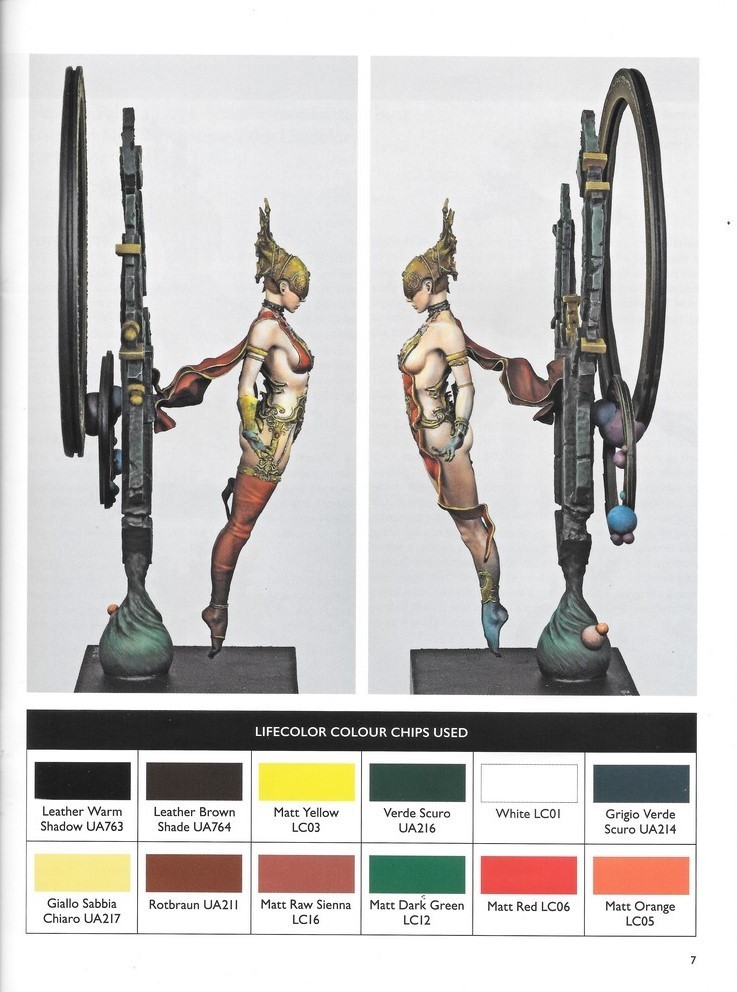
A very comprehensive guide follows each stage of the build, “the red cloth was painted with a basic mix of Rotbraun UA211 (German WWII Tanks set 2 CS03), Matt Raw Sienna LC16 and a touch of Matt Dark Green LC12. Highlights were created with some Matt Red LC06 and touch Matt Orange LC05 (Essential set ES01 & ES02). If you want a rich red colour, you should take care not to overdo the orange or yellow tones in your highlight mixes.
On the opposite page, we have the life colour chips used, all of which are numbered, and you will be able to use the chips to make your personal choice on how you would like to finish your Genesis figure.
The paints used so far were used on the stand on which Genesis is mounted, the stones, mythical runes, her cloak, the wrappings on her right leg, and some of the metallic body armour.
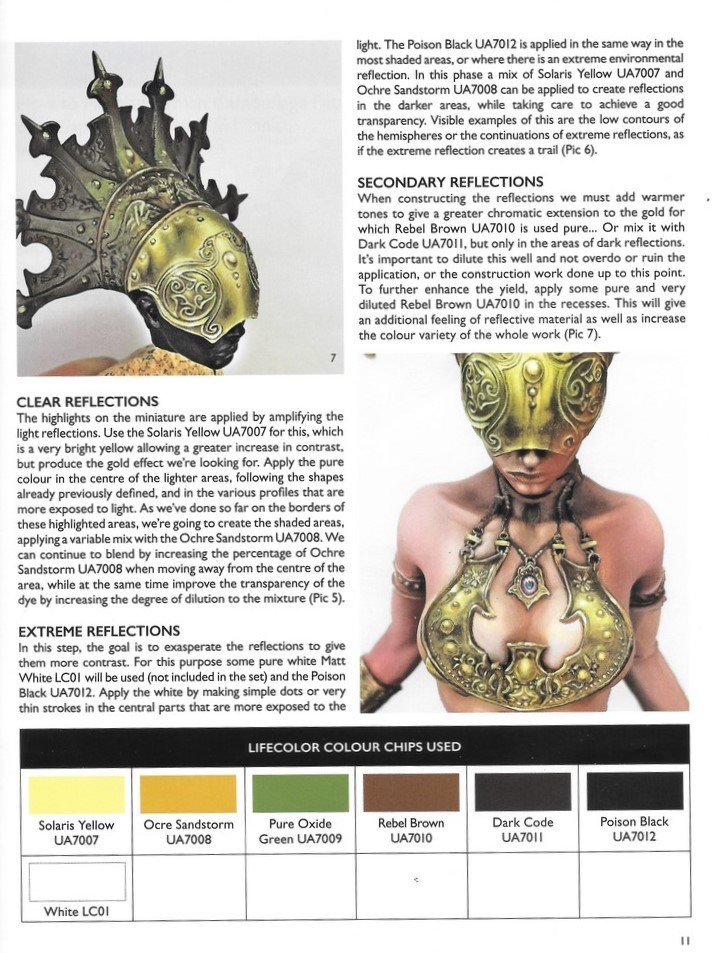
The next chapter was the editor’s choice to include a step-by-step painting guide after Christos’s Katselos’article, giving the reader an all-around view of using the metal paints, even though you can download it from the Astromodel store website. At the time that Christos painted the Genesis figure the non-metallic metal sets of gold (CS53) and Steel (CS54) were not available and he used his palette. Alessandro Gobbi then did the bust of Genesis using in his palette the two missing sets (CS53) and (CS54).
This is highly unusual when it comes to deadlines for getting things done, most editors would not wait and are certainly unlikely to put in an extra section showing you how to use the LifeColor Non-Metallic Metals paint set. This extra section again explains incredible detail allowing you to see how each part of the metallic “NMM” (Non-Metallic Metals) paint can do, and what the coverage and colours can do, one small note of interest, the paints themselves took years to refine and become the product that it was first imagined succeeding and become what it is now.
Like articles in this guide and the first guide, nothing is too small or large to be put into the article giving exact information with the LifeColor colour chips used at the end of the second painted Genesis Bust.
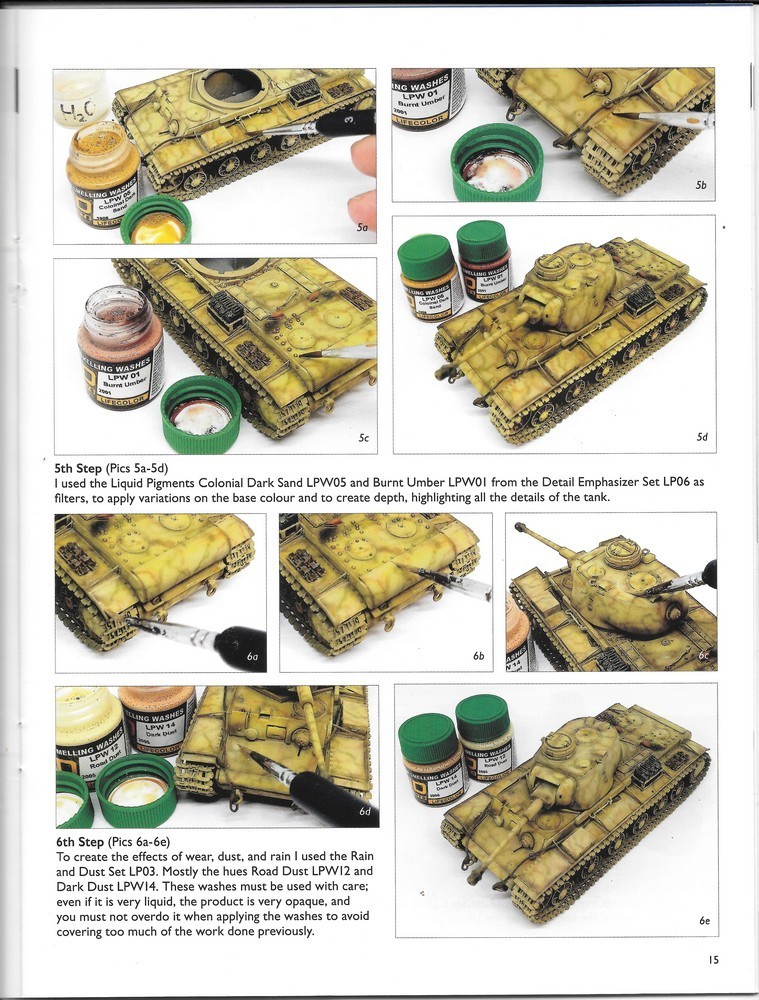
The next chapter focuses on how to paint a German camouflage pattern on a captured Russian KV-1 Tank in 10 easy steps. The German Pz. Kpfw VK-1B 756(r) the model used is a Hobby Boss (84818) 1/48th scale
Vincenzo Lanna gives you a comprehensive guide on the Hobby Boss kit including a small introduction giving you some history of the tank, the kit itself consists of 10 sprues with a small photo-etch. Over the 10 steps, there are more than 10 pictures, for instance, step 4 has pictures 4a, 4b, 4c, and 4d, this way you get to see each step with each picture allowing you to follow without having to pause a video to see what they are doing.
This guide goes through so much detail with each subject, tracks, turret, hull, accessories, techniques,
‘Sandbagging’ Tamiya’s Carro Armato M13/40 painting sandbags step by step for dioramas this article from Theodosis Giannakidis it is easy to see from the first picture to the last just how each step sets you up for some realistic-looking sandbags.
It is refreshing to see just how this works it may look simple but the results are stunning as you will see at the end where the Carro Armato truly comes alive, it is also great to see the actual real Carro Armato gives you some extra help and one of my favourite things history I probably spend more time researching the subject than building it. As always for me, all-important LifeColor paint chips are there showing every colour used.
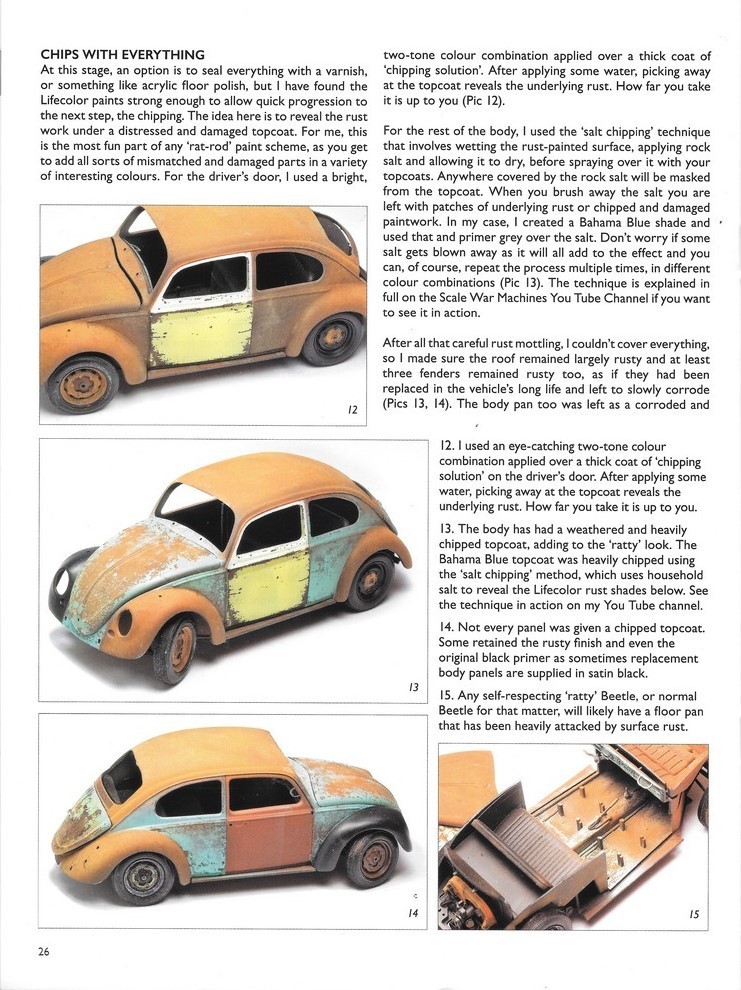
‘Rat-Look’ Volkswagen Beatle civilian vehicles, creating rust, mould, and decay this is part two of this step-by-step painting guide following on from LifeColor painting guide Vol. 1
Following on from Martin Hughes’s first instalment where he got to grips with the Revell VW Golf GTI. One of those cars I always wanted but never managed to get in my youthful days sticking to motorcycles, XR2, XR3i, and my favourite car that I have ever had the pleasure to own coming exceedingly close to my Renault 5 GTI was my Ford Escort RS 2000 4x4 now that was a beautiful car. I digress somewhat so back to part one we had a couple of pictures that included the VW Beatle giving a glimpse as to what was to come.
This is a comprehensive section looking at the art of weathering rust to a point of decay and has you captured from the start, where Martin Hughes explains the first stage using a coat of black acrylic surface primer on most of the panels which were quickly followed by repeated coats of LifeColor Dust and Rust Diorama set CS10.
Like all the painting sections this painting guide is a series of hi-res pictures which gives you the visual result, to understand just how this is being created and ultimately help you achieve similar effects in your projects that you may be wanting this particular result. Maybe some discarded military vehicles on a battlefield long since left, or one of those barns finds an old car. The possibilities are endless, the now-famous LifeColor Chips Used section at the end of this guide. In the brief history section one of my ways to give you historical relevant content we talk about the history of the Volkswagen Beetle a vehicle that has stood the test of time with over 80 years in producing a fantastic achievement.
The final section which I have found somewhat fascinating and had my mind wandering, dreaming of a diorama or two if only my modelling skills could keep up with my imagination, I would need a barn myself in which to display all of my dioramas.
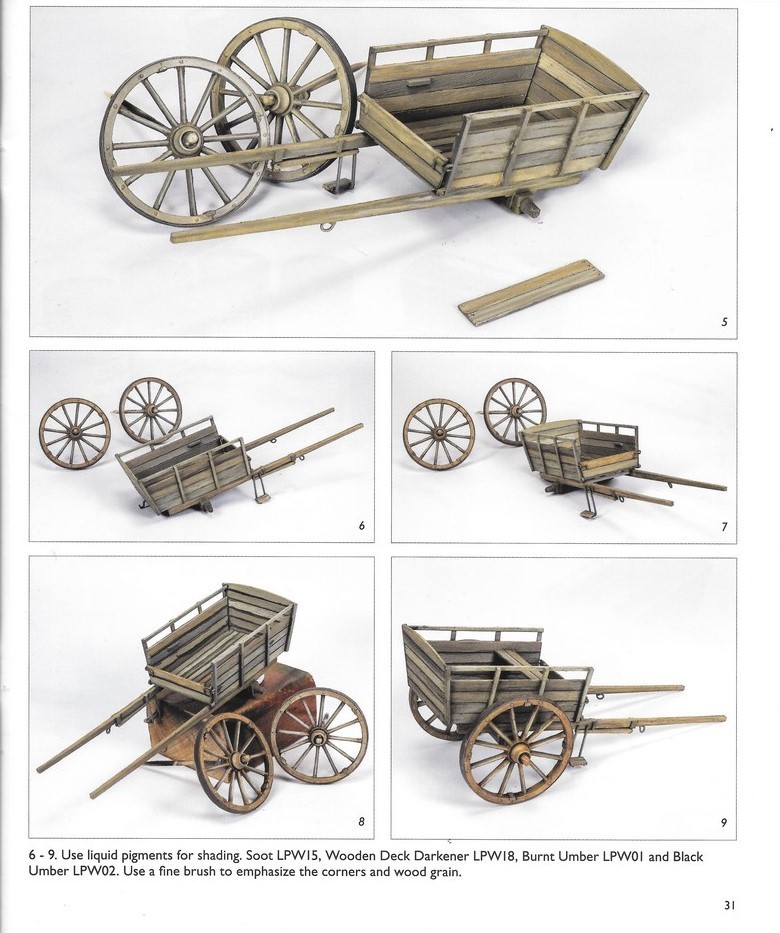
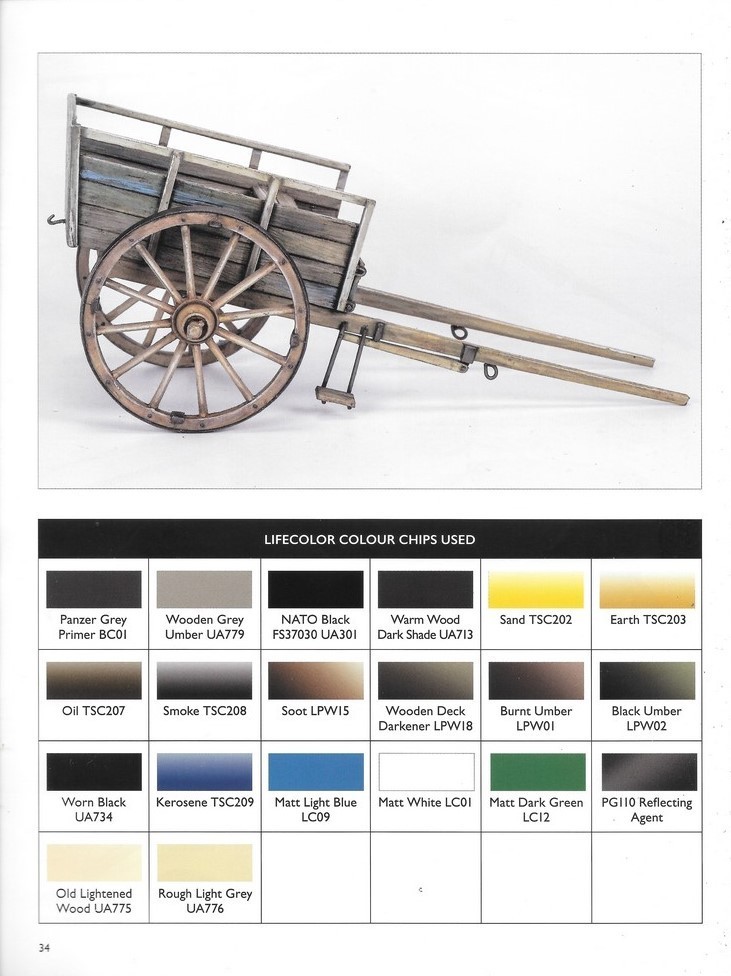
The MiniArt Farm Cart painting of a realistic wooden farm cart using LifeColor Acrylics by modeller Theodosis Giannakdis was assembled straight out of the box without the need for any filler.
I have found it fascinating how people can make plastic look just like wood if you would like to find out how to do this, well, it is right here in that last section of this guide and believes me this is a fantastic way to achieve this. Spread over 17 step-by-step guides including the hi-res pictures have you looking around to try to find something a wooden plastic model just to get this wooden effect under your belt ready to create some amazing dioramas. It is these amazing hi-res photos that make it Theodosis has created some amazing work with just some very light shading and of course dark shades, and the metal plating around the wheel this just really brings it to life. The number of colours used was more than I thought but all are in the LifeColor paint chips at the end of this final section.
Conclusion
The second LifeColor painting guide is another easy-to-follow painting guide that I am sure you will enjoy, even if some of the subjects are not what you would normally build you can take the step-by-step guide and bring the same or similar finish to one of your model kits. This is one of the things that I appreciated about this painting guide it is not just the modellers who build the models in this guide, it is the guide itself nothing is left out as I said about the previous Vol 1 everything that is used in each of the builds with an emphasis on everything which is something you don’t see in many other guides like the glue used, paintbrush size, airbrush needle size, every single paint used everything.
But more than this it is this kind of editing rectitude and complete disclosure that sets this editor’s painting guide aside from many others it is a tight schedule deadline that has to reach to get the most value out of a book regardless of its content. But the editor Stelios Demiras added the second section so that the correct paint could be used a further reason that sets this guide one of the best in my humble opinion.
Finally, I would like to thank Rolando Lezzi from Astro Models, LifeColor Acrylics, Stelios Demiras of Mr Black Publications, Airbrush Company, and especially Lisa for her unwavering support and kind words.
I am Adie Roberts from In War and Peace and the kitmaker Network this is the LifeColor Painting Guide Vol. 2