

Quoted Text
Makes me wonder if they shrink over time or something.
Gaz
Maybe
https://www.youtube.com/watch?v=GG2dF5PS0bI


Makes me wonder if they shrink over time or something.
Gaz


Now I will have to scheme and plan waiting for an opening...
Gaz


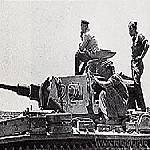


Is the "whitewash" inside the gun barrel an optical illusion or is there actually white paint in there?
The angle of the front fenders makes me dizzy. They look undamaged so I assume that the slope to the right in the image is unintentional and that it is a pure coincidence that they have almost the same angle.
The whitewash gives me the impression that it has been washed out by spring rains. Not really a chipped effect. Joes advice sounds good (never done this myself).
If we go for the 'washed out by spring rains' effect then some mud and dirt below the fenders could enhance the feeling of spring. The whitewash is still there, sort of, and the thawing ground is starting to make everything dirty/muddy again. No white on the wheels, covered or worn away by mud. Very little white below the fenders, covered/replaced by mud and dirt splatters. Some dirty/muddy footprints topside but not all over the place, just to get up on top and into the hatches.
The whitewash around the hatches to the fighting compartment could be more worn away. Lots of mittens and clothes rubbing of the paint there.
/ Robin
Hey Gaz,
Im confused. Why whitewash?
mike
I like the look of the whitewash, and I think this looks more realistic than the harsh contrast one usually sees when the hairspray method is used. The chipping technique gives results that infer that the colour underneath was exposed due to impact from a hard object(s), so when the whole subject is displayed this way, it does not look right, to me anyways.
The white paint used on panzers was a distemper, a temporary paint that wasn't durable like factory paint, it would eventually fade off through wear and wet weather.
Gaz,
What was your technique for creating wear effect vs chipping with your white wash? I would like to mimick it on my build to show some dunkelgrau showing through the RAL 8000.
Thanks
 |


