

1⁄35LAV III
27
Comments
INTRODUCTION
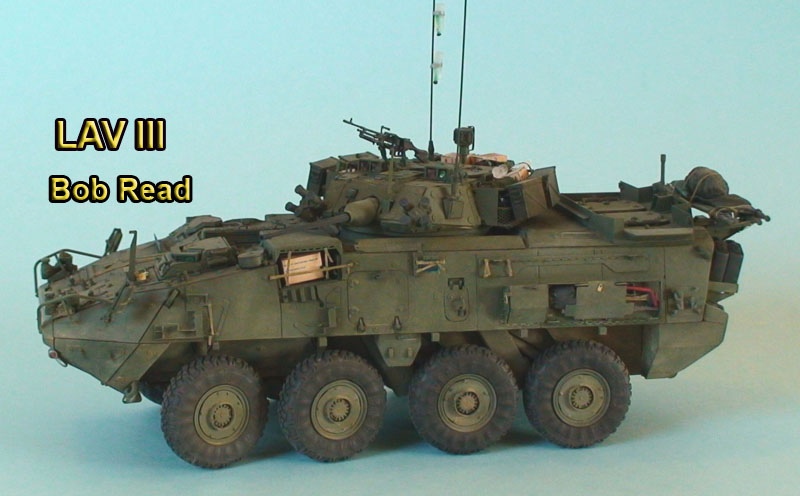
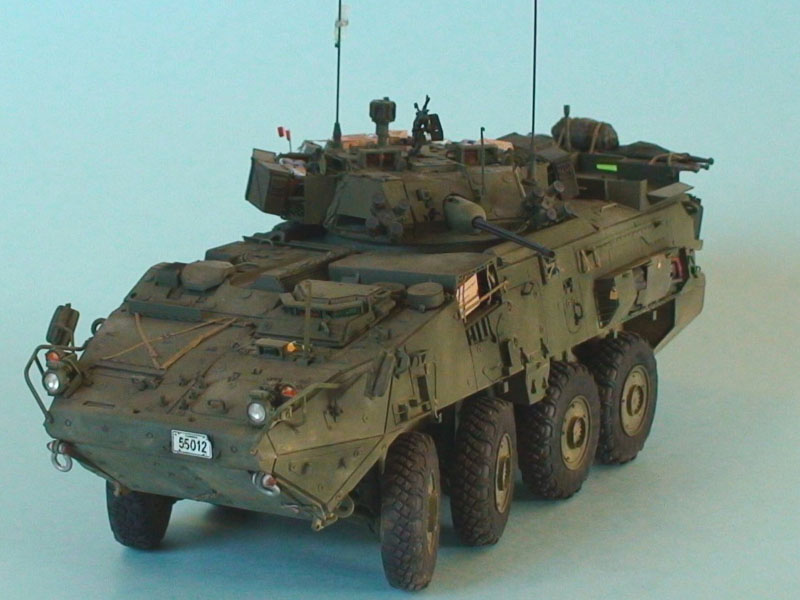
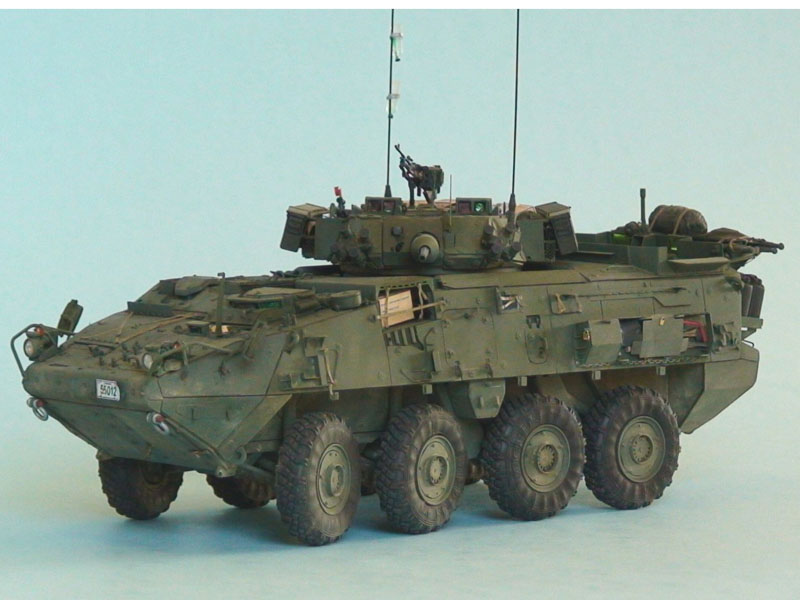
The LAVIII is a well armed and fast Light Armoured Vehicle currently deployed with Canadian troops in Afghanistan. Built by Canada and entering service in 1999, it is a well armoured 8 wheeled troop carrier and advanced scout/reconnaissance vehicle with a 25mm stabilized M242 chain gun, a 7.62mm C6 co-axle mounted GPMG and also another C6, or sometimes an FN Mini Mitrailleuse, pintle mounted machine gun. This MG can either have a standard butt-stock attached or spade grips instead. It has very similar in appearance to the US Army Stryker with the addition of what is basically the same turret as in an LAV-25. New Zealand has a similar vehicle known as the NZLAV.PRODUCTS
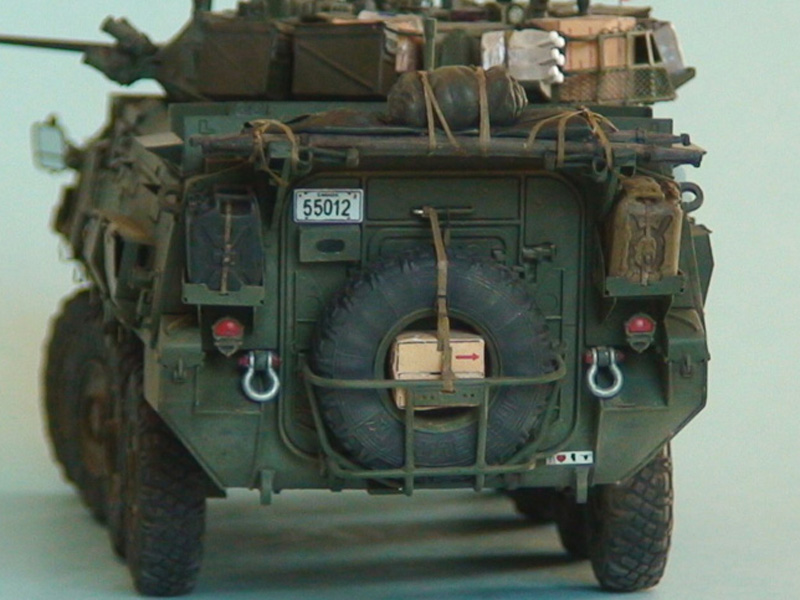
The base kit is AFV Club's Stryker M1126 ICV with the superb RealModel Canadian LAVIII-ISAF conversion set. The conversion set has a one piece, warp-free resin upper hull to replace the one in the Stryker kit, plus a full turret in resin, the proper grenade launchers, and a host of other resin parts and details. No less than 5 sheets of perfectly fitting photo-etch are included and it's these parts that really make the kit shine. Everything from hull-side bins and racks to armoured wheel covers and rims to turret basket screens are included. The only thing you really need to make this appear as an operational vehicle is stowage. Also included are a paper sheet of road signage and warning signs, a sheet of Canadian ration boxes, some brass wire and a Barrel Depot 25mm fluted barrel for the M242 gun.CONSTRUCTION
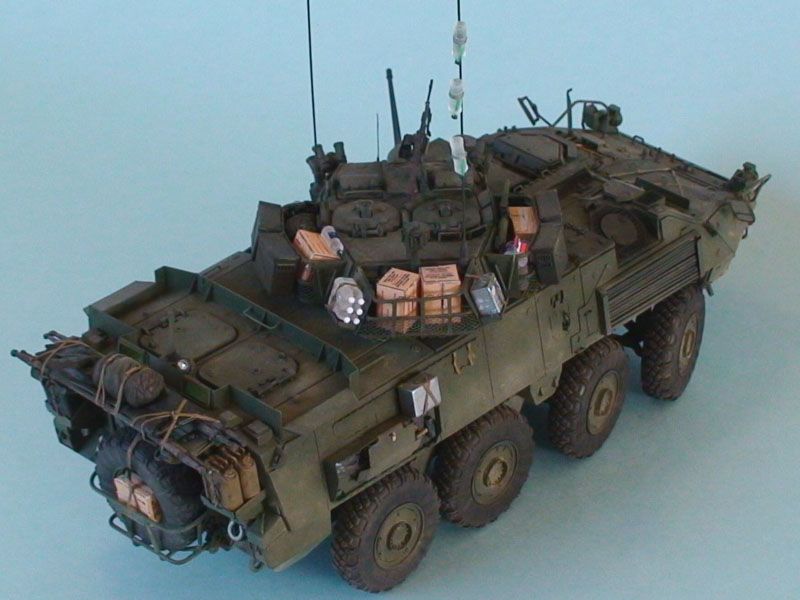
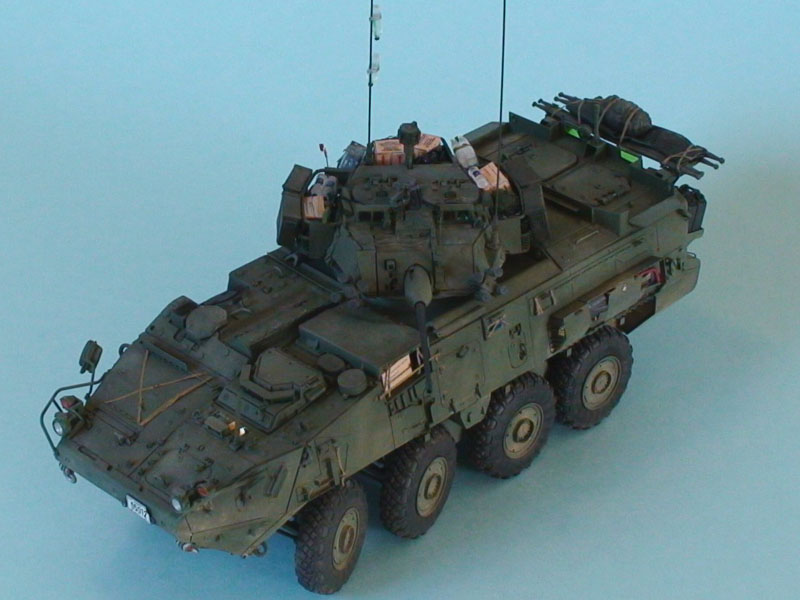
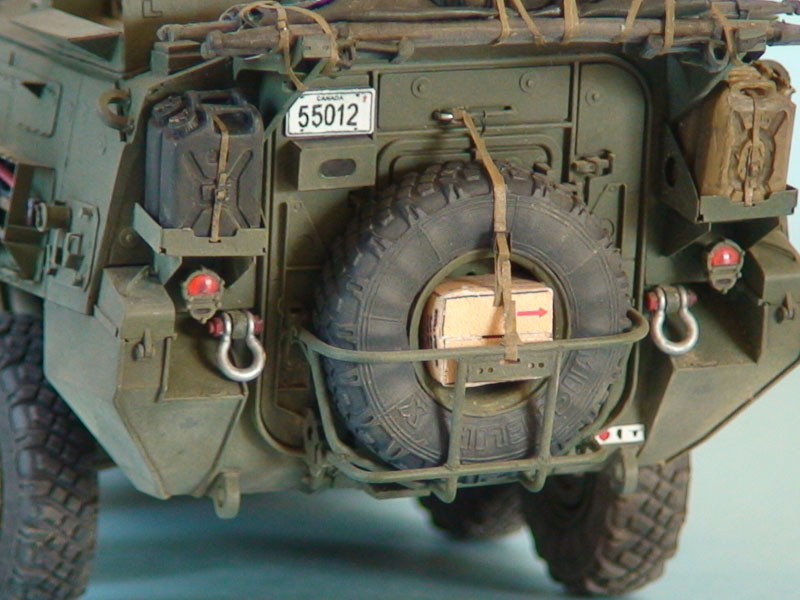
Apart from the myriad of parts and bits, the build-up was fairly straightforward. From the hull break line downwards is all AFV Club Stryker, while everything above that is the RealModel offering. A small problem arose when I realized that the resin upper hull at the rear was a bit short in height creating a bit of a fit problem with the AFV Club rear door parts, but with a bit of shaving, sanding and a small amount of grunting and shoving fixed that. Other than that problem, and I freely admit it may have been one of my own doing, the kits fit together extremely well all over. All grab handles and some tie-downs were replaced with wire except for the excellent items supplied in RealModel's PE set. The spare tire rack attached to the rear door was scratch built although the mounting brackets are in the PE set.PAINTING
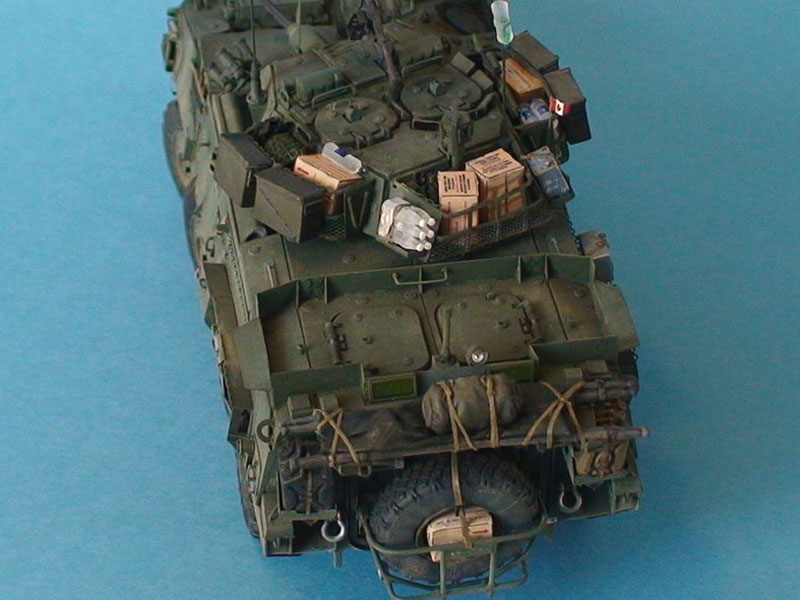
Once the main construction was finished, I sprayed Tamiya fine surface primer from a rattle can and after 24 hours, I airbrushed a base of Tamiya NATO green followed by a satin Polyscale finish. After another 24 hours, I applied a filter all over the vehicle of 90% distilled water to 10% Vallejo German Camouflage Black Brown. This darkened the green down to the right shade and added tonal qualities to the finish to break up the monotone colour. I also area-filtered an acrylic wash of lighter green in certain areas such as the centre of some panels and hatches to give them a more faded look. I also used a black acrylic pin wash around details to define and bring out depth. After everything was dry, I brushed on a preliminary selection of Mig powders to give it that all-important dusty appearance and then started to assemble the stowage.STOWAGE
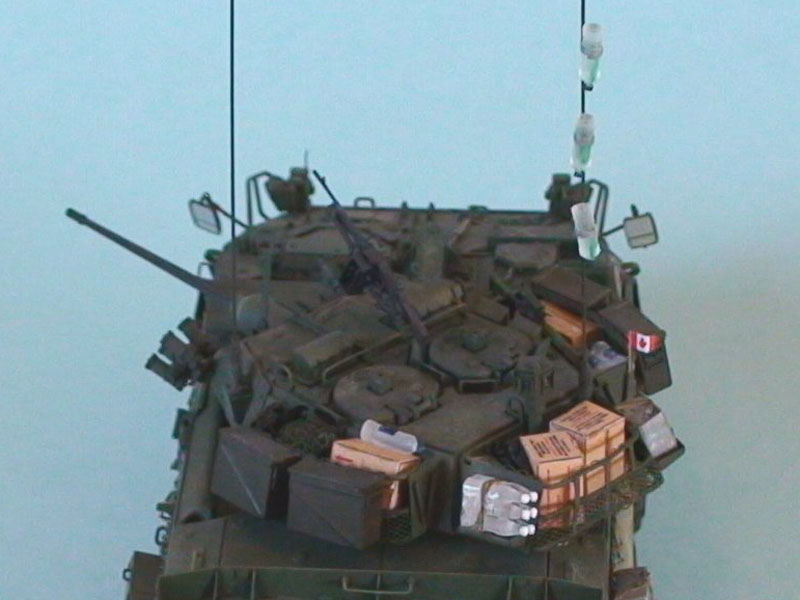
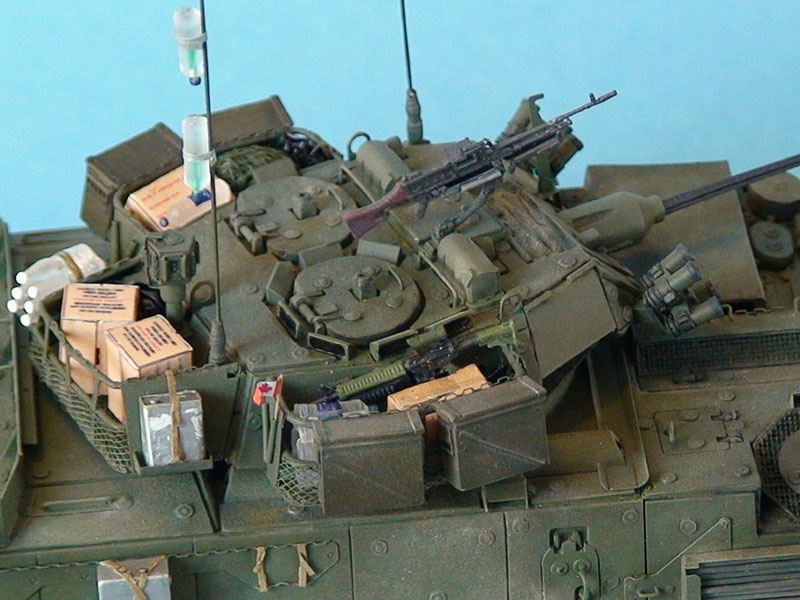
Items are made up of a selection of aftermarket suppliers I've come to know and love. Maple Leaf Models here in Canada produces very fine conversions and parts to make Canadian vehicles. I used their excellent folding stretchers, jerry cans, C7A2 crew weapon and antenna mounts. The water bottles are from Accurate Armour. They're wrapped in ordinary clingy kitchen wrap to make them look like packaged sets. I added padlocks from Hauler and Accurate Armour as Canadian vehicles are festooned with padlocks. The tarps are homemade items from latex rubber glove pieces and black poly-bags. The camouflage net is left over from a spares box Quartermaster Depot net I've had for years. Some additional pioneer tool items were taken from the Academy Allied and German tank supplies set and I included a scratch built bush saw. That's made from a bent piece of brass wire and a spare PE strip added with one side etched with a needle to give it a toothed edge. The water bottles and the wire antennas are there for the crew to insert chemical light sticks for night operations. I chose to show them with green light sticks in them so I drilled a hole through the top of each one of the Accurate Armour clear resin bottles at a natural angle. I then put some bright green paint on a thin wire and inserted it into the hole to apply the paint. Once that was done, a small piece of stretched sprue and some paint finished off the bottle cap. I used Aber buckles, Echelon Stryker mirror faces and MV lenses as well.FINISHING
Both the coax mounted C6 and the pintel mounted C6 have their muzzles replaced with hypodermic needle sections to make them look like the flash eliminators and to give a scale 7.62mm hole in the business end. The RealModel ration boxes were soaked for a few minutes in tea to give them a browner, uneven appearance. The TACNAV/GPS antenna is scratch built from a small piece of turned brass wire, the rear spotlight is scratch built with an MV lens added. I used masking tape painted Khaki throughout for tie down straps with Aber buckles. I also scratch built the link ejection chute area on the right side of the turret and replaced the armoured door. The C6 pintel mount is scratch built as well with styrene rod and I added PE details from spares. There aren't many markings on Canadian LAV III's but I used Archer transfers for the front and rear number plates as well as the small black maple leaf appearing on the front bumper and rear fuel tanks. The final finishing step was a coat of Polyscale flat and various patches of Mig powders to finish of the dusty appearance of the vehicle. The very last thing was adding the small Canadian flag on the turret made with thin foil and Archer transfers.CONCLUSION
This is the most fun I've had with a model ever. I always thoroughly enjoy my hobby, but this one was exceptional. The subject matter coupled with the excellent kits made this a truly rewarding experience. On Sept 13th, 2008 at the Alberta Armoured Fighting Vehicles Model Show (AAFVMS) here in Calgary, I was truly honoured when my LAVIII was awarded a Gold Medal in the AMPS judging and was also distinguished by the very special award of "Best of Show". I'm now looking forward to getting into my next project. Let's see, it will either be a Canadian Leopard C1 or a Command and Control version of the LAV III. Or possibly the LAVIII TUA, or maybe a Canadian Leopard 2A6M with slat armour...or maybe......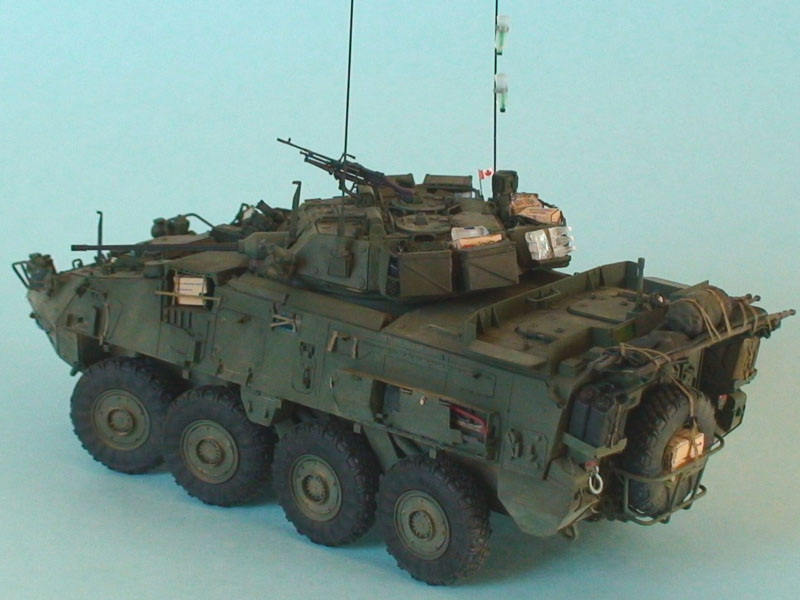


About the Author


FROM: ALBERTA, CANADA
Model builder for over 45 years (off and on - mostly on), biggest model building passion is armour and real space models, married - 3 kids.
Comments
Hey Bill
The stretchers are Maple Leaf Models ones, yes. They're really, really nice I might add.
I'll try and put up some newer photos in a day or two once I get my homemade light tent figured out.
cheers;
Bob
FEB 26, 2009 - 10:31 AM


Thanks for all your great comments guys, I really appreciate it.
Here are some new photos taken with my new camera and a better light setup;


 Bob
Bob
BobFEB 28, 2009 - 06:12 AM

Nice to have another clearer look, thanks for the effort.
Perhaps this is wrong place to talk about photography but you did mentioned using a lighting cube, could you take a pic of that too, I've always wanted to make one, they have got to be the best way to photograph small objects.
Regards
Bill
FEB 28, 2009 - 08:04 AM

NZLAV. The commanders sight is open and the Gunners is closed in this photo. Not the best photo, but you can see what i thought was missing. Until i realised I was wrong!

FEB 28, 2009 - 05:42 PM
NZLAV. The commanders sight is open and the Gunners is closed in this photo. Not the best photo, but you can see what i thought was missing. Until i realised I was wrong!
Here is different - NZLAV and LAVIII


FEB 28, 2009 - 07:17 PM
@ Bill
Thanks for the reply and you're welcome. I'll try and post some pics to the photography forum this weekend.
@ Ray
Thanks for the NZLAV pic, it's clear now.
cheers
@Miloslav
Sorry, but the LAVIII pic is a red x for me.
Bob
MAR 02, 2009 - 05:20 AM

Amazing model Bob, really showcases your eye for detail. I agree with Bill that the model has a homogeneous quality of "the way things should be" on a military AFV. Proper, locked-on, squared-away, solid, etc. The things that fighting men are repeatedly trained to do.
Worthy of all its accolades.
MAR 02, 2009 - 06:58 AM
Copyright ©2021 by Bob Read. Images and/or videos also by copyright holder unless otherwise noted. The views and opinions expressed herein are solely the views and opinions of the authors and/or contributors to this Web site and do not necessarily represent the views and/or opinions of Armorama, KitMaker Network, or Silver Star Enterrpises. All rights reserved. Originally published on: 2009-02-24 00:00:00. Unique Reads: 21164

WEB HOSTING BY


Copyright ©2021 Armorama and Kitmaker Network, a subsidiary of Silver Star Enterprises
All Rights Reserved. Please read our Conditions of Use and Privacy Policy.
All Rights Reserved. Please read our Conditions of Use and Privacy Policy.