Armor/AFV: Large Scale
1/16 and Larger Armor Modeling
Hosted by Darren Baker
Amazing T-34 model
seyahmit
Visit this Community
Missouri, United States
Joined: March 14, 2004
KitMaker: 51 posts
Armorama: 0 posts
Posted: Friday, July 02, 2004 - 12:20 AM UTC
I made the turret hatches workable. I drilled the hinges and used some brass rod. Here are a couple of pics.


majorproblem
Visit this Community
England - West Midlands, United Kingdom
Joined: June 27, 2004
KitMaker: 132 posts
Armorama: 0 posts
Posted: Friday, July 02, 2004 - 12:57 AM UTC
Fantastic work sgerty! I love the floor.
Anyone ever been in one of these?...I have and wish I had taken more photos of it, it was too oily to be comfortable in....hence, I know these things are prone to bad oil leaks everywhere.
My question is, were these as oily inside during the war, or are the leaks only due to age now, as I have been toying with the idea of putting oil leaks in my model?

TIM, thats cool with brass rod in the hinges, its something I want to do, but cant figure out how to get my drill so close to the turret roof without the drill catching against it and marking it? (I have the 1942 version with large hatch)
Thats why I thought about making slightly larger scratchbuilt hinges.
How did you get the drill tip in so close?

Carl
sgirty
Visit this Community
Ohio, United States
Joined: February 12, 2003
KitMaker: 1,315 posts
Armorama: 0 posts
Posted: Friday, July 02, 2004 - 01:33 AM UTC
Hi, Seyahmit, This is a very good idea about making those hinges workable. Hope some of my micro bits are long enough.

Thanks majorproblem. I had 2 other pictures, but they must have vanished into who really knows where. Ha, ha!

Have been reading "Tigers in the Mud" by Otto Carius and he talks about spending countless hours buttoned up inside his tanks, eating, sleeping, and I would imagine relieving bodily wastes as well. Plus, I'm sure various leaks and grease stains here and there, not to metion mud, grass, dirt, etc., that he said at one point the inside of one of his vehicles was hardly white anymore. So I would imagine, depending on just how much front line service a particlar vehicle has had, they would get very, very dirty inside.


I'm still going to put in some blankets and bed rolls etc. in, then try my hand at making up some 'mud' out of celuclay, food coloring, and some staic grass and put little bits of this mix here and there back in the tight spots. Then maybe even try my hand at pastels or weathering chalks too. I really think you would have to try pretty darn hard to 'over-weather' the inside of a fighting vehicle, esp. a tank that has been around on the front lines for a while. And not to mention that these Russian vehicles were really bent and banged up. I think they tended to use them more as battering rams that AFVs sometimes, and I would imagine the insides pretty much looked like the outsides.

Take care, Sgirty
seyahmit
Visit this Community
Missouri, United States
Joined: March 14, 2004
KitMaker: 51 posts
Armorama: 0 posts
Posted: Friday, July 02, 2004 - 05:46 AM UTC
majorproblem

I used a pin vise and a micro drill bit, maybe a #67? I can't remember off hand the bit size I used. The bit barely stretched all the way through the hinges.
jejack2
Visit this Community
Maryland, United States
Joined: April 09, 2002
KitMaker: 322 posts
Armorama: 0 posts
Posted: Friday, July 02, 2004 - 09:05 AM UTC
Sgirty, your pics are great, and the inside looks AWESOME! I'm gonna go work on my tank right this instant!!!
sgirty
Visit this Community
Ohio, United States
Joined: February 12, 2003
KitMaker: 1,315 posts
Armorama: 0 posts
Posted: Friday, July 02, 2004 - 10:10 AM UTC
Hi Thanks jejack2. Like what you've done on your vehicle too. I'm going to remember this fuel line wiring on your picture and hopefuly I'll be able to pick up one of the /85s someday and do this one similar to yours. Seeing that 1942 model makes me what one of them as well. Ha! What with the diferent road wheels and turret there does seem to be quite a bit of difference between the kits. I found on my 1943 kit there were 2 or 3 holes in the bottom I had to fill in with green stuff, as there was nothing to go in them, at least on this particular model style. So this makes me wonder how much, if any, things are different inside between the 1942 and 1943 kits.

I did get some of that modeling clay at the craft store today and fashion something of a rubber 'mat' to put down over the ammo boxes, with it rolled up on one side. Didn't turn out too bad either. Hope that rolled up section doesn't interfere with anything hanging down from the turret inside.

I'll tell you, I'm getting kind of tired of painting and weathering. This thing is so d---- big! And EVERYTHING you do, esp. in the painting department, has to be done BIG as well.

Take care, Sgirty
jejack2
Visit this Community
Maryland, United States
Joined: April 09, 2002
KitMaker: 322 posts
Armorama: 0 posts
Posted: Saturday, July 03, 2004 - 03:48 AM UTC
I know what you mean, I want them all now!
cfbush2000
Visit this Community
North Dakota, United States
Joined: December 01, 2001
KitMaker: 1,796 posts
Armorama: 1,207 posts
Posted: Saturday, July 03, 2004 - 03:55 AM UTC
I think I can be content with one 1/16 T-34, but a Sherman....now that's a different story.
BTW guys, some good looking work posted here so far.
I need to catch up.
Chuck
sgirty
Visit this Community
Ohio, United States
Joined: February 12, 2003
KitMaker: 1,315 posts
Armorama: 0 posts
Posted: Sunday, July 04, 2004 - 06:09 AM UTC
Hi, Just finished building the driver's hatch for the monster and decided to add a couple more photos to my gallery showing it. 15 pieces to assemble this. Just another of the many very nice little sub-assemblies that goes with this very, very nice Trumpeter kit.

I've been meaning to take a break from this thing and do some other things around the house, but as soon as I finish one odd-job, there I am back at the work bench again. Ha! This thing keep drawing me to it.

Take care, Sgirty
cfbush2000
Visit this Community
North Dakota, United States
Joined: December 01, 2001
KitMaker: 1,796 posts
Armorama: 1,207 posts
Posted: Sunday, July 04, 2004 - 08:53 AM UTC
Nice! That is probably my next step. I've takin a break but will be back to the kit in the next few days. Actually my hangup is, am I going to try to add more to the interior (wireing, ect).
What orange are you using?

chuck
sgirty
Visit this Community
Ohio, United States
Joined: February 12, 2003
KitMaker: 1,315 posts
Armorama: 0 posts
Posted: Sunday, July 04, 2004 - 01:09 PM UTC
Hi, cfbush2000: Don't know if you have seen the Trumpeter T-34 on the Missing Lynx site. If not it's:

http://www.ace-modellbau.de/werkbank.htm

It show some extra wiring and plumbing that this modeler did on his kit. It looks really good.

The orange I'm using is just an old bottle of Testors orange that I don't know how long I've had. It's a little bright, but I figure with some dullcote and weathering, it should tone down okay.

Spent today using a candle to damage those front fenders and have them bent in pretty good. At least have them bent back close to the idlers so there isn't such a gap between them and the track.

About to start on the PE for all those mg magazines in the bottom of the turret and those that hang on the inside of the upper hull too. This PE is failry thick and is kind of hard to get bent, but once bent it seems to be fairly sturdy stuff that holds it's shape even if banged around with a brush and such a little.

I'm beginning to get a bad feeling that I'm going to have to ask for one of the 1942 model kits for my birthday come Sept. even if I have to pay for it myself. Got a real bad case of T-34 'fever' here. Ha, ha!

I would love to see some aftermarket decals for these kits, esp. one of those "Order of the Red Banner" ones. The decal selection in the kit really is something of a disappointment. Plus some tools in this scale as well. I can use the 2 seperate ammo rounds as a pattern to make some wooden boxes from balsa strips for ammo crates.

Take care, Sgirty
seyahmit
Visit this Community
Missouri, United States
Joined: March 14, 2004
KitMaker: 51 posts
Armorama: 0 posts
Posted: Tuesday, July 06, 2004 - 01:03 AM UTC
I have the engine compartment almost completed. I have a few touchups to do still. Next I will tackle the crew compartment, turret and gun.

Pictures are a great way to see little spots you missed. Here are a few


E23C
Visit this Community
Ontario, Canada
Joined: January 23, 2002
KitMaker: 238 posts
Armorama: 142 posts
Posted: Thursday, July 08, 2004 - 02:03 AM UTC
Now thats some nice work Tim! Awesome job on the back end "stuff' of the tank.
My 43 model arrived yesterday I think I will have to get it started
cfbush2000
Visit this Community
North Dakota, United States
Joined: December 01, 2001
KitMaker: 1,796 posts
Armorama: 1,207 posts
Posted: Thursday, July 08, 2004 - 07:54 AM UTC
Nice work Tim! Are you planning on opening up the engine deck?
Chuck
seyahmit
Visit this Community
Missouri, United States
Joined: March 14, 2004
KitMaker: 51 posts
Armorama: 0 posts
Posted: Thursday, July 08, 2004 - 08:51 AM UTC
Thanks for the compliments.

I am kicking around the idea of drilling the hinges and making the rear mantlet (?) part #G16 and G17 workable since the turret hatches turned out so well. I am also planning on not permanently attaching the upper hull so it will be removable.

sgirty
Visit this Community
Ohio, United States
Joined: February 12, 2003
KitMaker: 1,315 posts
Armorama: 0 posts
Posted: Thursday, July 08, 2004 - 01:06 PM UTC
HI, I'll also add my compliments to your work as well seyahmit. I like your blending of the oil washes you've applied.

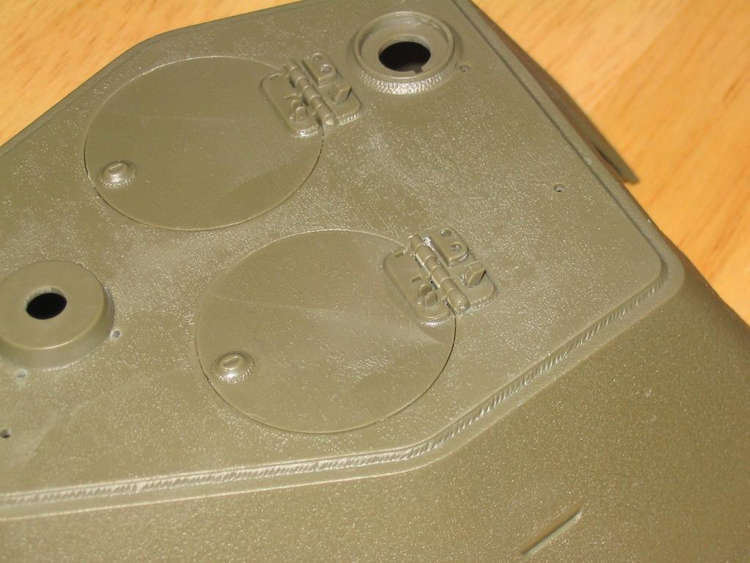
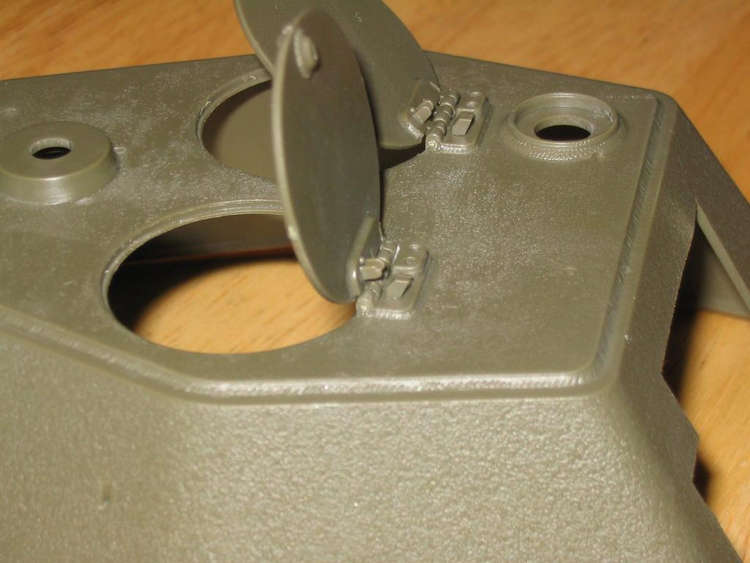
Had to end up gluing the inspection hatch in the rear of mine down on the top of the hull, as the hinges were starting to break off for some reason. But that's okay, as I plan to leave the upper hull removable too. Have to be careful in taking this upper hull on and off, as that mg storage rack up front hangs down pretty far.

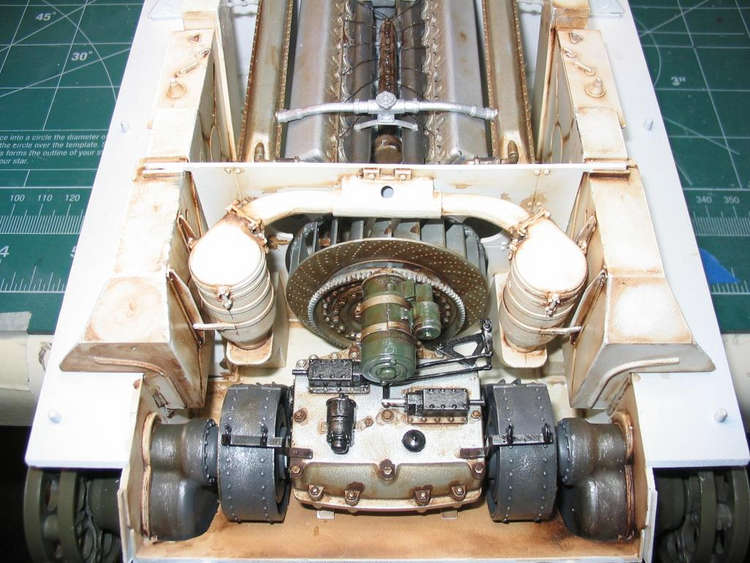
Just mounted the driver's hatch on today and am almost ready to add the forward mg unit. Then that will just about finish up the lower section of this baby.

Still have to do some thinking on the tracks. Going to have to do some blending with 'mud' and various 'dustings' of lighter colors to make that red primer blend into more of a backround shade instead of standing out as it does at the present.

Also have been reading various articles both here and on other sites about the use of weathering powders on models. They seem to be the way to go, as they are much stronger than the pastel chalks. Or at least worth giving a try. I'm finding out that one bad thing about the Net. is that there is so much information on it about any type of subject, that after a while the brain tends to become 'overloaded' and that a person starts to get confused on it all; which for me doesn't take too long. Ha, ha! Believe if I do get some, I'll need to do some experimenting on some of the smaller stuff I have here.

Am thinking really seriously of getting one of the /42 kits, as I've seem some really neat pictures in some of the books showing these types with various things added to them. Extra grab handles, extra armor welded on the front, etc. Might be interesting additions to try in this scale.

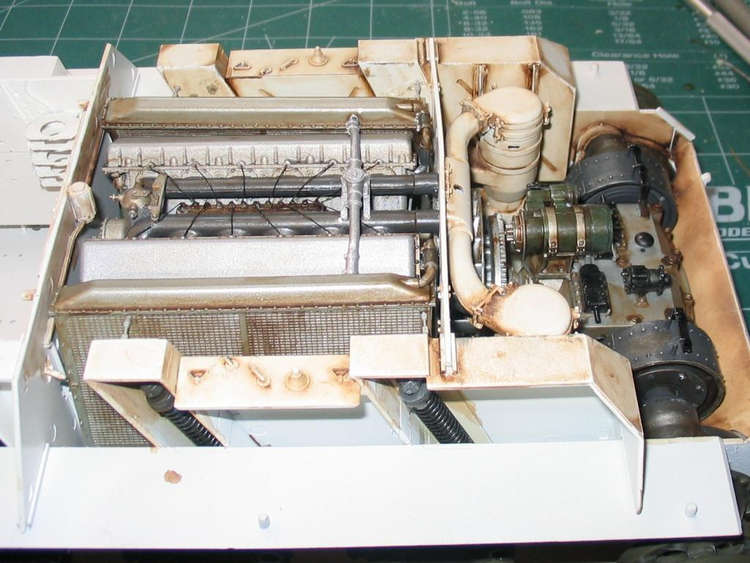
Am really having a fun time with this kit! Best model I think I've ever had the privilege to work on. Everything just fits so well together, it's really quite amazing!

Good luck and take care, Sgirty
sgirty
Visit this Community
Ohio, United States
Joined: February 12, 2003
KitMaker: 1,315 posts
Armorama: 0 posts
Posted: Sunday, July 11, 2004 - 02:44 AM UTC
Hi. Just posted some more pictures on my gallery of my T-34 as it stands now. All I've given it is a heavy wash of van dyck brown. Also added some of the extra track links to the front, for something different. Into building the PE mg. containers for the turret now.

I've been thinking of the different things I could add to a /42 model in this scale that would make it different from the /43 from some of the photos I've got here--additional sheet armor on the front and turrets sides, different grab handles, leaving off the rear gas tanks, etc.--but am starting to reach the point of 'burn out' on working on this thing. Ha, ha!

Have one of the /85s on a standing order from the local hobby shop, so I had better not get too covered with the same model, as I would imagine that the insides are all the same on all 4 kits being made--and theymay well have been on the real things too. But that's bound to get a little boring.

Take care, Sgirty
didiumus
Visit this Community
Utah, United States
Joined: March 18, 2003
KitMaker: 564 posts
Armorama: 312 posts
Posted: Sunday, July 11, 2004 - 05:52 AM UTC
Nice work. I would love to see some pictures of your tank in the sunlight, any chance?

Also, doesn't the 1942 kit put out by Trumpeter have the smaller, 1941 style turret? I have not seen one but I thought the box art had it this way...

I have the 1943 version as well, and will get the -85 also when it comes. Trumpeter is doing such great work, have you seen the LST?

Hey, I know its' tiny, but the new Dragon 1941 model T-34 is awesome.

Scott Gentry
seyahmit
Visit this Community
Missouri, United States
Joined: March 14, 2004
KitMaker: 51 posts
Armorama: 0 posts
Posted: Sunday, July 11, 2004 - 07:39 AM UTC
I have been keeping an eye on that Dragon 1941 buildup. It looks really nice and I think the Trumpeter wants a little brother! :-)
cfbush2000
Visit this Community
North Dakota, United States
Joined: December 01, 2001
KitMaker: 1,796 posts
Armorama: 1,207 posts
Posted: Sunday, July 11, 2004 - 08:41 AM UTC
sgirty,
Looking good buddy.
Did you glue the hull together?
I'm doing other "quick" projects when I need a breal from this one.
Chuck
sgirty
Visit this Community
Ohio, United States
Joined: February 12, 2003
KitMaker: 1,315 posts
Armorama: 0 posts
Posted: Sunday, July 11, 2004 - 09:04 AM UTC
Hi, didiumus: Thanks for the suggestion of taking the photos outside. That would most definintely help with the light conditions as some of the photos are kind of on the dark side. Still experimenting with the camera.

Yes, about the only differences that I can see between the /42 and /43 kits are the turret and the solid, rubber-backed road wheels on the /42. That's the reason why if I do get one later on I'm going to have to make some changes to the outside upper hull to set it off some more from the /43 kit.

seyahmit: All the Dragon 1/135 scaleT-34s are very, very nice kits in their own right. The one sitting by the Trumpeter kit in the two photos is their UTZ T-34/85 1944 kit.

cfbush2000: No didn't glue the hull top down. After it was painted I noticed that a couple of the little plastic U-catches on the bottom of the inspection hatch cover in the rear were bent up and outward and soon to break off. So I bent these back down and glued the hatch shut instead of having them break off later. And I just left the top loose. Really, once you put the top on the entire engine-radiator/trans. section, except that which shows from the hatch on top and on the rear is closed off. So what with all that work done inside it's really a shame to cover it all up permanently. And quite a bit of the front interior is hard to see once the top is on too.

Am looking forward to the /85s as well. Expect them to be here sometime around mid to late Aug, or first of Sept. I'd be guessing.

Take care, Sgirty
LogansDad
Visit this Community
North Carolina, United States
Joined: March 30, 2004
KitMaker: 938 posts
Armorama: 416 posts
Posted: Monday, July 12, 2004 - 02:31 AM UTC
Hey, Sgirty! First off, congrats on the new grandkid. I shouldn't have to look forward to that for at least 15 yrs, as my oldest is just 3 (Damn well bettre be at LEAST 15 years...)
Back to topic- In about a week I will have some pics of the Trumpeter T-34/85 Prototype to post on the site! I went up to the AAF Tank Museum in VA http://www.aaftankmuseum.com/ on SAt. and the RCACN was prepping for their big show in Aug. Anyway, fantastic bunch of guys, they let me play with the R/C prototype version that Trump. sent to them to test out! Phantastich! They also had a built up kit of Marcus Horne's 1/15 Panther (Late A, Barkmann's 'Das Reich' markings), All aluminum W/ resin add-ons.I'll be sure to let you all know when the photos are available. Cheers!
Aitch
Visit this Community
England - South West, United Kingdom
Joined: April 19, 2002
KitMaker: 138 posts
Armorama: 0 posts
Posted: Monday, July 12, 2004 - 06:08 AM UTC
Woo hoo !! #:-) Finally got my Model 1942 today - now I can really drool along with you guys
That engine is really a honey. I'm going to try and have the engine hatch lowered to show the whole back end open. I'm thinking of a mini dio with a few tools on the engine deck.
Anyone found a source of 1/16th hand tools yet
cfbush2000
Visit this Community
North Dakota, United States
Joined: December 01, 2001
KitMaker: 1,796 posts
Armorama: 1,207 posts
Posted: Monday, July 12, 2004 - 12:08 PM UTC
Welcome to the club.
I haven't been able to find much we can use in 1:16 scale. But I'm thinking that "toy" handtools may be found that could be used. Let us know if you find anything.
Chuck
jejack2
Visit this Community
Maryland, United States
Joined: April 09, 2002
KitMaker: 322 posts
Armorama: 0 posts
Posted: Tuesday, July 13, 2004 - 03:10 AM UTC
Anyone else building the '42. I am having a problem with the bow MG. There is a gap (a noticeable one) between the armored ring and the actual hull peice. Was wondering if it was my model only, or if anyone else had this problem?