Constructive Feedback
For in-progress or completed build photos. Give and get contructive feedback!
Berlin Brigade Mk10 Chieftain, Takom OOB.
iwatajim
Visit this Community
United Kingdom
Joined: December 15, 2008
KitMaker: 246 posts
Armorama: 171 posts
Posted: Monday, August 17, 2020 - 11:31 PM UTC
Thanks John. That’s the thermal sleeve painted again, added a few drops of clear for a more satin finish for subsequent weathering.


And found a good colour in the back of a drawer for the extinguishers, humbrol 3 Brunswick green, gloss but weathering will dull.
Johnnych01
Visit this Community
England - South West, United Kingdom
Joined: June 29, 2019
KitMaker: 604 posts
Armorama: 506 posts
Posted: Tuesday, August 18, 2020 - 01:23 AM UTC
I'm liking the finish on that barrel Jim, I would say thats the winner. I may now be getting some of that RAF green and redoing my C/S 42 Chally barrel the same. With a subtle weathering that is the perfect finish for faded thermal sleeve. Great match up.
iwatajim
Visit this Community
United Kingdom
Joined: December 15, 2008
KitMaker: 246 posts
Armorama: 171 posts
Posted: Thursday, August 27, 2020 - 11:31 PM UTC
Thanks again John. The RAF green is quite dark so the yellow is really needed, last highlights and mist coat was probably 60:40 green/yellow. Gloss coat has darkened it markedly but Matt will bring it back somewhat.

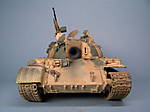
Just a quick update to prove it is progressing. Green on extinguishers, gloss coat on and tracks painted and washed.

So, I decided to experiment with this kit I have spent crazy hours on, clever eh!? My bottle of Klear hasn’t been as reliable as in the past so I thought I would try Tamiya clear x22 with Tamiya lacquer thinner(retarder type), and it actually seems to have gone down rather well, PHEW!!! I have also painted the port side running gear black after all. I nearly masked the engine deck to do it brown but it is staying green.

A word of warning about the tracks. I painted them red brown, masked and painted the pads rubber black, then started my usual mig enamel dark wash. The thinner seemed to attack the glued joints and it started to fail in a few places. So I stopped, repaired and used Flory washes dark wash, which is a water based clay type product, instead which ended up looking pretty good I think.

A couple of questions if I may. Firstly, the orange beacon on the turret roof has a rather high pole in the model compared to the shots of the real thing I’ve seen, is this extendable, or fixed? And secondly, what length would the two aerials be?

Thanks for looking, Jim.


maximus8425
Visit this Community
England - North East, United Kingdom
Joined: May 12, 2006
KitMaker: 331 posts
Armorama: 320 posts
Posted: Friday, August 28, 2020 - 12:39 AM UTC
The orange warning light (winky pot) usually sat on it's own purpose installed socket. You can see it on this pic on Prime Portal between the loaders hatch and the turret battery cover, it looks like a slightly smaller antenna base. I'm sure this was fitted as part of the Stillbrew armour modification in the late 80's.

http://data3.primeportal.net/tanks/erik_jan_eskes/chieftain_mk10_rev/images/chieftain_mk10_rev_032_of_136.jpg

I personally never saw or used one on a stalk on Chieftain but did on CVRT. Standard Clansman whip antenna length was 2 metres. Or if you were going to shorten it then 1.2 metres whch was the lower section only.
Johnnych01
Visit this Community
England - South West, United Kingdom
Joined: June 29, 2019
KitMaker: 604 posts
Armorama: 506 posts
Posted: Friday, August 28, 2020 - 01:40 AM UTC
Very nice Jim, it's coming along a treat. I know the Matt wash will tone it down nicely and a light weathering will be all it needs.

What colour are you doing the tow cables ? Is that just a black primer you have on them ?

As Max said, the normal antennas were 2m for both connected together or 1.2 for the battle whips.

I've never seen or used a winky wonky amber light with a long stalk on a Chieftain or Chally. Ours were just the lights and then they had a 3in or so connection on the base and they plugged straight into the turret mount behind the loaders hatch. The only long stalk amber lights I saw were on the ARRVs as without the long stalk the light gets hidden from view behind the jib, boxes etc, and when connected they have to visible from all directions. Just bear in mind, they would only be fitted for a road move or on ranges, so if you leave yours off it wouldn't be out of place.
iwatajim
Visit this Community
United Kingdom
Joined: December 15, 2008
KitMaker: 246 posts
Armorama: 171 posts
Posted: Friday, August 28, 2020 - 02:22 AM UTC
Thanks Max, Thanks John. Much appreciated indeed.

A Winky Pot, Ha! I love that! It has to go on just for that. As you can see in the pic, the kit piece is rather long and you can see from the instructions in the background that is how they expect you to fit it. However I shall remove almost all the stalk and have it looking like the reference pics I have seen.

The tow cables do indeed just have a black base layer on. I was planning on using a nice soft pencil to create the metal effect on these as I understand they wouldn’t have been brown rusty. Would that be correct?

Thanks again, J.


maximus8425
Visit this Community
England - North East, United Kingdom
Joined: May 12, 2006
KitMaker: 331 posts
Armorama: 320 posts
Posted: Friday, August 28, 2020 - 04:09 AM UTC
HI Jim,,
No any kind of lifting tackle or tow ropes were kept rust free otherwise the REME jumped all over you on their LOLER inspections. Shackles were generally oiled and I seem to remember rubbing a really thin layer of grease on the two ropes. They would be an oily steel colour (vallejo 70.865). The end connectors were some kind of alloy that didnt rust and was quite bright, almost like aluminium but not as I iamgine it wouldn't have been strong enough.
Johnnych01
Visit this Community
England - South West, United Kingdom
Joined: June 29, 2019
KitMaker: 604 posts
Armorama: 506 posts
Posted: Friday, August 28, 2020 - 04:23 AM UTC
That will be fine on the tow cables, the graphite should give them a nice full sheen... You don't want them to bright ..... Although, I wouldn't mind betting on the occasional ceremonial parade they would get a lick of silver paint by an over zealous crew, only to get a good chewing out by the LAD on the next inspection lol ...
On some cables (not all) where the actual cable goes into the connector, the end of the cable was sometimes painted read, will see if I can find a pic showing it... But it's not an important detail...

Don't forget the Comds GPMG ammo box would of been brown...
metalhead85
#519
Visit this Community
New York, United States
Joined: March 24, 2006
KitMaker: 219 posts
Armorama: 169 posts
Posted: Friday, August 28, 2020 - 07:10 AM UTC
Hi Jim
Beautiful job all around Jim ! I painted the tow cables black and as mentioned by others, dry brushed with Hannants oily steel. I painted the ammo box dark green, don't know if that's correct.I think I used a lighter khaki color on the barrel shroud, but can't remember for sure. Keep up the excellent work !
iwatajim
Visit this Community
United Kingdom
Joined: December 15, 2008
KitMaker: 246 posts
Armorama: 171 posts
Posted: Friday, August 28, 2020 - 07:10 AM UTC
That’s great, thanks again guys. Just as well you mentioned the ammo box as I was going to paint it green! But brown it shall be.


Edit, and thanks Richard, must have posted exactly same time as you!


Thanks again, J.
metalhead85
#519
Visit this Community
New York, United States
Joined: March 24, 2006
KitMaker: 219 posts
Armorama: 169 posts
Posted: Friday, August 28, 2020 - 03:54 PM UTC
metalhead85
#519
Visit this Community
New York, United States
Joined: March 24, 2006
KitMaker: 219 posts
Armorama: 169 posts
Posted: Friday, August 28, 2020 - 03:57 PM UTC
Ugh sorry Jim ! Meant to put a caption to the pic I posted, finally got around to getting a pic of my Chieftain for you. It's late here in NY and I'm having brain cramps lol !!
iwatajim
Visit this Community
United Kingdom
Joined: December 15, 2008
KitMaker: 246 posts
Armorama: 171 posts
Posted: Friday, August 28, 2020 - 10:29 PM UTC
Hey Richard, your chieftain looks great! I see you have been super accurate with the camo scheme, even including that little square of brown in front or the driver! And I like the packed turret baskets, and the crew look fantastic.

Thanks for sharing mate,

Cheers, Jim.
metalhead85
#519
Visit this Community
New York, United States
Joined: March 24, 2006
KitMaker: 219 posts
Armorama: 169 posts
Posted: Saturday, August 29, 2020 - 12:00 AM UTC
Thanks for the kind words Jim, I used the Accurate Armor conversion set. The tracks were also from AA...I used oil washes , pigments and drybrushed it with oil/humbrol enamels to finish it off. Figs are from Verlinden. Thanks a bunch for letting me post a pic in your blog! You are very kind sir! BTW, your paint job looks better and more crisp than mine.

Rich
iwatajim
Visit this Community
United Kingdom
Joined: December 15, 2008
KitMaker: 246 posts
Armorama: 171 posts
Posted: Saturday, August 29, 2020 - 07:34 AM UTC
Thanks Richard. I also like your weathering and how you have managed to tone everything in together. And I noticed the padlocks on the side bins and the separate tie downs on the side armour plates, some great detail!

I have managed to get the decals on now. Not many but they went on easy enough. The union flags were rather large so I trimmed them down slightly but still oversized I think. I also hand painted the red reflectors on the rear mudguards. Vallejo foundation white for the surround on the left that wasn’t already white, then humbrol 19 bright red which I let gravity pool in the handy surround with the hull on its nose.

Onto the next step...


Johnnych01
Visit this Community
England - South West, United Kingdom
Joined: June 29, 2019
KitMaker: 604 posts
Armorama: 506 posts
Posted: Saturday, August 29, 2020 - 09:40 AM UTC
I think the Union decals are ok Jim, they don't look overly big. And it is all coming along nicely. The barrel is looking great now.
One thing I would keep an eye on are the extinguishers, at the moment they are looking very shiny bright green ... BCFs are more of an olive drab / green colour.
iwatajim
Visit this Community
United Kingdom
Joined: December 15, 2008
KitMaker: 246 posts
Armorama: 171 posts
Posted: Friday, September 04, 2020 - 12:22 AM UTC
Hello again. Yeah John, I’ll tone down that green. That’s the weathering started. Spot the difference in this post. First pic is untouched and second has pin wash with Abteilung starship filth and AK paneliner for desert and camouflage, and I used both those to great a filter to weather the camo slightly. Going for road grime look rather than dusty, muddy, think a few days running around rainy Berlin streets! Effect is slightly more marked in the flesh, although still pretty subtle. Will post more pics when washes finished and Matt coat on.

Thanks for looking in.


phil2015
Visit this Community
Illinois, United States
Joined: July 27, 2015
KitMaker: 502 posts
Armorama: 325 posts
Posted: Friday, September 04, 2020 - 02:29 AM UTC
Nice. I love every new pic you post!
Johnnych01
Visit this Community
England - South West, United Kingdom
Joined: June 29, 2019
KitMaker: 604 posts
Armorama: 506 posts
Posted: Friday, September 04, 2020 - 03:53 AM UTC
That's looking really good Jim, the washes are picking out just all the right details to give it a nice depth. Subtle is always better than over done.
I may have to invest in those 2 washes you mentioned. Keep up the great work.
iwatajim
Visit this Community
United Kingdom
Joined: December 15, 2008
KitMaker: 246 posts
Armorama: 171 posts
Posted: Friday, September 04, 2020 - 07:45 AM UTC
Hey, Phil, hey John,

Thanks it is a rewarding build indeed. The Abteilung starship filth wash I made myself using their oil paint and some mig thinner, which is nice and non smelly! The paneliner is more a dark tan but adds the tone I was looking for.

This picture shows the contrast better, the left of the tank is washed/filtered showing the contrast especially in the white. The engine deck is still to be done...

metalhead85
#519
Visit this Community
New York, United States
Joined: March 24, 2006
KitMaker: 219 posts
Armorama: 169 posts
Posted: Sunday, September 06, 2020 - 11:40 PM UTC
Hey Jim that looks great , its really coming along nicely keep it up!
iwatajim
Visit this Community
United Kingdom
Joined: December 15, 2008
KitMaker: 246 posts
Armorama: 171 posts
Posted: Sunday, September 13, 2020 - 02:06 AM UTC
Thanks Richard!

Well, I have been mostly adding very little amounts of weathering, which seems to take a lot longer than lots of weathering, using the same technique with the washes and filters, to just grubby up the finish lightly. I have given the front and back slightly more but still very restrained for me. It doesn’t show up in the pictures too well but is just enough to take the “newness” off the finish in real life. I think I like how it looks now, and it would suit a nice plinth with a simple road section.

I have also painted the commanders vision block surrounds and wiper blades and given them a wash with the starship filth. The mg ammo box is now brown, Vallejo chocolate brown with starship filth wash again. The fire extinguishers are now Vallejo Russian uniform green with a wash of mig dark. The tow cables have been shined up with graphite from an 8b pencil, as have the guide horns on the tracks. The running gear has all been given a wash with mig dark. And the engine deck has been made what I hope is suitably grubby!

So, just a matter of putting it all together now! Oh, and some black pigments on the exhausts, and maybe a dusting of pigments on the tracks, and some....

Thanks for looking in...


metalhead85
#519
Visit this Community
New York, United States
Joined: March 24, 2006
KitMaker: 219 posts
Armorama: 169 posts
Posted: Sunday, September 13, 2020 - 02:19 AM UTC
Jim that wash looks excellent, especially the engine deck and main gun barrel.It shows up very well in your photos.
Johnnych01
Visit this Community
England - South West, United Kingdom
Joined: June 29, 2019
KitMaker: 604 posts
Armorama: 506 posts
Posted: Sunday, September 13, 2020 - 02:33 AM UTC
Jim, well, where to begin ....... actually, it will be easy .....

Pretty much perfect !!

You have really smashed this one out the park. The Cupola episcopes have the right green sheen, the BCFs are now pretty much the perfect green, the thermal sleeve is looking great, the engine deck has just the right amount of grime, and the resilient rail is a nice dull black as per the real ones.

Weathering is exactly what it should be for a wagon rolling round the streets - just right.

The only 2 things I would look at are the ABA'a - they would be black but I can double check to see if the Berlin wagons painted theirs to go with the cam and the other one is the recovery cables, the actual connector ends are a more pure matt aluminium colour and not as dark as what you've done mate.

Other than that, I will go out on a limb and say that is the best Berlin brigade Chieftain I have seen.

And its just a OOB build ... no aftermarket, even more impressive.

A masterpiece and should go in a display box to protect it
iwatajim
Visit this Community
United Kingdom
Joined: December 15, 2008
KitMaker: 246 posts
Armorama: 171 posts
Posted: Sunday, September 13, 2020 - 07:26 AM UTC
Thanks guys, your most kind words are very much appreciated! I really have enjoyed this build, and learned a lot on the way. It is challenging but hugely rewarding. I can’t wait for it to be put together but I must take my time and enjoy the rest of the process.

And many thanks once again John for your excellent help with the accuracy. I think I have a plan for the cable ends, will do some tests. I take it the aba’s are the rectangular boxes on the right bustle rack and left turret side? I hope they were painted the camo’ colour as I think they are staying grey now! Ha! Have just noticed the plate that goes from the side of the searchlight housing to the bustle rack has been mounted on the painting block the wrong way round, so I have a bare strip of brass I need to deal with, oh well, shouldn’t be too taxing...

Oh, and I’ve made up some aerials with plastic coated wire bought for Christmas baubles, stretched between two pairs of pliers it goes nice and straight, and 5.7cm is just about right for 2 metre scale, and they are painted nato black.

Thanks again, not too long to go now!

Cheers, Jim.