


Hosted by Darren Baker
Which comes first,...

Golikell

Joined: October 25, 2002
KitMaker: 1,757 posts
Armorama: 914 posts

Posted: Tuesday, February 25, 2020 - 02:59 AM UTC
Getting better and better...


jrutman

Joined: April 10, 2011
KitMaker: 7,941 posts
Armorama: 7,934 posts
Posted: Tuesday, February 25, 2020 - 03:53 AM UTC
I think the Crommy is in a nice covered position to defeat that bookshelf. Should go well. Inform me by dispatch. LoL
J
J
pnance26
Joined: January 22, 2016
KitMaker: 766 posts
Armorama: 518 posts
Posted: Tuesday, February 25, 2020 - 07:21 AM UTC
WOW!

G-man69

Joined: October 17, 2017
KitMaker: 944 posts
Armorama: 928 posts
Posted: Wednesday, February 26, 2020 - 05:31 AM UTC
Hi Erwin,
Thanks for your continued support,.
Cheers, ,
,
G
Thanks for your continued support,
.Cheers,
,G
G-man69
Joined: October 17, 2017
KitMaker: 944 posts
Armorama: 928 posts
Posted: Wednesday, February 26, 2020 - 05:34 AM UTC
Hi Jerry,
I'm afraid the bookshelf was too heavily armoured, must be camouflaged paper panzers, .
.
Cheers,,
G
I'm afraid the bookshelf was too heavily armoured, must be camouflaged paper panzers,
.Cheers,
,G
G-man69
Joined: October 17, 2017
KitMaker: 944 posts
Armorama: 928 posts
Posted: Wednesday, February 26, 2020 - 05:35 AM UTC
Thanks Patrick.
Cheers,,
G
Cheers,
,G
G-man69
Joined: October 17, 2017
KitMaker: 944 posts
Armorama: 928 posts
Posted: Wednesday, February 26, 2020 - 05:43 AM UTC
Hi all,
Today I have managed to dull down the somewhat garish colours of the the outside run of the wall with the aperture for the door.
I have also added the first layer of grass along the same run of wall, and I've started to paint the masonry debris (see images below).


Cheers,,
G
Today I have managed to dull down the somewhat garish colours of the the outside run of the wall with the aperture for the door.
I have also added the first layer of grass along the same run of wall, and I've started to paint the masonry debris (see images below).
Cheers,
,G
Golikell
Joined: October 25, 2002
KitMaker: 1,757 posts
Armorama: 914 posts
Posted: Wednesday, February 26, 2020 - 11:15 PM UTC
I will temper my number of copmliments, otherwise you will become too big for your breeches 
I have one question though: why did you add brick red stones to the debris? I don't see any bricks in the wall??
I have one question though: why did you add brick red stones to the debris? I don't see any bricks in the wall??
G-man69
Joined: October 17, 2017
KitMaker: 944 posts
Armorama: 928 posts
Posted: Thursday, February 27, 2020 - 04:58 AM UTC
Hi Erwin,
I'd have to have some breeches, and skill, before I could become too big for them,.
Good question regarding brick red debris, my initial blocked in colours are always a tad too garish, . Once they're toned down they should hopefully be closer to the 'brownish' stones you can see dotted about in the image below, .

Glad to see that you're keeping me on my toes though, .
.
Cheers,,
G
I'd have to have some breeches, and skill, before I could become too big for them,
.Good question regarding brick red debris, my initial blocked in colours are always a tad too garish,
. Once they're toned down they should hopefully be closer to the 'brownish' stones you can see dotted about in the image below, .Glad to see that you're keeping me on my toes though,
.Cheers,
,G
G-man69
Joined: October 17, 2017
KitMaker: 944 posts
Armorama: 928 posts
Posted: Thursday, February 27, 2020 - 05:09 AM UTC
Hi all,
Not much done today, the weather has been too nice...for a change...to be stuck indoors,.
I've managed to finish blocking-in the random stone colour to the remainder of the internal wall (see images below). Again, a tad garish, but hopefully I'll be able to tone it down a little tomorrow as the weather forecast looks bad...again, .
.


As an aside, is anyone aware of any good links to threads that cover how to make good vegetation from scratch, as opposed to buying ready-made stuff? Any help would be greatly appreciated,.
Cheers,,
G
Not much done today, the weather has been too nice...for a change...to be stuck indoors,
.I've managed to finish blocking-in the random stone colour to the remainder of the internal wall (see images below). Again, a tad garish, but hopefully I'll be able to tone it down a little tomorrow as the weather forecast looks bad...again,
.As an aside, is anyone aware of any good links to threads that cover how to make good vegetation from scratch, as opposed to buying ready-made stuff? Any help would be greatly appreciated,
.Cheers,
,G
Tank1812
Joined: April 29, 2014
KitMaker: 1,112 posts
Armorama: 886 posts
Posted: Thursday, February 27, 2020 - 05:34 AM UTC
It is coming along nicely.
I have only seen people doing demos for building trees not vegetation.
Joaquin used instruction sheet to make the grass on his BA-64.
http://garciagazquez.com/wp/tag/148/
Most here go to a generic hobby store and get dried floral for vegetation instead of buying the fancy stuff.
https://wpcdn.us-midwest-1.vip.tn-cloud.net/www.kansascitymag.com/content/uploads/2019/09/Screen-Shot-2019-09-17-at-3.50.03-PM.png
Trimmed down this stuff works great.
G-man69
Joined: October 17, 2017
KitMaker: 944 posts
Armorama: 928 posts
Posted: Friday, February 28, 2020 - 03:57 AM UTC
Hi Ryan,
Thanks for the positive feedback,.
Also, thanks for the links, the 1/48th stuff is amazing, especially so when you consider the diminutive size of some of the vehicles.
How goes your 'cobbles' and 'jeep' build? I did check the thread yesterday but couldn't see a finished article.
Cheers,,
G
Thanks for the positive feedback,
. Also, thanks for the links, the 1/48th stuff is amazing, especially so when you consider the diminutive size of some of the vehicles.
How goes your 'cobbles' and 'jeep' build? I did check the thread yesterday but couldn't see a finished article.
Cheers,
,G
Tank1812
Joined: April 29, 2014
KitMaker: 1,112 posts
Armorama: 886 posts
Posted: Friday, February 28, 2020 - 04:10 AM UTC
Quoted Text
Hi Ryan,
Thanks for the positive feedback,
Also, thanks for the links, the 1/48th stuff is amazing, especially so when you consider the diminutive size of some of the vehicles.
How goes your 'cobbles' and 'jeep' build? I did check the thread yesterday but couldn't see a finished article.
Cheers,
G
No problem. I have liked his builds.
My cobbles need lots engineering help. I used two sheets to cut down on the double stones you used and my side split open. So I am on plan b and using a Coastal Kits Base 021 from your neck of the woods. I am going to cut out a 3x5 section and be done with this project. I will post pics tomorrow.
G-man69
Joined: October 17, 2017
KitMaker: 944 posts
Armorama: 928 posts
Posted: Friday, February 28, 2020 - 04:10 AM UTC
Hi all,
Today I have managed to tone down the garish colours of inside face of the walls (see images below).


I have also had a go at creating some moss (see images below),. Again, it looks a bit garish at the moment, especially as it is still wet. But hopefully it'll dull-down when it dries, plus I'll probably dry-brush it.


I also need to study some images of 'mossy' walls, so as to create a more realistic appearance. As I've mentioned before, this is more of an experiment as opposed to a planned build so, at the end of the day, if it looks rubbish it's not the end of the day,.
Cheers,,
G
Today I have managed to tone down the garish colours of inside face of the walls (see images below).
I have also had a go at creating some moss (see images below),
. Again, it looks a bit garish at the moment, especially as it is still wet. But hopefully it'll dull-down when it dries, plus I'll probably dry-brush it.I also need to study some images of 'mossy' walls, so as to create a more realistic appearance. As I've mentioned before, this is more of an experiment as opposed to a planned build so, at the end of the day, if it looks rubbish it's not the end of the day,
.Cheers,
,G
G-man69
Joined: October 17, 2017
KitMaker: 944 posts
Armorama: 928 posts
Posted: Friday, February 28, 2020 - 05:24 AM UTC
Hi Ryan,
Sorry to hear that you had problems, it's damned frustrating when you've put so much effort into them,. Maybe you can give them another coat of glue and leave them longer to cure and be able to reuse them on another project?
The link to the company was interesting, visually the cobbled section looks good, though I'm presuming that the printing is only two dimensional as opposed to embossed?
Look forward to seeing the images,.
Cheers,,
G
Sorry to hear that you had problems, it's damned frustrating when you've put so much effort into them,
. Maybe you can give them another coat of glue and leave them longer to cure and be able to reuse them on another project?The link to the company was interesting, visually the cobbled section looks good, though I'm presuming that the printing is only two dimensional as opposed to embossed?
Look forward to seeing the images,
.Cheers,
,G
Tank1812
Joined: April 29, 2014
KitMaker: 1,112 posts
Armorama: 886 posts
Posted: Friday, February 28, 2020 - 05:53 AM UTC
Your wall is looking better and coming along nicely.
I am saving the work for now and I might revisit or start over in the future.
The base is a printed 2d image.
After I cut it out I think I might have to make a frame around it to cover the cut edges.
I am saving the work for now and I might revisit or start over in the future.
The base is a printed 2d image.
After I cut it out I think I might have to make a frame around it to cover the cut edges.

Dioramartin

Joined: May 04, 2016
KitMaker: 1,476 posts
Armorama: 1,463 posts
Posted: Friday, February 28, 2020 - 02:43 PM UTC
Great progress & excellent walls but yeah that wall ivy/moss is somewhat slime-shade suggest a 33% yellow/orange injection & a pale khaki dry-brush, needs to look dusty. Local walls always good for tips, easy to overdo vertical rain- & rising damp-stains but they can make all the difference
Tank1812
Joined: April 29, 2014
KitMaker: 1,112 posts
Armorama: 886 posts
Posted: Saturday, February 29, 2020 - 12:49 AM UTC
The base did not any mods after cutting with a fresh blade and straightedge.
G-man69
Joined: October 17, 2017
KitMaker: 944 posts
Armorama: 928 posts
Posted: Saturday, February 29, 2020 - 04:27 AM UTC
Hi Tim,
Thanks for the feedback on the moss colour and the suggestions regarding suitable colours, it didn't change much after it had dried,. I will need to get some yellows/oranges, my range of acrylic paint colours is very limited at the moment, but hopefully will start to expand quite rapidly...bit like my gut, ...as I get back more into the hobby.
I'll have a look at some images of weathered walls to see what I can do regarding rain stains and rising damp...Oooooh! Miss Jones! (done in my best Rigsby voice).
Cheers,,
G
Thanks for the feedback on the moss colour and the suggestions regarding suitable colours, it didn't change much after it had dried,
. I will need to get some yellows/oranges, my range of acrylic paint colours is very limited at the moment, but hopefully will start to expand quite rapidly...bit like my gut, ...as I get back more into the hobby.I'll have a look at some images of weathered walls to see what I can do regarding rain stains and rising damp...Oooooh! Miss Jones! (done in my best Rigsby voice).
Cheers,
,G
G-man69
Joined: October 17, 2017
KitMaker: 944 posts
Armorama: 928 posts
Posted: Saturday, February 29, 2020 - 04:40 AM UTC
Hi Ryan,
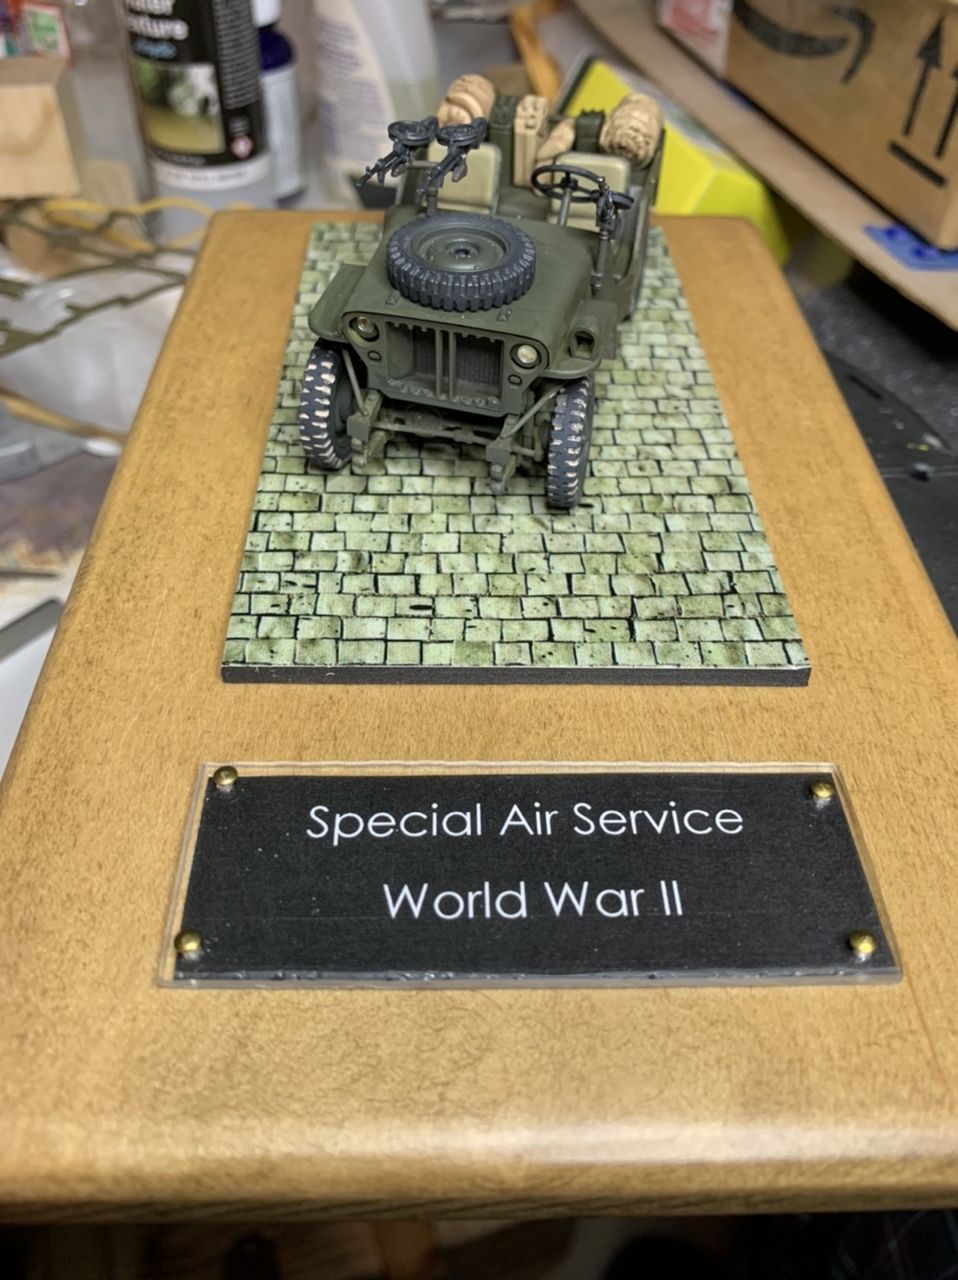
Looks excellent, the base/plinth is very professional looking without detracting from the model itself,.
My bases, 40 odd years ago, when I built kits regularly always looked naff. They were always an afterthought and always rushed,. I suspect that will be true of this build too as I didn't bother with a smart base on my last build, .
The jeep looks really good, I think you've struck an excellent balance, your weathering emphasises detail without overpowering it. Hopefully you're pleased with your results?
Cheers,,
G
Looks excellent, the base/plinth is very professional looking without detracting from the model itself,
.My bases, 40 odd years ago, when I built kits regularly always looked naff. They were always an afterthought and always rushed,
. I suspect that will be true of this build too as I didn't bother with a smart base on my last build, .The jeep looks really good, I think you've struck an excellent balance, your weathering emphasises detail without overpowering it. Hopefully you're pleased with your results?
Cheers,
,G
G-man69
Joined: October 17, 2017
KitMaker: 944 posts
Armorama: 928 posts
Posted: Saturday, February 29, 2020 - 05:21 AM UTC
Hi all,
A bit more progress, and some purchases,. I have, more-or-less, finished the first layer of grass within the 'courtyard', and started to construct a couple of steps through the 'gateway' (see images below).


I need to do some more work on the steps before they're ready for painting.
Also managed to get some plastic bits to build the gate and associated frame (see image below), as well as getting an A4 sheet of black plastic (difficult to see below) to make the trim around the edge.

I have also added more 'moss', and have used a paler colour (see images below). I still need to work on the colour, but need to get some additional acrylic paints, as per Tim's (callsign Dioramartin) recommendations.


Adding the 'moss' is slow work, but it help breaks up the blandness of the wall. Still need to think about rain and damp staining as suggested by Tim.
Cheers,,
G
A bit more progress, and some purchases,
. I have, more-or-less, finished the first layer of grass within the 'courtyard', and started to construct a couple of steps through the 'gateway' (see images below).I need to do some more work on the steps before they're ready for painting.
Also managed to get some plastic bits to build the gate and associated frame (see image below), as well as getting an A4 sheet of black plastic (difficult to see below) to make the trim around the edge.
I have also added more 'moss', and have used a paler colour (see images below). I still need to work on the colour, but need to get some additional acrylic paints, as per Tim's (callsign Dioramartin) recommendations.
Adding the 'moss' is slow work, but it help breaks up the blandness of the wall. Still need to think about rain and damp staining as suggested by Tim.
Cheers,
,G
Tank1812
Joined: April 29, 2014
KitMaker: 1,112 posts
Armorama: 886 posts
Posted: Saturday, February 29, 2020 - 09:56 AM UTC
Quoted Text
Hi Ryan,
Looks excellent, the base/plinth is very professional looking without detracting from the model itself,
My bases, 40 odd years ago, when I built kits regularly always looked naff. They were always an afterthought and always rushed,
The jeep looks really good, I think you've struck an excellent balance, your weathering emphasises detail without overpowering it. Hopefully you're pleased with your results?
Cheers,
G
A club member did the wood base and plaque for all member in our club for the group build. Thanks for the nice words on the Jeep. I did post more pics in the Shep thread. I am 50/50 on the build. Which is good cause I hated the last one I finished.
Glad I have at least one kit done this year and finished a campaign build. Tried some new things that didnt go as I hades hoped for. I have a few Tamiya jeeps that I hope to attempt the same on in the future. On to a different campaign build.
I do think your project is moving along at a good pace and slowly coming to life.
G-man69
Joined: October 17, 2017
KitMaker: 944 posts
Armorama: 928 posts
Posted: Tuesday, March 03, 2020 - 03:10 AM UTC
Hi Ryan,
You're one kit further ahead than me,. I think you're underselling yourself with a 50/50, I think your jeep build was excellent, but what kit was your 'hated' one?
What's your next campaign build going to be?
Cheers,,
G
You're one kit further ahead than me,
. I think you're underselling yourself with a 50/50, I think your jeep build was excellent, but what kit was your 'hated' one?What's your next campaign build going to be?
Cheers,
,G
G-man69
Joined: October 17, 2017
KitMaker: 944 posts
Armorama: 928 posts
Posted: Tuesday, March 03, 2020 - 03:20 AM UTC
Hi all,
Thus far, this week, I've not done very much as we're having some half decent weather for a change and outdoors tasks are impinging on my modelling time...mixed blessings, .
I've been playing around with adding some courtyard detail. This involves having my first ever attempt at corrugated iron sheeting (see images below),. The sheet needs painting, as does the axe, which is only temporarily held in place. I'll need to add some 'sawdust' and split wood ready for the fire.


Cheers,.
G
Thus far, this week, I've not done very much as we're having some half decent weather for a change and outdoors tasks are impinging on my modelling time...mixed blessings,
.I've been playing around with adding some courtyard detail. This involves having my first ever attempt at corrugated iron sheeting (see images below),
. The sheet needs painting, as does the axe, which is only temporarily held in place. I'll need to add some 'sawdust' and split wood ready for the fire.Cheers,
.G
Tank1812
Joined: April 29, 2014
KitMaker: 1,112 posts
Armorama: 886 posts
Posted: Tuesday, March 03, 2020 - 05:48 AM UTC
Quoted Text
Hi Ryan,
You're one kit further ahead than me,
What's your next campaign build going to be?
Cheers,
G
My hated kit was the Tamyia 1/48 BA-64. I liked the kit, build and painted figure I did but I screwed the pooch on a white wash and kept going down hill from there.
I am in too many campaigns:
Sci-Fi - Vallejo 28/54mm? Hellboy (mostly done)
Bent Wing - Haseagawa 1/72 F6F-5P close to closing up the fuselage
Bandai - 1/48 AT-ST (non-canon paint scheme) base color painted
I haven't started the following:
Delta - 1/48 F4D or A-4E
Bronco - 1/35 6x6 (probably will drop out)
Leopard 2 - 1/35 HobbyBoss German A4
Bundeswehr - 1/35 Takom Fug Tractor or 1/35 Revell Man truck
 |

WEB HOSTING BY


Copyright ©2021 Armorama and Kitmaker Network, a subsidiary of Silver Star Enterprises
All Rights Reserved. Please read our Conditions of Use and Privacy Policy.
All Rights Reserved. Please read our Conditions of Use and Privacy Policy.