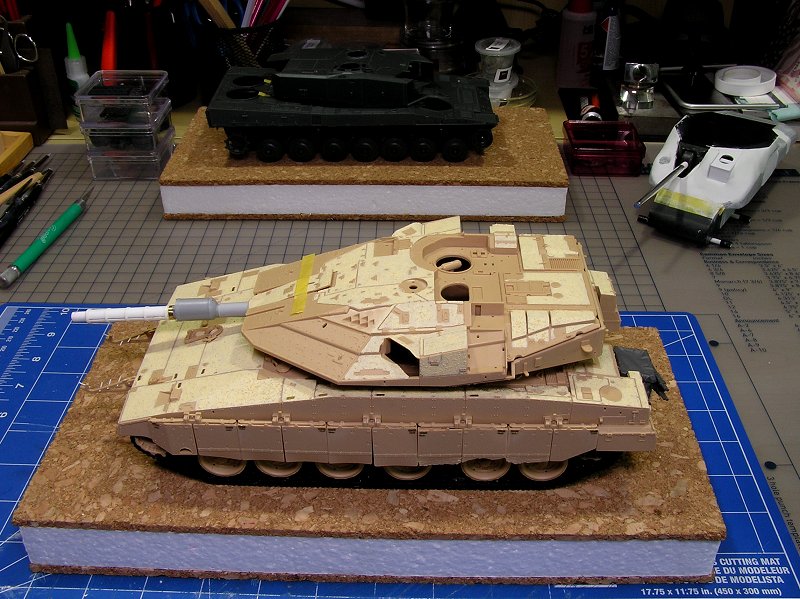
Armor/AFV: IDF [Israeli Defense Forces]
Armor and AFVs of the IDF army from 1947-today.
Hosted by Darren Baker
Merkava Mk.4M w/Trophy APS (Meng-1/35th)
panzerbob01
Visit this Community
Louisiana, United States
Joined: March 06, 2010
KitMaker: 3,128 posts
Armorama: 2,959 posts
Posted: Sunday, May 19, 2019 - 05:58 AM UTC
High parts-count - over 40 - eh? Hmmmmm. Well, it does look good in the pics I've seen, and my PE skills are pretty good (I'm less keen on resin stuff... ), but...

I haven't even looked at the Takom 2b kit barrel yet. Maybe sounds weird, but I've been focused on adding non-skid and bits to the turret and upper hull, and the boom-tube just hasn't come into focus. But now it's time. Maybe I'll consider my usual "old school" approach and just detail-up and tweak that styrene thing for this Merk. It's my first, and I expect at least one more of these things in my future.

But that barrel kit does look pretty nice...

Cheers! Bob
ReluctantRenegade
Visit this Community
Wien, Austria
Joined: March 09, 2016
KitMaker: 2,408 posts
Armorama: 2,300 posts
Posted: Sunday, May 19, 2019 - 06:34 AM UTC

Quoted Text

I haven't even looked at the Takom 2b kit barrel yet.


While the kit as a whole is pretty good, the barrel is wrong for a Mk.2: there are only five brackets holding the thermal sleeve in place forward the bore-evacuator when in reality there are six. I guess they just carried the sprue over from their Mk.1 kit (which indeed only had five)...


ReluctantRenegade
Visit this Community
Wien, Austria
Joined: March 09, 2016
KitMaker: 2,408 posts
Armorama: 2,300 posts
Posted: Sunday, May 19, 2019 - 06:55 AM UTC
Sorry Eric, don't mean to hijack your thread...
cabasner
Visit this Community
Nevada, United States
Joined: February 12, 2012
KitMaker: 1,083 posts
Armorama: 1,014 posts
Posted: Sunday, May 19, 2019 - 07:09 AM UTC
Hey all,

While Eric did a fine job with his texture application (and I have the same product that he used, by the way), I just wanted to report to anyone interested that I JUST tried another kind of texture that I bought years back but never tried. It's called Hull Tex, and it comes in 2 bottles, one an adhesive and the other, the actual texture. I had been afraid of trying it, as it's not cheap (about $9 for a set that I'm guessing would be enough for 2 tanks with a lot of anti skid area). The adhesive is where you'll run out first, again, my guess. If you look up their videos on YouTube, it works EXACTLY like they show. And, you can collect the excess texture, pry open the texture bottle top, and put the extra back in the bottle for another use. The Meng kit has molded-in anti-skid, but I admit it's a bit 'delicate'. The Hull Tex works great, and I'm certainly going to use it on my Takom Merkava Mark I Hybrid that has NO anti-skid.

My apologies, like Israel, to Eric for hijacking his very nice thread...
panamadan
Visit this Community
Minnesota, United States
Joined: July 20, 2004
KitMaker: 1,513 posts
Armorama: 1,449 posts
Posted: Sunday, May 19, 2019 - 08:30 AM UTC
where did you get it Curt?
Dan
panzerbob01
Visit this Community
Louisiana, United States
Joined: March 06, 2010
KitMaker: 3,128 posts
Armorama: 2,959 posts
Posted: Sunday, May 19, 2019 - 10:27 AM UTC

Quoted Text

Hey all,

While Eric did a fine job with his texture application (and I have the same product that he used, by the way), I just wanted to report to anyone interested that I JUST tried another kind of texture that I bought years back but never tried. It's called Hull Tex, and it comes in 2 bottles, one an adhesive and the other, the actual texture. I had been afraid of trying it, as it's not cheap (about $9 for a set that I'm guessing would be enough for 2 tanks with a lot of anti skid area). The adhesive is where you'll run out first, again, my guess. If you look up their videos on YouTube, it works EXACTLY like they show. And, you can collect the excess texture, pry open the texture bottle top, and put the extra back in the bottle for another use. The Meng kit has molded-in anti-skid, but I admit it's a bit 'delicate'. The Hull Tex works great, and I'm certainly going to use it on my Takom Merkava Mark I Hybrid that has NO anti-skid.

My apologies, like Israel, to Eric for hijacking his very nice thread...


Curt: Sounds like you could be a candidate for trying my route...!

It's a LOT cheaper and it actually goes on and works the same way as Hull-Tex or any other brush-on-adhesive - apply grit process...

Just a suggestion!

Cheers! Bob
errains
#045
Visit this Community
South Carolina, United States
Joined: September 23, 2005
KitMaker: 362 posts
Armorama: 350 posts
Posted: Sunday, May 19, 2019 - 11:19 AM UTC
HIGHJACK!!...HIGHT JACK....HI JACK!!!


It all good fellaz! This is the place to pass on and share Ideas and suggestions...so keep it up.

Unfortunately no work on the Merk today. Spent the time laying on some primer on a few other projects.

cabasner
Visit this Community
Nevada, United States
Joined: February 12, 2012
KitMaker: 1,083 posts
Armorama: 1,014 posts
Posted: Sunday, May 19, 2019 - 12:30 PM UTC

Quoted Text

where did you get it Curt?
Dan


Dan,

It's made by a company called VMS, and there are lots of places to get it. I believe I ended up getting mine from the Michigan Toy Soldier Shop, but just do a search for it. I found it on EBay also.
cabasner
Visit this Community
Nevada, United States
Joined: February 12, 2012
KitMaker: 1,083 posts
Armorama: 1,014 posts
Posted: Sunday, May 19, 2019 - 12:40 PM UTC

Quoted Text


Curt: Sounds like you could be a candidate for trying my route...!

It's a LOT cheaper and it actually goes on and works the same way as Hull-Tex or any other brush-on-adhesive - apply grit process...

Just a suggestion!

Cheers! Bob


Bob, I've tried a number of different methods, including ways similar to yours, including white glue and Chinchilla Dust, Tamiya liquid glue and Badger Aluminum Oxide Powder. There are a ton of different ways to do anti-skid, no one way is the best. But thanks for the thought!
panzerbob01
Visit this Community
Louisiana, United States
Joined: March 06, 2010
KitMaker: 3,128 posts
Armorama: 2,959 posts
Posted: Monday, May 20, 2019 - 06:27 AM UTC

Quoted Text


Quoted Text

I haven't even looked at the Takom 2b kit barrel yet.


While the kit as a whole is pretty good, the barrel is wrong for a Mk.2: there are only five brackets holding the thermal sleeve in place forward the bore-evacuator when in reality there are six. I guess they just carried the sprue over from their Mk.1 kit (which indeed only had five)...


Argh! Maybe I can convince myself that my particular 2b kit is supposed to represent some early, transitional version still featuring that Mk. 1 barrel! Right.

The sort of conundrum which imposes further un-anticipated decision-making upon the builder.

But THANKS for the clarification! Knowledge is almost everything!
ccordoba7141
Visit this Community
New York, United States
Joined: February 25, 2018
KitMaker: 27 posts
Armorama: 24 posts
Posted: Tuesday, May 21, 2019 - 04:14 PM UTC
I have to agree with Curt on this. I've tried a few methods, but the Hull Tex has been the best (although a bit messy) way to go when doing your anti-skid. I now have three Merks with this method...……..with a few more pending.
panzerbob01
Visit this Community
Louisiana, United States
Joined: March 06, 2010
KitMaker: 3,128 posts
Armorama: 2,959 posts
Posted: Tuesday, May 21, 2019 - 06:41 PM UTC

Quoted Text

I have to agree with Curt on this. I've tried a few methods, but the Hull Tex has been the best (although a bit messy) way to go when doing your anti-skid. I now have three Merks with this method...……..with a few more pending.


I watched the video. Looks just like what I do, technique-wise (brush on glue, dust, brush off excess), only the Hull-Tex adhesive is pretty clear, and he uses a plastic squeeze-bottle to blow his grit on! As for the grit... use whatever grit one likes and/or which looks the "scale"! Frankly, it's pretty much the same, by me, save that I need to get a little plastic squeeze-bottle for shooting grit around - THAT looked like FUN!!!

PS: It's all true that some adhesives work better then do others... I tried out diluted wood-glue, thinned Elmer's white PVA, Gorilla Glue (thinned), acryl paints applied via AB (least controllable for fine detailing of the lot!), brushed-on enamels, brushed-on Tamiya-thin cement, brushed - on Vallejo Model Color (not bad...), and, of course, the Stynylrez primer. The testing was pretty extensive... I did a couple old hulks, and sheets of styrene as surfaces, and tried just about every possible grit which various folks have mentioned trying (save for that Chinchilla dust which Russ mentioned...). It was a LOT of fun!

I'm new to this non-slip stuff (my posted Merk 2b pics are my very first attempt!) and to IDF armor... I've longed to do a Merk, but was afraid of the gritting process for quite a bit... And the few attempts at creating it that I saw at model shows wasn't very encouraging. Now that I have found something which is super-easy to do and works great, I have a couple more Merks, an Achzarit, a Magach 7c, and a Puma lined up for getting a bit gritty!

It's nice to see that there is a commercial product out there which appears to work well. Choices and options are all GOOD! The "proof of the pudding" is always to see the stuff used and painted-over and see what it comes out like in the end!

Cheers! Bob
errains
#045
Visit this Community
South Carolina, United States
Joined: September 23, 2005
KitMaker: 362 posts
Armorama: 350 posts
Posted: Thursday, May 23, 2019 - 04:33 AM UTC
Just an update...

I started working on the Meng resin turret basket and after about 2 and half hours of pure frustration I moving this project to my SoS (Shelf-of-Shame). For whatever reasons this kit had fought me the entire time to the point that there is just zero fun left in it...and it a hobby after all.

I'll leave off here with a couple of thoughts...

A. This is a great kit that really out of Box except for the tracks. It does not need any AM items other than a new set of tracks. I mentioned earlier the tracks are the worst part of this kit as the design and engineering just plan...sux.

B. I need to take more time in making proper choices of what AM products to use and when. And realistically understand my skill level.

I feel I can save this project and before an doing anything that can't be reversed it is going on the SoS and hopefully I'll come back to it movitied and able to enjoy it once again.

Thanks for following along everyone.

ReluctantRenegade
Visit this Community
Wien, Austria
Joined: March 09, 2016
KitMaker: 2,408 posts
Armorama: 2,300 posts
Posted: Thursday, May 23, 2019 - 05:15 AM UTC

Quoted Text

I started working on the Meng resin turret basket and after about 2 and half hours of pure frustration I moving this project to my SoS (Shelf-of-Shame).


What went wrong?

errains
#045
Visit this Community
South Carolina, United States
Joined: September 23, 2005
KitMaker: 362 posts
Armorama: 350 posts
Posted: Thursday, May 23, 2019 - 05:39 AM UTC
In a nutshell the resin basket doesn't fit.

The basket sides are about 2mm short and do not fit into the kit holes. Then the bottom of the basket has a bow in it with about 1.5 to 2mm deflection and is 2mm to wide to fit into the resin sides.

I can use the kit parts and lead foil to enclose the basket...but it's just one thing after another it seems so I need to take a break from it. Almost all the Issues I'm having are self-inflicted...other then the tracks.
panzerbob01
Visit this Community
Louisiana, United States
Joined: March 06, 2010
KitMaker: 3,128 posts
Armorama: 2,959 posts
Posted: Thursday, May 23, 2019 - 05:47 AM UTC

Quoted Text

Just an update...

I started working on the Meng resin turret basket and after about 2 and half hours of pure frustration I moving this project to my SoS (Shelf-of-Shame). For whatever reasons this kit had fought me the entire time to the point that there is just zero fun left in it...and it a hobby after all.

I'll leave off here with a couple of thoughts...

A. This is a great kit that really out of Box except for the tracks. It does not need any AM items other than a new set of tracks. I mentioned earlier the tracks are the worst part of this kit as the design and engineering just plan...sux.

B. I need to take more time in making proper choices of what AM products to use and when. And realistically understand my skill level.

I feel I can save this project and before an doing anything that can't be reversed it is going on the SoS and hopefully I'll come back to it movitied and able to enjoy it once again.

Thanks for following along everyone.


I feel for you, Eric. Sorry to see it headed to the SoS, but... But I think you are exhibiting wisdom and solid thinking. Skip the frustration and do something else. I've learned to step back and try to avoid the "Concorde Fallacy" when things just are not working out on a build. It's a hobby. Have fun with it and enjoy what you are doing. When it goes bad, put it aside and do something else. I have a "shelf of shame", too. But there are soooo many cool kits of cool subjects out there, I don't feel very bad about sliding a troubled build onto it. There's other stuff I will find more satisfying just waiting for my attention and its turn! For you, too.

Whenever you pull this one back out, I'll look in on it. I'd love to see what comes of your project. And who knows? Maybe as other Merk projects move along, you'll regain desire to get on with your's. Meanwhile, Model On and enjoy the hobby!

Bob
cabasner
Visit this Community
Nevada, United States
Joined: February 12, 2012
KitMaker: 1,083 posts
Armorama: 1,014 posts
Posted: Thursday, May 23, 2019 - 01:50 PM UTC
First of all, Eric, I'm so sorry that you had such problems! I agree with you that the kit tracks are not great, which is why I used the Fruil tracks, and I use aftermarket tracks for almost all my AFV models. I've found only the Rye Field M1A1/2 tracks as really well done OEM individual link tracks, and even those need quite a delicate touch on use of glue. The Fruils work and look fantastic, especially after using the AK Burnishing Fluid on 'em!

I'm really sorry that you got frustrated, though I agree with you that if you've reached the level of frustration, by all means, put the model aside. It SHOULD be FUN! That said, I had no issues at all with the turret basket on my Meng M4. Albeit, this is NOT the Meng resin basket, the additional one for big dollars from Meng, modeling a fully enclosed one, that Eric used. In fact, I was thrilled that all the kit parts went together so well, including the photoetch bottom pieces. The only parts that were a bit dicey were the very thin plastic 'rods' that are mounted on the exterior of the basket, and they were very delicate and difficult to remove from their sprues. But it can be done, if you work very slowly and carefully. But I did replace the two smallest ones with wire as those I could not get cleanly off the sprue.

Eric, if you want to commiserate, or just talk about your build, please let me know and I'll send you my number. I know it can be frustrating. I myself have trashed a few models in sheer frustration, but if I can help, by all means, let me know!

One last aside. I wrote to VMS, as I'd noted that they were selling extra individual texture, but not extra adhesive, and the adhesive is what I'm likely to run out of first. I've now learned that you can get individual adhesive! Great work, VMS, and thank you!
cabasner
Visit this Community
Nevada, United States
Joined: February 12, 2012
KitMaker: 1,083 posts
Armorama: 1,014 posts
Posted: Monday, June 03, 2019 - 12:02 AM UTC
Eric, I don’t recall when you said you’d be back from your vacation, but I did want to let you know that I’ve been making some progress, albeit slow, on my Merkava 4M. All of the big parts are together. I had the running gear (suspension, wheels and tracks) all done and the turret, too. I primed all of it with white Stylynrez, and did some preshading of panel lines with Tamiya Hull Red, and then, after much masking of the running gear, painted the tank with my mixture of Tamiya colors. I was reasonably pleased. No pictures yet, but I’ll get some. Also, I was really excited to receive my first order of the Wilder water based weathering stuff, which comes in many different colors and textures (has bigger ‘stones’ and smaller, etc.). I was happy to see it is offered in ‘red desert’, which is what I need for my 4M tank, as almost all the 4M tank photos I have show dust, dirt and some mud, in red soil, covering large area of the tanks in the pictures. I tried it yesterday afternoon, and it worked great! As of this morning, all dried, with little change in appearance. I haven’t had the chance to check on the Wilder claim that these products can be reactivated with water. Will check later this evening.

I’ll also try to take some pictures. As of now, there is no weathering done, except for the road wheels, tracks (Fruil) and the suspension, which I needed to do before the side skirts are glued in place. Outside of dust and dirt, there is not as much chipping and rust on these IDF compared to other modern tanks (presumably, the IDF crews pay more attention to vehicle maintenance) so not as much weathering of that type to do.
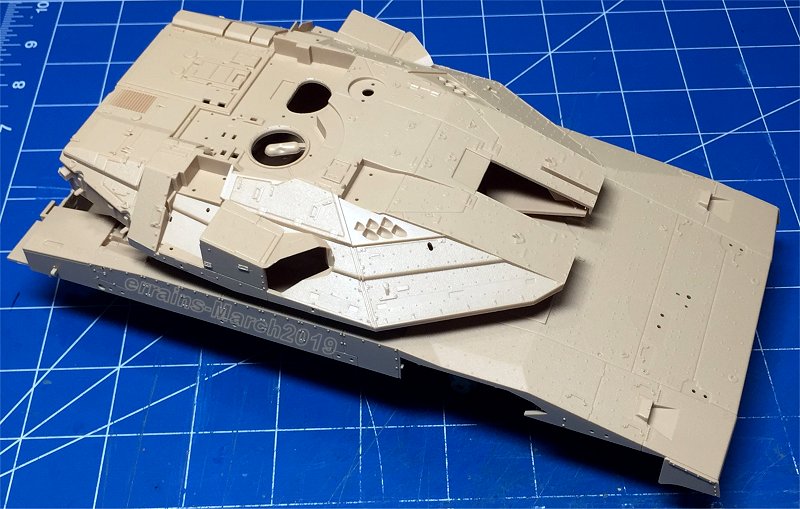
By the way, I’ve now gotten to see, for the first time, what the Hull Tex product, under primer and paint, actually looks like. It is interesting. There is absolutely no way to miss where the texture has been placed. I used it at the 4 corners, on the horizontal parts, of the hull. I would say it is very effective, and REALLY easy to notice, as it creates almost a ‘black hole’ with respect to reflection of light (or rather, absorption). It definitely makes the molded in/on anti-skid look like there is nothing there, in comparison. It is very uniform, and I will, absolutely, be using this product on my Takom Merkava I Hybrid, which does not have any anti skid at all in the molding.
panzerbob01
Visit this Community
Louisiana, United States
Joined: March 06, 2010
KitMaker: 3,128 posts
Armorama: 2,959 posts
Posted: Monday, June 03, 2019 - 03:50 AM UTC

Quoted Text

...

By the way, I’ve now gotten to see, for the first time, what the Hull Tex product, under primer and paint, actually looks like. It is interesting. There is absolutely no way to miss where the texture has been placed. I used it at the 4 corners, on the horizontal parts, of the hull. I would say it is very effective, and REALLY easy to notice, as it creates almost a ‘black hole’ with respect to reflection of light (or rather, absorption). It definitely makes the molded in/on anti-skid look like there is nothing there, in comparison. It is very uniform, and I will, absolutely, be using this product on my Takom Merkava I Hybrid, which does not have any anti skid at all in the molding.


Curt: Stands to reason that the Hull-Tex stuff will create a much-deader surface then will any molded-on non-slip - you are applying an actual grit and those particles are each a defined and irregular - relative - to - surface item w/ different reflection at any given angle. I get that exact same effect - my DIY non-slip creates a very dead surface. Given as many of the real things appear to have some-to-lots of thin, worn, and scraped-away patches on their non-slip, and we would likely want to see these "inconsistencies", the applied non-slip approaches seem to be much more capable of producing a realistic-looking surface inclusive of thinner patches, etc.

Looking forward to seeing a pic or... of your results!

Bob
vettejack
Visit this Community
Florida, United States
Joined: November 23, 2012
KitMaker: 1,277 posts
Armorama: 1,254 posts
Posted: Tuesday, June 04, 2019 - 12:27 AM UTC

Quoted Text

Hello Everyone!

It has been several years since I last posted a build here so I felt it was time to do so again.

Here is a photo of the base kit and some extra goodies I plan to include for this build.


First order of business for me is to assemble the major hull and turret components and identify any fit issues. Of course being a fairly new kit there were no issues.


After the major component assemblies checked out I then mounted them to their respective building boards, one for hull and one for the turret. The building boards help minimize direct handling and facilitate safe storage and transporting while this kit is being built.


THANKS for stopping in for a look and as always comments are welcome.


Well Eric, I pretty much have all the aftermarket I can stand now to compliment my Merk IV. I even bought aftermarket whether they are meant for Hobbyboss or Academy kits (I manipulate other proprietary aftermarket all the time to fit what I want it too). Still watching your thread as well. Now, all I have to do, is find/get the time to build my Merk IV!!
M4A1Sherman
Visit this Community
New York, United States
Joined: May 02, 2013
KitMaker: 4,403 posts
Armorama: 4,078 posts
Posted: Tuesday, June 04, 2019 - 01:47 AM UTC

Quoted Text


Quoted Text

Hello Everyone!

It has been several years since I last posted a build here so I felt it was time to do so again.

Here is a photo of the base kit and some extra goodies I plan to include for this build.


First order of business for me is to assemble the major hull and turret components and identify any fit issues. Of course being a fairly new kit there were no issues.


After the major component assemblies checked out I then mounted them to their respective building boards, one for hull and one for the turret. The building boards help minimize direct handling and facilitate safe storage and transporting while this kit is being built.


THANKS for stopping in for a look and as always comments are welcome.


Well Eric, I pretty much have all the aftermarket I can stand now to compliment my Merk IV. I even bought aftermarket whether they are meant for Hobbyboss or Academy kits (I manipulate other proprietary aftermarket all the time to fit what I want it too). Still watching your thread as well. Now, all I have to do, is find/get the time to build my Merk IV!!


Hi John, and Everyone Else!

I think John has the right idea as far as any after-market doo-dads are concerned. You use what you can, where you can. This concept also goes for "kit-bashing". If kit "a" has a "better" representation of a certain part or an assembly than kit "b" does, you can bet your last dollar that Dennis is going to use the "better" stuff...

In my own building processes, I "cross-pollinate" PE, resin goodies and parts from other kits ALL OF THE TIME, with no qualms, whatsoever...

PS- Eric: Have you any photos of your latest progress with which to "up-date" us all..?
errains
#045
Visit this Community
South Carolina, United States
Joined: September 23, 2005
KitMaker: 362 posts
Armorama: 350 posts
Posted: Thursday, June 06, 2019 - 07:20 AM UTC
Hay guys, Thanks for keeping this thread alive
Though it is still on hold it is calling to me in my dreams...or is that nightmares...anywho, I just might be back to this sooner then I thought.

For Curt; I have seen the Hull Tex product for sale on a few websites. I am real interested in seeing how your application came out. BTW I also saw that Ammo by Mig has released three new anti-skid products much like the one I used...might have to look into them as well.

For John and Dennis; Undoubtedly aftermarket goodies are awesome and I love looking at them as much as the next person. I don't feel like I sux as a model hobbyist but I'm definitely no Rembrandt. While I like to challenge myself and understand that Failure is often the true teacher. I need to be more realistic with setting goals that are more inline with my skills while improving them as I go. And most important...to HAVE FUN since this is a hobby after all.

And here is where I left off...


I have since started a new build project which I'll be post here soon. But I've kept the Aftermarket and goals in check.
cabasner
Visit this Community
Nevada, United States
Joined: February 12, 2012
KitMaker: 1,083 posts
Armorama: 1,014 posts
Posted: Sunday, June 09, 2019 - 02:59 PM UTC
Eric,

I think your build looks great, thus far! I've been making lots of progress on mine. The hull and turret are painted in their main colors, with slight highlights to simulate faded panels. The running gear, including road wheels, and tracks, are weathered and installed. I've put on the decals, and have coated all of the tank in a satin sheen, to more easily begin the panel lines and oil dot weathering. Will take some photos soon, and will post. I've got a huge amount of work to go, though, but looking forward to it, with lots of reddish dust to cover huge areas per the photos of the Vulcan tank that I have...
errains
#045
Visit this Community
South Carolina, United States
Joined: September 23, 2005
KitMaker: 362 posts
Armorama: 350 posts
Posted: Monday, June 10, 2019 - 05:43 AM UTC
Sounds like you have made excellent progress Curt. I eagerly await pictures!!

I pulled the my Merk out this morning... ...and was looking it over...I just can't seem to walk away from it.

Pongo_Arm
Visit this Community
British Columbia, Canada
Joined: January 27, 2017
KitMaker: 147 posts
Armorama: 147 posts
Posted: Monday, June 10, 2019 - 07:12 AM UTC
I am still amazed that they put torsion bars in a model of a tank that does not have them, just to put some resistance on the suspension arms?