

Patrick, it's always something Bro, but once that snow flies I call it done, till spring. Thx for the compliment, Amigo.
Thx Jerry, but I must confess, the Mrs. usually never hits me with a honey do-list. She knows my list will always be longer than hers and will usually include her stuff too, lol.
Just catching up on the summer builds everyone else has been working takes a few days to peruse through, yall have been busy, especially you Jerry!
Hosted by Darren Baker
German Uboat TypeVIIB Conning Tower Gun Deck
PolishBrigade12

Joined: January 31, 2009
KitMaker: 380 posts
Armorama: 366 posts

Posted: Saturday, October 20, 2018 - 02:42 PM UTC


GazzaS

#424

Joined: April 23, 2015
KitMaker: 4,648 posts
Armorama: 2,248 posts

Posted: Saturday, October 20, 2018 - 06:34 PM UTC
What an amazing construct!

Dioramartin
Joined: May 04, 2016
KitMaker: 1,476 posts
Armorama: 1,463 posts
Posted: Saturday, October 20, 2018 - 09:19 PM UTC
Long time no Ski! had to wait a while to say that, great to see you back. So thats the new man-cave/work bench for big-scale work eh? The sub that fits under that excellent con tower looks like it should fit inside easy. And did I fall asleep or isnt that Normandy courtyard still a work in progress? 
PolishBrigade12
Joined: January 31, 2009
KitMaker: 380 posts
Armorama: 366 posts
Posted: Sunday, October 21, 2018 - 02:59 PM UTC
Sorry for the extended absence Tim, it has been a long summer for me, I'm burned out on outside builds. That's a young lads sport, HA!
Oh yes, the 200mm dio is still on the bench, figs and rigs are done, just got side tracked by a few figs and gun deck. I'll get back to it after the figs and deck are done.
____________________
Thx Gary. I use to have to bust my hinney back in the day. It's paid off by the $$thousands$$ by not having to pay a contractor. I know they gotta make a living, but not off me, HA!
Thx Gents, Ski.

cheyenne
Joined: January 05, 2005
KitMaker: 2,185 posts
Armorama: 1,813 posts
Posted: Tuesday, October 23, 2018 - 02:36 AM UTC
Beautiful 1/1 stuff Ski , been absent myself from the bench , just finished splitting and stacking 4 cords , I'm gettin to old fer this ......
PolishBrigade12
Joined: January 31, 2009
KitMaker: 380 posts
Armorama: 366 posts
Posted: Wednesday, October 24, 2018 - 02:06 PM UTC
Quoted Text
Beautiful 1/1 stuff Ski , been absent myself from the bench , just finished splitting and stacking 4 cords , I'm gettin to old fer this ......
Dang Bro, ya had to remind me. Just spent the last 2 days splitting logs and loading the deck. Just have about 2 chords left to stack. Ya, that's a young lads sport, HA!
Cheers, Ski.
PolishBrigade12
Joined: January 31, 2009
KitMaker: 380 posts
Armorama: 366 posts
Posted: Wednesday, October 31, 2018 - 09:11 AM UTC
Ok Gents, the bunker has been cranked up to full power and we are in business once again, it's been a long summer.
At the end of last summer I was working on the 3D German U-Boat Gun Deck, Type VIIB made by Shapeways, Sasa Drobac. Taesung Hamms graciously sent me Alpine's 1/16th scale German U-Boat Captain, kit # 16021, and I picked up another Watch Officer figure for that particular dio build.
In this section of the blog I'll be covering Alpine's 1/16th scale German U-Boat Watch Officer, kit #16036, by Taesung Hamms.
Now, yall may remember I've already done this figure for Track-link, exclusive build. I paid for this Watch Officer to go with Alpine's 1/16th scale German U-Boat Captain, kit # 16021, which I did not pay for. So, the Watch Officer in this blog and the Captain will appear in the final pics for this particular blog, the Gun Deck. The Captain will "not" be a feature in this blog except for the final pics, that is for Track-Link exclusively. Clear as mud, I know, HA!
Here we have the motley crew all together.

Now, what you did not see, unless you visited my blog on TL, was the method used to paint the face specifically. I ran across a young lady's work on YT showing how she blends oils and starts from a basic grey background and produces some incredible work. So much so that I've used it to paint the Captain's face exclusively, with better than expected results. That partial head painted you see on the right was painted as a test run for this method. The pretty young lady's name is Daria Callie. She's very well known in the portrait community and she has several videos you can use to perfect your techniques. I had to go through the videos once again to get back into the swing of things, so to speak, after a long summer season.
A frontal view showing the flesh tones blended without a base tone. The pics are a bit glossy, but oils will dull after a few days. There's still plenty to work over on this head, but for right now, he's looking pretty good for starters. I painted this head in just over four hours, that's a first! I plan to nail this method down hard, it works too well to just let it get rusty in the ol cabesa.

The eyes will be worked a bit more, plus blending more tones/values into the surrounding upper cheek and below the eyes, etc.

After a few days I will go over the beard to get it dialed in. The lips will be worked a bit more too. As you can see, the gloss from the oils makes it difficult to really see all the detail, but they will become more apparent after the Dull Coat.

At any rate, it's been one heck of a long summer and I'm glad to be back in the bunker. The only thing stopping me now is plowing snow, and that ain't so bad, HA!
Please, if you "see something, say something", I'm not shy to constructive criticism, I'm still learning too.
Thanks for watching, more to follow soon. Cheers, Ski.
At the end of last summer I was working on the 3D German U-Boat Gun Deck, Type VIIB made by Shapeways, Sasa Drobac. Taesung Hamms graciously sent me Alpine's 1/16th scale German U-Boat Captain, kit # 16021, and I picked up another Watch Officer figure for that particular dio build.
In this section of the blog I'll be covering Alpine's 1/16th scale German U-Boat Watch Officer, kit #16036, by Taesung Hamms.
Now, yall may remember I've already done this figure for Track-link, exclusive build. I paid for this Watch Officer to go with Alpine's 1/16th scale German U-Boat Captain, kit # 16021, which I did not pay for. So, the Watch Officer in this blog and the Captain will appear in the final pics for this particular blog, the Gun Deck. The Captain will "not" be a feature in this blog except for the final pics, that is for Track-Link exclusively. Clear as mud, I know, HA!
Here we have the motley crew all together.
Now, what you did not see, unless you visited my blog on TL, was the method used to paint the face specifically. I ran across a young lady's work on YT showing how she blends oils and starts from a basic grey background and produces some incredible work. So much so that I've used it to paint the Captain's face exclusively, with better than expected results. That partial head painted you see on the right was painted as a test run for this method. The pretty young lady's name is Daria Callie. She's very well known in the portrait community and she has several videos you can use to perfect your techniques. I had to go through the videos once again to get back into the swing of things, so to speak, after a long summer season.
A frontal view showing the flesh tones blended without a base tone. The pics are a bit glossy, but oils will dull after a few days. There's still plenty to work over on this head, but for right now, he's looking pretty good for starters. I painted this head in just over four hours, that's a first! I plan to nail this method down hard, it works too well to just let it get rusty in the ol cabesa.
The eyes will be worked a bit more, plus blending more tones/values into the surrounding upper cheek and below the eyes, etc.
After a few days I will go over the beard to get it dialed in. The lips will be worked a bit more too. As you can see, the gloss from the oils makes it difficult to really see all the detail, but they will become more apparent after the Dull Coat.
At any rate, it's been one heck of a long summer and I'm glad to be back in the bunker. The only thing stopping me now is plowing snow, and that ain't so bad, HA!
Please, if you "see something, say something", I'm not shy to constructive criticism, I'm still learning too.
Thanks for watching, more to follow soon. Cheers, Ski.

jrutman
Joined: April 10, 2011
KitMaker: 7,941 posts
Armorama: 7,934 posts
Posted: Thursday, November 01, 2018 - 01:10 AM UTC
Looks good. Nice technique!
J
J
PolishBrigade12
Joined: January 31, 2009
KitMaker: 380 posts
Armorama: 366 posts
Posted: Thursday, November 01, 2018 - 02:40 AM UTC
Thx Jerry. Daria's techniques just worked well for me, but I gotz a long way to go still.
Cheers, Ski.
Cheers, Ski.
PolishBrigade12
Joined: January 31, 2009
KitMaker: 380 posts
Armorama: 366 posts
Posted: Thursday, November 01, 2018 - 06:06 AM UTC
I realized I never did a "white balance" before taking the last set of pics, oops, my bad.
At any rate, I did some reworking of the eyes, cheeks and lips. While that was drying I used oils for the cap leather strap and worked the gold trim on the elements. In a few days the original layer of oils will be close to dried at which time I'll start adding layers of reddish tones where needed as well as defining the eye lids, etc.
There's still plenty to do, but we are making progress. Hopefully this head will be done in a few days and then it will be uniform time.
Remember "ol one eye"? This was a perfect head to practice on. As you can see this is just a rough draft, but it shows just how easy the techniques described above really works. A big thanks goes out to Steve Readdie of "Reedees Miniatures" for supplying several different heads. http://www.reedeesminiatures.co.uk/the-quartermasters/1-9---200mm


More to follow and thanks for watchin. Cheers, Ski.
Dioramartin
Joined: May 04, 2016
KitMaker: 1,476 posts
Armorama: 1,463 posts
Posted: Thursday, November 01, 2018 - 10:36 PM UTC
Superb work Ski is there anything you cant do really well? As you asked, my only suggested improvements would be to fade/blend the hard lines between the beard & skin, take the gloss off the beard & darken the irises a bit looks like hes got cataracts or a 1,000yd stare. But those skin tones are just brilliant, Im taking detailed notes
PolishBrigade12
Joined: January 31, 2009
KitMaker: 380 posts
Armorama: 366 posts
Posted: Friday, November 02, 2018 - 04:41 AM UTC
Thx Tim. Yes, the eyes will be reworked some more. I'll need to wait a bit for more drying time. I'll be adding a darker shade of the eye color in the top halves, then the glint.
The beard has the dark grey/black base coat which will be defined in the end, hi-lites, etc., last item before dull coat. Good point, I will fade the flesh into the beard area. Thx for the third eye Amigo.
Cheers, Ski.
The beard has the dark grey/black base coat which will be defined in the end, hi-lites, etc., last item before dull coat. Good point, I will fade the flesh into the beard area. Thx for the third eye Amigo.
Cheers, Ski.
PolishBrigade12
Joined: January 31, 2009
KitMaker: 380 posts
Armorama: 366 posts
Posted: Saturday, November 03, 2018 - 02:49 PM UTC
A bit more progress has been accomplished. It should be noted here that I gave the head a shot of Dull Coat before starting any of the steps mentioned below so as not to disturb any prior work.
I spent about another four hours reworking the eyes, what a pain in the tuckus. I'm so use to the 200mm figures that just stepping down to 1/16th can be a bit challenging, especially after a long break from the paints. But, once in the groove it started to comply with my wishes, lol.
Ok, I was able to get the ever so slight glint in the eyes and definition around the pupils. I use acrylics for eye work because it dries faster and is easier to control in such a small area. I had to lighten the eye around the pupil a bit and redo the lower lid for definition as well. Touch up around the eyes will also be addressed, such as slight feathering of lighter tones under the eyes, crows feet, etc.
Next up I worked the cap using Ultra Marine Blue, Titanium White, and a touch of Paynes Gray. The recesses were feathered in before adding the highlights. Once the oils were in place I feathered them all together in the appropriate locations. So far so good.
I also added Paynes Gray, Titanium White, and a touch of Ivory Black to highlight the beard, which still has plenty of work needed. When the oils set in a day or so I'll make a filter pass with black and Dark Earth acrylics to work into the recesses of the beard, bring in more definition in that area.
Once these next few steps are completed and the head is in a satisfactory condition I'll move on to the uniforms of both figures. I'm really excited to finally be getting to the jackets and trousers.


More to follow soon and thanks for watchin. Cheers, Ski.
I spent about another four hours reworking the eyes, what a pain in the tuckus. I'm so use to the 200mm figures that just stepping down to 1/16th can be a bit challenging, especially after a long break from the paints. But, once in the groove it started to comply with my wishes, lol.
Ok, I was able to get the ever so slight glint in the eyes and definition around the pupils. I use acrylics for eye work because it dries faster and is easier to control in such a small area. I had to lighten the eye around the pupil a bit and redo the lower lid for definition as well. Touch up around the eyes will also be addressed, such as slight feathering of lighter tones under the eyes, crows feet, etc.
Next up I worked the cap using Ultra Marine Blue, Titanium White, and a touch of Paynes Gray. The recesses were feathered in before adding the highlights. Once the oils were in place I feathered them all together in the appropriate locations. So far so good.
I also added Paynes Gray, Titanium White, and a touch of Ivory Black to highlight the beard, which still has plenty of work needed. When the oils set in a day or so I'll make a filter pass with black and Dark Earth acrylics to work into the recesses of the beard, bring in more definition in that area.
Once these next few steps are completed and the head is in a satisfactory condition I'll move on to the uniforms of both figures. I'm really excited to finally be getting to the jackets and trousers.
More to follow soon and thanks for watchin. Cheers, Ski.
tangodown
#494

Joined: August 08, 2018
KitMaker: 213 posts
Armorama: 198 posts

Posted: Saturday, November 03, 2018 - 03:07 PM UTC
Amazing work Ski! Proof that old school is the best school.

PolishBrigade12
Joined: January 31, 2009
KitMaker: 380 posts
Armorama: 366 posts
Posted: Saturday, November 03, 2018 - 05:16 PM UTC
Quoted Text
Amazing work Ski! Proof that old school is the best school.
You said it! I'm a hardcore oiler, always will be.
Thanks Takedown, appreciate it.
Cheers, Ski.
Kranta

Joined: October 10, 2014
KitMaker: 290 posts
Armorama: 290 posts
Posted: Monday, November 05, 2018 - 06:00 AM UTC
Great work.
PolishBrigade12
Joined: January 31, 2009
KitMaker: 380 posts
Armorama: 366 posts
Posted: Tuesday, November 06, 2018 - 05:18 AM UTC
Quoted Text
Great work.
Thank you Ayhan!
Kuba_Bartosik

Joined: October 20, 2018
KitMaker: 41 posts
Armorama: 41 posts
Posted: Tuesday, November 06, 2018 - 09:49 PM UTC
Amazing
Cheers
Kuba
Cheers
Kuba

strongarden
Joined: May 14, 2012
KitMaker: 730 posts
Armorama: 624 posts
Posted: Thursday, November 08, 2018 - 03:12 AM UTC
Turning out beautiful Ski, keep at it!
Dave
Dave
PolishBrigade12
Joined: January 31, 2009
KitMaker: 380 posts
Armorama: 366 posts
Posted: Thursday, November 08, 2018 - 07:22 AM UTC
Thx Kuba, thx Dave, I'll get progress pics up soon.
Cheers, Ski.
Cheers, Ski.
PolishBrigade12
Joined: January 31, 2009
KitMaker: 380 posts
Armorama: 366 posts
Posted: Friday, February 22, 2019 - 04:17 PM UTC
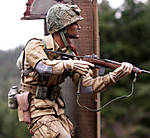
Alpine Miniatures 1/16th German U-Boat Captain #16021
Taesung Hamms has been so kind to send this U Boat figure for me to paint. The sculptor is Ju Won Jung. Floquil Gray Primer was brushed over the entire figure before using oils. I did not use an acrylic base this time, just oils blended throughout. This figure was painted for Track-Link. This figure will be part of the gun deck scenario.


Cheers, Ski.
Taesung Hamms has been so kind to send this U Boat figure for me to paint. The sculptor is Ju Won Jung. Floquil Gray Primer was brushed over the entire figure before using oils. I did not use an acrylic base this time, just oils blended throughout. This figure was painted for Track-Link. This figure will be part of the gun deck scenario.
Cheers, Ski.
cheyenne
Joined: January 05, 2005
KitMaker: 2,185 posts
Armorama: 1,813 posts
Posted: Saturday, February 23, 2019 - 12:23 AM UTC
Beautiful work Ski , dude looks real !!!
jrutman
Joined: April 10, 2011
KitMaker: 7,941 posts
Armorama: 7,934 posts
Posted: Saturday, February 23, 2019 - 01:31 AM UTC
Yep,he came out great and will fit in superbly,
J
J
PolishBrigade12
Joined: January 31, 2009
KitMaker: 380 posts
Armorama: 366 posts
Posted: Saturday, February 23, 2019 - 07:35 AM UTC
Thanks Cheyenne and Jerry. It's been a tough winter to paint, bummer to say the least.
Thx for the kind words Gents! Cheers, Ski.
Thx for the kind words Gents! Cheers, Ski.
Dioramartin
Joined: May 04, 2016
KitMaker: 1,476 posts
Armorama: 1,463 posts
Posted: Saturday, February 23, 2019 - 06:32 PM UTC
Yep this ones breathing too like most of JRs, superb sculpting & your paint job to match
 |

WEB HOSTING BY


Copyright ©2021 Armorama and Kitmaker Network, a subsidiary of Silver Star Enterprises
All Rights Reserved. Please read our Conditions of Use and Privacy Policy.
All Rights Reserved. Please read our Conditions of Use and Privacy Policy.