

Hosted by Darren Baker
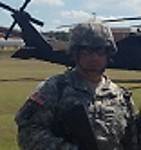
OIF USF-I QRF Mosul, Iraq 2007

WilliamDeCicco

#161

Joined: May 03, 2010
KitMaker: 392 posts
Armorama: 373 posts

Posted: Thursday, May 28, 2015 - 06:13 AM UTC
Wanting to do something like this for awhile, you are giving me inspiration. Can't wait to see more.
JGphins
Joined: July 19, 2014
KitMaker: 249 posts
Armorama: 249 posts
Posted: Thursday, May 28, 2015 - 06:56 AM UTC
Thanks everyone for the compliments, they are appreciated.
I know what it feels like in regards to waiting to start a project... I started out modeling HO scale train kits over ten years ago. I purchased thousands of dollars worth of HO scale train kits and MISC items within that 10YR time period in hopes of building a huge 12' x 12' size layout in my two car garage. After several years of it not happening but yet wanting to enjoy the hobby I learned about the wonderful opportunities in making dioramas. Much more manageable as far as time, space, and funding...
I have learned a lot just by looking at all the awesome work done by so many modelers on this site. Even though my work doesn't even come close to a lot of what I've seen on this site it's a great time building these kits and I'll continue to get better in time. I'm glad you like what you see here and hopefully you will start your build soon.
Best regards,
JGphins
JGphins
Joined: July 19, 2014
KitMaker: 249 posts
Armorama: 249 posts
Posted: Thursday, May 28, 2015 - 09:56 AM UTC
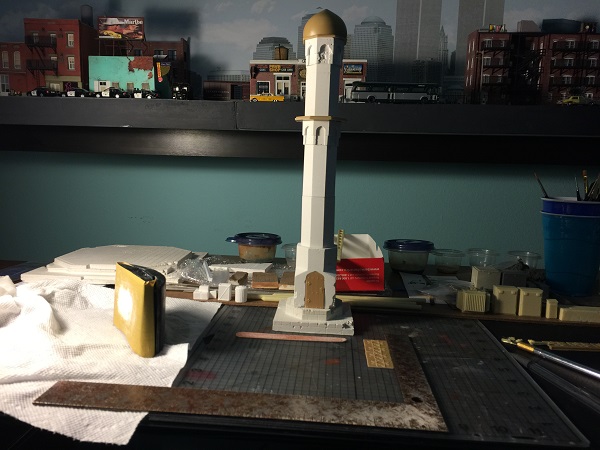
Next up, Verlinden Productions kit 2289 Minaret Iraq.
I'm really looking forward to this kit and the accompanying Battle Damaged Shrine (Kit 2288). These will keep me busy for a while that's for sure. Here's the staged up kit right out of the box ready for a little sanding, priming, painting, and details.
 ,
, 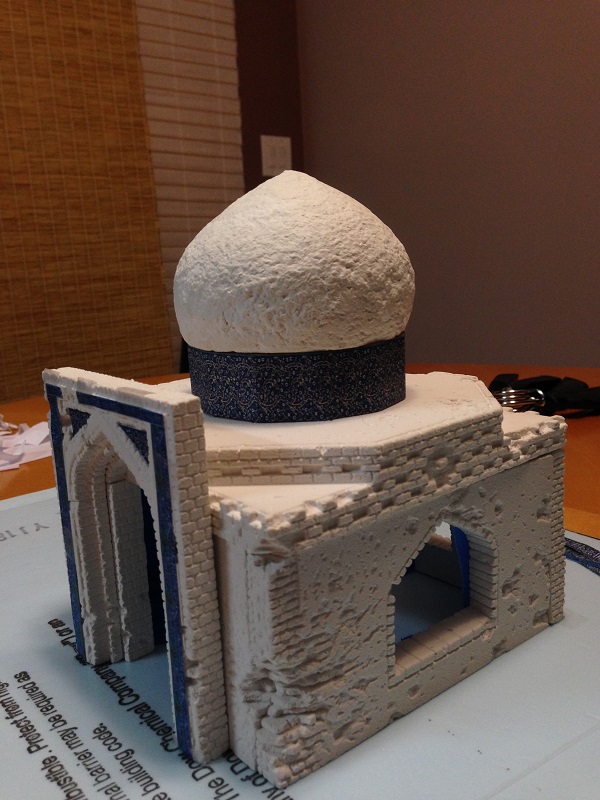
Great looking kit with lots of nice details.
Thanks for looking.
JGphins
I'm really looking forward to this kit and the accompanying Battle Damaged Shrine (Kit 2288). These will keep me busy for a while that's for sure. Here's the staged up kit right out of the box ready for a little sanding, priming, painting, and details.
, Great looking kit with lots of nice details.
Thanks for looking.
JGphins

jrutman
Joined: April 10, 2011
KitMaker: 7,941 posts
Armorama: 7,934 posts
Posted: Thursday, May 28, 2015 - 06:24 PM UTC
That is a very nice looking offering for sure.
J
J
Stickframe
#362
Joined: December 01, 2013
KitMaker: 1,661 posts
Armorama: 1,202 posts

Posted: Thursday, May 28, 2015 - 11:49 PM UTC
Hi Joaquin,
Glad to see you posting again. I started as an HO guy too, but figured out I liked building things more than running a railroad!
You're build is coming right along too, looking good! Keep building!
Cheers
Nick
Glad to see you posting again. I started as an HO guy too, but figured out I liked building things more than running a railroad!
You're build is coming right along too, looking good! Keep building!
Cheers
Nick
JGphins
Joined: July 19, 2014
KitMaker: 249 posts
Armorama: 249 posts
Posted: Saturday, June 13, 2015 - 01:29 PM UTC
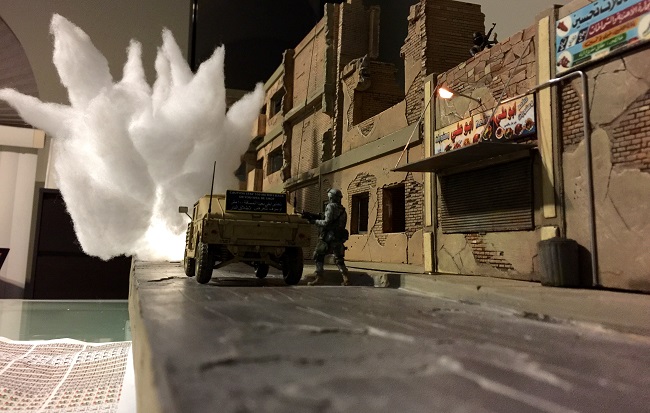
Need some feedback on this...
I'm considering adding an IED explosion (early, unpainted version below) at the end of the road where I will place the BUFFALO vehicle. I think it will look good BUT it's going to take up a lot space. What do you guys think?
Thanks for looking and all the inputs.
I'm considering adding an IED explosion (early, unpainted version below) at the end of the road where I will place the BUFFALO vehicle. I think it will look good BUT it's going to take up a lot space. What do you guys think?
Thanks for looking and all the inputs.
terminators

Joined: February 20, 2012
KitMaker: 1,932 posts
Armorama: 1,907 posts
Posted: Saturday, June 13, 2015 - 05:17 PM UTC
Great idea.
I think that the fallout of smoke which exceeds of the base would be better near the building even if it means not seeing anymore a part of the building.
Perhaps you could make also projections towards the humvee.
And you should change side mirrors of your humvee, it is not the good type for this operation theater.
This is this type:
JGphins
Joined: July 19, 2014
KitMaker: 249 posts
Armorama: 249 posts
Posted: Saturday, June 13, 2015 - 09:07 PM UTC
Thanks Alex, I agree with everything you mentioned.
I will not be using this out dated vehicle on my completed diorama. It is simply a staging vehicle which I acquired for $3 total from eBay. I built and painted it as a practice run since this is my first attempt at modeling scale 1/35 and military theme....
The vehicles for this 80" long x 14" deep diorama will consist of (x2) M1151 & (X1) M1114 up armored vehicles, (x2) MRAPs, and (X1) Buffalo.
The IED is a WIP and the placement location has not yet been determined. I Like the idea of creating this into my diorama but I am concerned about all the space that it takes plus how much building details it covers...
Nonetheless, I think it compliments the theme well since IEDs were a huge part of this conflict. It completes the story...
I plan on adding guitar wire painted black and orange to simulate projectials with attached bricks...
jrutman
Joined: April 10, 2011
KitMaker: 7,941 posts
Armorama: 7,934 posts
Posted: Saturday, June 13, 2015 - 09:12 PM UTC
Really nice ideas!
J
J
JGphins
Joined: July 19, 2014
KitMaker: 249 posts
Armorama: 249 posts
Posted: Saturday, June 13, 2015 - 09:31 PM UTC
Thanks! I've learned a lot from just visiting this site. Lots of skilled people here with awesome projects.
Thanks to everyone for sharing your projects, opinions, and for looking.
Thanks to everyone for sharing your projects, opinions, and for looking.

parrot

Joined: March 01, 2002
KitMaker: 1,607 posts
Armorama: 1,581 posts
Posted: Sunday, June 14, 2015 - 01:23 AM UTC
Looking really good.
I have to agree that the blast shouldn't go over the base.
I always believe in a dio your taking a chunk of land and it ends were the border of it ends.
I'll look forward to how you paint it.
Did you use cotton to do it?
Tom
I have to agree that the blast shouldn't go over the base.
I always believe in a dio your taking a chunk of land and it ends were the border of it ends.
I'll look forward to how you paint it.
Did you use cotton to do it?
Tom
JGphins
Joined: July 19, 2014
KitMaker: 249 posts
Armorama: 249 posts
Posted: Sunday, June 14, 2015 - 02:38 AM UTC
Hey Tom,
I used "Buffalo Snow" instead of cotton for this IED project. Its a test run. Got to see how it will react once painted.
The light source consist of one battery operated flickering candle.
The support system which holds the Buffalo Snow is made from chicken wire. I drilled small holes in the plastic candle container to better support the weight.
Shape the wire to simulate desired explosion formation then stuff with either cotton or similar material.
Painting colors will be: Black, Grey, Red, Yellow, Orange. The paint will be water based acrylic.
JGphins
andromeda673
Joined: July 30, 2013
KitMaker: 584 posts
Armorama: 525 posts
Posted: Tuesday, June 16, 2015 - 05:49 AM UTC
this is awesome, nice job so far, and really great work! I think everything so far is really well done, I know you were asking about how to lighten up the market walls, what about just airbrushing model master FS/sand mixed with some white. Just maybe lightly go over it?
Your a braver man then me for taking this build on, truly awesome work mate!
Your a braver man then me for taking this build on, truly awesome work mate!
WilliamDeCicco
#161
Joined: May 03, 2010
KitMaker: 392 posts
Armorama: 373 posts
Posted: Tuesday, June 16, 2015 - 07:54 AM UTC
Everytime I check your progress it keeps drawing me back, to make a nice size dio myself. Can't wait to see more.
Happy modeling
Happy modeling
JGphins
Joined: July 19, 2014
KitMaker: 249 posts
Armorama: 249 posts
Posted: Tuesday, June 16, 2015 - 11:27 AM UTC
Hey there gents, thanks for all of your inputs, views, and positive feedback. They are all truly appreciated.
This is a huge project, my progress is slow but I'm having a great time creating this thing piece by piece. The rewarding part as you all know is seeing it come to life, piece by piece and completing it 110% is the challenge.
For me, the planning phase takes a huge amount of time. I research the heck out of many options prior to taking action for each particular item that I build. I take a ton of options into consideration; my past and other fellow soldier's experiences, completed amazing projects found here of course, and the internet.
Those are the steps that take the longest in my opinion. The fun starts once you start the actual hands on building process. Nonetheless, it's an awesome relaxing hobby and I enjoy every aspect of it.
Thanks again for looking and more updates will be posted soon.

zorrolobo

Joined: May 31, 2013
KitMaker: 1,457 posts
Armorama: 1,440 posts
Posted: Wednesday, July 01, 2015 - 09:07 AM UTC
Impressive work! Very nice.
JGphins
Joined: July 19, 2014
KitMaker: 249 posts
Armorama: 249 posts
Posted: Wednesday, July 01, 2015 - 11:08 PM UTC
Thanks Marcos, appreciate your feedback!
I will post a few updated pictures soon of a few areas that I'm currently working on...
Completed one Verlinden Productions Street Transformer Station, and adding various exterior wall details such as water, gas, and electrical conduit/pipe lines. Many modifications and changes have delayed and slowed my progress recently but it's all good.
Happy modeling & hope everyone has a safe an awesome 4th of July holiday!!
JGphins
JGphins
Joined: July 19, 2014
KitMaker: 249 posts
Armorama: 249 posts
Posted: Sunday, July 26, 2015 - 09:58 AM UTC
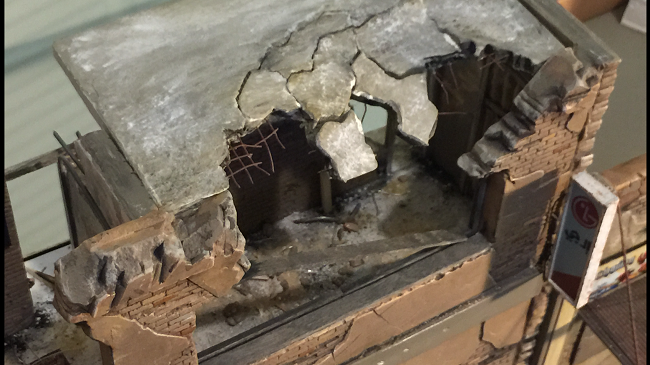
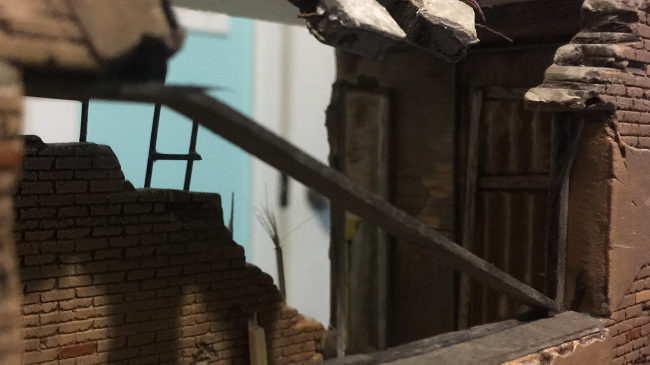
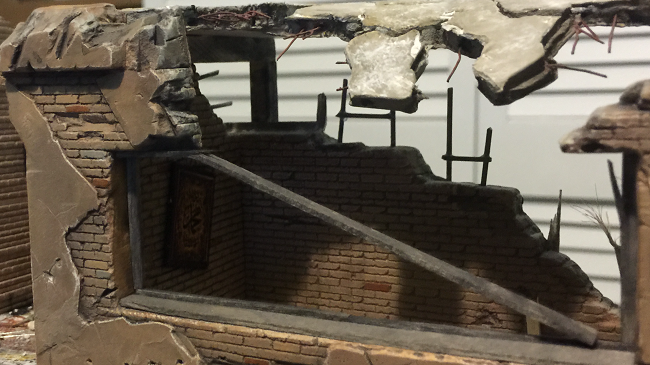
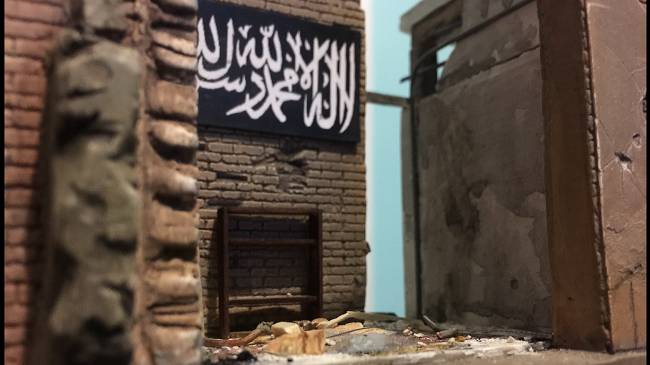
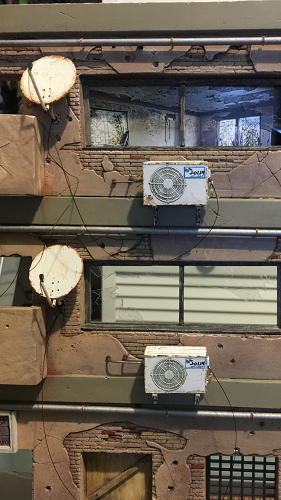
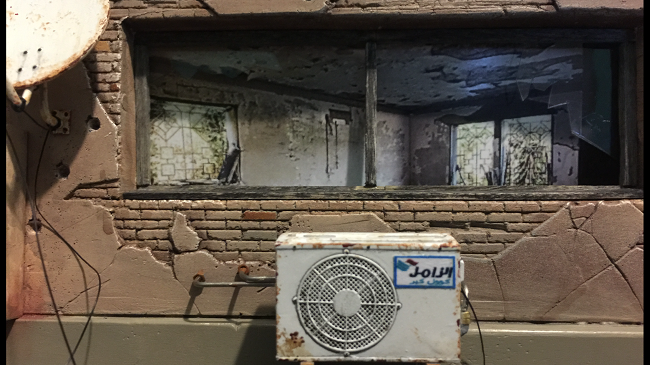
Update pics of current WIP; added water conduit pipes (exterior) to main BLDG, 2 Satellite Dishes, 2 Wall mounted A/C units, and added various internal details to the damaged 2 story BLDG. All pics are WIP and plenty additional details are pending.
Sorry for the long wait but it's been a bit of a challenge completing the above mentioned updates...
As always, your feedback and opinions are welcomed.
Enjoy!
Sorry for the long wait but it's been a bit of a challenge completing the above mentioned updates...
As always, your feedback and opinions are welcomed.
Enjoy!
jrutman
Joined: April 10, 2011
KitMaker: 7,941 posts
Armorama: 7,934 posts
Posted: Sunday, July 26, 2015 - 06:34 PM UTC
Nice work! That last pic could be the real thing.
J
J
zorrolobo
Joined: May 31, 2013
KitMaker: 1,457 posts
Armorama: 1,440 posts
Posted: Sunday, July 26, 2015 - 09:53 PM UTC
Very nice! Only one observation though, sattelite dishes are usually made of fiberglass or some plastic composition. They don't rust. Unless rust drips on them, from another source, they should be rust free. My 2 cents.
JGphins
Joined: July 19, 2014
KitMaker: 249 posts
Armorama: 249 posts
Posted: Monday, July 27, 2015 - 01:15 AM UTC
Thanks Jerry & Marcos for looking and compliments, appreciate it.
As for the rust on dish, in USA and most other places they are some sort of plastic but these dishes are trucked in via black market from Iran and consist of plastics with cheap metal parts; border ring, screws... Overtime, they rust and spread over on to the dish.
Here's one of many reference pics from the net.
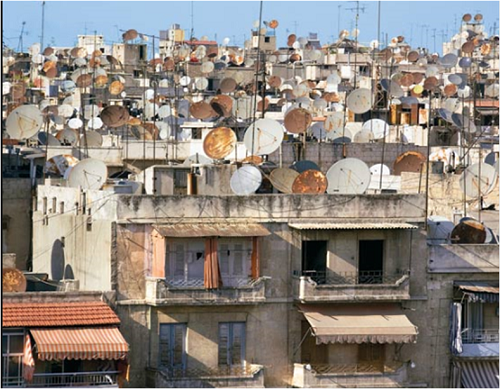
Nontheless, the rust adds details to the dio & in this part of the world - everything is dirty, rusty, and broken down.
As for the rust on dish, in USA and most other places they are some sort of plastic but these dishes are trucked in via black market from Iran and consist of plastics with cheap metal parts; border ring, screws... Overtime, they rust and spread over on to the dish.
Here's one of many reference pics from the net.
Nontheless, the rust adds details to the dio & in this part of the world - everything is dirty, rusty, and broken down.
JGphins
Joined: July 19, 2014
KitMaker: 249 posts
Armorama: 249 posts
Posted: Monday, July 27, 2015 - 02:14 AM UTC
Had to delete several pics to make room for recent updates but will need to delete more pics for upcoming updates...
Any ideas or suggestions on avoiding deleting pics? Can I upload pics to forum from another source other then the gallery?
Thanks for inputs and I apologize in advance for being lazy to research for the answer myself but been short on time lately, thanks again.
Any ideas or suggestions on avoiding deleting pics? Can I upload pics to forum from another source other then the gallery?
Thanks for inputs and I apologize in advance for being lazy to research for the answer myself but been short on time lately, thanks again.
zorrolobo
Joined: May 31, 2013
KitMaker: 1,457 posts
Armorama: 1,440 posts
Posted: Monday, July 27, 2015 - 09:35 AM UTC
I upload all my pics from flickr. Simple and free.
JGphins
Joined: July 19, 2014
KitMaker: 249 posts
Armorama: 249 posts
Posted: Monday, July 27, 2015 - 09:47 AM UTC
Thanks Marcos for the tip. I'll check it out.
avenue

Joined: May 25, 2013
KitMaker: 544 posts
Armorama: 542 posts
Posted: Monday, July 27, 2015 - 02:00 PM UTC
for year I been trying to figure out how to construct blast or smoke.I use cotton,result was not very satisfied, just how do you do it.could you give use step by step how you construct the IEd explosion.
 |

WEB HOSTING BY


Copyright ©2021 Armorama and Kitmaker Network, a subsidiary of Silver Star Enterprises
All Rights Reserved. Please read our Conditions of Use and Privacy Policy.
All Rights Reserved. Please read our Conditions of Use and Privacy Policy.