_GOTOBOTTOM
Armor/AFV: Large Scale
1/16 and Larger Armor Modeling
Hosted by Darren Baker
1/6th scale M3 Lee Project
armourguy
Visit this Community
Pennsylvania, United States
Joined: March 12, 2008
KitMaker: 464 posts
Armorama: 371 posts
Posted: Monday, January 11, 2010 - 09:41 AM UTC
I was able to prime and paint the model over the weekend.

Final Prime


When it came to the tank's base coat I wanted to use a different more lighter shade of OD than I typically use. The shade that I mixed together is suitable for early / mid war US vehicles.


The model is now ready for it's markings.
Banshee3Actual
Visit this Community
New York, United States
Joined: February 07, 2007
KitMaker: 125 posts
Armorama: 118 posts
Posted: Monday, January 11, 2010 - 11:46 AM UTC
Just a quick observation. IIRC, the Cupola Brownings buffer and pistol grip were removed and a different trigger assembly used. A short buffer tube replaced the long version.
armourguy
Visit this Community
Pennsylvania, United States
Joined: March 12, 2008
KitMaker: 464 posts
Armorama: 371 posts
Posted: Monday, January 11, 2010 - 03:56 PM UTC

Quoted Text

Just a quick observation. IIRC, the Cupola Brownings buffer and pistol grip were removed and a different trigger assembly used. A short buffer tube replaced the long version.


For my copula interior detailing reference I used this image. It shows a standard M1919 with the Pistol Grip.


The interior was cramped, but I don't see any way of aiming the gun without the pistol Grip.

If you have any images of the shortened Buffer tubes, and solenoid arrangement I would like to see so I can make the changes to my gun.
Dangeroo
#023
Visit this Community
Zurich, Switzerland
Joined: March 13, 2009
KitMaker: 2,058 posts
Armorama: 1,656 posts
Posted: Monday, January 11, 2010 - 08:12 PM UTC
I just reviewed the whole thread, simply amazing all the work you did on it! It's well worth the long loading time for all the pics...

Cheerio!
armourguy
Visit this Community
Pennsylvania, United States
Joined: March 12, 2008
KitMaker: 464 posts
Armorama: 371 posts
Posted: Tuesday, January 12, 2010 - 04:44 PM UTC
I have completed the tanks markings and weathering.


Weathered.


The model is now ready for the tracks and tire painting.
armourguy
Visit this Community
Pennsylvania, United States
Joined: March 12, 2008
KitMaker: 464 posts
Armorama: 371 posts
Posted: Friday, January 15, 2010 - 10:07 AM UTC
The M3 is now on it tracks, and The tank is now 95% complete.


The DML 30.cal and tripod were painted and weathered. For the 30.cal ammo boxes the kit supplies you with a plastic rod to be used on the box hinges. These rods are very flimsy and a sewing pin was used in its place.


The copula's interior was painted and the copula gun was added.


Most of the tanks details and components have been painted and added. These would include the Antenna, head/ tail light lenses, 30.cal MGs, Air filters, painting the fire extinguisher handles and the grease fittings red.


All that remains now are the fuel caps, and the tank's tools. The tank will then be complete
!
TAFFY3
Visit this Community
New York, United States
Joined: January 21, 2008
KitMaker: 2,531 posts
Armorama: 859 posts
Posted: Friday, January 15, 2010 - 03:29 PM UTC
Hello John, That is an incredible model. The attention to detail and your craftsmanship is really outstanding. It does not look 1/6, but rather 1/1. There aren't enough superlatives to describe your Lee properly. It belongs in a museum. Al
TankSGT
Visit this Community
New Jersey, United States
Joined: July 25, 2006
KitMaker: 1,139 posts
Armorama: 946 posts
Posted: Saturday, January 16, 2010 - 03:27 AM UTC
Absolutely amazing. That tank just needs to be started up and driven into battle. What makes it most remarkable was that you made most of the tank yourself. Again very well done.

Tom
sgtreef
Visit this Community
Oklahoma, United States
Joined: March 01, 2002
KitMaker: 6,043 posts
Armorama: 4,347 posts
Posted: Sunday, January 17, 2010 - 01:29 AM UTC
Dang John Jaw dropping good.
Most would not really believe the size of the thing.
This is Frigging fantastic.
The detail is beyond belief.
Great job from rags to riches.
Hope to see more of your builds and keep making some parts.
Any hope on you switching to German stuff soon?
Decals, PE for Flak guns and Kubblewagens ,Jeeps.
One question what color did you use on that antenna base looks dead on a match for the ceramic ones?

Cheers
armourguy
Visit this Community
Pennsylvania, United States
Joined: March 12, 2008
KitMaker: 464 posts
Armorama: 371 posts
Posted: Monday, January 18, 2010 - 10:56 AM UTC

Quoted Text

Dang John Jaw dropping good.
Most would not really believe the size of the thing.
This is Frigging fantastic.
The detail is beyond belief.
Great job from rags to riches.
Hope to see more of your builds and keep making some parts.
Any hope on you switching to German stuff soon?
Decals, PE for Flak guns and Kubblewagens ,Jeeps.
One question what color did you use on that antenna base looks dead on a match for the ceramic ones?

Cheers


Thanks for the compliments everyone they are much appreciated,

Jeff, for the insulator porcelain color I use Tamiya Hull Red. After the Paint dries I apply gloss clear lacquer to get the luster. I also do this Procedure on my 1/35th scale tanks. The antenna insulator adds a lot of color on American tanks, and it is commonly missed on a lot of 1/35th scale builds.

When it comes to Decals, I don't like to use decals in scales over 1/16. You will have the same issues with 1/6th scale decals that you have with 1/35th scale decals. These would be decal gloss, chips, rips...etc. For my markings I make my own stencils by creating them on my computer, printing them out on sticker paper, and cutting the markings out with an x-acto. I then stick the template to the tank and add the paint with an airbrush. The airbrush gives more precision and control on the paint intensity and brightness, which gives you a more realistic look. There are water slide decal sets in 1/6th scale. They are offered by a company called John's stuff, they can be found on the Sixth Army Group .,

the tank is now finished. I will now be creating the tank's gallery webpage. Once the webpage is complete, and the shop gets a good cleaning I will then start on my next project(s) .


I have added the last of the parts to the tank including the pioneer tools, and the fuel caps.


I have also added the last of the M3 parts to the product line.http://www.eastcoastarmory.com/ustankparts.htm

I have added the large suspension spanner wrench to the US AFV tool set.


The last parts that have been added are the resin Rivet heads. The heads come in two diameters the smaller 5/32nd which are used on the top deck, and the rear plate


and the larger 11/54th which are used for the tank's sides plates.


I took advantage of the good weather and I was able to get some pics of the M3 out doors.


I also made a rendition of a propaganda image that was taken in Fort Knox in 1940
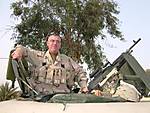


armourguy
Visit this Community
Pennsylvania, United States
Joined: March 12, 2008
KitMaker: 464 posts
Armorama: 371 posts
Posted: Saturday, January 23, 2010 - 12:55 PM UTC
The tank's gallery webpage is complete. The webpage contains all of the construction and diorama pictures that were taken during the build.


http://www.eastcoastarmory.com/m3_lee/olive_oil.htm


With the M3 now out of the way I will be able to focus on my next project. I should have some progress to post on next week !
Rubicon
Visit this Community
California, United States
Joined: February 18, 2009
KitMaker: 125 posts
Armorama: 111 posts
Posted: Saturday, January 23, 2010 - 01:22 PM UTC
That is really an amazing model.

One of the most impressive things I have seen on this site. Really well done.
210cav
Visit this Community
Virginia, United States
Joined: February 05, 2002
KitMaker: 6,149 posts
Armorama: 4,573 posts
Posted: Saturday, January 23, 2010 - 01:25 PM UTC
John-- you created a true work of art. Your workmanship is exemplary. Marvelous job. Thanks for leaving us speechless in praise of your effort.
DJ
Rubicon
Visit this Community
California, United States
Joined: February 18, 2009
KitMaker: 125 posts
Armorama: 111 posts
Posted: Saturday, January 23, 2010 - 01:30 PM UTC
What are you going to do for a next project?

Abydos
Visit this Community
New York, United States
Joined: August 11, 2005
KitMaker: 231 posts
Armorama: 225 posts
Posted: Saturday, January 23, 2010 - 02:00 PM UTC
after looking at this , it reminds me of the bunch of guys in england that do the german stuff, the detail is awesome, you are truly a master , thank you for allowing us to view the build log and the final
 _GOTOTOP