Milicast is a well-established company producing 1/76th scale resin models (both vehicles and figures). Their primary focus seems to be the World War II era and they cover most of the larger nations taking part in the conflict. Despite of the nowadays not very fashionable scale, their catalogue is well worth having a look. They have several versions of famous, popular tanks (different variants of Shermans, Crusaders, Cromwells, Churchills, Moebelwagens, etc), and they also provide rare conversions and rare vehicles. Some of their models look pretty impressive considering their scale: the M3 Lee has an interior provided, and the Bergepanther looks better detailed than some of the 1/35th scale offerings in plastic.
Review
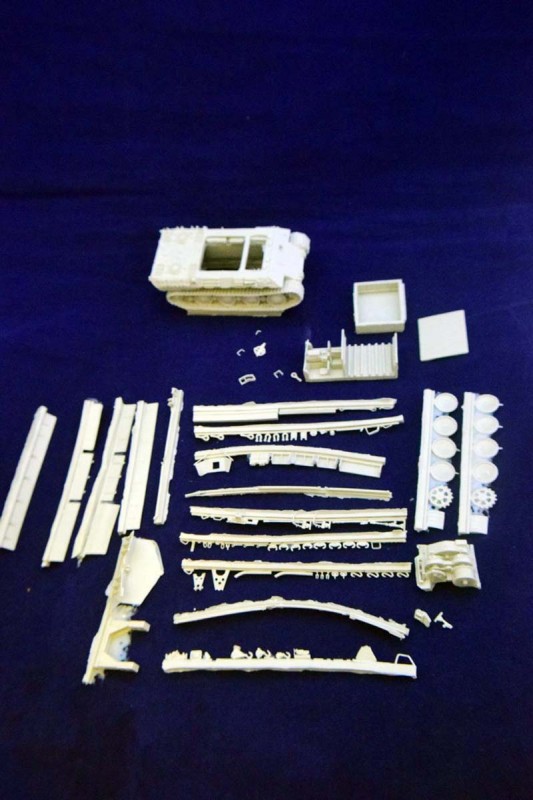
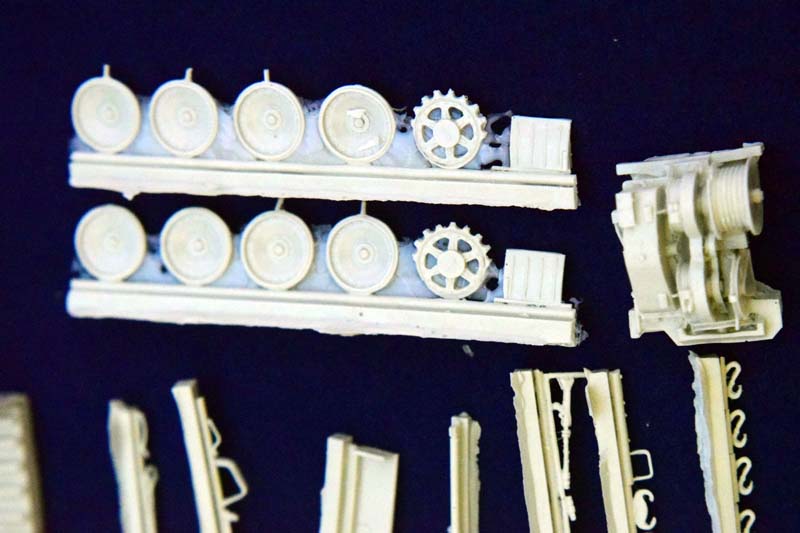
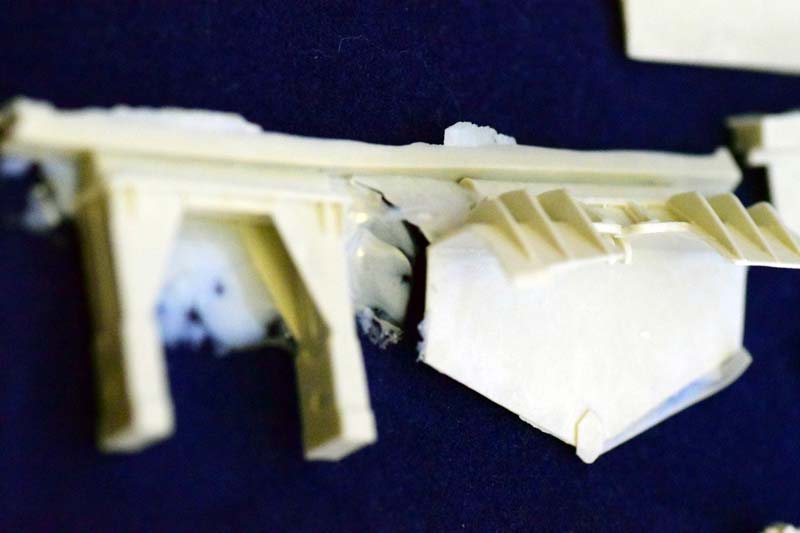
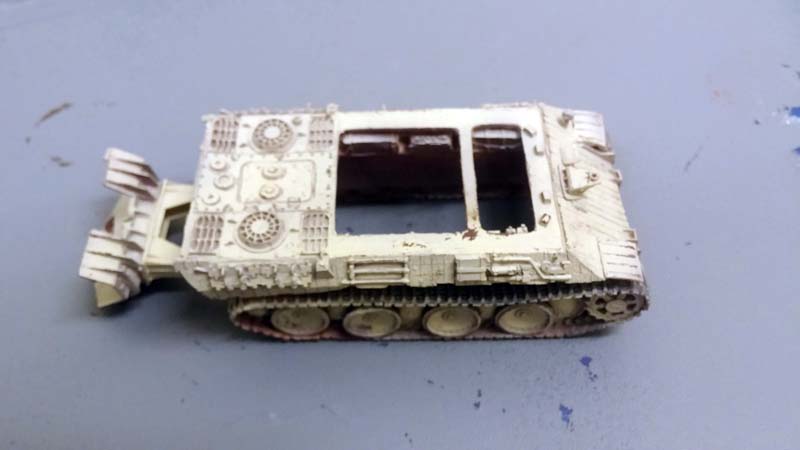
The model has a bewildering amount of parts; the tank is made up of more than a hundred pieces. The kit includes metal wire and some very fine chains as well. Some of the pouring blocks are huge; you will need a fine saw in order to be able to detach the larger parts without damaging them. (Always use wet sanding/sawing methods when working with resin.)
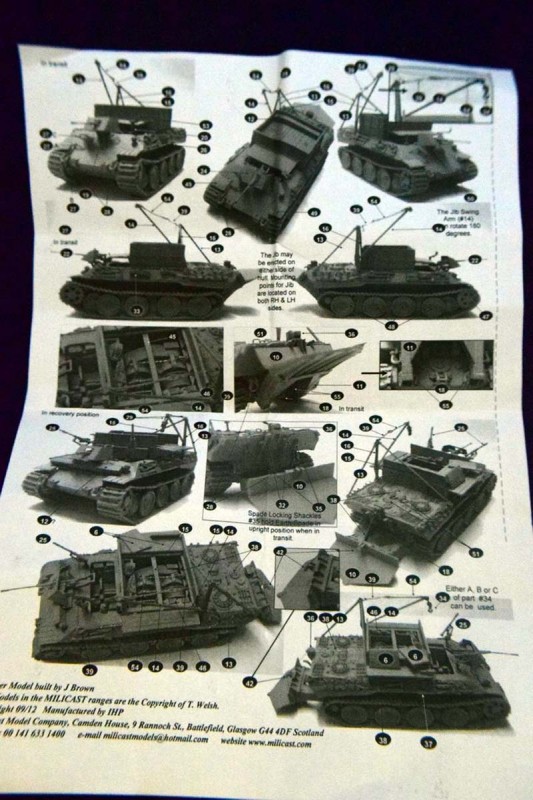
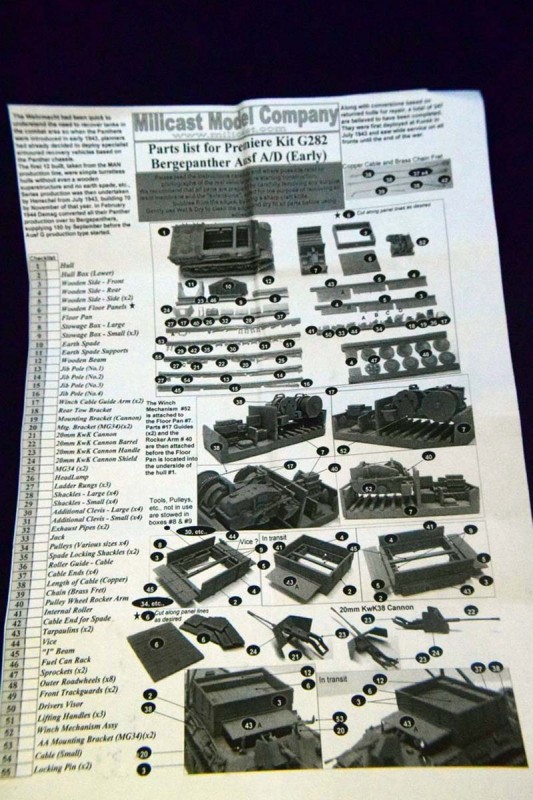
The instruction manual is essentially a series of photocopied black and white photos of the model in various stages of assembly, showing the part numbers. They are for the Ausf A/D early version, since Milicast offers several versions of this vehicle. If you purchased the late version of the model, you get a second page with the extra details. The front page has a short history of the vehicle, a photo of all the parts, a checklist for the parts, and the first steps of assembly. One thing I found was that you need a lot of good references and a lot of knowledge of the vehicle in order to build it into an accurate representation of the Ausf A final production version.
The instructions for the late version are not very clear; the images are pixelated, so a lot of the times I had no idea which part should go exactly where. I admit I ended up picking a photo of a vehicle, and trying to make my model look like it as best as I could.
Here are some reference links that may be useful:
http://www.wardrawings.be/WW2/Files/1-Vehicles/Axis/1-Germany/07-Others/Bergepanzers/Bergepanther.htm
http://www.fahrzeuge-der-wehrmacht.de/Artikel/Bergepanther.html
The instructions offer several options at every step- sometimes its not easy to determine which parts are optional and which are not. (Optional cover for the crew compartment, transit and deployed setup, etc.)
The main issue with the assembly was that in many cases the photos were not clear enough about the exact parts and their location. In most cases its easy to work these out, but some of the option parts (for the different versions of the Bergepanther, and for the different setups) they were not exactly informative. Some references and even clearer versions of the same photos on Milicasts website- will be very useful during the building stage. What I did was to get a photo of a vehicle I liked and tried to recreate that specific one. Another somewhat annoying issue is the large number of parts - you will need to work out a way to keep track of them. I simply wrote their numbers below the parts onto the casting block, but that meant I had to cut and clean them off one by one as the assembly required, which is not the ideal method when it comes to workflow.
The overall dimensions of the model are reasonably accurate. I used drawings and Spielbergs Panther book as reference (with the kind help of the Armorama community). Measuring the distance between the centre of the drive wheel and the centre of the idler the model is 6.8cm long; the original vehicle had a distance of 5350cm, which comes to 7cm in 1/76. The rest of the measurements (width, hull height, etc) are within this 2mm range. (A 1/72 scale Panther would be 7.4mm long between the wheels, just to give an idea of the difference between the two scales.)
The quality of casting is good; some of the long parts (crane assembly) were somewhat bent, but it was relatively easy to straighten them.
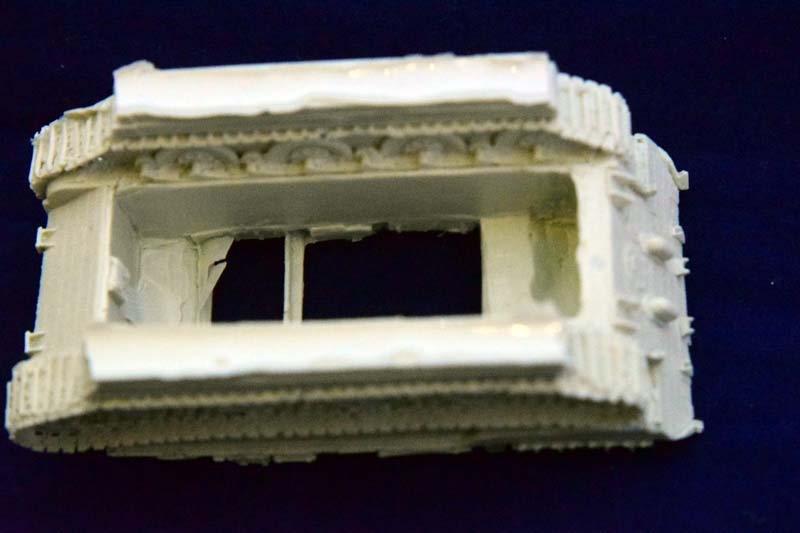
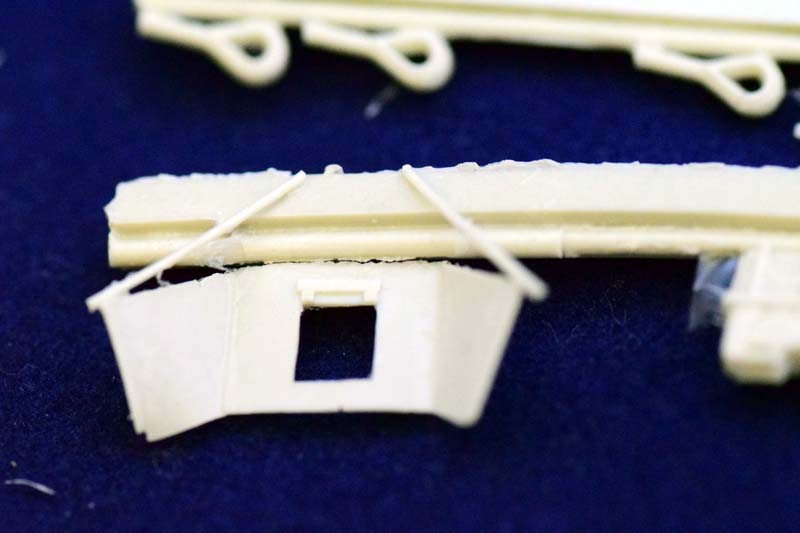
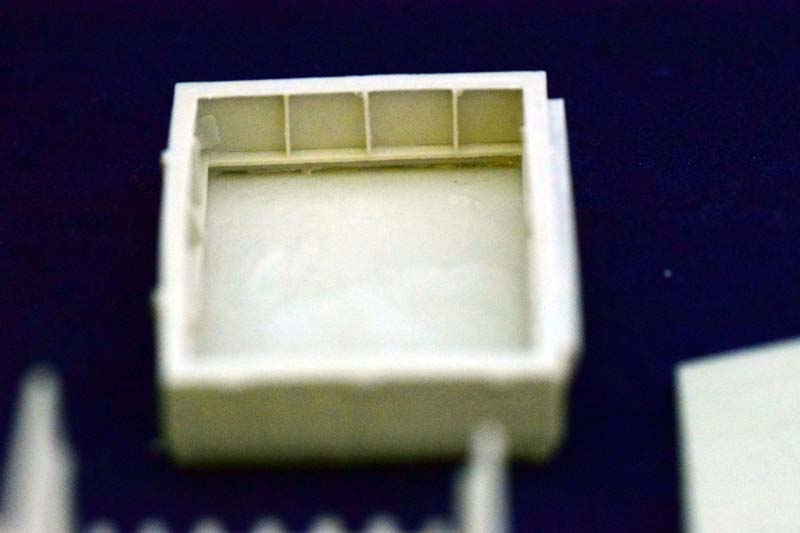
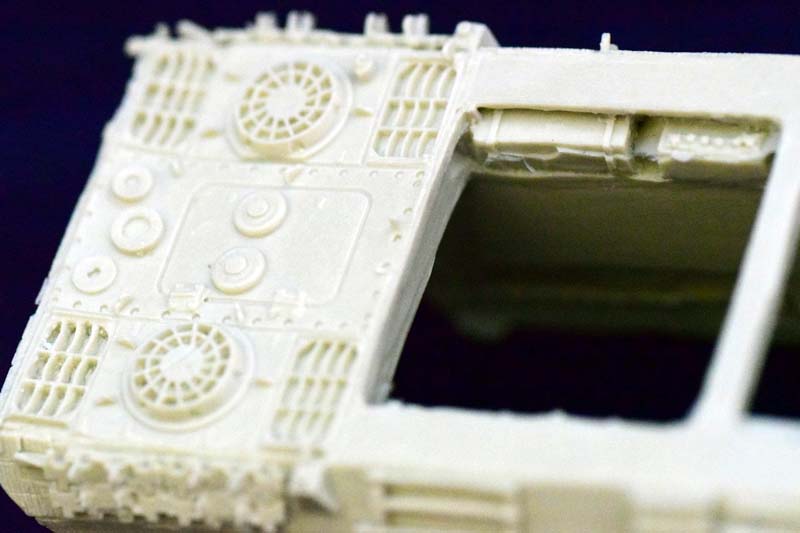
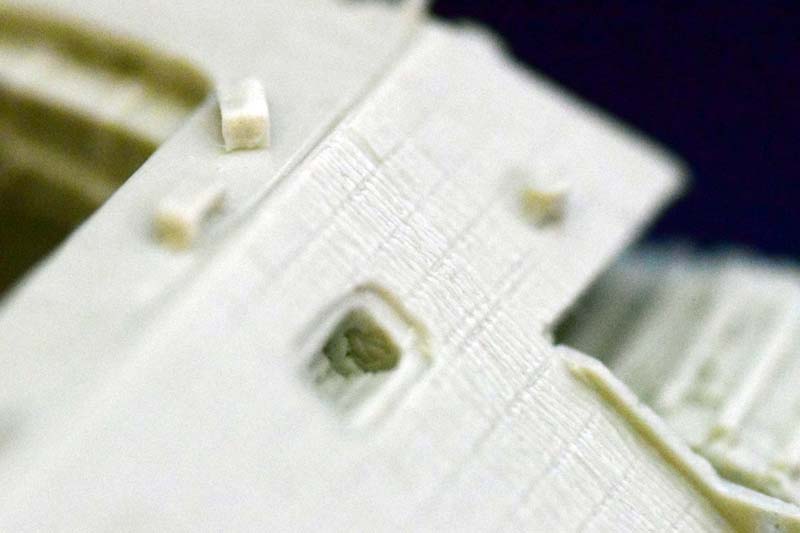
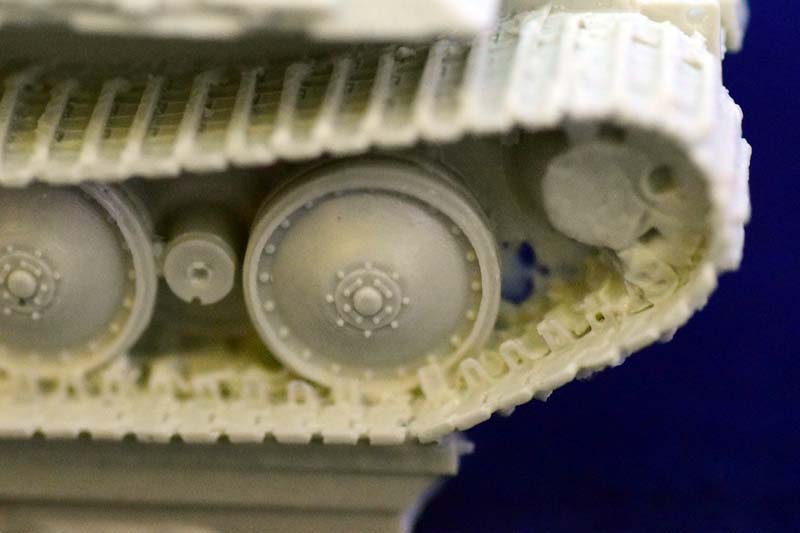
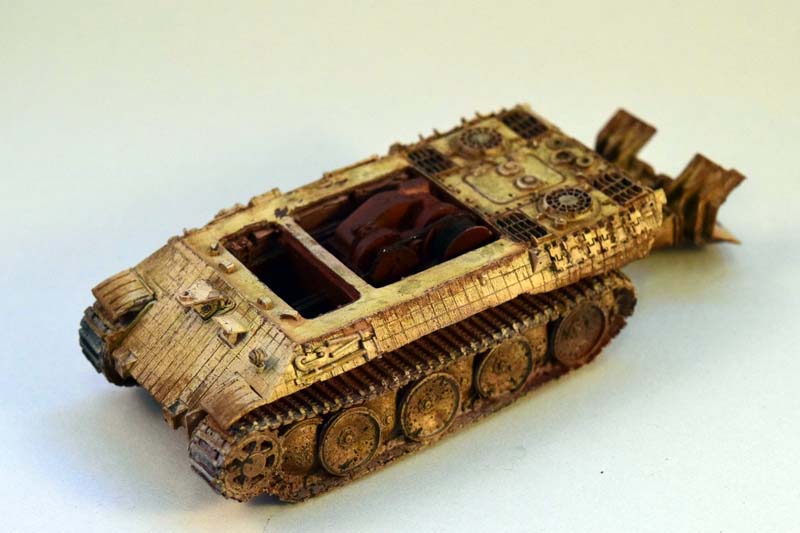
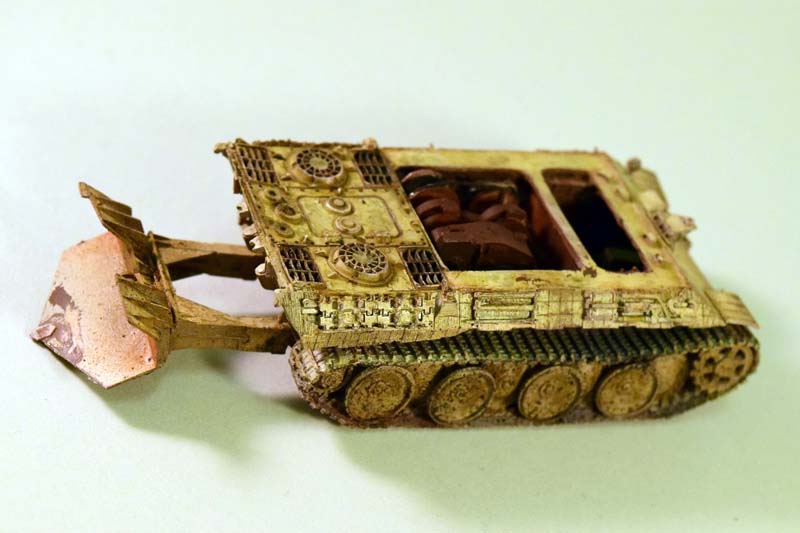
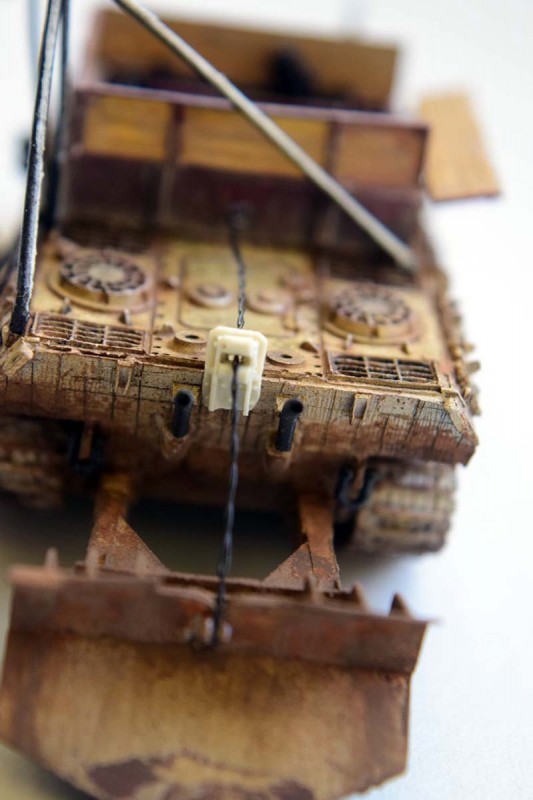
The complete hull is given as one, hollow part. It has all the running gear, tracks already attached; the middle is empty, where the interior (drivers compartment, winch assembly) needs to be placed from under. In my model there was a considerable gap left between the sides of the hull and the insert. Also, another issue was that the bottom of this part needed to be trimmed so that it did not stick out from under the vehicle.
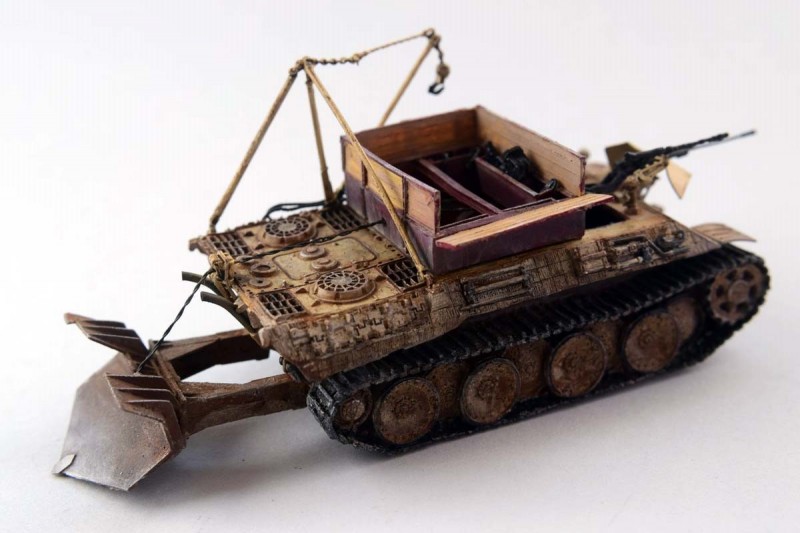
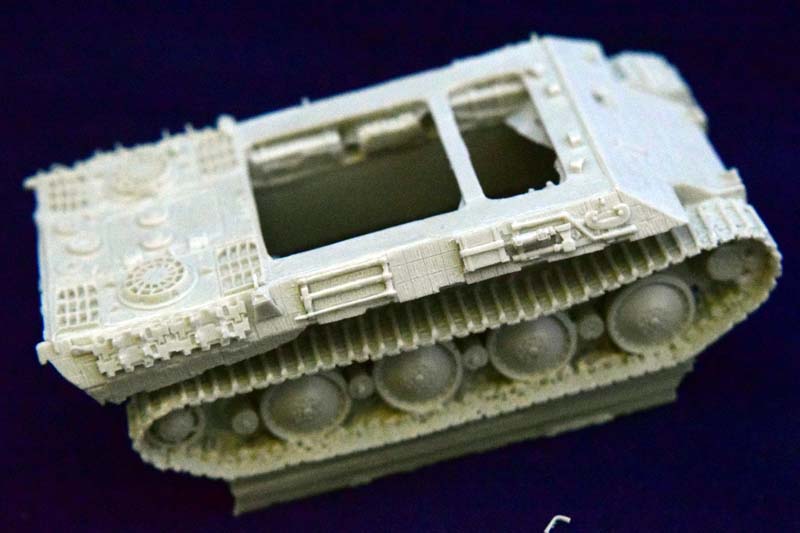
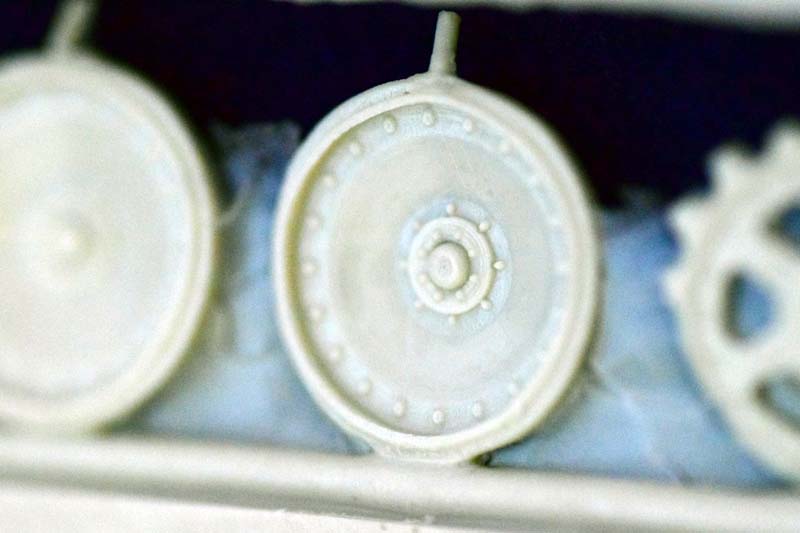
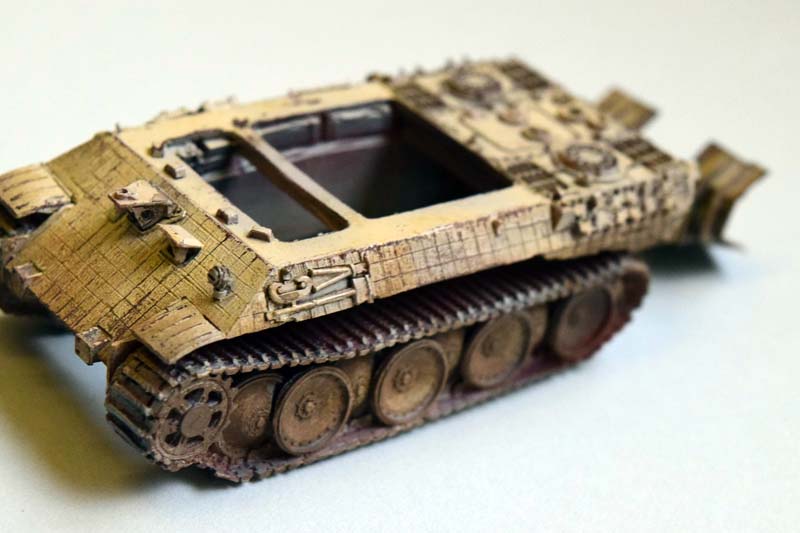
The hull is actually quite an impressive piece of resin; the tracks and road wheels look well detailed; some flash needs to be cleared, but its something you expect with a resin model. (And takes about a minute.) The hull is covered with Zimmerit, which is nicely reproduced. The basic assembly is actually quite easy and fast. I went around the building and painting steps in an unorthodox sequence: first assembled, painted and weathered the hull, then added the interior.
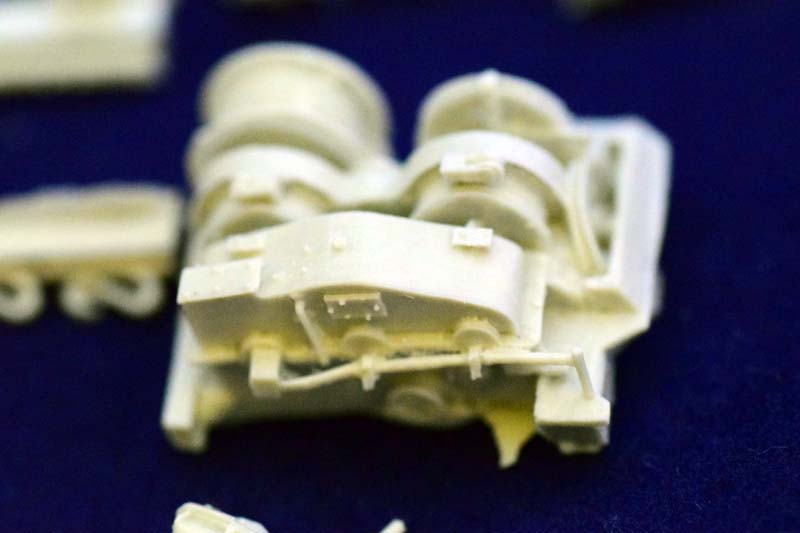
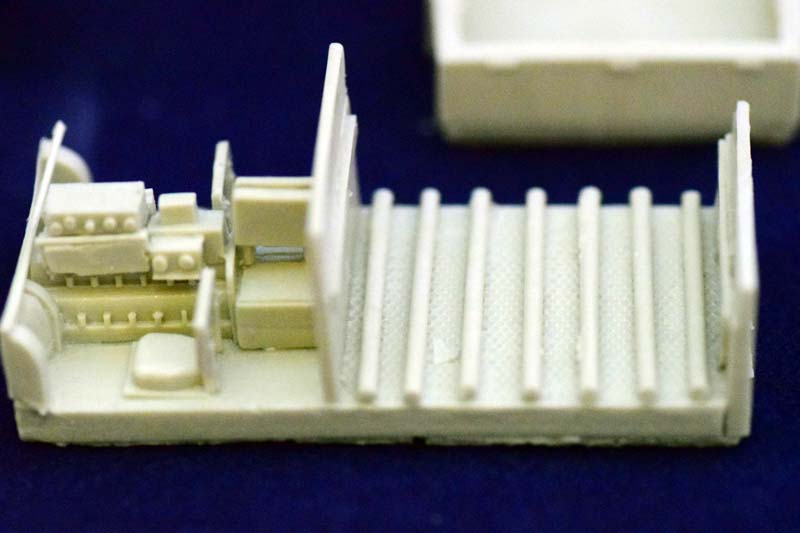
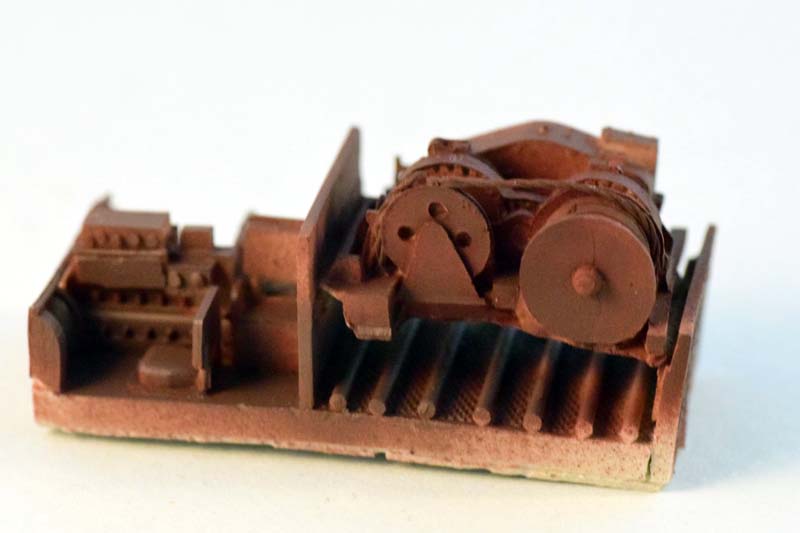
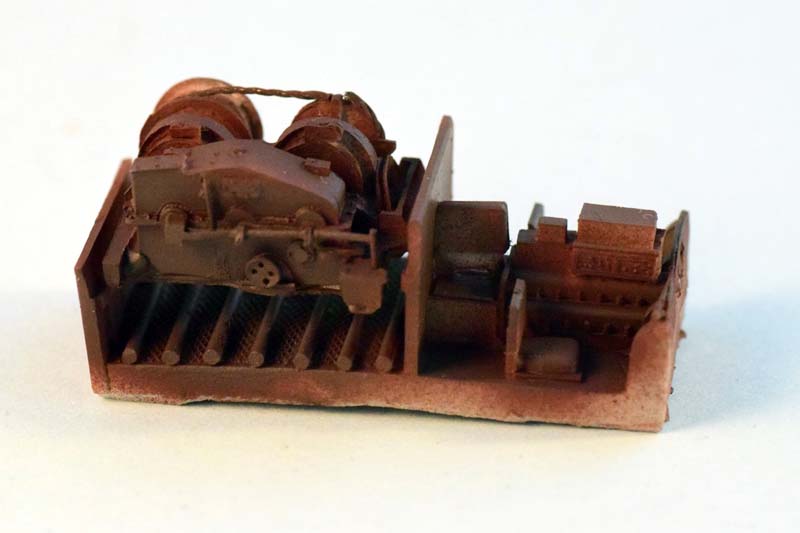
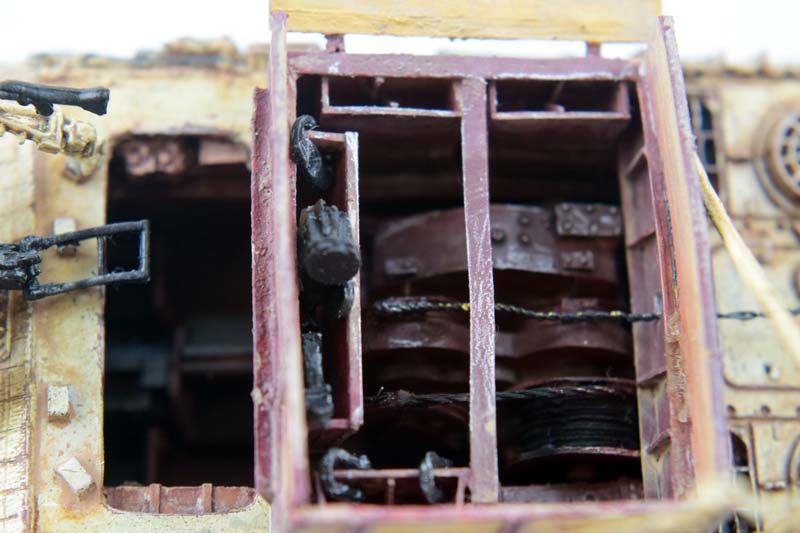
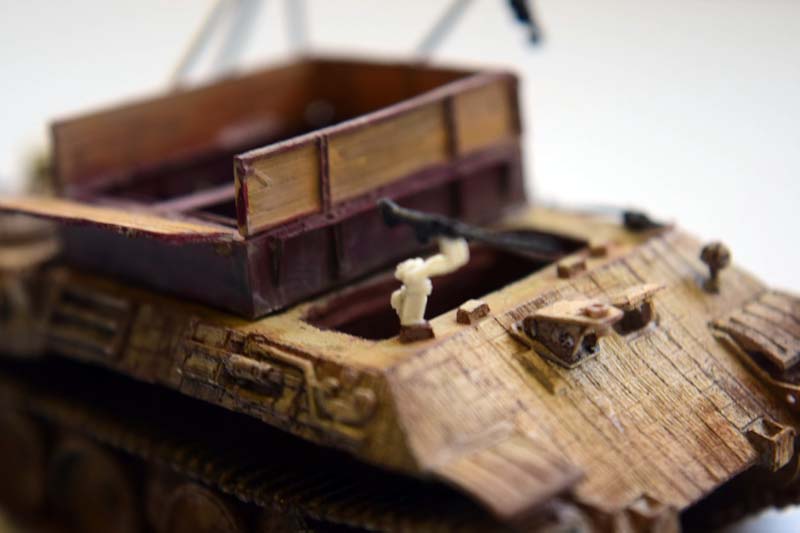
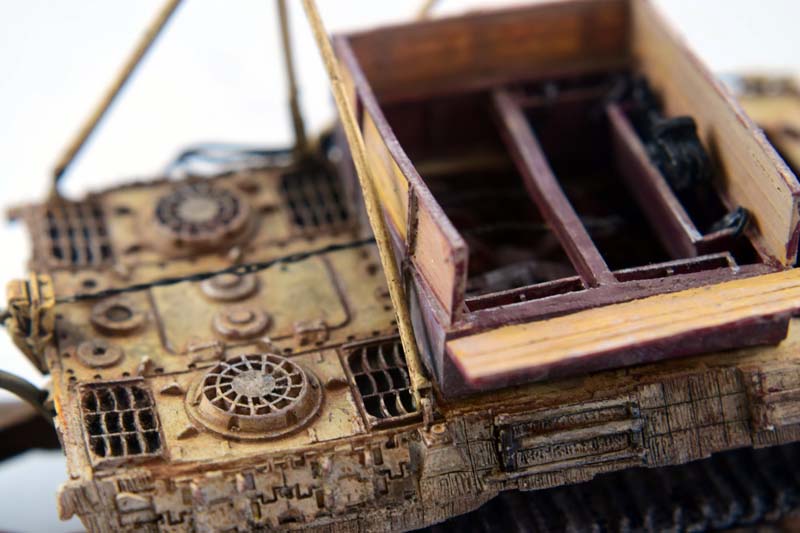
The interior is pretty well detailed, but has relatively few parts making it up. There are some soft details, though: some of the storage boxes and whatnot were not perfectly cast. The drivers compartment is nice; the radio, the instrument panels, the transmission house, etc. are very well done. Most of the winch assembly is a single piece, with some impressive detail; its a shame most of it is hidden once the tank is completed.
I added most of the larger details to the hull (with some of the more fragile ones left out), and did the painting and weathering. I used Mig Ammos Dunkelgelb, followed by several brown filters; I used Vallejos oil stain weathering product on the engine deck, and several light brown pigments on the sides and top to depict dust. The lower part of the hull and the running gear received a generous amount of mud (prepared from pigments mixed with turpentine) in several layers and colors; the last step was to rub some metallic pigments onto the tip of the dozer blade/earth spade (it was mostly used to provide a "grip" for the vehicle while pulling a heavy vehicle, so "spade" is probably a better term for it). Since this is an engineering vehicle I wanted to make it properly dirty and oily.
Only after all the weathering was done did I glue the interior in, and chipped the bottom away a bit with a scalpel so that it did not stick out from under the tank. (It was quite thick, and could be easily seen if viewed from the front or back.) I would suggest adding the guide rollers for the cable onto the back of the hull at this stage; I left it off until I added the cables themselves, so I had to paint that part separately. (You will need to drill a hole for the cable if you plan to install it.)
The gaps between the interior and the hull sides were filled, and I carefully painted the surface of the filler with primer red from above using a 00 brush. (Since everything was already weathered in the inside, any fresh paint marks stood out like a sore thumb )
I think completing the hull before installing the interior and small, fragile parts worked out overall, but I did run into some difficulties of my own making. It was also a bit more tedious to add the exhaust ports after the dozer blade was installed, for example, and I already mentioned the gap issues, so plan ahead with the build. It would probably be easier to glue the insert in, fill the gaps, paint, and then start weathering of the interior, followed by the painting and weathering of the hull.
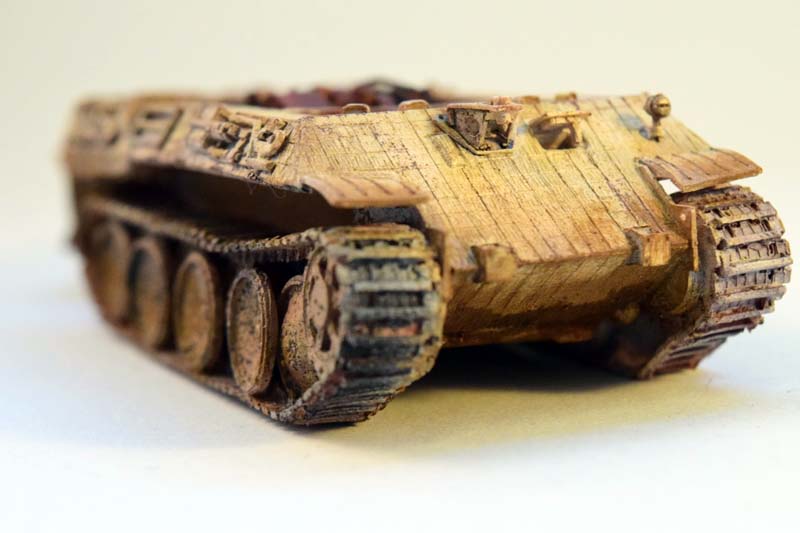
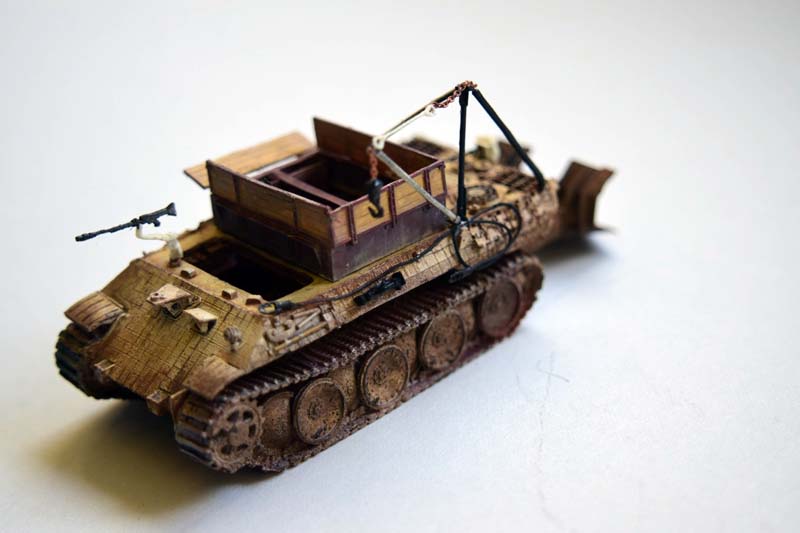
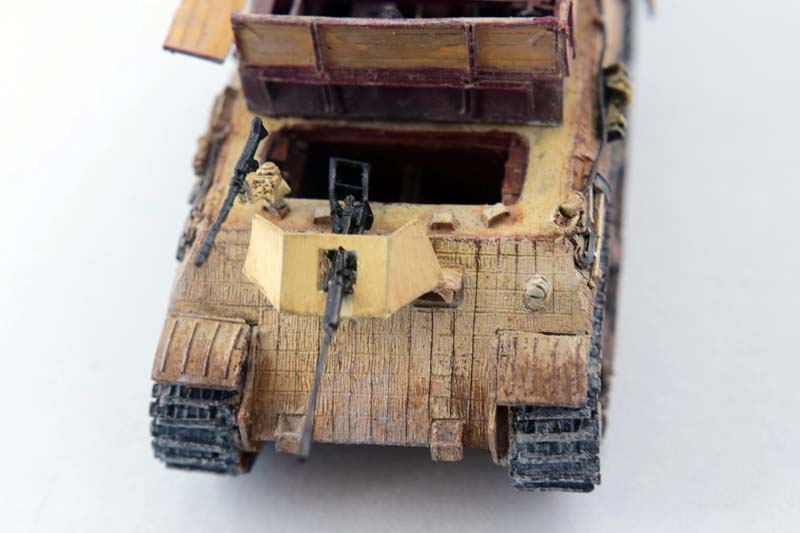
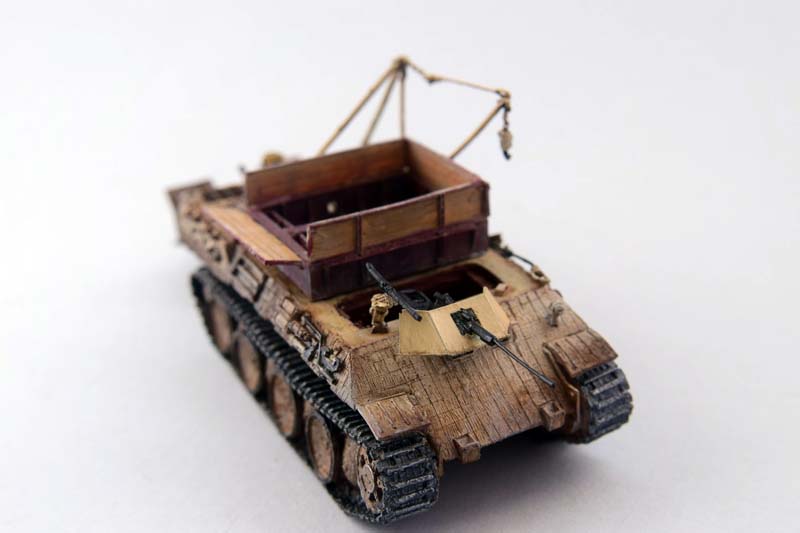
Once most everything was finished, I continued with the raised frame and wooden planks around the winch assembly. Since most of the engineering vehicles were converted from broken down Panthers, I used primer red on the metal - this particular Bergepanther was not given an overall paint coat after assembly. The wooden sidewalls were painted Tamiya deck tan, and I used burned umber oil washes to make it look like wood- the texture is really nicely done. There are wooden planks covering the interior provided, but I did not use them, as I wanted to display the winch. There is also an optional armor plate for covering the crew compartment but I also left it off. I've put most of the towing hooks and other equipment into the storage bins around this frame; they should be mounted on the hull itself, but I decided to fill up these empty spaces with haphazardly stored equipment instead.
One word of warning: when installing the frame around the winch, make sure that the side with the hole is facing backwards; this is where the cable from the winch goes through.
I have done most of the detail painting and weathering steps at this stage, leaving the fragile parts off until the last moment. The MG-34, the 2cm autocannon and the crane was added on the very last step.
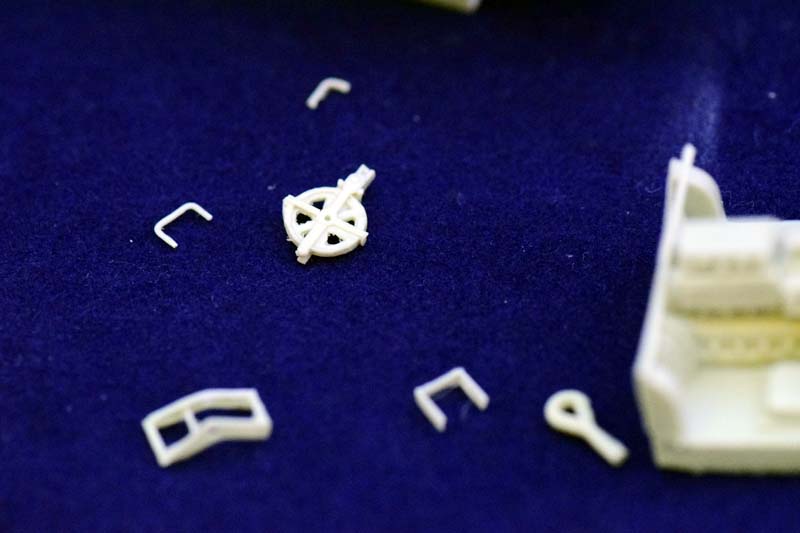
The tank had some weapons for self-defense: a 2cm KwK38 cannon, and one or two MG32s (depending on the variant). These are very nicely done resin pieces, but they are very fragile. If I had a plastic 1/76 MG for substituting the resin one I would have switched them, but as it was it looks perfectly fine. The resin barrel for the 2cm is also good (straight, in-scale); just be very, very careful not to break it. The frame of the gun was somewhat twisted; I was not sure how I could correct it, so I left it was it was.
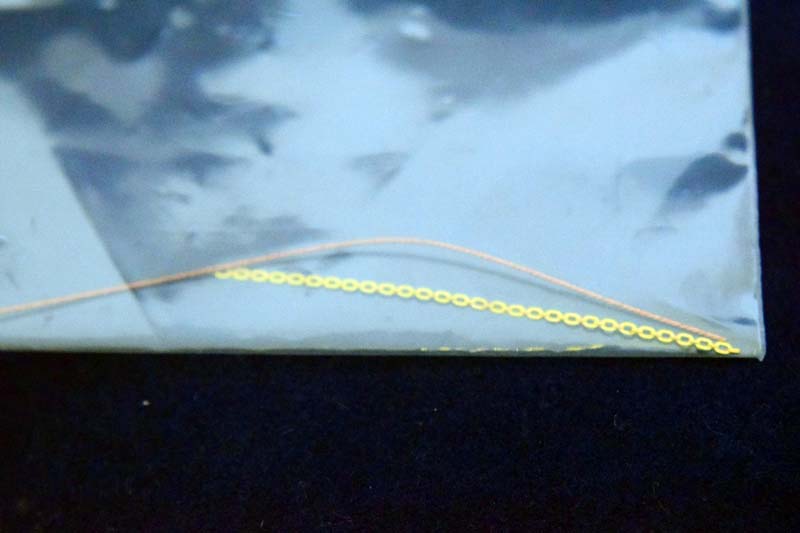
The crane went together easier than I expected. I was prepared to display it folded up, and call it a day, to be honest. I was pleasantly surprised how easy the assembly was. The only bit Im not satisfied with -which is my fault- is the slight angle the top chain has in the middle -obviously it should be ramrod-straight. If there is a small weight on the hook, the tension straightens it out, so I might actually find something to hang on it to make it look a bit more realistic. I assembled the crane in situ (in place), but it might be a better way to assemble vertical parts (two rods and the connecting chain forming a triangle) separately, laying flat on a surface first. There is a similar problem with the section of chain with the hook at the end: the resin hook is not heavy enough to pull the chain down. (I have a Revell Famo engine in my spares box; Im thinking about installing it to deal with both of these issues.)
Looking at historical photos and larger scale models I have to say the pulley and chain system is simplified considerably on the crane. We do get several hooks and pulleys, but most of them are simply stored in the hull; I'm not sure how they should be displayed in-use. At the end of the day I just went with Milicast's instructions.
Overall the kit was not as difficult to build as I thought it would be after looking at the instructions. It is a pretty good representation of the Bergepanther, and you can customize it to resemble several different variants easily. The scale is somewhat archaic (not many new 1/76 kits are being made as 1/72 has seem to have won the competition), and the model itself is quite old-school in its design, but this does not mean its not a good one. Anyone enjoying Braille scale resin kits will like this model; and if you put in extra time for research, the model can be made into an outstanding representation of the real thing.
Addendum: reviewing the photos I realized I forgot to add the wooden beam to the side of the vehicle. It shall be installed promptly.
SUMMARY
Highs: great detail, interesting subjectLows: 1/76 scale, some casting issues, some fit issues, difficult to use instructionsVerdict: recommended for Braille enthusiasts (with experience working on resin models)
I am a biologist by trade, and as a hobby I've been building scale models for the last twenty years. Recently I started to write reviews of the models I bought. These reviews are written from the point of view of an average model builder; hence the focus is on quality of the model, how easy it is to...
Okay, this is a start, so double the size and finally give us a 1/35th Bergepanther! Come on Dragon and Trumpeter, get with it and quit with the "infinite variant" theme and those laughable "paper panzers" that they seem focused on offering us!
There is a good resin conversion for 1/35, and ICM has a couple of versions; as does Italeri. Are those not good enough? (Never actually seen them, so I can't really comment.)
Nice job on the build and the review Andras, it looks a bit of a challenge with that number of small resin parts. You're right that it does look a bit old school, and looks as if it suffers a little from the same problem as that resin Centurion you passed to me with the tracks not being quite straight. Hard to do anything about it though.
Dragon's small Panthers all have that location mark on the back plate that looks like it is for the Bergepanther shovel, but if they ever get around to producing it, it probably won't have zimmerit...
On the bent chain run, perhaps just clamping it dead straight and then giving it some hairspray or some kind of glue, might that be enough to hold it straight?
Thank you Matt
These are "garage kits", so one needs to accept their limitations; but having built it I'm quite happy I have it; it is a unique vehicle.
I'll try to hang something on the hook (an engine, for example as I mentioned in the review), but we'll see. I don't want to overstress the crane's structure. Perhaps a small weight and some glue together would solve the issue.


Comments