

1⁄35Dust Cloud On The Horizon
15
Comments
Setting
Never having tried a desert diorama before, I decided to give it a go after the release of the Italeri AB41. I thought it would be interesting to tackle an unusual subject Italian forces in N. Africa and a desert locale. I contacted R&J Enterprises after finding some rather fine resin figures by Model Victoria, an Italian company, on their web site. I ordered an anti-tank gun and three man paratrooper crew set, a set of another two paratroopers, and for the AB, a trio meant for a Semovente. For the AB, I got the Eduard PE set and some resin wheels from Hussars through Air Connection.I did some web surfing for Tunisian landscapes as this was the area I decided upon for the diorama. The rather rocky, hardscrabble type terrain looked interesting, so I picked up some large foam rocks ( These are several different size/shape rocks that are a dense gray foam of some kind. You cut them off the sheet individually) from Scenic Express and some plastic cactus from Pegasus. Im always on the lookout for groundwork materials, and stumbling across the cactus plants was a real find.
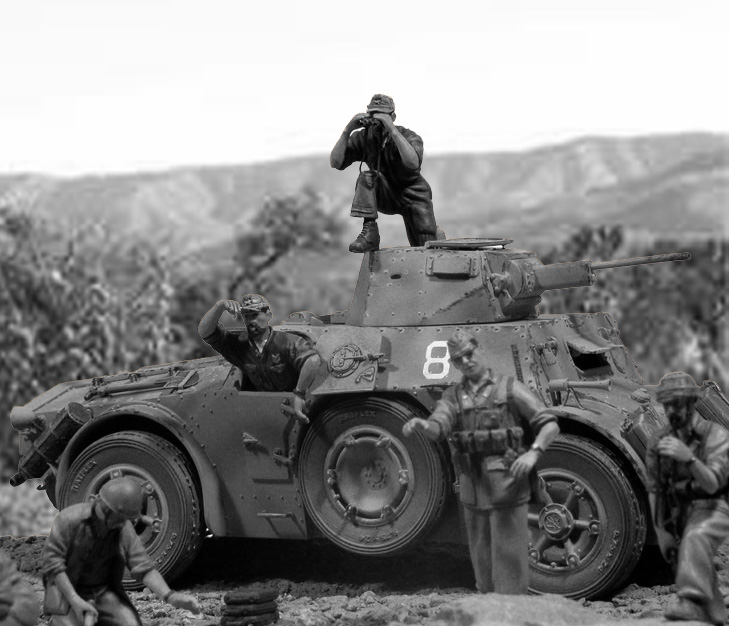
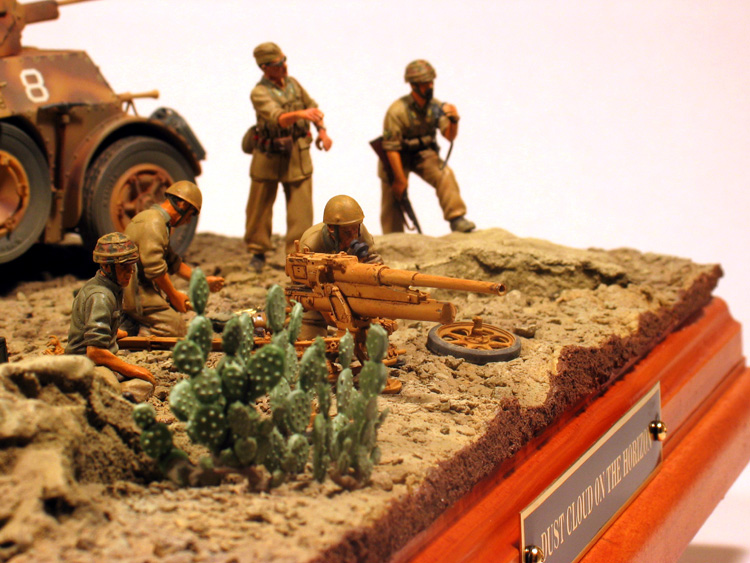
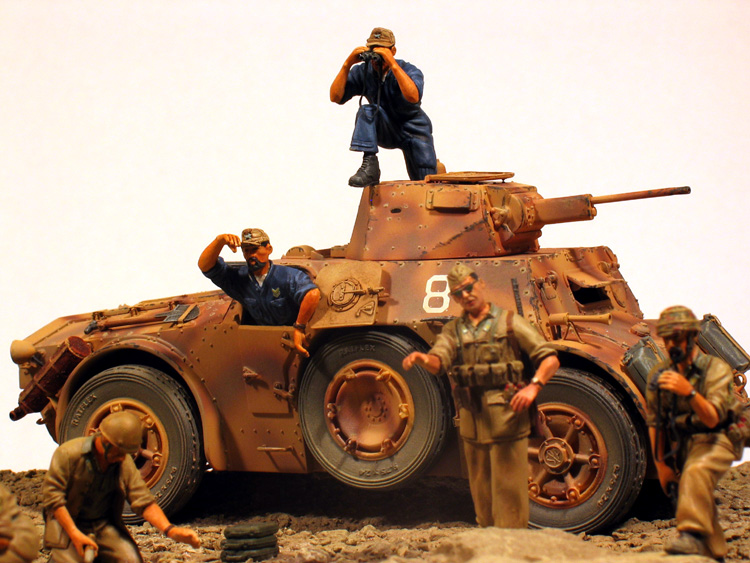
The composition was pretty straightforward. The gun crew and infantry would be placed among the rocks and cactus at the front , intently gazing toward the viewer. Behind the gun, the AB crews focus would also be fixed on the same area. The title conveys the reason: Dust cloud on the horizon. In the desert, this can mean large forces are on the move.
Assembly
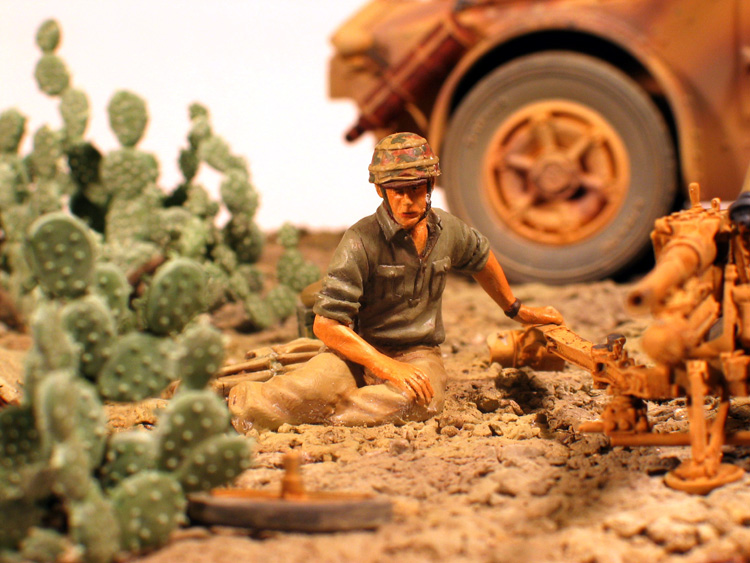
I began by screwing together two separate wood plaques. I did this because the nature of the piece meant there would be almost no vertical relief, so I wanted the base to be a bit beefier. After several coats of cherry colored stain, the base was sealed with water based polyurethane. I do the stain and polyurethane coats one coat per day, letting them set up while Im working on figures or whatever. One of the most useful items I have for building dioramas is a round, plastic Lazy Susan my wife gave me. It allows me to turn the base 360 degrees without touching it. I do all my work with the base sitting on that little helper.The foam rocks were cut from the base sheet. I selected appropriate ones from the seven individual pieces that came with the sheet, checking to make sure the one at the far right was the correct height for the paratrooper with his leg up leaning on something. Once their locations were set, I fixed them to the wood base with epoxy. Next, some Sculptamold was troweled on and kitty litter sprinkled onto the wet Sculptamold and pressed into it with my hand. Working quickly (Sculptamold doesnt have much of a working time its only drawback) I located the finished figures, gun, equipment, and the AB on the base and pressed them in for a proper sit before removing them. After masking the wood base, a layer of Tamiya Buff was airbrushed over the entire groundwork, followed by a lighter dusting of Tamiya Neutral Gray. Not knowing if the foam rocks would melt if I used an oil based enamel for the base coat, the acrylic would act as a barrier for the wash. After that, a wash of Burnt Umber enamel and some drybrushing of lightened Buff finished the groundwork. Next was the cactus. These are a soft plastic on sprues. The sprues contain two types, one of which, the clump (pear?) cactus being the type seen in photos of Tunisia. I purchased one set of the large, and one of the small cactus. The pieces are exactly the same, just different sizes. While still on the sprues I brushed on a base color of pale green, followed by a wash of still paler green. The edges were washed a second time with a more potent density of the paler green. Then the fun really began. I tried a light drybrushing to pick out the individual thorns, but it didnt look very good. So I took a #00 brush and painted each one individually, on both sides. As tedious as that was, it was necessary. I drilled holes into the groundwork and used CA gel to fix the cactus to the base. The cactus gave at least a bit of color to an otherwise bleak landscape.
I soon discovered there is precious little in the way of references for Italian troops and equipment. For some reason, the vast majority of info on the N. African campaign is about some guys named Montgomery and Rommel, whoever they were. I endeavored to persevere, and used what reference material I could ferret out. I did spend some money on a little AB41 reference book which was of some value for fittings, headlights, etc. My personal feeling is that the research phase of a diorama is just as important as the build phase, and I devote a significant amount of time to it. Im sure I miss or misinterpret something or other along the way, but I really try to get as much right as I can. Researching a piece is enjoyable to me and I always learn something, whether it be a style of architecture, an unusual variation of a uniform, or the texture of a rock strewn desert. This is the history part of the hobby, and I feel I owe it to the viewer to have done my due diligence in regard to historical fidelity. Having said that, my research couldnt verify a particular AB in the area I was depicting, so there is definitely some license used. Were there ABs with gas cans on the front glacis? Yes. Was there a vehicle with a white number 8? Couldnt say. I had more luck with the landscape. The desert hasnt changed much, so contemporary color photos work just fine. I even found some rock formations very close in shape and color to the ones I ended up using.
As with most PE sets, I used about half of it on the AB, mostly the exhaust and tool fittings and the engine doors clamps. Those clamps require removal of the kit blobs and some Zen to keep calm while they are assembled, since each clamp consists of four PE parts and a miniscule length of stretched sprue. I suggest an absence of caffeine when attempting these little devils. The good news is when finished they look mahvelous.
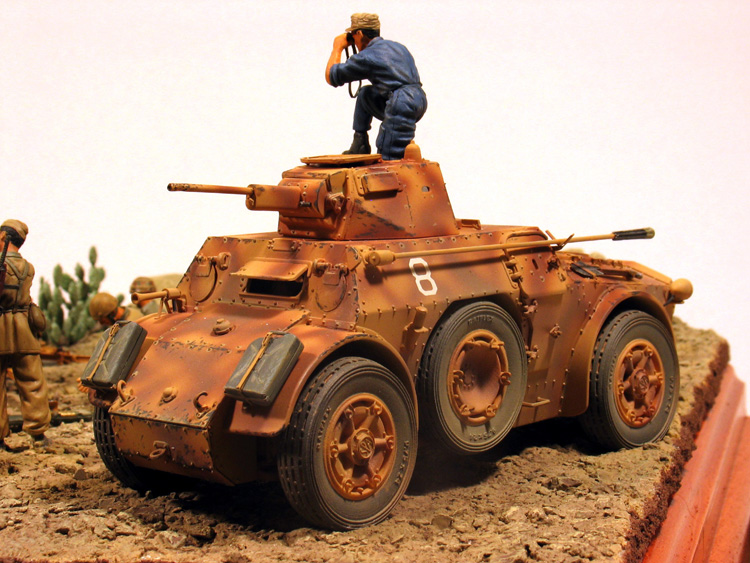
The kit itself has some quirks, the odd spacer bars and such, but it went together without much fuss. There is some seam filling to be done, but its not a big deal. Using my reference book as a guide, I reworked the claxon on the front of the AB by cutting off the horn and gluing on a piece of stretched sprue and some scrap PE. Solder wire was used to represent wiring. Despite the frustration from many modelers about brushing Tamiya paints, Ive always used Tamiya German Gray for any rubber elements. I simply heavily dilute the paint with water on an aluminum foil palette and carefully brush on the color with a heavily loaded brush. The trick is to keep the paint very wet as you proceed. I rarely need a second coat using this method. The Hussars resin wheels are nicely detailed and I hate using those soft vinyl tires anyhow. I had a heckuva time getting the mold release off the resin, however. I washed them with detergent at least three separate times and still, there were spots where the paint just didnt want to stick. Since I was going to have the commanders hatch and the top portion of a side hatch open, I glued in some styrene sheet wherever I could see daylight from inside the vehicle. There is plenty enough detail inside the turret if its going to be mostly filled with a figure. I brush painted the interior flat white. The exterior was airbrushed with Vallejo Sand Yellow as a base, then a squiggly camo pattern was airbrushed over the base in Tamiya Red Brown. My references assured me field applied camo was not unusual, so I went for it. Over the bottom and rear of the AB I sprayed Tamiya Buff for a good coating of dust. I even did a little of the now ubiquitous chipping, figuring that if it made sense anywhere it would be in the desert.
I had left the rear headlights (Rear headlights? Sounds strange.) off the vehicle so I could try a new way of making the lenses . I had checked prices for a pair of MV lenses in the size needed, and decided that 20 bucks was a bit steep. Instead, I ground-out the plastic lenses, painted the interior with silver enamel, and after the paint dried wedged each headlight into a pair of tweezers so they were sitting level, the openings facing upward. Then I simply took some undiluted white glue and filled the openings. When the glue dried it was fairly transparent. Total cost? Id guess about 2 cents worth of glue. The lights were then attached to the mounting tabs on the rear of the vehicle with CA and brush painted to blend with the rest of the AB. Some thin soldering wire was added from the lights to the hull as wiring.
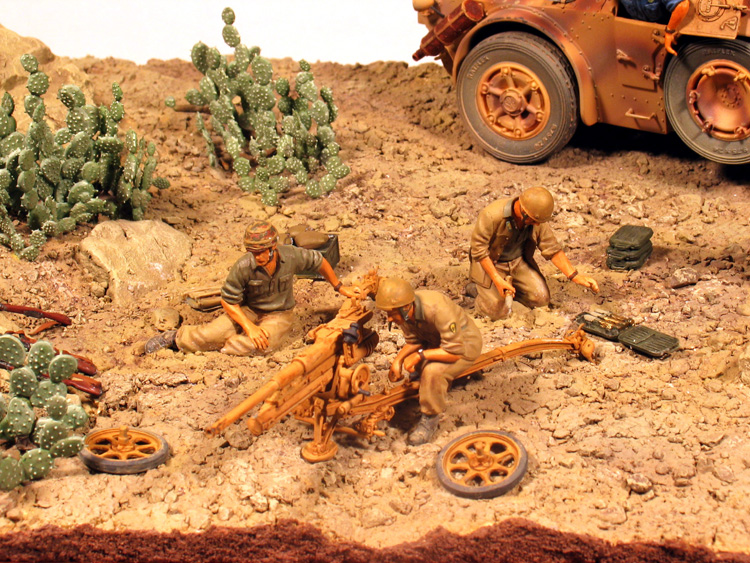
The little anti-tank gun was a jewel. Very few parts and looks convincing when assembled. It was painted with the same base color as the AB and washed with burnt umber. Some wear marks were added with a lead pencil. Not much more to say.
Figures
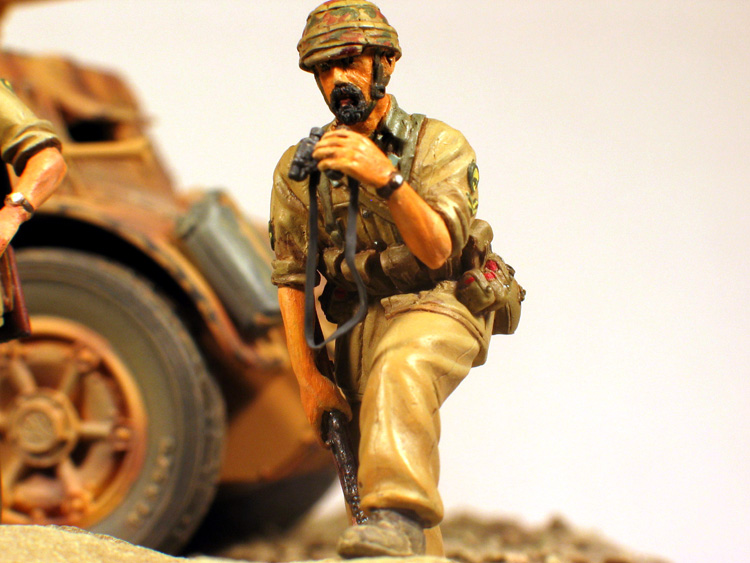
This was my first diorama that didnt require a lot of re-posing of figures. I had an idea of the poses I wanted, and the Model Vic figures were already there. The only things I did were relocating the arms of the crew guy hanging out the side hatch, and sawing off the bottom of the driver figure to get him to fit inside the hull. Hes barely visible in there, but hes there. I found a military replicators site on the web and used that as a uniform reference, along with the box art and instructions inside. The uniforms and equipment were done with Vallejo acrylics, and the skin tones done with oils. Some nice touches on the Model Vic figures were wristwatches and the sunglasses worn by the officer. I added neck straps for the binoculars with lead foil.There was a lot of ancillary equipment included with the gun and crew set. An open ammo container is meant to be placed near the figure holding a round and reaching for another. However, the open container has all the rounds in there, so where did the round in the guys hand come from? I drilled out one of the rounds in the container to eliminate the confusion. The extra ammo containers, a box of some kind (?), crew personal weapons with lead foil slings, and some canteens were painted and added. There was also a nice gun cleaning rod and a shovel, but things were getting a bit cluttered so I left them out.
Wrapping Up
It was fun trying a desert diorama. I wanted to convey the moonscape aspect of war in such a landscape. Whether I succeeded in this or not is up to the viewer. It was somewhat disappointing, despite combing through my admittedly limited reference books and some heavy duty Googling, to discover how thin the reference material is. The Model Victoria figures and pieces were just what I needed, and the Italeri AB41 was a nice change from my typical fare of Shermans and such. As per usual, this piece concentrates on the human side of conflict. I wanted the figures to convey a vague sense of foreboding. After all, that dust cloud is coming from the direction of the Aussies!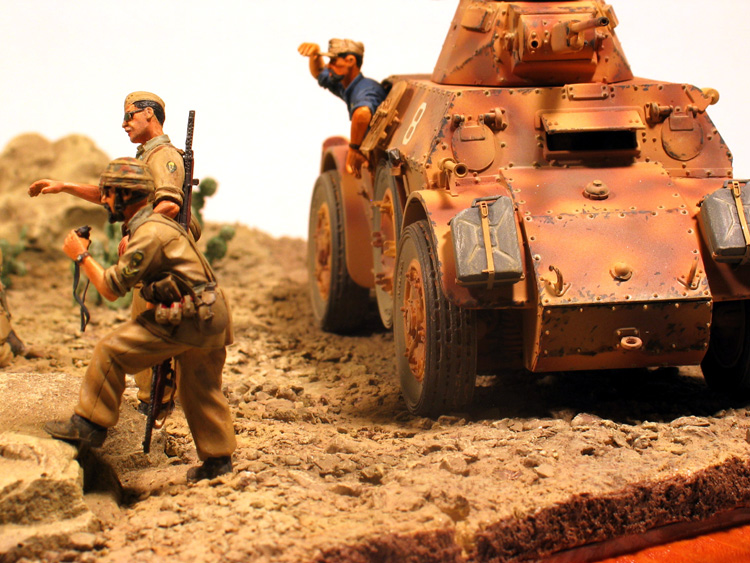


About the Author


Comments

Well Baz, this turns my topsoil!
The subject matter piques the interest alone...
The placement of all looks quite natural, and the ground work I echo looks amazing. I'd love to have a bash at a desert dio~ Hmmm... were Grant/Lees used there?... :-)
JUN 07, 2006 - 06:37 PM

Hi guys,
Those Model Victoria figures were irresistable - they are great, huh?
Despite being a pain in the behind to paint, the cactus really adds to the desert feel, I think.
And, you bet, Grants and Lees were roaming around out there.
Regards,
Barry
JUN 07, 2006 - 11:06 PM

Barry great work, the layout and story line are great!! The vehicle and figs outstanding. those are some sweet figs and now i want one of those vehicles too. Thanks for sharing it with us. cheers Kevin
JUN 08, 2006 - 02:01 AM

Very nice! Tells a great story.
The Italian tanker uniforms add a nice splash of color in what would otherwise be a fairly dull, tan/brown scene.
Who makes the cactus? (or did I miss it in the article?)
JUN 08, 2006 - 08:17 AM


hy just a couple of questions
one is that a british 2 pounder you have there? if it is what are the italians dooing with it if they stol it they found alot of amo with it and 2nd only a minor thing sine the action is easily reconizable of taking place were every one is looking shoulldnt the turret of the armoured car face that way ??
overall this is it great modelling abileties in this model
simon
JUN 09, 2006 - 03:16 AM
Hi Simon,
Well, um, the gun is an Italian 37mm anti-tank gun. It came with the crew and ammo and stuff.
I suppose the turret could've been traversed, but I figured it was more important for the crew to be "traversed".
Thanks for the comments,
Barry
JUN 11, 2006 - 09:44 PM

Congratulations Barry!!!
I'm always pleased to see that someone from abroad is going to depict a scene involving the Italian Army. I love the lanscaping and how do you tought the scene too. I model almost only Italian Cavalry subjects and if you went for a Tunisian dio, what you have portraited is an AB41 from the "Raggruppamento Lequio" which collectged the remaing AB from the III Gruppo Corazzato "Nizza" and the R.E.Co. "Lodi". You choose the right tires (the Lybia ones), but the camo scheme you painted was not used in N.A. at any stage of the campaign, and the white number 8 on the side was never used on our armoured cars. The only ones numbered had it black and belonged to PAI (Italian Africa Police) but in that case it's necessary to move the antenna on the other side and use the "Artiglio" tires. For the rest only one word: excellent!!!
Ciao
Fabio
JUN 14, 2006 - 09:55 PM
Fabio, Fabio!!!
Where were you when I was struggling through all this?
But seriously.....
I figured I was on shaky ground for the unit/markings, but just couldn't find anything. Frustrating.
Did I at least get the figures somewhat correct?
Thanks for the (correct) history.
Barry
JUN 15, 2006 - 12:17 AM
Barry,
quite likely I was sunbathing somewhere in the middle of nowhere ...
For what concerns the figures in my view they are ok (and much much more better than the ones I'm able to do).
Ciao
Fabio
JUN 15, 2006 - 12:27 AM
Copyright ©2021 by Barry Gazso. Images and/or videos also by copyright holder unless otherwise noted. The views and opinions expressed herein are solely the views and opinions of the authors and/or contributors to this Web site and do not necessarily represent the views and/or opinions of Armorama, KitMaker Network, or Silver Star Enterrpises. All rights reserved. Originally published on: 2006-06-06 00:00:00. Unique Reads: 14389

WEB HOSTING BY


Copyright ©2021 Armorama and Kitmaker Network, a subsidiary of Silver Star Enterprises
All Rights Reserved. Please read our Conditions of Use and Privacy Policy.
All Rights Reserved. Please read our Conditions of Use and Privacy Policy.