

Solvaset Decal Solution
9
Comments
Solvaset Described
Solvaset Decal Setting Solution. Just the name of this powerful chemical is enough to send some scale model builders running for cover. Why you may ask? Well, many say its overpowered, destroys decals, damages paint; pretty much everything negative that could be said, has been said. Many modelers, however, who have learned to handle and master the use of Solvaset will swear up and down that there is no better decal setting solution on the market. 904-470 Solvaset Decal Setting Solution is made by Walthers who specialize in Model Railroading. Their sales blurb for Solvaset goes like this: "For the most realistic models, decals should look like they're painted on. Getting professional results is easy with Solvaset. It actually softens the decal film so it snuggles down to the surface and stretches over details, such as rivets, without hiding them. Also eliminates air bubbles, white spots, draping and silvering. Just brush it on and Solvaset does the rest!" Solvaset is a 'hot' decal solvent; it works by apparently melting the decal onto the model and surface details so that it has the covering properties of paint. Compared to Solvaset, Micro-Sol and Micro-Set are much weaker products.Solvaset, The Tutorial
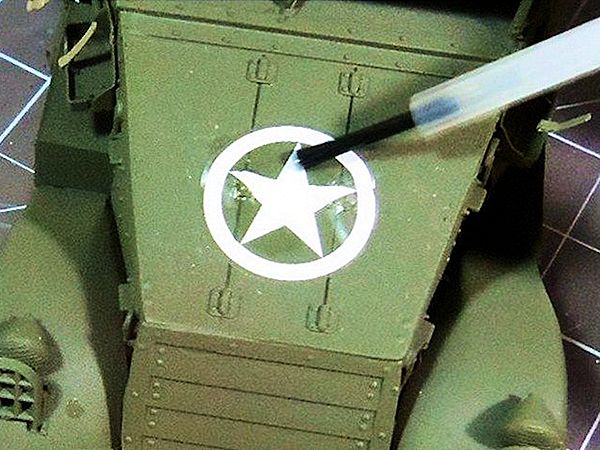
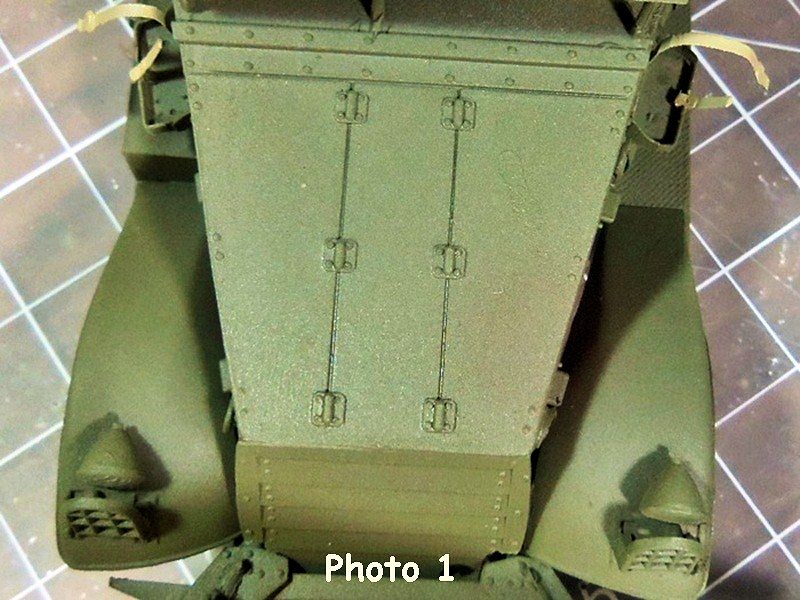
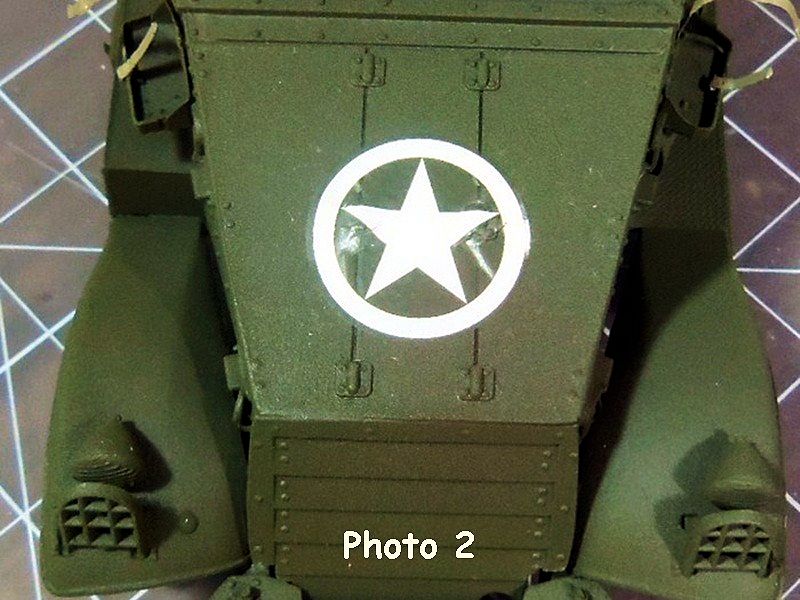
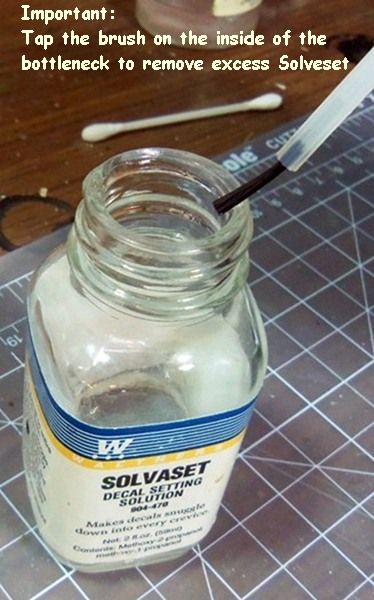
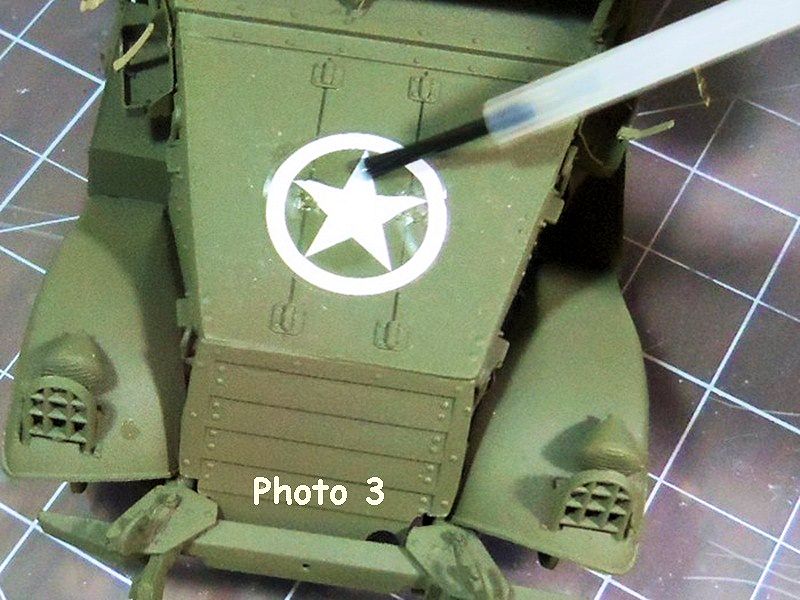
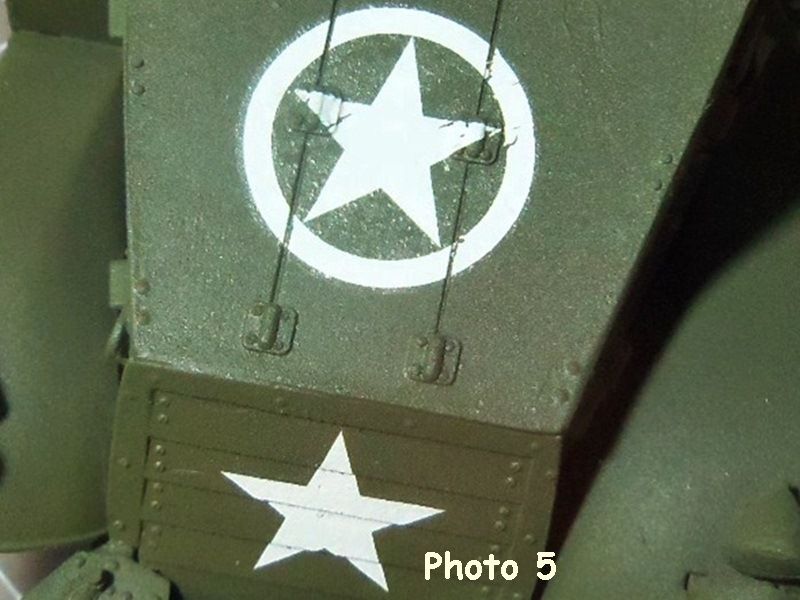
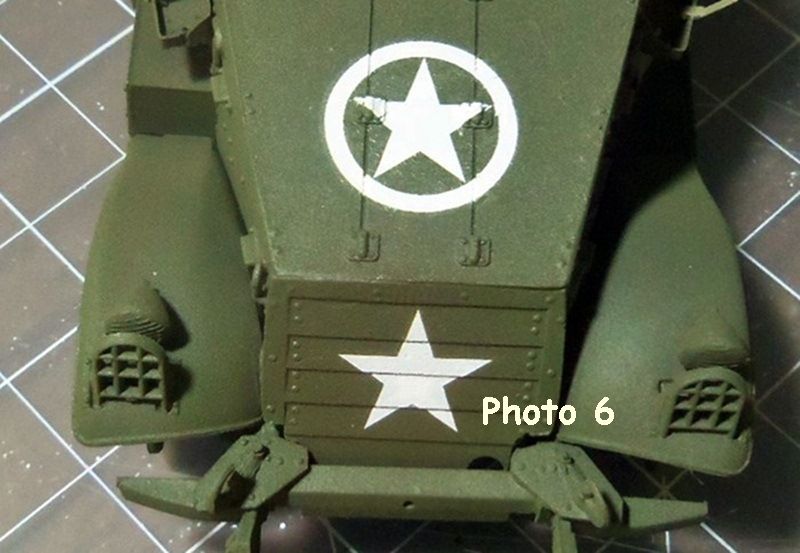
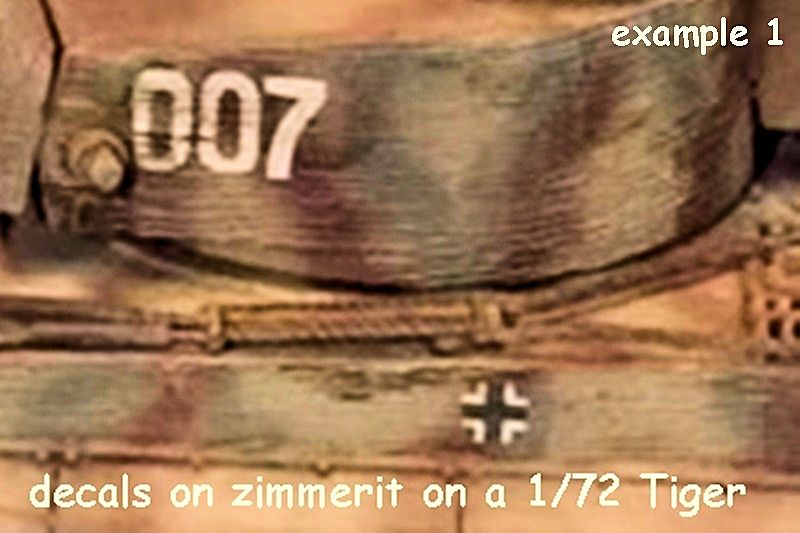
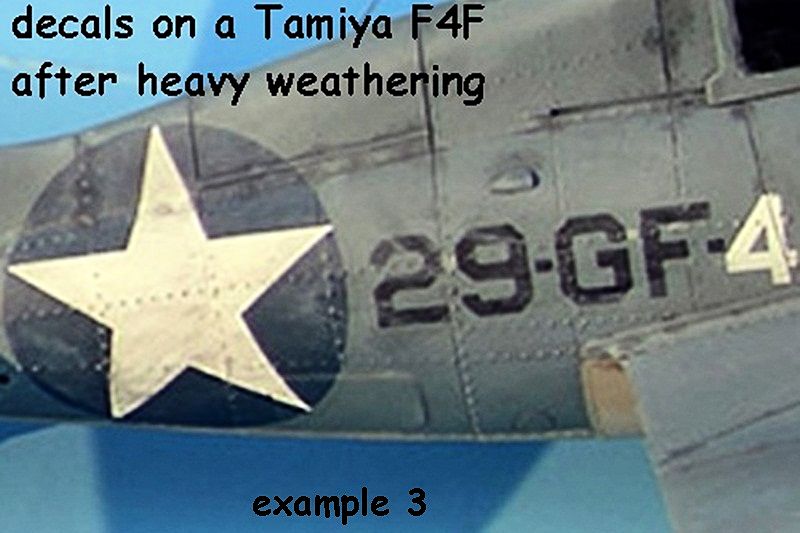
Now for this study, I've chosen one of my latest builds to demonstrate the proper use of Solvaset. We will be applying the U.S. white star marking to the hood of an M3A1 Scout Car, the decal being from a Zvezda set for the M3A1 kit. It will cover a couple of hinges along with a pair of channels in the hood where the body panels hinge, so there is plenty of heavy surface detail that it will have to cope with and conform to. In Photo 1 you can see our working area, this example being painted in enamel paint and then airbrushed with a couple of light coats of Johnsons Future (also known as Klear). I strongly recommend that you use Solvaset on top of a coat of Future, or other clear coat, as this helps prevent silvering and gives your base coat of paint more protection from discoloration and other problems that may result from using Solvaset. I would strongly recommend against using Solvaset directly on to your paint as it can affect the colour. In Photo 2 we apply the decal as directed by the instructions. Here you can clearly see the clear decal film in the center sitting on top of the surface details, most notably the hinges. After the decal has been allowed to settle for a few minutes and has dried, it is time to start snuggling it down with Solvaset. Now here is where the real secret of using Solvaset comes into play. RULE #1 is to use it sparingly. The built-in brush that comes attached to the bottle lid will easily hold too much Solvaset to put on your model in one go. It is therefore important to run the brush against the edge of the bottle neck a few times in order to remove excess liquid, as shown in the photo (making sure of course that you dont knock the bottle over!) You want to add only a little at a time: its a lot like dry brushing. If there is too much liquid on your brush you run a greater risk of damaging your paint finish as well as maybe floating the decal out of position. Alternatively of course you can ignore the in-built brush and use your own finer paintbrush. I prefer to use the built-in bottle brush myself as its much handier and you always know where it is. My Golden Rule is to use the Solvaset as if I was dry brushing, not painting. Too much and you run the risk of at best discoloring your paint, or at worst eating right through the paint, and potentially this can happen even with a clear coat. So we can appreciate the bad reputation it has with some. In Photo 3 we apply the Solvaset directly on to the decal in small brushing motions. Try to keep the Solvaset on the decal and just barely go around the edges of the decal to minimize any problems with your paint finish. At this stage do not reload your brush with more Solvaset unless its really necessary with a large decal. As can be seen in Photo 4, as the Solvaset is quickly brushed on, the decal will start to pull down on to the surface details of the model. At this point you must be careful: as the decal snuggles down it softens, and becomes weaker, so if you keep brushing for too long or too vigorously, your brush can start to damage the decal, causing tears or holes. Now set the model aside for 2 or 3 hours. Come back when the decal is completely dry and check the way that the dry decal is now sitting on the surface detail of the model. If it still looks like it is sitting on top of the detail, rather than being part of the surface, repeat the last step as necessary until the decal is well and truly snuggled down and it looks like it is painted on rather than stuck on. Remember, too much Solvaset at any one time can damage or destroy your base coats, even those protected by Future or other clear coats. I know this has been mentioned already, but this is the crux of the matter. Go slow, have patience. As can be seen in Photo 5, the Solvaset has now pulled the decals down on top of the hinges pretty well, and also the white star on the radiator slats has drawn down over the minor details. Also visible on the right and left points of the star is some cracking that occurred due to brushing after the decal had already become too soft. The gap between the panels was just a little too wide for the decal to cover well. I used a toothpick to carefully press the dry decal into these gaps between a couple of the Solvaset applications. In Photo 6 we can see the finish line; I've fixed the minor cracking damage to the decal, and those gaps in coverage across the body panel joins, with some careful application of white paint. At this stage there is almost no silvering, and we have yet to add our sealing top coat of Future. In Photo 7 we can see our finished product after the coat of Future, the weathering and a final coat of Testors Dullcote. Note that this photo was taken in bright sunlight. The last three photos show examples of some other builds on which Ive used Solvaset. I have been using this product for about a decade and it is one of my primary tools for dealing with decals. I have heard that some aftermarket decals, such as those by Microscale, can have problems with Solvaset, but having not used any of that manufacturers products I cant comment directly; Id always recommend testing on aftermarket stuff before using Solvaset on any important builds. I have certainly used Solvaset on decals from Tamiya, Dragon, Academy, Revell-Monogram, Zvezda, and PST kits without any problems. I wrote this piece as a starting point for those who wish to know more about using Solvaset, based on my own experience over the past 10 years. Everyone should of course build on their own experiences, using others knowledge as a stepping stone. Thank you for reading and I hope that some have found it useful. Delbert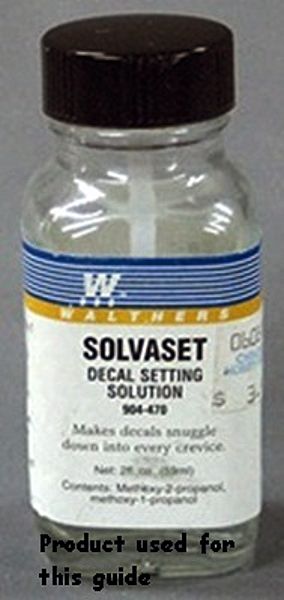


About the Author


FROM: PENNSYLVANIA, UNITED STATES
I'm 51. I've been model building since Dec 2001 and I build everything from wingy things to ground hugger's. esp WWII era. also built a car or two. Some people think my stuff isn't too bad.
Comments


Good to know Delbert. Never heard any one complain about Solvaset personally, though I might have been one of them too if not for this....
NOV 08, 2012 - 03:33 AM

Delbert,
Nice job! I still have my first bottle with a sticker from City Cycle (my small town's first hobby shop) that closed in the late 1970s. It cost 49 cents! Back in the "good ol' days" it was the only thing that could make the thick decals by Walthers and others settle. I think I first read about it in Scale Modeler magazine or Military Modeler (not today's Military Modelling) magazine.
Solvaset is great stuff; I use it when Micro Sol and other solutions can't do the job. But Solvaset is "hot", and can hurt some decals. It completely melted the kit decals of my Monogram P-40 several years ago. They were completely deformed but were perfectly settled over all the surface detail!
Thank you for this tutorial.
NOV 11, 2012 - 02:13 AM

Delbert:
VERY COOL and nicely done! I'm one of those guys who has had a lot of issues with decals over the years and frankly now try my darndest to just NOT, in favor of spraying a stencil whenever I can. Never used this stuff - only the apparently much-"cooler" or weaker Micro-Sol. You pin-pointed the issues: decals need to conform down into the details, and decals trap air-bubbles and "silver" on almost any surface not shiny-smooth. As I am an armor-builder ... there's precious little indeed which is all shiny and smooth! So Future comes in. But that's an added layer followed by need to add yet another dull-coat layer.
I'll have to try this Solvaset - from what you show, it does the trick fair well!
I would offer a suggestion: As your photos of that 'track show, you can still see the excess film around the decal - albeit much less silvered then would be the case otherwise. THIS is actually my greatest issue with decals - I HATE seeing these film boundaries! It is actually reasonably simple to address for most decals: use a sharp pointy Exacto #11 or similar and cut closely around the pattern before you wet the decal, so that you transfer less film.
THANKS for posting this little note!
Bob
NOV 11, 2012 - 06:31 AM

Thanks Fellows. Just grabbed the camera as I was working and thought it might prove useful.
I tried to aim the article more at the beginner and intermediate builders. And the one thing I like in articles like this are lots of photos.
Bob, I'll remember the tip on cutting the edges, for the most part you can't see those edges unless you look very close under bright lights. which of course I used for the photos.
I have a couple of sets of PE stencils that I've used a time or two, but unless the area is perfectly flat I tend to get some fuzzy edges.
I always use Future before using Solvaset, less risk of problems, and I like the extra protection of the base color when I'm weathering. :>
Delbert
NOV 11, 2012 - 03:08 PM
Delbert, A well thought out, and presented tutorial on using Solvaset.
I've used it since it 1st came out, and quickly learned the hard way that's it's not for every decal, nor every decal application, as it's just way to hot compared to Microset and Microsol.
I've found that it's best for those thick stiffer decals, that require a hotter solvent then the Micro products. Using it on most of today's kit decals that would work well with the Micro system, including those thin after market decals, more often then not ends in a destroyed decal and could damage the paint finish as well.
I would suggest that for those who haven't used Solvaset to paint a piece of scrape plastic, seal as you would any model, then test a decal from the sheet you're planning on using, and see how those decals react to the Solvaset. Better safe then sorry. Once you've used Solvaset a few times, you'll have a pretty good idea of what you can and can't use it for. Just keep in mind that when not sure, test 1st.
Joel
NOV 16, 2012 - 11:36 AM

@Delbert Delbert,
Excellent feature. Im glad you had the foresight to bring us this tip while building your project and the biggest plus to this are that it is written with the novice to intermediate modeler in mind. Ive been using Solvaset for over 20 plus years and Ive lost a few decals along the way and all of them were due to lack of experience with this product.
Today I rarely if ever use this solution straight out of the bottle anymore and only when the decal(s) has decided to withstand the Mico-Set/Sol solutions and do battle with me! Then its tuff peaches cause your going down one way or another! When that happens and the decals dont snuggle down, I simply add a touch of the Solvaset to the Micro-Sol and place that on the decal(s) just as you mention via drybrushing.
I also dont use any of the solutions straight out of the bottle anymore either, I add enough drops of the decal solutions via a nose dropper to a small tin for one decal(s) modeling session. With the current standard of well-made and designed decals today I dont find myself using this solution as much as I use to but I still have a lot of yesteryear kits in the pile with decals that are sure to give me a challenge every now and again.
Another very important issue with applying decals that you mention is the application of a barrier used between the decals and paint and Future / Klear that you mention in your article is tops in my book. One of the best brushes for working with decals that Ive found is Floquils No. 2 880 series Silver Fox to help place and move decals around on the surface of the model.
Wish articles like this had existed back when I started modeling it would have saved me the trouble and expense of sometimes having to go out and purchase a second copy of the model I was working on just to replace the destroyed decals I lost on the first model!
~ Eddy
NOV 17, 2012 - 08:23 PM
Based on this tutorial, I tried Solvaset. I've used MicrSol for a few things lately and it came NOWHERE near the awesome decal melting/forming goodness that Solvaset did. Thanks for the heads up on how to use this properly!
JAN 11, 2013 - 06:57 AM
Copyright ©2021 by Delbert. Images and/or videos also by copyright holder unless otherwise noted. The views and opinions expressed herein are solely the views and opinions of the authors and/or contributors to this Web site and do not necessarily represent the views and/or opinions of Armorama, KitMaker Network, or Silver Star Enterrpises. All rights reserved. Originally published on: 2012-11-04 21:59:53. Unique Reads: 37081

WEB HOSTING BY


Copyright ©2021 Armorama and Kitmaker Network, a subsidiary of Silver Star Enterprises
All Rights Reserved. Please read our Conditions of Use and Privacy Policy.
All Rights Reserved. Please read our Conditions of Use and Privacy Policy.