

1⁄35Hybrid Tree Creation
For a recent diorama a variety of skills were combined to produce this tree.
1) You decide the height and get a thick balsa dowel almost the size you need the final tree.
2) You get thinner balsa sticks (always cylindrical in shape). Make sure they are smaller diameter than the main trunk and cut them to different lengths.
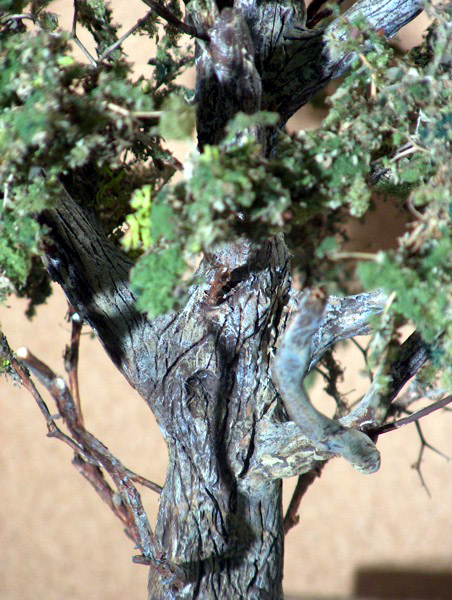
3) You attach the branches on the main trunk in different angles. Join them useing CA glue and a pin (snip a short piece of paper clip). Add the thicker ones lower and the thinner higher on the tree trunk.
4) Because some of the balsa branches will end up 'stiff straight and a bit thick', drill a hole in the end if you want and insert some thick 'twisted wire' parts in different and random angles . See the related feature here - Making Trees with Wire.
5) On the upper body of the tree, use some branches made of 4-7 pieces of twisted wire that will split half and half as they go to the end and give you 2 or more possible open ends.
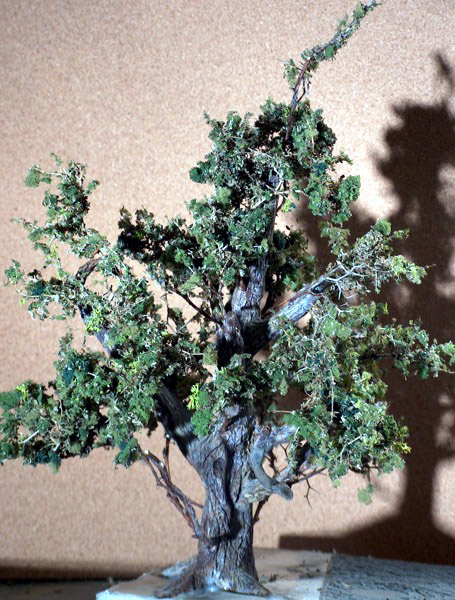
6) After basic armature of the tree (with balsa and wire branches) is ok add 3-4 triangle shaped pieces of balsa on the base of the tree to shape the feet/roots, as you can see on my pictures of the final tree.
After all this is finished you have to decide with what you will do for coverage of the armature. Some kind of modelling clay such as epoxy putty can be expensive enough for all this to cover. I used DAS white modelling clay. It hardens slowly when exposed to air and that give you plenty of time to do many modifications, even over the course of two days. I applied DAS with nothin other than water on my hands and I didnt rushed it to dry, I didn't exposed it to high temperatures. I left it at room temp to dry normaly.
7) You start covering the treee surrounding the trunk from bottom to top. As you progress up the tree keep trying to get the clay thinner and thinner. Thin down the clay was you progress out branches too.
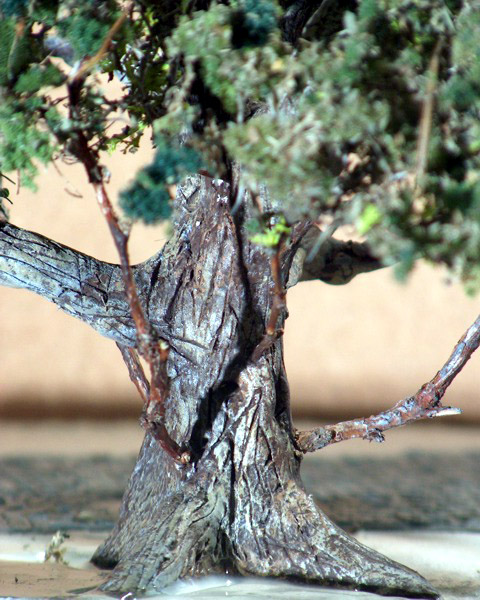
8) After the tree is covered and you are satisfied with the thickness and shape you let it sit for 4-5 hours to let the clay get a bit harder yet still 'workable'. Then you start carving the bark with a fresh x-acto blade. You have to study some real tree pictures to get an impression of the way that you want to carve the bark. Then you have to make deep lines enough with the knife to achieve the desired impression in the trunk.
When you are done with the texturing of the bark you leave it to dry for good 2-3 days to be sure that all the clay has hardened and gotten rid of the moisture and is ready for paintin
9) I painted a burnt umber/black mix as the base coat and make it good and thin so that it runs in all trunk's 'bark' cuts because these are waht you want to be shown really dark. after it has dried completely you start dry brushing lighter colours. I used some plain brown, some ochre and finally I dry brushed with a light gray mixture. What's important to me, is that the dry brushing layers do not cover the previous ones completely and the dry bursh layers are uniform in coverage. This ensures that the tree will have a nice symetric appearance. When this is all done. leave it to dry.
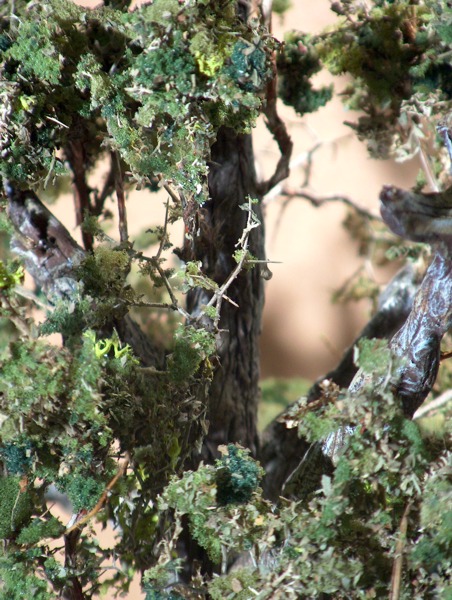
10) Now it's time for the smaller branches and foliage. I have found in the country there are many small thorny bushes that can be cut in parts and be used as the smaller branches.
11) You cut them in different sizes and lengths. Then you make a mix of crushed pieces of 3 woodland scenics coarse turf in 3 different colours and some lichen in dark green colour you brake it in small pieces and make a nice blend mix of all four things.
12) You put the mixture of 'turf' it in a bowl (make sure you have enough of mixture) then you spray the small branches with 3m spray mount or anything similiar and you dip the branch in the bowl rotating it to get it covered all around. Don't make it too thick or too transparent, look for a good overall coverage. Again - study a real tree.
13) You leave the leaves to dry some, then you prepare a mix of kitchen spices, like oregano, mint, parcly, and basilic, (any mix will do) that all are dried and crushed.
14) You spray the branches foliage with the 3m spay adhesive. This time spary lighter and then you sprinkle the mix of spices all over the sprayed portion from above and on the sides so you get some 50% coverage of the previous foliage step.
Your branches are now ready.
15) You leave them for a few hours to dry completely. Then you have to drill the thick tree branches and insert the throny smaller branches with foliage in random but logical places using thick CA glue.
16) Rotate and arrange them so you have a nice look of the tree; not too symmetric but not thick on one side and empty on the other.
After you finish that, you leave it to dry and stabilize the whole build.
17) Then with some brown paint you dry brush the joining points of the branches where attached it to the tree. You also leave to dry and then 2 light passes with a hairspray to stabilise the whole build.
Thats it! You are ready. Pin the base of the tree with a thick piece of wire and use it on your dio.
I hope i gave u some help.
Excellent help on this making is the book " Terrain modelling " by Osprey .
Post Note: I have already used acrylic matt varnish over the hairspray. The reason that I used some intense green material as internal foliage below the parsley and mint flakes was, that on the time they turn brownish yellow olive there will be a green layer under them to keep the general colour of the tree. But this is also an experiment for me to see how things will go. On my next projects I will run also different methods of foliage and try maybe some other colour preservation method.
Basic Proces
The basic make up of it its like that.1) You decide the height and get a thick balsa dowel almost the size you need the final tree.
2) You get thinner balsa sticks (always cylindrical in shape). Make sure they are smaller diameter than the main trunk and cut them to different lengths.
3) You attach the branches on the main trunk in different angles. Join them useing CA glue and a pin (snip a short piece of paper clip). Add the thicker ones lower and the thinner higher on the tree trunk.
4) Because some of the balsa branches will end up 'stiff straight and a bit thick', drill a hole in the end if you want and insert some thick 'twisted wire' parts in different and random angles . See the related feature here - Making Trees with Wire.
5) On the upper body of the tree, use some branches made of 4-7 pieces of twisted wire that will split half and half as they go to the end and give you 2 or more possible open ends.
6) After basic armature of the tree (with balsa and wire branches) is ok add 3-4 triangle shaped pieces of balsa on the base of the tree to shape the feet/roots, as you can see on my pictures of the final tree.
After all this is finished you have to decide with what you will do for coverage of the armature. Some kind of modelling clay such as epoxy putty can be expensive enough for all this to cover. I used DAS white modelling clay. It hardens slowly when exposed to air and that give you plenty of time to do many modifications, even over the course of two days. I applied DAS with nothin other than water on my hands and I didnt rushed it to dry, I didn't exposed it to high temperatures. I left it at room temp to dry normaly.
7) You start covering the treee surrounding the trunk from bottom to top. As you progress up the tree keep trying to get the clay thinner and thinner. Thin down the clay was you progress out branches too.
8) After the tree is covered and you are satisfied with the thickness and shape you let it sit for 4-5 hours to let the clay get a bit harder yet still 'workable'. Then you start carving the bark with a fresh x-acto blade. You have to study some real tree pictures to get an impression of the way that you want to carve the bark. Then you have to make deep lines enough with the knife to achieve the desired impression in the trunk.
When you are done with the texturing of the bark you leave it to dry for good 2-3 days to be sure that all the clay has hardened and gotten rid of the moisture and is ready for paintin
9) I painted a burnt umber/black mix as the base coat and make it good and thin so that it runs in all trunk's 'bark' cuts because these are waht you want to be shown really dark. after it has dried completely you start dry brushing lighter colours. I used some plain brown, some ochre and finally I dry brushed with a light gray mixture. What's important to me, is that the dry brushing layers do not cover the previous ones completely and the dry bursh layers are uniform in coverage. This ensures that the tree will have a nice symetric appearance. When this is all done. leave it to dry.
10) Now it's time for the smaller branches and foliage. I have found in the country there are many small thorny bushes that can be cut in parts and be used as the smaller branches.
11) You cut them in different sizes and lengths. Then you make a mix of crushed pieces of 3 woodland scenics coarse turf in 3 different colours and some lichen in dark green colour you brake it in small pieces and make a nice blend mix of all four things.
12) You put the mixture of 'turf' it in a bowl (make sure you have enough of mixture) then you spray the small branches with 3m spray mount or anything similiar and you dip the branch in the bowl rotating it to get it covered all around. Don't make it too thick or too transparent, look for a good overall coverage. Again - study a real tree.
13) You leave the leaves to dry some, then you prepare a mix of kitchen spices, like oregano, mint, parcly, and basilic, (any mix will do) that all are dried and crushed.
14) You spray the branches foliage with the 3m spay adhesive. This time spary lighter and then you sprinkle the mix of spices all over the sprayed portion from above and on the sides so you get some 50% coverage of the previous foliage step.
Your branches are now ready.
15) You leave them for a few hours to dry completely. Then you have to drill the thick tree branches and insert the throny smaller branches with foliage in random but logical places using thick CA glue.
16) Rotate and arrange them so you have a nice look of the tree; not too symmetric but not thick on one side and empty on the other.
After you finish that, you leave it to dry and stabilize the whole build.
17) Then with some brown paint you dry brush the joining points of the branches where attached it to the tree. You also leave to dry and then 2 light passes with a hairspray to stabilise the whole build.
Thats it! You are ready. Pin the base of the tree with a thick piece of wire and use it on your dio.
I hope i gave u some help.
Excellent help on this making is the book " Terrain modelling " by Osprey .
Post Note: I have already used acrylic matt varnish over the hairspray. The reason that I used some intense green material as internal foliage below the parsley and mint flakes was, that on the time they turn brownish yellow olive there will be a green layer under them to keep the general colour of the tree. But this is also an experiment for me to see how things will go. On my next projects I will run also different methods of foliage and try maybe some other colour preservation method.


About the Author


FROM: KIKLADHES, GREECE / Ελλάδα
I started modelling 27 years ago with some 1/72 planes and military vehicles. Soon the diorama bug got into me and with Sheperd Paynes books I dug in. I loved to build dioramas and military vehicles till the Vietnam Era. I don't like modern stuff so much. 4 years ago I had a crush on figure painti...
Copyright ©2021 by Costas Rodopoulos. Images and/or videos also by copyright holder unless otherwise noted. The views and opinions expressed herein are solely the views and opinions of the authors and/or contributors to this Web site and do not necessarily represent the views and/or opinions of Armorama, KitMaker Network, or Silver Star Enterrpises. All rights reserved. Originally published on: 2004-11-17 00:00:00. Unique Reads: 15828

WEB HOSTING BY


Copyright ©2021 Armorama and Kitmaker Network, a subsidiary of Silver Star Enterprises
All Rights Reserved. Please read our Conditions of Use and Privacy Policy.
All Rights Reserved. Please read our Conditions of Use and Privacy Policy.