

1⁄35Scratchbuilt M1134 Stryker ATGM Variant
25
Comments
Introduction
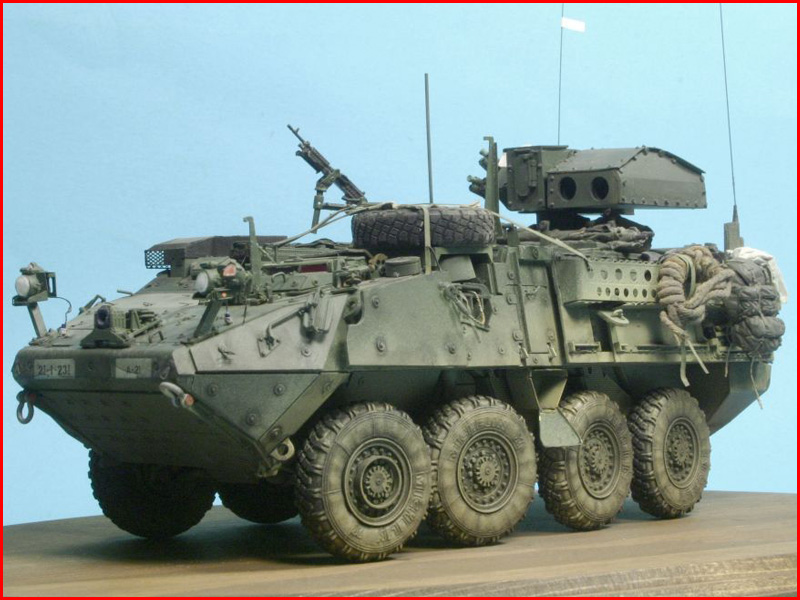
The Anti-Tank - guided missile vehicle or the ATGM as it is called is the primary weapon used by the SBCT Anti-Armor Companies. The M1134 Stryker is based on the M1126ICV, the first of the variants. This variant is equipped with an elevated TOW missile system mount and capable of destroying armor at a long distance with an effective range of about 3750m. I decided to build this variant because it was different. It can be considered to be my motto or theme, if you have been up to date with my builds, as most of you modelers might have already known. Doing things not readily available in kit form is my forte, so to speak. It gives me the unique pleasure of being the only Joe in town. Being that the builds I do are not available I am forced to scratch build the parts that will be an addition to the model.Planning
Planning is something I try to do as accurately as I possibly can. I am never lucky to get any plans or drawings when it comes to choosing my subjects that I wish to model. So I use a system that is my own. I call it Deductive Measuring. The phrase is similar to Deductive Reasoning, which I used as a method of getting my point across. Since I do not have any drawings or plans I use photographs to judge placement of the parts of the vehicle. It is pretty simple, If you look at a picture and see that a grab handle is slightly closer to the right top corner of the hull, then you simply place your model of the grab handle in the same area as in the photograph. Judging the exact placement in millimeters is next to impossible, If you are not a rivet counter as most modelers are not, then this should not be an issue. I place components as accurately as i possibly can. My method of modeling may not be acceptable to most By-the-book modelers, but then again, everyone is different and methods and procedures will differ, which is absolutely a good thing. I dont like to get hung up on standard issues. Anything that is simple and to the point, I will embrace with an open arm. My collection of pictures came from the http://primeportal.net/home.htm website and info from knowledgeable modelers. They are a good source of reference on many vehicles. Other pictures were taken from across the net while searching for reference material. I used the AFV Club M1126 ICV Stryker kit as the basis for the ATGM variant. I felt it was a much better kit than what the Trumpeter kit offered. A big plus was the detail which was much sharper and cleaner than the Trumpeter kit. After obtaining all the pictures and details needed for the project it was time to start the build. I plan on writing this article a little differently from the norm. Simply because long writes up are tedious and too word intensive, at least to me as a modeler. Also, it does not hurt to approach things from a different perspective.About the Author


FROM: DALARNAS, SWEDEN
Charles King hails from Sweden. He has been interested in modeling since he was 12; though there was other interest that took priority at the time, he would eventually fall into the modeling soon enough. Not until recent,in 2002 that his interest was rekindled. While browsing the Internet, he ca...
Comments

thanks charles. will be looking forward to see the update. Thanks.
MAR 19, 2008 - 12:25 PM

Jason, here are two pics after I made the changes...I added the tarp and weathered it some more:


MAR 21, 2008 - 04:51 AM
sorry to answer so late. Was outta town. Ti, the updates looks awesome. I particularly like the tarp. How did you achieve the look? looks real to me. Care to share your method...than you. Again, this styker beast looks fantastic.
I hope one of the manufacturers come out with it soon. Or maybe Miloslav can put one together for us.
APR 22, 2008 - 08:12 AM
[quote]sorry to answer so late. Was outta town. Ti, the updates looks awesome. I particularly like the tarp. How did you achieve the look? looks real to me. Care to share your method...quote]
Thanks Jason. Method was simple. 1. Wet tissue papper rolled up 2. Then painted with wate based paint while still wet. 3. weathered with pigments when it was completely dried. That's it.
Nice to see you're coming out with this variant...as always, I'm always the last to know So all my work was for nothing..
APR 22, 2008 - 08:34 PM
Such a simple method for a great looking item. Thanks Ti. Miloslav, I did not doubt you would be doing this variant.
APR 23, 2008 - 10:14 AM

Thanks for a great article.
If I may ask, how far away did you hold the rattle can when spraying on the "dirt"?
APR 24, 2008 - 01:09 AM
You're welcome John. Glad you enjoyed it. I held the can about 20cm from the model. I also used a piece of cardboard as a reflector to reduce the over spray these cans cause as you spray. I also used a kitchen strainer or fryer strainer to reduce the amount of spray particles.
My picture taking abilities is left to be disired. The model looks much better in person than in the pictures...so I would like to think..
APR 24, 2008 - 04:43 AM

Ti, In your last paragh you said you used Spray paint for the dirt. What make was it? btw, Trumpeter has come out with a M1134 now. Have you seen it?
SEP 28, 2008 - 11:19 PM
Copyright ©2021 by Charles King. Images and/or videos also by copyright holder unless otherwise noted. The views and opinions expressed herein are solely the views and opinions of the authors and/or contributors to this Web site and do not necessarily represent the views and/or opinions of Armorama, KitMaker Network, or Silver Star Enterrpises. All rights reserved. Originally published on: 2008-02-11 00:00:00. Unique Reads: 30173

WEB HOSTING BY


Copyright ©2021 Armorama and Kitmaker Network, a subsidiary of Silver Star Enterprises
All Rights Reserved. Please read our Conditions of Use and Privacy Policy.
All Rights Reserved. Please read our Conditions of Use and Privacy Policy.