Campaigns: Active Campaigns
Campaigns that are either in planning or underway should be grouped here.
Hosted by Richard S.
Build a Photo Campaign - Active
kunjuro
Visit this Community
Philippines
Joined: October 27, 2013
KitMaker: 520 posts
Armorama: 488 posts
Posted: Wednesday, May 20, 2020 - 03:46 AM UTC
Hey folks. Thinking of joining the campaign.

I lost my enthusiasm for building and painting miniatures for roughly two weeks. Not sure if it's because I got burned out or that I got tired of grappling with some of the corrections for a Hobby Boss Leopard 2.

So I went around digging in my stash. I've been meaning to build something from my nation's armed forces. I set my eyes on an AFV Club AIFV I bought before the start of the lockdown in the Philippines. There are a few photos of the vehicle going through a parade in Luneta Park located in the Nation's Capital back in the 90s.
Here's the photo of the AIFV strolling through the streets during the parade:


And here's my kit. It has a decals that match the vehicles that were there OOB. I'm not planning on using additional after market stuff as I want this to be a relaxing build

petbat
Visit this Community
Queensland, Australia
Joined: August 06, 2005
KitMaker: 3,353 posts
Armorama: 3,121 posts
Posted: Wednesday, May 20, 2020 - 10:44 AM UTC
Good choice Nigel.

I have considered building one of these with the Wood add on armour seen on occasion, but so few pics available:
Johnnych01
Visit this Community
England - South West, United Kingdom
Joined: June 29, 2019
KitMaker: 604 posts
Armorama: 506 posts
Posted: Monday, June 08, 2020 - 12:11 AM UTC
A few update shots if I can get IMGUR to work....


Most of the PE is on now apart from the Schurzen hangers and the hull side plates which are in the process of being done. There is a Radio Op's area which was scratch built from spares as his hatch is open. and also a scratch built engine was done and put in as the access plate appears blown off/put on at an angle in the photo.

One of the rear bins was PE, the other from the kit and a heated screwdriver used to replicate the damage.

Tracks have been done and put to one side ready for once its all painted. Im not to worried about some excess bits of superglue which yo ucan see on the PE as these will all be hidden once paint and weathering is applied.
Will put another 2 pics up later as they didnt load this time
Removed by original poster on 06/08/20 - 13:12:33 (GMT).
Removed by original poster on 06/08/20 - 13:14:58 (GMT).
yeahwiggie
Visit this Community
Dalarnas, Sweden
Joined: March 24, 2006
KitMaker: 2,093 posts
Armorama: 1,359 posts
Posted: Tuesday, June 09, 2020 - 07:41 AM UTC
Initially I had thought to join with another project, but I have opted for this one instead:
M1046 Desert Storm;


I will Mix Tamiya's M1025 and M1046 for that purpose.
SGTJKJ
#041
Visit this Community
Kobenhavn, Denmark
Joined: July 20, 2006
KitMaker: 10,069 posts
Armorama: 4,677 posts
Posted: Tuesday, June 09, 2020 - 10:05 AM UTC
John, nice PE job. It is fiddly to do, but adds a lot of nice details. Looking forward to see more

Ron, nice choice. You need some chipping fluid for that one.

I am making good progress on my desert Storm Cobra. An update with pictures to follow soon.
barkingdigger
Staff MemberAssociate Editor
ARMORAMA
#013
Visit this Community
England - East Anglia, United Kingdom
Joined: June 20, 2008
KitMaker: 3,981 posts
Armorama: 3,403 posts
Posted: Tuesday, June 09, 2020 - 11:31 PM UTC
Finally made a start on my build - I needed a few hours of simple plastic-bashing to "clear the pipes" so I grabbed the ancient ESCI goliath from the stash (been there 40 years!) and a fig from the Miniart US Jeep Crew and the results are quite pleasing! The DUKW kit has resin wheels from Resicast (I designed them in CAD based on info from Kurt Laughlin, so they are accurate, which can't be said of any other set on the market) and will get lotsa love along the way...


SGTJKJ
#041
Visit this Community
Kobenhavn, Denmark
Joined: July 20, 2006
KitMaker: 10,069 posts
Armorama: 4,677 posts
Posted: Friday, June 12, 2020 - 08:05 PM UTC
A bit of progress on my Cobra. The cockpit is almost done. Pretty basic, but will still look decent when done.

Next some masking for the cockpit glazing. Recently I have painted glazing separately and fixed it at the end. I have only been semi satisfied with the results. So now I am trying out some Microsol maskol combined with some tape.

More to follow

SpeedyJ
Visit this Community
Bangkok, Thailand / ไทย
Joined: September 17, 2013
KitMaker: 1,617 posts
Armorama: 1,150 posts
Posted: Friday, June 12, 2020 - 08:30 PM UTC

Quoted Text

Hello all.
I made a start with the build of the Tiger I
Engine - Cooling Fans - Fuel tanks - Transmission - Radio rack - Tracks (one finished, other still needs the horns.
Pretty nice and easy build so far. Parts have a good fit and almost no cleaning required. Some photos:


I try to follow David Byrden's Tweak List for the kit when it makes sense to me.

More to come when there is progress.

Kind regards,

Robert Jan


Well, hello.

As this was my progress way back in January, nothing was done after.
Maybe I pick it up in a few months. Otherwise I might go for an easy build.
The Tiger's got me by the neck for this one.
I've been through some busy and rough months, work and health got in the way for some serious modeling. Just got back to the bench a few weeks ago.
See where we will get in on this campaign.
Nice works I've seen so far. Will push me for sure.

Johnnych01
Visit this Community
England - South West, United Kingdom
Joined: June 29, 2019
KitMaker: 604 posts
Armorama: 506 posts
Posted: Friday, June 12, 2020 - 10:12 PM UTC
Nice progress Tom and Jesper, the Goliath and DUKW will look good together and love the bloke sat in it, that would be a hell of a ride lol.
Cobra is taking shape as well .. always a mean gunship...
The Humvee will be good to watch come together Wiggins.

My Panther is now done base primed in grey with wheels and tracks to fit. Then I can think about the cam layout and the figure donated kindly by Tom. I have also painted Adolf as well Tom and will put his pic up here. (Tom will understand lol)
Having issues uploading pictures into my gallery at the moment. Can get onto gallery, but then says can't find domain when I try uploading ??
I did try IMGUR but I was only able to upload one pic direct then that went odd....
Johnnych01
Visit this Community
England - South West, United Kingdom
Joined: June 29, 2019
KitMaker: 604 posts
Armorama: 506 posts
Posted: Friday, June 12, 2020 - 10:15 PM UTC
Hope all is well now Speedy and you're able to get back on track soon. Really looking forward to seeing that Tiger get done... We all love a big cat
barkingdigger
Staff MemberAssociate Editor
ARMORAMA
#013
Visit this Community
England - East Anglia, United Kingdom
Joined: June 20, 2008
KitMaker: 3,981 posts
Armorama: 3,403 posts
Posted: Friday, June 12, 2020 - 11:51 PM UTC
Hi John, yes the gallery is having trouble - all part of the server-overload issue Jim's been trying to sort these past few weeks. From what I gather the server cuts out the gallery if the general load is too high (because the gallery is big and intensive) and only allows access again when server demand goes back down to normal levels.

I've switched to Imagur, but the upload is a PITA. I found I cannot do the drag&drop thing - I have to use the Browse button to find my pics to upload. Then I need to add them separately to an album, since they upload to a "general" folder every time! But once they are in it's all good - don't give up on it.
Removed by original poster on 06/13/20 - 23:07:42 (GMT).
Johnnych01
Visit this Community
England - South West, United Kingdom
Joined: June 29, 2019
KitMaker: 604 posts
Armorama: 506 posts
Posted: Sunday, June 14, 2020 - 09:14 PM UTC
Here is a pic of the G primed and ready. Tracks have been done and wheels getting base coats now.

yeahwiggie
Visit this Community
Dalarnas, Sweden
Joined: March 24, 2006
KitMaker: 2,093 posts
Armorama: 1,359 posts
Posted: Thursday, June 18, 2020 - 06:17 AM UTC
The build was pretty straight forward, since Tamiya's fit is good as expected. The only personal touch I gave was the additional bumpers, as seen in the original photo. However with the figures I almost deviated. As I was experimenting with the figures, ideas came and went. But in the end I stuck to "the plan".


To the left the converted figures, to the right the originals as intended.


As for the painting I went for Tamiya's original plan and numbers. Knowing that I always have issues with brushpainting Tamiya's paint I was a bit apprehensive.
The interior is painted NATO green, the accessories olive drab, the rockets field drab, after which I applied a drybrush in natural steel, followed by a grey and a brown wash, topped off with ground pastels in earth and skintone for a dusty interior.

The difference between washes and without.


The figures;
Here too I stuck with Tamiya's plan, combining both paint schedules from both Humvee's; woodland pattern for the vests, chocolatechip cookie pattern for the uniforms. I really had to get back into painting on this scale and I am not completely satisfied with the results.


yeahwiggie
Visit this Community
Dalarnas, Sweden
Joined: March 24, 2006
KitMaker: 2,093 posts
Armorama: 1,359 posts
Posted: Saturday, June 20, 2020 - 02:58 AM UTC
Over the past few days I have been steadily working on this project and I had to make some more decisions; should I go for the original picture or should I open up the vehicle and load out the interior. After contemplating for a long while, I went for the first option, since this build is in the Build a photo-campaign and I already have taken some liberties with the figure and the not covering up of the TOW sight and battery.
So again I stuck with the plan.

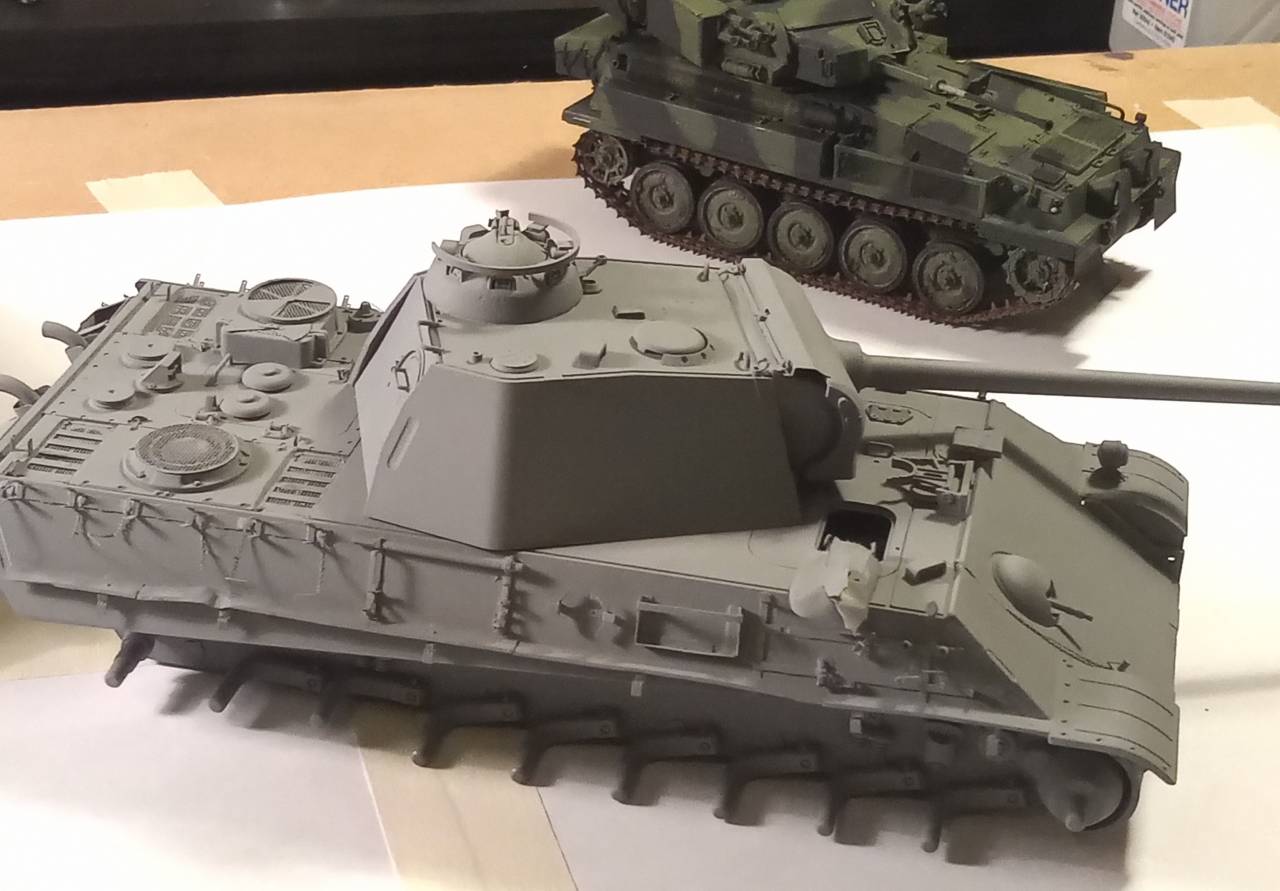
Analyzing the picture I concluded that this was a hastily and sloppily overpainted vehicle, meaning it would have the standard 3-tone camouflage underneath. It also looks as if 3 bands have been deliberately left unpainted. Why I do not know. Furthermore the vehicle appears to be on guard duty and lacks the overloading with gear. It actually is bare, except for 1 backpack. Even rear shows loose hanging straps.

So first things first. I used Tamiya paints predominantly. NATO green XF-67 + Olive drab XF-62 (because I ran out of NATO green, so had to cheat), NATO brown XF-68 and NATO black XF-69 (which is more of a dark gray instead of flat black!) as a base, followed by tape and hairspray, over which I applied a mix of Desert yellow XF-59 and Dark yellow XF-60 1:1 mix. This mix in the end turned out to be too dark. I should have used Buff XF-57 instead of Desert yellow.
I ended up spraying to much brown, though.


And now for the scary part; I am doing the hairspray technique for the first time! And I do rub too hard on some spots, making the plastic come through! It took a while to figure out that I had to let the water soak in a little, before removing the paint and hairspray.
But in the end I am actually rather pleased with the result.


After this was done I set it away to thoroughly dry, before I toned down the harsh contrasts with a very diluted wash of Vallejo Dark sand. I then assembled the rest of the vehicle and coninued weathering. However in my eagerness to get the build done, I forgot to add a few parts BEFORE I started painting and weathering... such as the hatchet and the mirrors. The battery and backpack were added and at long last also an antenna, made by stretched sprue. The end is drawing near on this one!

yeahwiggie
Visit this Community
Dalarnas, Sweden
Joined: March 24, 2006
KitMaker: 2,093 posts
Armorama: 1,359 posts
Posted: Sunday, June 21, 2020 - 09:39 PM UTC
Yes, I finished it!
The first build completed in...... a long time.

What I aimed for:


And as it turned out:


I uploaded the pictures into the gallery.
On to the next campaign!!
Johnnych01
Visit this Community
England - South West, United Kingdom
Joined: June 29, 2019
KitMaker: 604 posts
Armorama: 506 posts
Posted: Sunday, June 21, 2020 - 09:46 PM UTC
Well done Ron, and nice finish with the weathering.
RedwingNev
Visit this Community
England - East Midlands, United Kingdom
Joined: February 07, 2004
KitMaker: 911 posts
Armorama: 348 posts
Posted: Thursday, June 25, 2020 - 12:20 AM UTC
Cracking Humvee Ron
SGTJKJ
#041
Visit this Community
Kobenhavn, Denmark
Joined: July 20, 2006
KitMaker: 10,069 posts
Armorama: 4,677 posts
Posted: Thursday, June 25, 2020 - 07:08 AM UTC
Looks very nice, Ron!
petbat
Visit this Community
Queensland, Australia
Joined: August 06, 2005
KitMaker: 3,353 posts
Armorama: 3,121 posts
Posted: Thursday, June 25, 2020 - 07:20 AM UTC
Looks Great Ron. You captured the feel very well.
yeahwiggie
Visit this Community
Dalarnas, Sweden
Joined: March 24, 2006
KitMaker: 2,093 posts
Armorama: 1,359 posts
Posted: Thursday, June 25, 2020 - 07:46 PM UTC
Thanks gents!
I am not entirely satisfied with the result. The contrasts are not harsh enough. The desert camouflage came out far to dark, the backpack should be completely green, tires clean and in hindsight I could have done the covers of the batteries and optics too.
Ah well, always a next time.
Removed by original poster on 07/18/20 - 17:05:08 (GMT).
yeahwiggie
Visit this Community
Dalarnas, Sweden
Joined: March 24, 2006
KitMaker: 2,093 posts
Armorama: 1,359 posts
Posted: Wednesday, August 05, 2020 - 03:14 AM UTC
The campaign appears pretty dead in the water, right now.
Anyone still at it??