Building the Bergepanzer 2 from Takom
United States
Joined: October 14, 2012
KitMaker: 2,663 posts
Armorama: 2,649 posts
Posted: Thursday, August 22, 2019 - 01:18 AM UTC
The completed unit.

The Pullies , you need 2 of them.

Next I assembled the sides and Bottom, be careful here as there should be a slight lip where they join together, I didn't get it quite right there.

Don't forget the Pully in the end.
I then spread the sides slightly and fitted in the twin units.

United States
Joined: October 14, 2012
KitMaker: 2,663 posts
Armorama: 2,649 posts
Posted: Thursday, August 22, 2019 - 01:28 AM UTC

I forgot to take Pics. of assembling the Block it's not to hard and what you do with it depends upon how you are going to display the completed model. I'm doing it in the Travel / Rest configuration .

I used the string from the kit for the Boom Cable most of it can't be seen except for where it goes over the blocks, it runs inside the Boom.
There are two different ends to attach the Cable to the Boom. which one you use depends upon how you place the Hook Block.

I painted a portion of the inside of the Boom with NATO Green as some of it may be visible through the side openings.

United States
Joined: October 14, 2012
KitMaker: 2,663 posts
Armorama: 2,649 posts
Posted: Thursday, August 22, 2019 - 01:44 AM UTC
Here's how the Cable goes.

The Hook and end of the Block need to be drilled out with an #48 Drill bit at the pin will not fit.

I.m not quite shure if I have the small part that locks the pin for the Hook exactly right, it looks sorta like what Pics. I could find on the net.

United States
Joined: October 14, 2012
KitMaker: 2,663 posts
Armorama: 2,649 posts
Posted: Thursday, August 22, 2019 - 01:52 AM UTC
Here's the completed Boom.

Here's it on the Hull.

Now for a lot of painting.
Donald
United States
Joined: October 14, 2012
KitMaker: 2,663 posts
Armorama: 2,649 posts
Posted: Thursday, August 22, 2019 - 07:35 AM UTC
Ready for Painting.

Base Coat Painted

Once this cures it's on to the camo.
Regards
Donald
Correze, France
Joined: June 10, 2004
KitMaker: 5,329 posts
Armorama: 5,204 posts
Posted: Thursday, August 22, 2019 - 06:37 PM UTC
Great and quick job! Congratulations.
Now I need to get one

Olivier
Visit my site Click the banner
"La reine des batailles, j'ai nommé l'infanterie"
Napoléon
Lower Austria, Austria
Joined: November 02, 2007
KitMaker: 633 posts
Armorama: 599 posts
Posted: Saturday, August 24, 2019 - 07:53 AM UTC
Great build Donald!
I really love your detailed step-by-step informations.
Just one question ... can the crane arm be positioned in different positions or do we have to glue it in a fixed position?
Good luck with the painting.
Cheers
Walter
United States
Joined: October 14, 2012
KitMaker: 2,663 posts
Armorama: 2,649 posts
Posted: Sunday, August 25, 2019 - 02:56 AM UTC
Quoted Text
Great build Donald!
I really love your detailed step-by-step informations.
Just one question ... can the crane arm be positioned in different positions or do we have to glue it in a fixed position?
Good luck with the painting.
Cheers
Walter
To answer your question, Yes & No.
The Crane can be rotated left to right quite easily, as for the position of the Boom it may be raised or lowered.
The problem comes from the Cables, if you have the Hook in the lifting position you use a different hook up to attach the end of the cable to the boom. One is straight for the lifting position the other as angled to have the Hook Block on the end of the Boom.
Unless you can figure how to tighten up the cable when raising the Hook or Boom I would say it's best to select a position and stick with it.


I hope this helps.
Donald
United States
Joined: October 14, 2012
KitMaker: 2,663 posts
Armorama: 2,649 posts
Posted: Monday, August 26, 2019 - 04:43 AM UTC
Working on the camo.


There's still a lot of little stuff to do.
Regards
Donald
Germany
Joined: September 12, 2008
KitMaker: 307 posts
Armorama: 304 posts
Posted: Monday, August 26, 2019 - 08:47 AM UTC
Hi!
Very interesting and helpful build. However, you painted the anti slip surfaces anthracite, at least it looks that way. These are always painted in the camouflage scheme. Sometimes they look a bit dusty in colour because they catch dirt and dust better than the steel surfaces, even after the dirt was being washed down from the vehicle.
Andreas
United States
Joined: October 14, 2012
KitMaker: 2,663 posts
Armorama: 2,649 posts
Posted: Monday, August 26, 2019 - 11:16 AM UTC
Quoted Text
Hi!
Very interesting and helpful build. However, you painted the anti slip surfaces anthracite, at least it looks that way. These are always painted in the camouflage scheme. Sometimes they look a bit dusty in colour because they catch dirt and dust better than the steel surfaces, even after the dirt was being washed down from the vehicle.
Andreas
Actually the instructions call for them to be painted this way.
I used Tamiya FX67 Nato Green for the base color, FX68 Nato Brown for the Brown part and FX1 Flat Black for the Black part of the Camo. I used Tamiya FX69 Nato Black for the Anti Slip areas.
The Anti Slip areas on this vehicle aren't painted in the Camo.
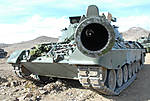
Here's a Pic of the real one.

The one I'm modeling has the same numbers on the White bar on the Crane.
Donald
Singapore / 新加坡
Joined: August 30, 2012
KitMaker: 265 posts
Armorama: 186 posts
Posted: Monday, August 26, 2019 - 12:30 PM UTC
IMHO anti-slip areas on that photo look darker as they have rough surface compared with metal around. They just scatter more light but are painted in camo color.
God created Arrakis to train the faithful.
New Zealand
Joined: June 19, 2013
KitMaker: 1,217 posts
Armorama: 1,092 posts
Posted: Monday, August 26, 2019 - 03:33 PM UTC
Looking at
http://www.panzer-modell.de/referenz/in_detail/bpz2/bpzii_22g.jpg Im inclined to agreed with Damian; yet the instructions would have you paint the patches different. Odd.
Hessen, Germany
Joined: March 26, 2017
KitMaker: 95 posts
Armorama: 79 posts
Posted: Monday, August 26, 2019 - 05:08 PM UTC
still missing the interior
United States
Joined: October 14, 2012
KitMaker: 2,663 posts
Armorama: 2,649 posts
Posted: Monday, August 26, 2019 - 08:48 PM UTC
Quoted Text
still missing the interior
Yeah with 3 big side doors & 3 hatches up top, lots of viewing room.
Well maby we will get them when RFM or Meng release's their version . Hey maby a Bridge Layer will be along.
Donald
As for the non Slip I'm not repainting it (Finished)
England - South East, United Kingdom
Joined: December 16, 2007
KitMaker: 559 posts
Armorama: 517 posts
Posted: Monday, August 26, 2019 - 09:19 PM UTC
All the best
Michael Shackleton
Leopard Workshop, Trackpad Publishing and Scorpion Miniature Models
United States
Joined: October 14, 2012
KitMaker: 2,663 posts
Armorama: 2,649 posts
Posted: Tuesday, August 27, 2019 - 07:56 AM UTC
JUST A THOUGHT
I wonder if the non-slip that they use is anything like the sheet material they sell at the home improvement stores here.
It is used to make the steps on wooden decks, just peal off the back and place.
This could be why some Pics. have it in Black and some is painted over.
If you'r repainting a vehicle you'r not going to mask off the Non-slip, just paint over it.
Just wondering.
Donald
Germany
Joined: September 12, 2008
KitMaker: 307 posts
Armorama: 304 posts
Posted: Tuesday, August 27, 2019 - 09:06 AM UTC
Hi!
On German vehicles, the anti slip surfaces are a quite fine grainy patch that is laminated on the steel in the factory. it is not laminated by the crew like it is sometimes on vehicles for example on scandinavian vehicles where it a a kind of adhesive material that self-sticks on the metal surface. I have only seen it painted in the vehicle colours simply because the camouflage is factory applied after the patches are laminated on. The different (sometimes darker, sometimes more muddy)look is caused by the different reflection of light on that grain surface.
Andreas
United States
Joined: October 14, 2012
KitMaker: 2,663 posts
Armorama: 2,649 posts
Posted: Wednesday, August 28, 2019 - 09:39 AM UTC
Quoted Text
Hi!
On German vehicles, the anti slip surfaces are a quite fine grainy patch that is laminated on the steel in the factory. it is not laminated by the crew like it is sometimes on vehicles for example on scandinavian vehicles where it a a kind of adhesive material that self-sticks on the metal surface. I have only seen it painted in the vehicle colours simply because the camouflage is factory applied after the patches are laminated on. The different (sometimes darker, sometimes more muddy)look is caused by the different reflection of light on that grain surface.
Andreas
Thanks for the Info. now we all know.
Regards.
Donald
United States
Joined: October 14, 2012
KitMaker: 2,663 posts
Armorama: 2,649 posts
Posted: Wednesday, August 28, 2019 - 09:41 AM UTC
I painted the Tow Bars in the Red & White pattern on the color chart it's most likely not accurate but it looks cool.

If you mask off the area under the Crane it makes it a lot easier to glue it in place.


The Color paint chart isn't really accurate, the patterns from one view to the next don't always match.
Finished for now.
Donald
Lower Austria, Austria
Joined: November 02, 2007
KitMaker: 633 posts
Armorama: 599 posts
Posted: Wednesday, August 28, 2019 - 09:27 PM UTC
Great job Donald!
Following your build blog just ended in ordering the kit for myself ;-).
cheers
Walter
North Carolina, United States
Joined: April 29, 2014
KitMaker: 1,112 posts
Armorama: 886 posts
Posted: Thursday, August 29, 2019 - 12:01 AM UTC
I agree, added the kit to the list of kits I want.
United States
Joined: October 14, 2012
KitMaker: 2,663 posts
Armorama: 2,649 posts
Posted: Saturday, August 31, 2019 - 11:19 AM UTC
United States
Joined: October 14, 2012
KitMaker: 2,663 posts
Armorama: 2,649 posts
Posted: Saturday, August 31, 2019 - 11:31 AM UTC
United States
Joined: October 14, 2012
KitMaker: 2,663 posts
Armorama: 2,649 posts
Posted: Saturday, August 31, 2019 - 11:36 AM UTC