Armor/AFV
For discussions on tanks, artillery, jeeps, etc.
KV-1/KV-1S Hybrid
MrNeil
Visit this Community
New Jersey, United States
Joined: November 01, 2005
KitMaker: 266 posts
Armorama: 262 posts
Posted: Tuesday, December 03, 2019 - 03:04 PM UTC

Quoted Text


Quoted Text

Now we come to the running gear.


You lost me here Neil. You say Trumpeter's KV-8S has the 33-68 wheel, but you don't mention that in the preceding text. Is that a typo for 33-65 or 33-67?

Also, in your photo of the three wheels, can you please list the part numbers of the wheels from left to right?

Thx,
KL


Well spotted, Kurt. I meant the 33-67 wheel but I fat-fingered it in my post

In the photo of the Parfino vehicle, you're looking at two 33-67 wheels left and center, and an 833-16 wheel on the right.
MrNeil
Visit this Community
New Jersey, United States
Joined: November 01, 2005
KitMaker: 266 posts
Armorama: 262 posts
Posted: Thursday, December 05, 2019 - 02:08 PM UTC
Next up, I fitted the turret roof, and added the weld bead around the edge in the usual manner.

The cupola lacks the very prominent weld bead around the circumference of its base, which can be seen in the photo below.


I added that weld bead too, followed by the vision devices and the loader's hatch with its torsion bar counterbalance device.

The grab handles on each side of the roof reach too far onto the roof itself compared to photos, so I filled the locating slots and built my own handles from 15-thou phosphor bronze wire.

The photo below shows the completed turret with the gun barrel and mantlet in place. The KV-1S kit provides a metal barrel but I used one from Aber since I had it on hand and it had a rifled muzzle where the Trumpeter barrel didn't.

MrNeil
Visit this Community
New Jersey, United States
Joined: November 01, 2005
KitMaker: 266 posts
Armorama: 262 posts
Posted: Friday, December 06, 2019 - 01:15 PM UTC
Now we come to the tracks. As I mentioned earlier in this thread, KV-1S vehicles built prior to the end of October 1942 were fitted with 608mm tracks, which looked like the tracks on the Parfino vehicle, shown in the photo below.


Note that the Parfino example has its tracks mounted backwards, relative to period photos of vehicles with this type of track.

Masterclub makes the 608mm tracks in white metal as MTL35030 KV-1s Early. Masterclub are my new favorite for individual link tracks. They are similar in quality to Friuls but have tiny resin pins instead of the wire that Friulmodel uses. In my opinion, this results in a much better appearance when viewed up close.

The photo below shows the model with its running gear test-fitted but not yet glued in place, to judge the correct number of links for the track. The track is also not joined up yet, which is why it's sagging a little beneath the sprocket.


In case you're wondering, I used 90 links for the left-hand track. The sag along the top run is only slight, and deliberately so. The TM for the KV-1S specifies that that sag between the return rollers should be no more than 50mm, which means the bottom of the lowest track link - not the guide tooth - should be a little above the center of the return rollers.
MrNeil
Visit this Community
New Jersey, United States
Joined: November 01, 2005
KitMaker: 266 posts
Armorama: 262 posts
Posted: Tuesday, December 10, 2019 - 02:37 PM UTC
I'm going to be taking another break from this project for a couple weeks, since I'm flying to Australia tomorrow for Christmas, and being on the other side of the planet from my workbench makes modeling a little difficult

See y'all in the New Year.

Neil
MrNeil
Visit this Community
New Jersey, United States
Joined: November 01, 2005
KitMaker: 266 posts
Armorama: 262 posts
Posted: Tuesday, January 07, 2020 - 10:36 AM UTC
Back from Australia, and having mostly stopped drooling on myself from the jetlag, I decided it's time to get back into this build.

Trumpeter's tow shackles are not the best point in their KV kits. At the very least, the bases of the retaining pins are typically out of round and need to be replaced. I've had a set of Aber brass ones (item R18) for a while, and I decided to use them.

Each shackle consists of three brass pieces - shackle, pin and collar - and the set includes a length of very thin copper wire to make the spring clips that retain the pins. The pins are pre-drilled to take the clips, but you have to bend the clips to shape and this requires patience and no small amount of cussing. The finished result is very nice though.

kunjuro
Visit this Community
Philippines
Joined: October 27, 2013
KitMaker: 520 posts
Armorama: 488 posts
Posted: Tuesday, January 07, 2020 - 12:29 PM UTC
Amazing work so far mate. I love how you're really bringing these Trumpeter kits to life with these improvements. I'm mostly an OOB builder, but it's great to see folks point how ways to improve existing kits. I'm planning to build one of the Trumpeter KVs in my stash so I'm really learning a lot through your blog. Keep em coming!
marcb
Visit this Community
Overijssel, Netherlands
Joined: March 25, 2006
KitMaker: 1,244 posts
Armorama: 1,226 posts
Posted: Tuesday, January 07, 2020 - 12:42 PM UTC
That looks really good.
MrNeil
Visit this Community
New Jersey, United States
Joined: November 01, 2005
KitMaker: 266 posts
Armorama: 262 posts
Posted: Wednesday, January 08, 2020 - 11:39 AM UTC
The front towing shackles were similar to the rear ones, but a little more involved since they have the tow cables attached.


I've never had much joy with Trumpeter's tow cables, so I used Eureka XXL's ER-3509 set for this build. The Eureka cables provide a heavier gauge copper wire compared to the Trumpeter parts, and the resin ends are larger too. They fit nicely over the Aber shackles.

The rear ends of the stowed tow cables on KVs are secured with turnbuckles. The Trumpeter parts are molded integrally with their mounting brackets. Since I had already cut away the brackets, drilled them out and fitted them separately to the hull sides, I needed to modify the turnbuckles. I replaced the two ends with 15-thou phosphor bronze wire, bent to shape using the kit parts as a guide, retaining the central section of each turnbuckle.

MrNeil
Visit this Community
New Jersey, United States
Joined: November 01, 2005
KitMaker: 266 posts
Armorama: 262 posts
Posted: Wednesday, January 08, 2020 - 03:22 PM UTC

Quoted Text

Amazing work so far mate. I love how you're really bringing these Trumpeter kits to life with these improvements. I'm mostly an OOB builder, but it's great to see folks point how ways to improve existing kits. I'm planning to build one of the Trumpeter KVs in my stash so I'm really learning a lot through your blog. Keep em coming!


Nigel, Marc, and others...glad you're finding this build log useful.

The Trumpeter kits are, for the most part, very nice though like all kits, they provide room for improvement. This build was an unusual one since the prototype was a very uncommon vehicle and even the original Soviet builders in 1942 needed to do some oddball things, which require special modifications to the kits.
MrNeil
Visit this Community
New Jersey, United States
Joined: November 01, 2005
KitMaker: 266 posts
Armorama: 262 posts
Posted: Friday, January 10, 2020 - 10:10 AM UTC
Just a couple small details remained to be added before construction was complete.

All KVs had mud scrapers fitted to the lower hull sides immediately in front of the drive sprockets, to help reduce the buildup of mud and dirt between the sprocket rings, which could otherwise cause a thrown track.

I cleaned up the Trumpeter kit parts but didn't do anything much to them, since they're pretty decent and they'll be covered in crud anyway once the model is weathered.


Note that you can't fit them in place until after you fit the sprockets to the hull, or you won't be able to get the sprockets on.

The last items to add were the two machine guns - one on the front hull and the other on the rear of the turret. The Trumpeter parts aren't bad but I decided to use turned brass barrels from a Russian company named Magic Models. The barrels are supplied in two parts each and were a little fiddly to assemble, but look good once they're in place.


MrNeil
Visit this Community
New Jersey, United States
Joined: November 01, 2005
KitMaker: 266 posts
Armorama: 262 posts
Posted: Sunday, January 12, 2020 - 01:35 PM UTC
A Facebook friend has correctly pointed out that the commander's cupola has some serious issues. The base is the correct size but everything above it is significantly too small. That step around the circumference is simply wrong.

I'm in the process of rebuilding the upper portion of the cupola with styrene and putty. Stay tuned
MrNeil
Visit this Community
New Jersey, United States
Joined: November 01, 2005
KitMaker: 266 posts
Armorama: 262 posts
Posted: Friday, January 17, 2020 - 10:05 AM UTC
Every time I compared the Trumpeter kit's cupola with the Parfino vehicle, I found new discrepancies, so I decided to replace the entire cupola with a scratchbuilt one.

Here's a photo of the cupola on the Parfino vehicle, which is missing its original roof.


The first step was to cut a circle of 40-thou (1mm) styrene sheet, 20mm in diameter, to form the base. I added another circle of identical thickness, 17.5mm in diameter, on top of this.

On top of that, I added a ten-sided piece of styrene sheet that will act as a former to butt the vision blocks and cupola sides up against.


I then added the vertical plates visible either side of the vision blocks, using 30-thou (0.75mm) styrene. The shape is rather complex and this, combined with the tiny size of the pieces (5mm x 3mm overall) meant I had to go slowly and take a few breaks between pairs.


I'll post another update when I stop gibbering and sucking my thumb
KurtLaughlin
Visit this Community
Pennsylvania, United States
Joined: January 18, 2003
KitMaker: 2,402 posts
Armorama: 2,377 posts
Posted: Friday, January 17, 2020 - 12:31 PM UTC
I wondered about that roof - Sheet metal seems to be a bit light, overhead cover-wise. Did it have a fixed top or a hatch?

KL
MrNeil
Visit this Community
New Jersey, United States
Joined: November 01, 2005
KitMaker: 266 posts
Armorama: 262 posts
Posted: Friday, January 17, 2020 - 12:37 PM UTC

Quoted Text

I wondered about that roof - Sheet metal seems to be a bit light, overhead cover-wise. Did it have a fixed top or a hatch?

KL


The KV-1S cupola lacked a hatch. There were plans to fit a new cupola with a hatch, but that never made it to production. The commander had to wait until the KV-85 to get a hatch of his own.
MrNeil
Visit this Community
New Jersey, United States
Joined: November 01, 2005
KitMaker: 266 posts
Armorama: 262 posts
Posted: Wednesday, January 22, 2020 - 11:23 AM UTC
A word on the construction of the cupola would be useful here. The outer shape was actually a relatively thin sheet metal cover, welded in place over an armored casting that featured a domed center and apertures for the five periscopes. The vertical armored sections visible either side of the periscopes in the photo above, are part of that casting.

I used putty to fill in the step between the lower two sections of styrene, to create the sloped base of the armored casting.


I added the lower, vertical sections of the cover between the periscopes using thin styrene, and shaped the scalloped cutouts in the lower edges with a half-round file. I then filled in the upper sections with putty and sanded it smooth.


I cut the top section of the unarmored roof from a piece of 20-thou styrene, glued it in place and sanded the edges between the periscopes to conform to the sloped contours underneath.


The domed casting under the cover actually protruded slightly above the underside of the roof, and a circular section was usually cut from the center of the roof to allow the casting to poke through. The replacement roof on the Parfino vehicle doesn't have this cutout, which is why it has a hump in the middle.

The roof around the cutout was either welded to the domed center of the casting, or a flat circular plate was welded in place over the cutout. I decided to go with the flat circular plate option, and cut a circle of styrene to go in the center of the roof.

MrNeil
Visit this Community
New Jersey, United States
Joined: November 01, 2005
KitMaker: 266 posts
Armorama: 262 posts
Posted: Sunday, January 26, 2020 - 04:24 AM UTC
After adding the weld beads along the edges of the cupola cover, either side of the periscopes from 10-thou styrene rod softened and textured, and the weld bead around the edge of the center roof plate in the same manner, I glued the completed canopy in place on the turret roof, and added the larger weld bead around its base from 20-thou rod, given the same treatment.


The more observant among you will note some other changes too. When I posted pics to the KV group on FB, some people pointed out that the hatches on KV-1S turrets in October 1942 were flat discs without raised rims. Checking the Parfino vehicle proved them right, so I carefully sanded the signal flag hatch cover and loader's hatch cover flat.

I also added weld beads around the hatch hinges and the loader's periscope covers, added the hole in the top of the gunner's periscope cover and the rather odd vertical metal strip up its side. I'm not sure of the purpose of this strip, but it's there on the Parfino vehicle so it's reasonable to assume it was there on 'Powerful' too.


Another detail I noted was the presence of two holes in the upper surfaces of the trunnion cheeks. There are there on the Parfino vehicle and also on a KV-1S at Kirovsk, so I drilled them out.

The other thing the FB folks mentioned was that the transmission access hatches were also flat disks in the fall of 1942, so I sanded them flat too.

MrNeil
Visit this Community
New Jersey, United States
Joined: November 01, 2005
KitMaker: 266 posts
Armorama: 262 posts
Posted: Monday, January 27, 2020 - 12:36 PM UTC
Since I'd made just about every modification and addition to the Trumpeter turret that I could think of, I decided to add the casting mark to the rear face, as shown in the photo of the Parfino vehicle below.


I thought about using the Archer Transfers' casting numbers set but it's designed specifically for US vehicles and the size and shape of the numbers isn't right for this build. I therefore used short lengths of 10-thou styrene rod except for the wiggly '3' which I bent up from 10-thou copper wire. The end result might be a little over-scale but I think it'll look ok under paint.


I also added the spring loaded latch to the base of the loader's hatch hinge. This was basically a knob with a notch in it, which engaged a plate on the top of the hinge to hold the hatch in the open position, as shown below.


I carved a notch into the end of piece of 40-thou styrene rod, then cut it off and glued it to the top of the hinge on the turret roof.


At this point, the model is ready for priming and painting.
JamesL27
Visit this Community
United States
Joined: June 02, 2013
KitMaker: 202 posts
Armorama: 199 posts
Posted: Monday, January 27, 2020 - 01:03 PM UTC
These are the type of builds I love to follow. Great work so far.
MrNeil
Visit this Community
New Jersey, United States
Joined: November 01, 2005
KitMaker: 266 posts
Armorama: 262 posts
Posted: Tuesday, January 28, 2020 - 10:37 AM UTC
I should have realized I was jinxing myself by saying the model was ready for paint

After I posted the pic of the loader's hatch hinge above, I realized that the Parfino vehicle has a shorter hinge plate on the hatch side and lacks the reinforcing ribs on the hinge, compared to the kit part.

I therefore removed the reinforcing ribs and trimmed back the hinge on the hatch side. It's still too big compared to the Parfino vehicle but that's because the hinge itself is approximnately 1mm too far away from the hatch rim. That's because I trimmed away the raised lip of the hatch without relocating the hinge itself. If I'd noticed this way back when I was first assembling the turret, I might have reworked it but now there's too much risk of damage to the surrounding detail, so I left it as-is.

panamadan
Visit this Community
Minnesota, United States
Joined: July 20, 2004
KitMaker: 1,513 posts
Armorama: 1,449 posts
Posted: Tuesday, January 28, 2020 - 01:00 PM UTC
One hatch in the turret top...
Crazy
Dan
MrNeil
Visit this Community
New Jersey, United States
Joined: November 01, 2005
KitMaker: 266 posts
Armorama: 262 posts
Posted: Tuesday, January 28, 2020 - 01:43 PM UTC

Quoted Text

One hatch in the turret top...
Crazy
Dan


Similar to an early Sherman except that the KV-1S was more difficult to get out of, because both the commander and the gunner were on the opposite side of the gun breech from the hatch.
MrNeil
Visit this Community
New Jersey, United States
Joined: November 01, 2005
KitMaker: 266 posts
Armorama: 262 posts
Posted: Sunday, February 09, 2020 - 11:53 AM UTC
Time for some revisions here...

First of all, I've been referring to the subject of my build as 'Powerful'. However, I recently realized that a closer translation of ‘СИЛЬНЫЙ’ is 'Strong', so that's how I'm going to refer to the subject vehicle from now on.

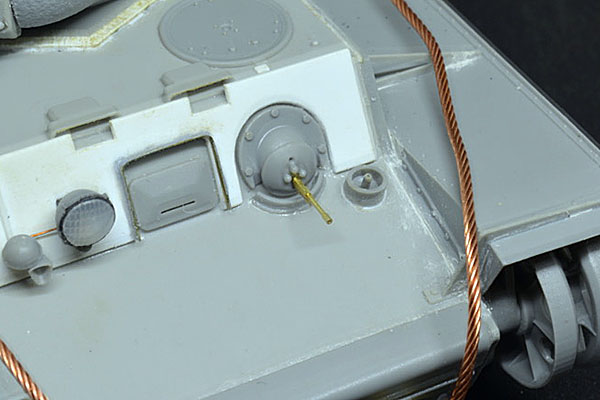
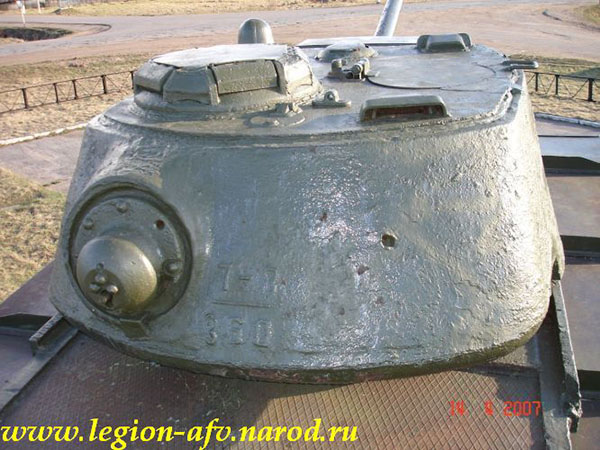
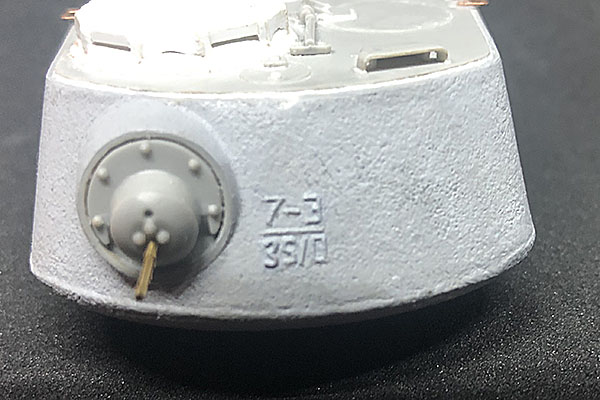
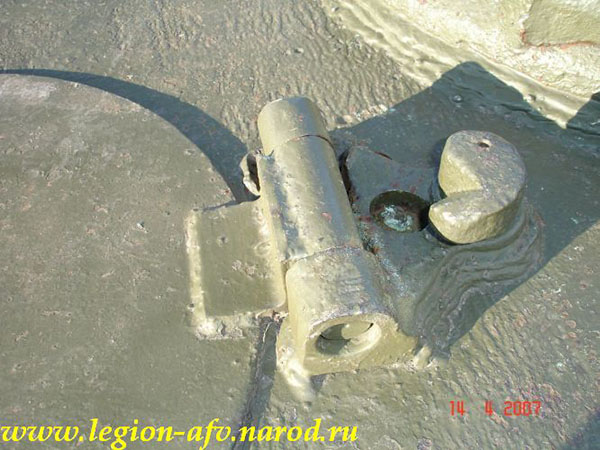
Next, I posted a pic on the 'Kliment Voroshilov. KV series of tanks Appreciation Society' group on Facebook, showing the casting number on the turret rear face of my build. Somebody over there posted a pic of the Parfino vehicle, showing the casting number in more detail than I'd previously been able to find, and showing my initial interpretation was incorrect.

The casting number was comprised of two parts. Above the horizontal line was a two-part number indicating the month in which the turret was cast. The Parfino vehicle carries '7-9' which indicates September (the ninth month) of 1943 (I don't know why 1943 is '7'). The lower part of the number is sequential and indicates the number of this turret in the series. The Parfino vehicle carries '360'. We don't know exactly what number 'Strong' carried so I used some modeler's license and used '350'.


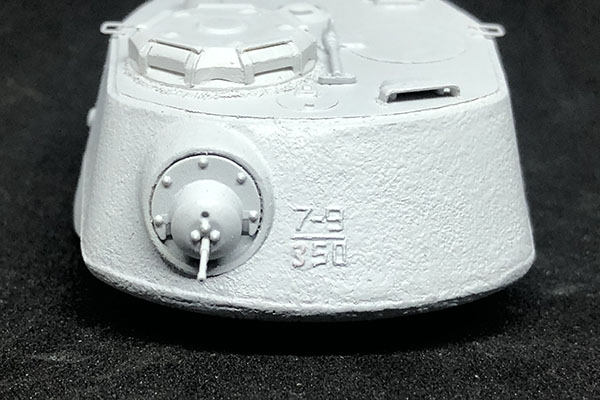
As with the first attempt, I made the numbers from short lengths of 10-thou styrene rod, except for the curly '3' for which I used 10-thou phosphor bronze wire.

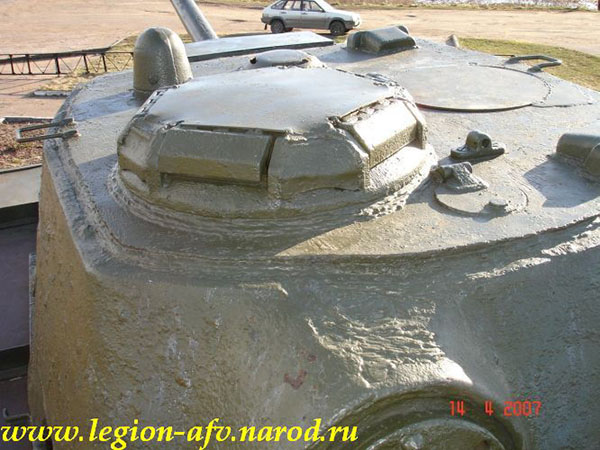
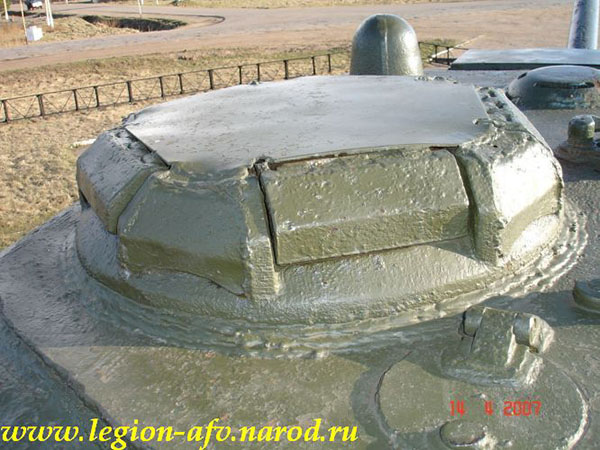
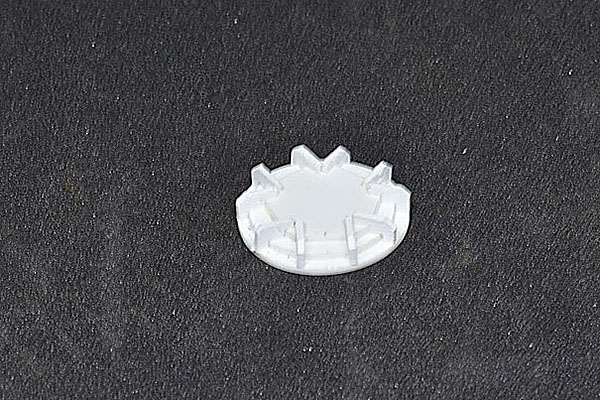
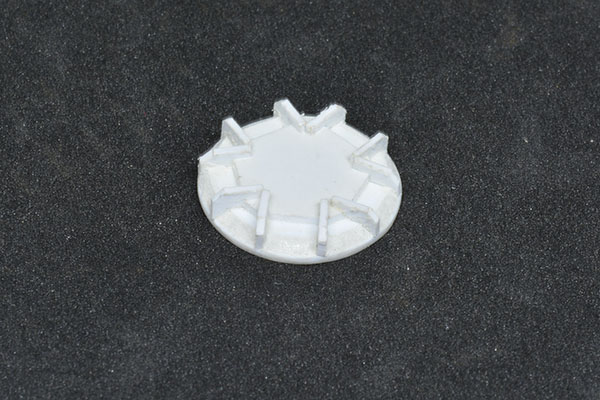
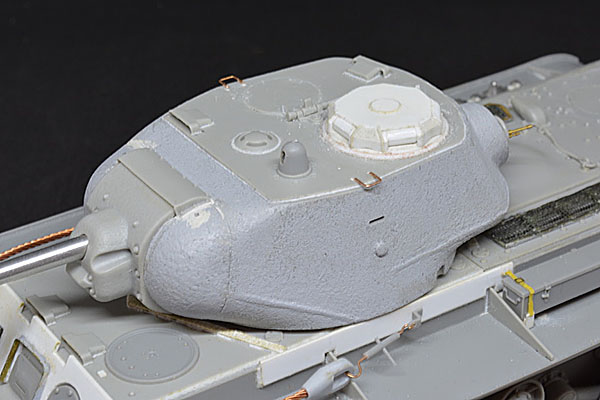
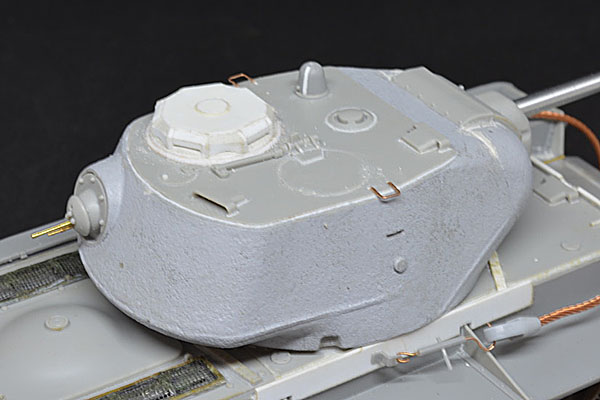
Another discussion on Facebook turned up some decent photos and drawings of the cupola roof, and showed some details I'd missed. I therefore went back and added rain strips to the roof over each periscope cover, as well as the little domed 'bumps' inboard of the right-hand side of each periscope cover. I'm not certain what these were for, but I'm assuming they provided clearance for the operating mechanisms that allowed the periscope covers to be opened and closed.


I used 10-thou styrene sheet for the ridges/strips, glued to the roof. After the glue had set, I filed and sanded the edges to blend them into the main portion of the roof.

The domed 'bumps' are 5-thou styrene sheet, cut out with my Waldron Punch set. I used the rounded end of a sculpting tool to 'dish' the undersides and create the domes. I then glued the pieces in place and after the glue had set, gently filed the edges to blend them in.
rfbaer
Visit this Community
Texas, United States
Joined: June 12, 2007
KitMaker: 1,866 posts
Armorama: 1,696 posts
Posted: Monday, February 10, 2020 - 11:56 AM UTC
I'm really enjoying learning the techniques you're using to scratch details.
SSGToms
Visit this Community
Connecticut, United States
Joined: April 02, 2005
KitMaker: 3,608 posts
Armorama: 3,092 posts
Posted: Tuesday, February 11, 2020 - 03:29 PM UTC
Wow Neil when you first began I thought this was going to be gluing together all the correct parts and aftermarket. Now, I'm just blown away by your scratchbuilding skills. Absolutely amazing craftsmanship, my friend!
Borris
Visit this Community
Rostov, Russia
Joined: October 03, 2019
KitMaker: 2 posts
Armorama: 2 posts
Posted: Tuesday, February 11, 2020 - 10:11 PM UTC
Amazing work!

Here is some photos of real tank: https://warspot.ru/9074-parfinskiy-kentavr