Armor/AFV: IDF [Israeli Defense Forces]
Armor and AFVs of the IDF army from 1947-today.
Hosted by Darren Baker
Puma Batash with Doghouse and Nochri Dalet
GTDeath13
Visit this Community
Attica, Greece / Ελλάδα
Joined: June 12, 2015
KitMaker: 921 posts
Armorama: 919 posts
Posted: Wednesday, March 07, 2018 - 03:32 AM UTC

Quoted Text

Fantastic progress- but I have to say if judges are getting it wrong then building to their prejudice/ignorance means the problem is perpetuated.


Thank you. The problem is perpetuated because there is little time and few judges. A modeller can spend lots of time studying and researching for his build while the judges have (depending on the show and number of participants) a few minutes. So expertise is a prequisite due to the small time available. But how many experts are out there? And here is an example from the ongoing build. The exhausts have protective caps on them. Hobbyboss does not provide the option to have them opened or closed, they are molded on shut, and with very subtle detail to indicate the cap hinge. If a judge does not know that the exhaust on the Puma has protective caps, he will see a solid plastic tube (blackened by pigments usually) and he might say that the exhaust was not holed out.
GTDeath13
Visit this Community
Attica, Greece / Ελλάδα
Joined: June 12, 2015
KitMaker: 921 posts
Armorama: 919 posts
Posted: Wednesday, March 07, 2018 - 03:37 AM UTC

Quoted Text

Like another member above I also have all the parts for a "normal" Puma with roller and carpet in my stash. Just waiting for a second lifetime to get round to it ............

Stop making me want (even more) to do a Batash Doghouse too!!!! That's what, £120-150 in HobbyBoss and Legend parts before we start on AM tracks?? Oh my aching wallet.........!

And then someone will finally do a decent Urdan dozer blade which doesn't cost €50 and I'll want to hang that on the front too...

A couple of months ago I told myself that I had to stop buying kits. But you just cannot refuse bargains or kits that were always in your to do list and come out with great detail. The only option is to limit your to do list and only buy high quality kits that do not need a ton of aftermarket stuff to make a decent model out of, e.g. Tamiya/Academy M-60 vs AFV Club M-60.
GTDeath13
Visit this Community
Attica, Greece / Ελλάδα
Joined: June 12, 2015
KitMaker: 921 posts
Armorama: 919 posts
Posted: Thursday, March 08, 2018 - 04:02 AM UTC
Some general comments/suggestions for the build:

You can replace the wheels with Merkava II wheels if you want.

HobbyBoss has made some minor accuracy mistakes that need careful research and comparing to photos of the real vehicle in order to correct, such as the rear mudguard length,exhaust caps, positioning of braces and handles etc.

Continuing with the instructions:

On Step 10 do not use parts D30, D43, C13, D38, D51, PE-2, C50, and G2. Parts PE-3 and C30 are optional, part F14 can be replaced with photoetch parts from the conversion set or used as it is. Remove the hinge details on the upper side of part D32

Step 11 instructs you to place the fenders on the lower hull. I suggest adding the biggest parts of the fenders (E1, E2) to the hull assembly and then work on the front fender modification (parts G14 and G15).

Step 12 is the RWS and nothing needs to be changed.

On step 13 you only need one Mag assembly, you can omit the tripod mount.

On step 14 do not use parts C47, PE-1 if you are adding the Doghouse.

Step 15 should be omitted if you are adding the doghouse.

On step 16 do not use assembly K-K if you are adding the Doghouse, make only the left hatch assembly (the right one as you are looking at the instructions) and do not use part D49. Remember to remove the sideskirt positioning blocks on the sides of part G16.

Step 17 should be omitted if you are adding the doghouse.

On step 18 do not add assembly M-M if you are adding the Doghouse.

On step 19 do not use parts C55 and C61 if you are adding a mine roller.

I am trying to find out if part D22 should be holed out (the left exhaust pipe). HobbyBoss has molded the exhaust caps shut on parts D22 and D23, but the conversion set supplies an exhaust gas deflector for the left exhaust, so it seems logical that there is no exhaust cap there. I will post this info the following days.

Steps 20,21 and 22 show the side skirt assemlies that replaced by the new heavier armored side skirts of the conversion set. I am planning to use part D73 (ladder) and place it on the engine deck instead of the right side.

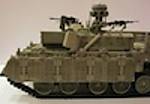
Some photos of my progress, I will try to assemble everything that is used from the kit parts and then start modifying or adding details from the conversion sets. I will try to clean up all the resin pieces during this weekend.


GTDeath13
Visit this Community
Attica, Greece / Ελλάδα
Joined: June 12, 2015
KitMaker: 921 posts
Armorama: 919 posts
Posted: Thursday, March 08, 2018 - 09:54 PM UTC
This is as far as one can get without using any parts from the conversion sets. Notice the front fenders, I have removed almost all of the molded on detail.The RWS is quie tricky to get straight. You might also notice I removed two mounting steps (part C32) from the front of the vehicle and moved them to back, as in the real vehicle.


Nagmakava
Visit this Community
England - East Anglia, United Kingdom
Joined: October 18, 2012
KitMaker: 116 posts
Armorama: 110 posts
Posted: Thursday, March 08, 2018 - 10:43 PM UTC
Looking good.

Now for the fun bits - the doghouse!
GTDeath13
Visit this Community
Attica, Greece / Ελλάδα
Joined: June 12, 2015
KitMaker: 921 posts
Armorama: 919 posts
Posted: Thursday, March 08, 2018 - 11:15 PM UTC

Quoted Text

Looking good.

Now for the fun bits - the doghouse!

Thank you. I am actually thinking of working on the front fenders at first, then add the Nochri adapter and then the anti skid before the doghouse.
GTDeath13
Visit this Community
Attica, Greece / Ελλάδα
Joined: June 12, 2015
KitMaker: 921 posts
Armorama: 919 posts
Posted: Friday, March 09, 2018 - 02:52 AM UTC
I carried on with the build and I have to admit I am really impressed by the quality of the Legend sets. The resin is easy to clean (take in mind that since this is freshly cast resin it is easier to work with and resembles plastic, as time passes by resin becomes more brittle), the photoetch is exceptional and very well designed.

In a couple of hours or so:

I assembled the front fenders, minus some small photoetch parts:


I addded the side armor parts (take in mind that you have to remove a triangular bracket at the left side of the vehicle in order to position the armor braces).


In order to attach the hatch at the superstructure you need to widen the opening a little, some dry fitting will help you. I decided to drill holes and use resin part 13 as an axle for the hatch mountings, instead of splitting it up.


The rear mudguards and the water canister mounts were pretty straight forwardto assemble.


I cleaned up the doghouse way easier than I expected and it fits like a glove. Well done Legend!!! I decided to add the details with the main part mounted on the vehicle so that is easier for me to align the doghouse base details.


CMOT
Staff MemberEditor-in-Chief
ARMORAMA
Visit this Community
England - South West, United Kingdom
Joined: May 14, 2006
KitMaker: 10,954 posts
Armorama: 8,571 posts
Posted: Friday, March 09, 2018 - 08:19 AM UTC
I wish I could progress as fast as you do and get as clean a looking build at the same time. Looking good and you are doing the samples proud. Well done thus far.
SteveS54
Visit this Community
England - South West, United Kingdom
Joined: March 10, 2018
KitMaker: 1 posts
Armorama: 1 posts
Posted: Friday, March 09, 2018 - 02:03 PM UTC
I love this build and will follow with interest.

Would anyone know of a stockist of Legend products in the U.K?. Friendship Models appear to be the official U.K. Importer but don't seem to hold the full range.

Thanks in advance

Steve
CMOT
Staff MemberEditor-in-Chief
ARMORAMA
Visit this Community
England - South West, United Kingdom
Joined: May 14, 2006
KitMaker: 10,954 posts
Armorama: 8,571 posts
Posted: Friday, March 09, 2018 - 05:36 PM UTC

Quoted Text

I love this build and will follow with interest.

Would anyone know of a stockist of Legend products in the U.K?. Friendship Models appear to be the official U.K. Importer but don't seem to hold the full range.

Thanks in advance

Steve


If you don't want to use them there are a number of companies on EBay that stock Legend Products.
Removed by original poster on 03/10/18 - 13:24:27 (GMT).
flugwuzzi
Visit this Community
Lower Austria, Austria
Joined: November 02, 2007
KitMaker: 633 posts
Armorama: 599 posts
Posted: Friday, March 09, 2018 - 09:10 PM UTC
Phantastic work Nikos.
The Puma looks great! Keep up the good work.
Cheers
Walter
GTDeath13
Visit this Community
Attica, Greece / Ελλάδα
Joined: June 12, 2015
KitMaker: 921 posts
Armorama: 919 posts
Posted: Saturday, March 10, 2018 - 08:52 PM UTC

Quoted Text

I wish I could progress as fast as you do and get as clean a looking build at the same time. Looking good and you are doing the samples proud. Well done thus far.


Quoted Text

I love this build and will follow with interest.

Steve


Quoted Text

Phantastic work Nikos.
The Puma looks great! Keep up the good work.
Cheers
Walter


Many thanks for the kind comments.


GTDeath13
Visit this Community
Attica, Greece / Ελλάδα
Joined: June 12, 2015
KitMaker: 921 posts
Armorama: 919 posts
Posted: Saturday, March 10, 2018 - 08:58 PM UTC
Quick update, I will post some more progress later:

By looking at photos and comparing with my model, the front fenders (parts G14, G15) need to be shortened by 8mm. This is not mentioned in the instructions and I noticed that my fenders looked somewhat longer.


And some reference photos, to make up for the small update:


P.S. Can one of the moderators please correct the topic name to "Puma Batash with Doghouse and Nochri"? Thaks in advance
CMOT
Staff MemberEditor-in-Chief
ARMORAMA
Visit this Community
England - South West, United Kingdom
Joined: May 14, 2006
KitMaker: 10,954 posts
Armorama: 8,571 posts
Posted: Saturday, March 10, 2018 - 09:08 PM UTC
All fixed bud.
GTDeath13
Visit this Community
Attica, Greece / Ελλάδα
Joined: June 12, 2015
KitMaker: 921 posts
Armorama: 919 posts
Posted: Sunday, March 11, 2018 - 06:13 PM UTC
The corrected front fenders look much better:


ReluctantRenegade
Visit this Community
Wien, Austria
Joined: March 09, 2016
KitMaker: 2,408 posts
Armorama: 2,300 posts
Posted: Sunday, March 11, 2018 - 06:18 PM UTC
Brilliant work, Nikos! What's Legend's solution for the doghouse windows?


GTDeath13
Visit this Community
Attica, Greece / Ελλάδα
Joined: June 12, 2015
KitMaker: 921 posts
Armorama: 919 posts
Posted: Sunday, March 11, 2018 - 06:35 PM UTC
Doghouse assembly and detailing:

After completing the assembly I reached the conclusion that anyone that is building this kit either has to drill out the resin in the windows or paint over the windows and then use a dark bluish-grey color and then a clear grenn over the grey layer to emulate the glass. I opted for the second choice, since I had not drilled the windows.

Each window consits of 3 parts. A photoetched inner frame and outer frame and a clear part. My biggest problem was that the assembled part has to be glued in place taking extra care not to stain the clear part with glue, which I failed doing as you can see in the photos. The second problem was that although I painted the interior silver, I do not like the look of the window and I think that even if I paint them with clear green they will not look the part.

The instructions for the position of the various details are pretty straight forward but one has to spend quite some time studying them. The resin casting is superb and the photoetch quality is great. Working with the parts is easy.

The hatch mechanisms were tricky and special care needs to be taken when aligning the left and right arms, so as not to leave a big gap between them. If you fail to install them with the correct distance photoetch part P13 will be difficult to glue into place.

I also suggest gluing resin parts 7 into place before attaching the mounting bases, because will find difficulty aligning them.

Legend does not provide the gun arc limiter situated below the Mag barrels. I used brass wire and the fix was quite easy.

I hated cutting the Mag barrels, since HobbyBoss supllies very nicely detailed machine guns, but I had no other choice. At least I can keep the rest of the part and add the missing barrel length.

Finally, I improvised a little and filled the locating holes for the engine deck basket, since it is not installed when the Doghouse is used, using plastic strip and a couple of Meng boltheads for each hole.


ReluctantRenegade
Visit this Community
Wien, Austria
Joined: March 09, 2016
KitMaker: 2,408 posts
Armorama: 2,300 posts
Posted: Sunday, March 11, 2018 - 06:50 PM UTC

Quoted Text

either has to drill out the resin in the windows


Would that be difficult? I think given the large surface of the windows that's probably the better solution. What do you think?


GTDeath13
Visit this Community
Attica, Greece / Ελλάδα
Joined: June 12, 2015
KitMaker: 921 posts
Armorama: 919 posts
Posted: Sunday, March 11, 2018 - 06:56 PM UTC

Quoted Text


Quoted Text

either has to drill out the resin in the windows


Would that be difficult? I think given the large surface of the windows that's probably the better solution. What do you think?


It is very easy. But I mistakenly thought that they would look better painted silver and the the clear part clear green.
CMOT
Staff MemberEditor-in-Chief
ARMORAMA
Visit this Community
England - South West, United Kingdom
Joined: May 14, 2006
KitMaker: 10,954 posts
Armorama: 8,571 posts
Posted: Sunday, March 11, 2018 - 07:26 PM UTC
If you use a dark green food colouring on the clear parts the look should be fine with the windows opened, I say that as it should be dark enough to hide the lack of detail inside that area. Mix the food colouring with Klear.
ReluctantRenegade
Visit this Community
Wien, Austria
Joined: March 09, 2016
KitMaker: 2,408 posts
Armorama: 2,300 posts
Posted: Sunday, March 11, 2018 - 07:31 PM UTC
What do you think about the base-kit? Would it build-up into a nice kit OOB? If it didn't, what essential AM stuff would you recommend? I always wanted to build a Puma but I'm not a big AM fan...
GTDeath13
Visit this Community
Attica, Greece / Ελλάδα
Joined: June 12, 2015
KitMaker: 921 posts
Armorama: 919 posts
Posted: Sunday, March 11, 2018 - 07:43 PM UTC

Quoted Text

What do you think about the base-kit? Would it build-up into a nice kit OOB? If it didn't, what essential AM stuff would you recommend? I always wanted to build a Puma but I'm not a big AM fan...

HobbyBoss does not supply wireropes. The link by link track has to be glued to place, so if you are not used to such thing you need aftermarket. The kit supplied photoetch is vey nice and covers all the details needed. The kit supplied wheels are usable. I would say that the base kit needs no aftermarket except the wireropes, and one can add some wheels if he feels like doing so. You can use both centurion or Merkava II wheels.
GTDeath13
Visit this Community
Attica, Greece / Ελλάδα
Joined: June 12, 2015
KitMaker: 921 posts
Armorama: 919 posts
Posted: Sunday, March 11, 2018 - 07:46 PM UTC
Chec out the mixed wheels on this one:

ReluctantRenegade
Visit this Community
Wien, Austria
Joined: March 09, 2016
KitMaker: 2,408 posts
Armorama: 2,300 posts
Posted: Sunday, March 11, 2018 - 07:53 PM UTC

Quoted Text

Chec out the mixed wheels on this one:


That's quiet unusual on Pumas, but at least the 'location' is right. Unlike on this one...