Under New Management 2018
Queensland, Australia
Joined: August 06, 2005
KitMaker: 3,353 posts
Armorama: 3,121 posts
Posted: Saturday, November 24, 2018 - 07:51 AM UTC
I has heard the kit was not one of Dragon's best Shawn. You seem to have tamed it though. Looking good so far. Where did the tarps stowage come from? They look really nice.
Looking 'white' on the money David


Ejector marks are a legacy of the age of the base kit. They were a pain back then too.
On the Bench:
Dust, styrene scraps, paint splotches and tears.
California, United States
Joined: March 03, 2016
KitMaker: 142 posts
Armorama: 137 posts
Posted: Wednesday, November 28, 2018 - 02:47 PM UTC
Shawn, that's a Beast you have there sir!
Pete, you always have a answer for everything!
As for my M3. I did touch up the cab areas that the air brush did not cover. Once im ready to paint the Bison II RAL8000 (funnies campaign). That's when ill kill 2 birds with one stone.
JohnA
Queensland, Australia
Joined: August 06, 2005
KitMaker: 3,353 posts
Armorama: 3,121 posts
Posted: Wednesday, November 28, 2018 - 03:34 PM UTC
Quoted Text
Pete, you always have a answer for everything!
JohnA
Is that a polite way of saying I talk too much?
On the Bench:
Dust, styrene scraps, paint splotches and tears.
California, United States
Joined: March 03, 2016
KitMaker: 142 posts
Armorama: 137 posts
Posted: Thursday, November 29, 2018 - 02:39 PM UTC
Quoted Text
Is that a polite way of saying I talk too much?
lolx2, not at all sir!
You have lots of knowledge when it comes to questions, information or issues with kits. That's why I said, you have a answer for everything.


Wales, United Kingdom
Joined: May 07, 2013
KitMaker: 242 posts
Armorama: 234 posts
Posted: Friday, November 30, 2018 - 12:04 PM UTC
I see we already have one of these

but I'm throwing it in anyway.
Queensland, Australia
Joined: August 06, 2005
KitMaker: 3,353 posts
Armorama: 3,121 posts
Posted: Friday, November 30, 2018 - 01:44 PM UTC
I have had the benefit of obtaining wisdom from others. I do not believe in hoarding it. If I can help someone, I am very happy to do so. That is the best part about Group builds, the interactions and advice given.
Welcome aboard Richard. No rule that says you can't build what someone else has chosen too. It can be very interesting to see how different people tackle the same kit/vehicle.
On the Bench:
Dust, styrene scraps, paint splotches and tears.
United Kingdom
Joined: September 17, 2012
KitMaker: 462 posts
Armorama: 417 posts
Posted: Sunday, December 02, 2018 - 08:54 PM UTC
Great work going on here!
I have a bit of progress to report on the beutevalentine. Heres a photo

Now on to the weathering.
Cheers
Matthew
Klaus-Adler
 Campaigns Administrator
Scotland, United Kingdom
Joined: June 08, 2015
KitMaker: 1,505 posts
Armorama: 840 posts
Posted: Monday, December 03, 2018 - 03:11 AM UTC
well the M113 is coming along nicely. i didn't manage to start painting it properly but i did get the pre-shading done today

Queensland, Australia
Joined: August 06, 2005
KitMaker: 3,353 posts
Armorama: 3,121 posts
Posted: Wednesday, December 05, 2018 - 08:24 AM UTC
Looking good guys.
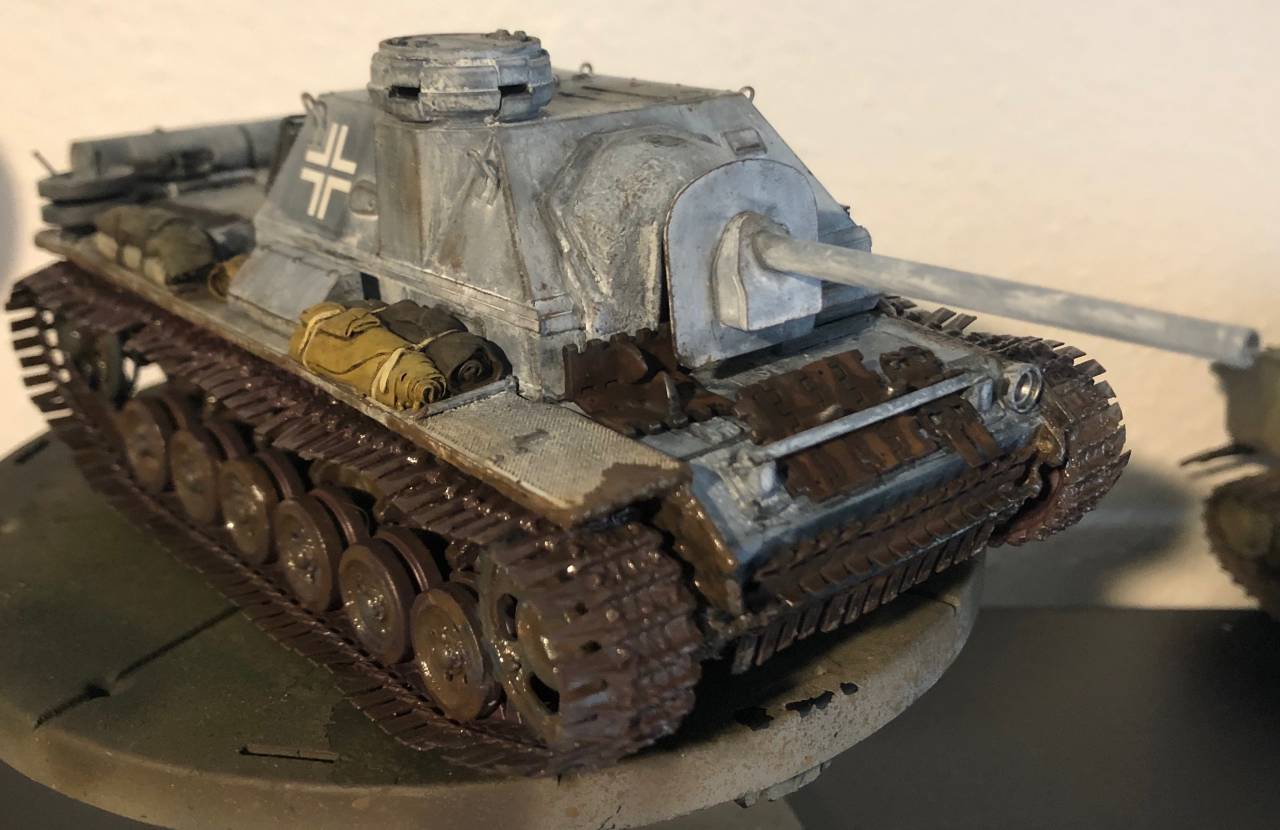
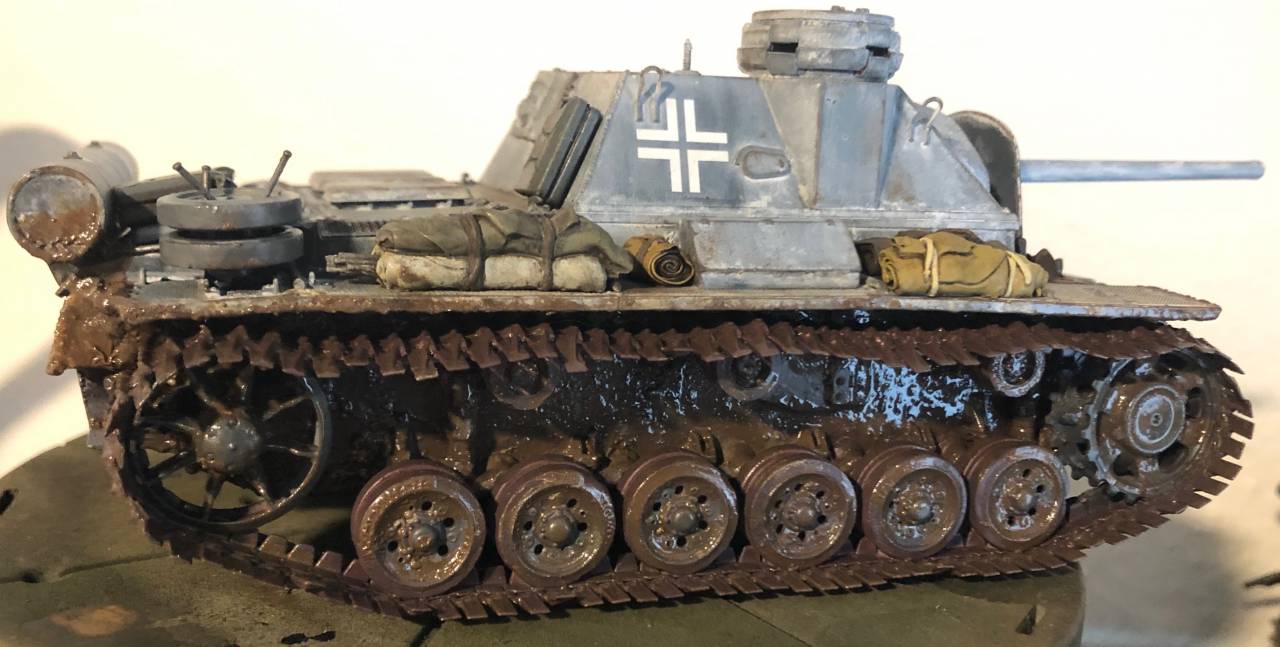
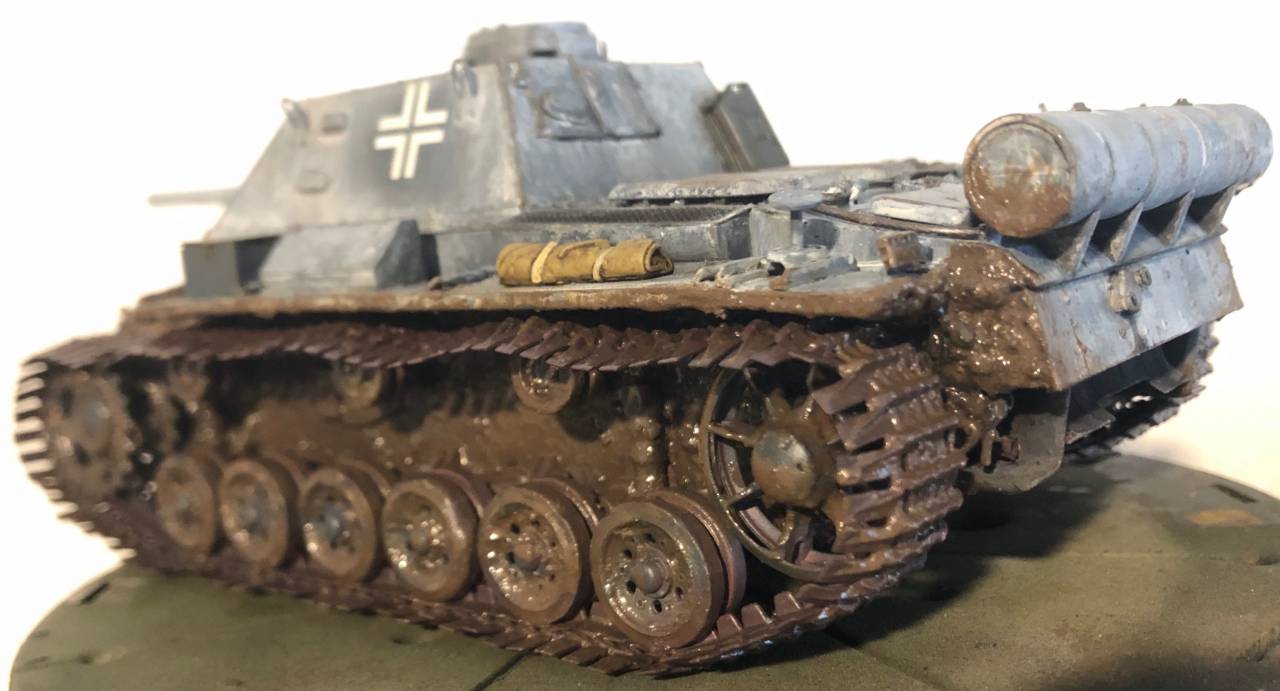
Finished the interior on the Marder by scratch building the ammunition covers as seen in the pics of the actual vehicle. Also needed as Dragon don't give you enough rounds to fill the racks on both sides, one rack only. Also added periscope mounts as the actual scopes are not fitted in the pics.
I have assumed the crew would have taken the gas masks, MP 40, mags and the MG when they vacated, so added the missing straps on the gas mask holders, and the frames to hold the MP 40 and mag holders.
The etch on the exhaust is not fixed down. Also have yet to sand down the filler seen here in the main gun parts


On the Bench:
Dust, styrene scraps, paint splotches and tears.
Klaus-Adler
Campaigns Administrator Scotland, United Kingdom
Joined: June 08, 2015
KitMaker: 1,505 posts
Armorama: 840 posts
Posted: Wednesday, December 05, 2018 - 11:15 PM UTC
Hi all,
just a quick update.
i have now begun to paint the APC and the main coat has gone on over the pre-shading, which you can just about make out in the these poor quality pictures (sorry about that it was a rush job before i went to bed)

United Kingdom
Joined: September 17, 2012
KitMaker: 462 posts
Armorama: 417 posts
Posted: Sunday, December 09, 2018 - 07:57 AM UTC
Hello!
Im nearly finished with the Beutevalentine.
I might add some wet effects to the mud on the running gear, just here and there for contrast, and perhaps a little oil too.


cheers
Matthew
Queensland, Australia
Joined: August 06, 2005
KitMaker: 3,353 posts
Armorama: 3,121 posts
Posted: Sunday, December 09, 2018 - 09:38 PM UTC
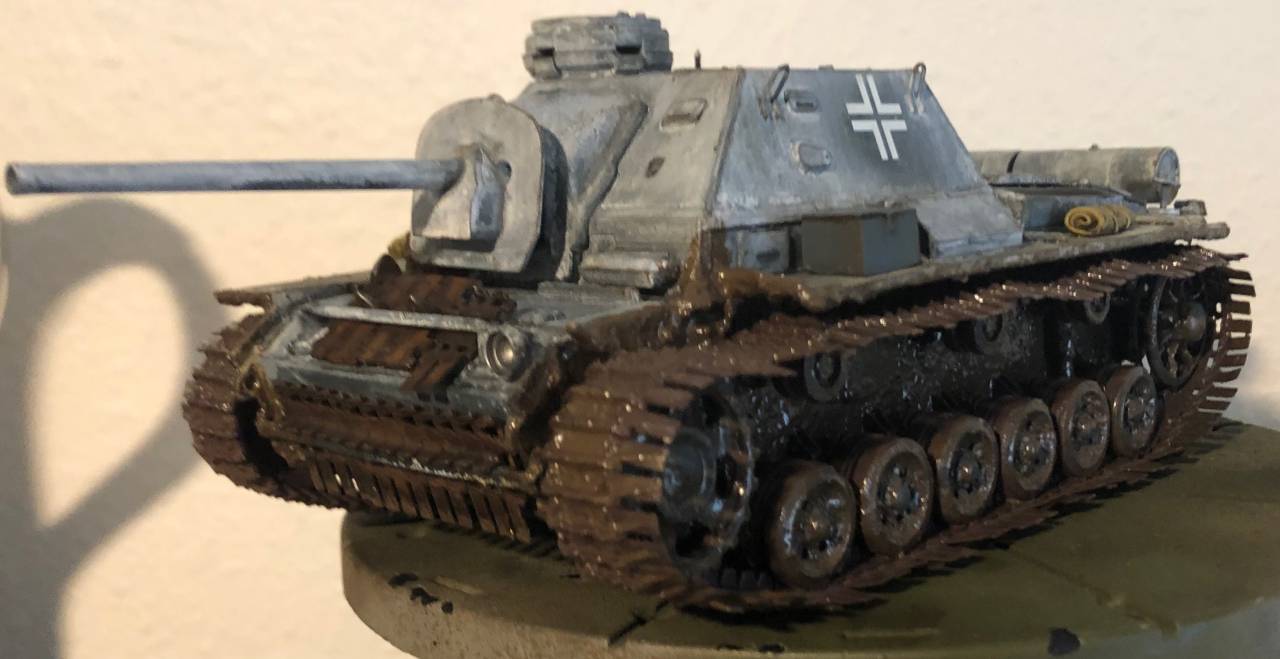
Very nice indeed Matthew. Love the way you took advantage of the articulating suspension.
On the Bench:
Dust, styrene scraps, paint splotches and tears.
United Kingdom
Joined: September 17, 2012
KitMaker: 462 posts
Armorama: 417 posts
Posted: Sunday, December 09, 2018 - 10:34 PM UTC
Thanks Peter. Your Marder is shaping up very nicely. I like the extra work youve done in the fighting compartment.
Cheers
Matthew

#401
Washington, United States
Joined: December 08, 2013
KitMaker: 323 posts
Armorama: 221 posts
Posted: Monday, December 17, 2018 - 04:43 AM UTC
Some solid work going on for this build!
I wrapped up the SU-76i this weekend. I still have not completed my photo booth so forgive me if the pics arent too great.
I wanted to depict the SU-76i like the boxart, showing the vehicle traversing some fresh mud. Considering this vehicle has changed hands at least 2 times, I wanted to show some general wear on the vehicle.
Looking forward to seeing everyone elses builds!

Queensland, Australia
Joined: August 06, 2005
KitMaker: 3,353 posts
Armorama: 3,121 posts
Posted: Monday, December 17, 2018 - 09:52 AM UTC
Really well done Shawn. The wet mud looks great. Thanks for joining in.
On the Bench:
Dust, styrene scraps, paint splotches and tears.
Queensland, Australia
Joined: August 06, 2005
KitMaker: 3,353 posts
Armorama: 3,121 posts
Posted: Monday, December 17, 2018 - 10:37 AM UTC
Just having a stab at a ribbon. Trying to keep it to the right kb requirements


Supposed to be an arm holding a spray gun

On the Bench:
Dust, styrene scraps, paint splotches and tears.
#298
Hong Kong S.A.R. / 繁體
Joined: August 08, 2002
KitMaker: 1,182 posts
Armorama: 665 posts
Posted: Thursday, December 20, 2018 - 05:25 PM UTC
Here is my entry to the campaign, RPM 1/35 Pzkpfw 730(f).


Uusimaa, Finland
Joined: October 01, 2016
KitMaker: 514 posts
Armorama: 171 posts
Posted: Thursday, December 27, 2018 - 05:21 AM UTC
Tool boxes done. The PE ones were too deep, so made modified copies from styrene sheet. Also started to make cooling air intake grilles, and I have couple of ideas how to proceed:

California, United States
Joined: March 03, 2016
KitMaker: 142 posts
Armorama: 137 posts
Posted: Saturday, December 29, 2018 - 02:59 PM UTC
Well done Matt and Shawn, and congrats on your completion!
Peter,
You skills on creating ribbons are excellent! What program do you use? First ribbon is my Fav.
JohnA
Klaus-Adler
Campaigns Administrator Scotland, United Kingdom
Joined: June 08, 2015
KitMaker: 1,505 posts
Armorama: 840 posts
Posted: Tuesday, January 01, 2019 - 07:36 AM UTC
well, i've had a lazy day in the house while the little woman went to work and i have actually managed to get some modelling done. the captured M113 is in the home straights now and should be done in a week or two if i get some time to sort things out.
as you can see the wheels are on and have been painted and i have started the weathering process as well as painted the rubber band tracks as this is going to be an OOB.

California, United States
Joined: March 03, 2016
KitMaker: 142 posts
Armorama: 137 posts
Posted: Tuesday, January 01, 2019 - 04:03 PM UTC
Happy New Year Everyone!
David.. Shes coming along nicely Sir!!
JoHnA
Queensland, Australia
Joined: August 06, 2005
KitMaker: 3,353 posts
Armorama: 3,121 posts
Posted: Tuesday, January 01, 2019 - 11:52 PM UTC
Quoted Text
Peter,
You skills on creating ribbons are excellent! What program do you use?
JohnA
Hi John . Nothing fancy. I use basic MS Paint that comes with your PC starting with either 150 x 60 pixels or 200x 80 pixels so it is large enough to work with text, etc. Then I use Irfanview ( a free program you can download) to scale it down to 50 x 20 and convert to a .gif file. It is Irfanview that has a great scaling algorithm and ensures the image stays sharp enough to read or recognise.
If you make a large design in paint, you can resize it with Irfanview down to fit the 150 x 60 or 200 x 80 and then paste it in the new picture. Then when you resize it again it will look clearer than trying to draw in the smaller size to begin with. It just takes some practice.
Things to remember when designing ribbons is they must be 50 x 20 pixel .gif files. The more colour you add means more kb size and you have to keep the ribbon to a max of 1.4mb for it to be able to be used. White uses less 'memory' than black, so black backgrounds limit what you can put in them.
cheers
On the Bench:
Dust, styrene scraps, paint splotches and tears.
Queensland, Australia
Joined: August 06, 2005
KitMaker: 3,353 posts
Armorama: 3,121 posts
Posted: Tuesday, January 01, 2019 - 11:54 PM UTC
Really nice scratch building work Pasi. Looks great.
David, the M113 carrier is also looking fantastic. Love the colouring so far.
On the Bench:
Dust, styrene scraps, paint splotches and tears.
Klaus-Adler
Campaigns Administrator Scotland, United Kingdom
Joined: June 08, 2015
KitMaker: 1,505 posts
Armorama: 840 posts
Posted: Wednesday, January 02, 2019 - 03:20 AM UTC
Quoted Text
Really nice scratch building work Pasi. Looks great.
David, the M113 carrier is also looking fantastic. Love the colouring so far.
cheers mate, i appreciate the comments...today i have been messing around with the Browning .5 cal and ammo box which you can see in the picture below. eagle eyed readers will be able to see i have painted the the tips of the rounds with a copper colour and i still need to paint the links as well. The open section of the ammo box was then given a dark wash to tone down the bright metal colours.
The gun itself was painted matt black and drybrushed with gun metal.

Georgia, United States
Joined: July 26, 2013
KitMaker: 2,272 posts
Armorama: 1,860 posts
Posted: Wednesday, January 02, 2019 - 01:19 PM UTC
On the Campaign Trail:
Tank Destroyer 2020