

Hosted by Richard S.
The Workhorses Campaign
Removed by original poster on 03/26/18 - 17:46:05 (GMT).

k_mero4

Joined: November 26, 2017
KitMaker: 393 posts
Armorama: 369 posts
Posted: Monday, March 26, 2018 - 05:07 PM UTC
Hello!
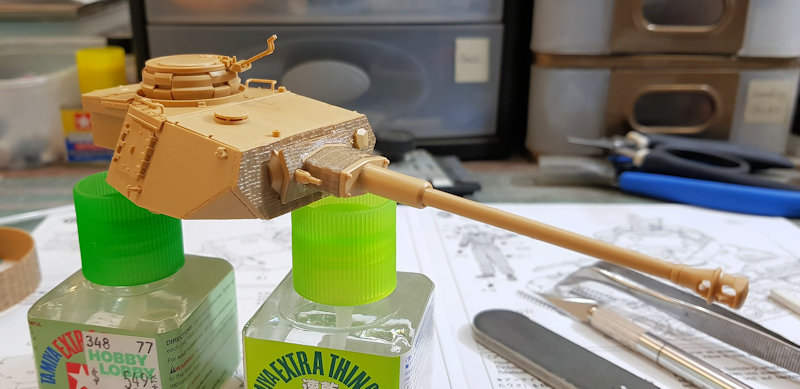
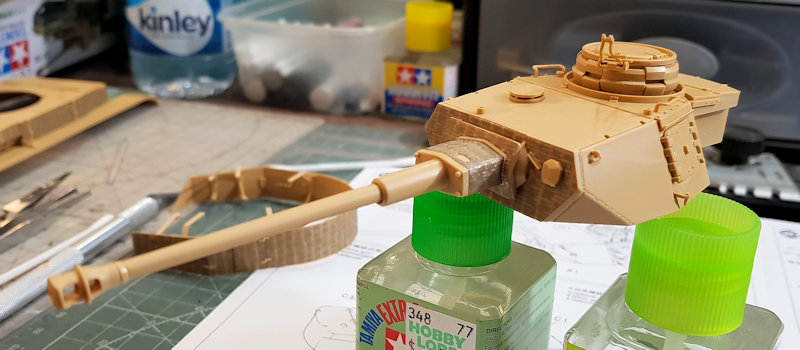
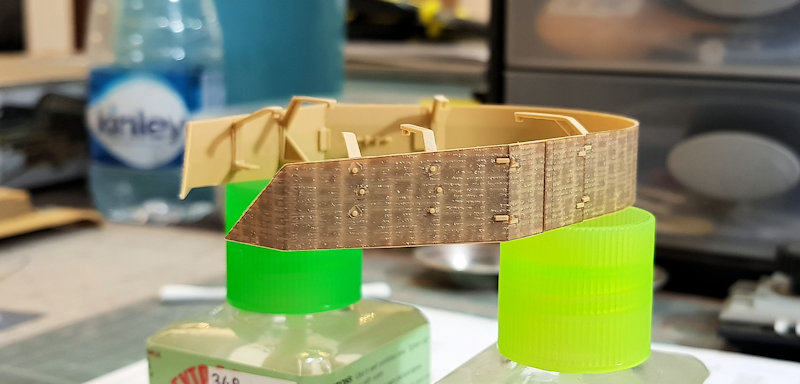
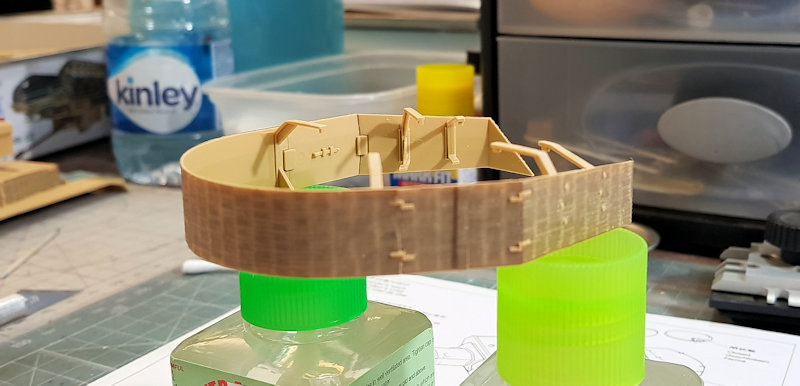
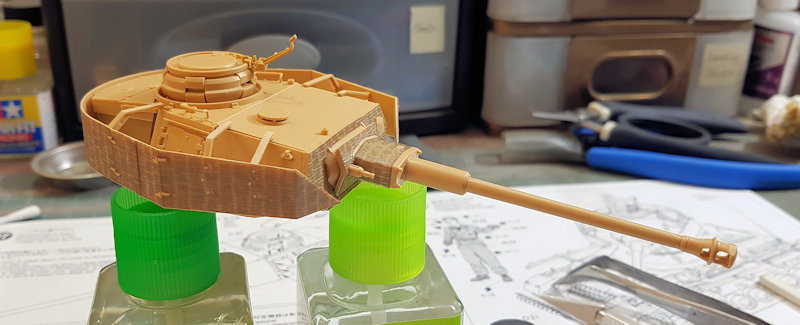
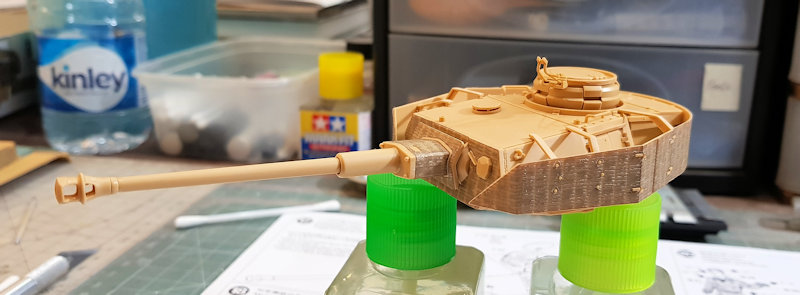
In a few weeks, I got here. The model is good, interesting, but some details are too fragmented. Here are some photos.


I hope things get tired from now on, even though it's a pretty tame job.
Pleasant activities for everyone.
In a few weeks, I got here. The model is good, interesting, but some details are too fragmented. Here are some photos.
I hope things get tired from now on, even though it's a pretty tame job.
Pleasant activities for everyone.

d111298pw

#456

Joined: September 22, 2016
KitMaker: 654 posts
Armorama: 638 posts
Posted: Tuesday, March 27, 2018 - 09:58 PM UTC
Making more progress. Build is basically complete. Need to get to spraying primer and then base coat.
Removed by original poster on 03/29/18 - 20:29:51 (GMT).

Conrad86

Joined: January 01, 2018
KitMaker: 25 posts
Armorama: 25 posts
Posted: Thursday, March 29, 2018 - 12:45 PM UTC
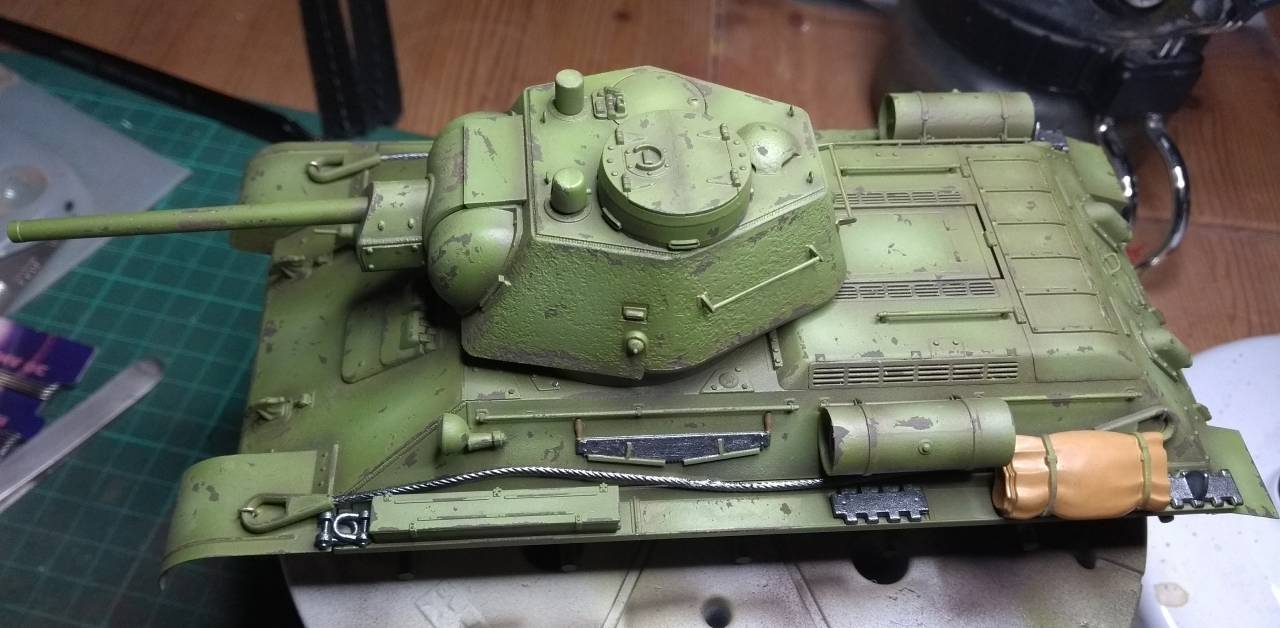
Panel fading/post shading and hairspray chipping done. Maybe went overboard with the chips, but it's good fun!

Soojet
Joined: March 22, 2018
KitMaker: 22 posts
Armorama: 20 posts
Posted: Thursday, March 29, 2018 - 06:39 PM UTC
Conrad, the chipping looks good to me! What color did you use for 4BO and how did you do the panel fading?
Conrad86
Joined: January 01, 2018
KitMaker: 25 posts
Armorama: 25 posts
Posted: Thursday, March 29, 2018 - 07:44 PM UTC
Hi Matt, thanks for the comments! 4BO was done using this set from AK:
https://ak-interactive.com/product/russian-green-modulation-set/
Used five of the six colours in the set, gradually building up shading and highlights over a 4BO base. It's actually pretty easy if you go steady and have a decent 0.2mm nozzle and keep the needle clean.
https://ak-interactive.com/product/russian-green-modulation-set/
Used five of the six colours in the set, gradually building up shading and highlights over a 4BO base. It's actually pretty easy if you go steady and have a decent 0.2mm nozzle and keep the needle clean.
kunjuro

Joined: October 27, 2013
KitMaker: 520 posts
Armorama: 488 posts
Posted: Thursday, March 29, 2018 - 11:42 PM UTC
Progress on mine  Actually did the decals earlier today but will wait for it to dry before posting more photos.


Actually did the decals earlier today but will wait for it to dry before posting more photos. Chaman911
Joined: August 28, 2015
KitMaker: 319 posts
Armorama: 308 posts
Posted: Friday, March 30, 2018 - 03:15 AM UTC
Good looking Panzer IVs. Mark is that a Tamiya kit? Is that the sticker style zim?
The pre shadinglooks very cool on that Sherman. Strong work
The pre shadinglooks very cool on that Sherman. Strong work
kunjuro
Joined: October 27, 2013
KitMaker: 520 posts
Armorama: 488 posts
Posted: Friday, March 30, 2018 - 01:14 PM UTC
Quoted Text
Good looking Panzer IVs. Mark is that a Tamiya kit? Is that the sticker style zim?
The pre shadinglooks very cool on that Sherman. Strong work
Thanks
Here's my nearly completed work. Might just do some more detail painting and some washes on the hull.


d6mst0
#453
Joined: August 28, 2016
KitMaker: 1,925 posts
Armorama: 601 posts

Posted: Friday, March 30, 2018 - 05:14 PM UTC
Nigel,
Nice finish on the Sherman.
Mark
Nice finish on the Sherman.
Mark
d111298pw
#456
Joined: September 22, 2016
KitMaker: 654 posts
Armorama: 638 posts
Posted: Friday, March 30, 2018 - 05:29 PM UTC
Quoted Text
Good looking Panzer IVs. Mark is that a Tamiya kit? Is that the sticker style zim?
The pre shadinglooks very cool on that Sherman. Strong work
Bryan, Yes it is the Tamiya kit and the Tamiya zimmerit stickers.
petbat

Joined: August 06, 2005
KitMaker: 3,353 posts
Armorama: 3,121 posts
Posted: Saturday, March 31, 2018 - 01:43 AM UTC
Guys these are some fantastic builds. The painting and finishes are excellent.
Great to see some variety in subjects too.
Great to see some variety in subjects too.

d111298pw
#456
Joined: September 22, 2016
KitMaker: 654 posts
Armorama: 638 posts
Posted: Sunday, April 01, 2018 - 08:43 PM UTC
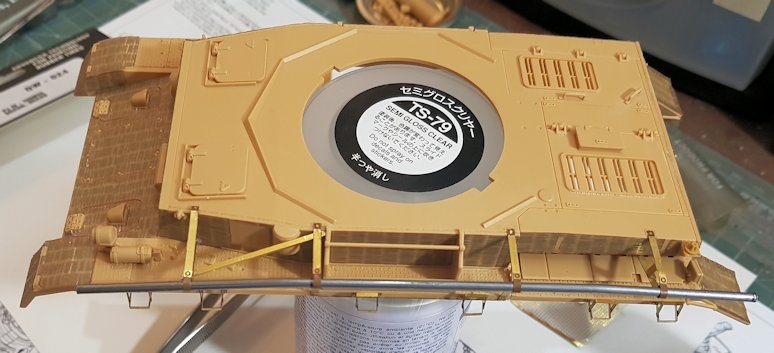
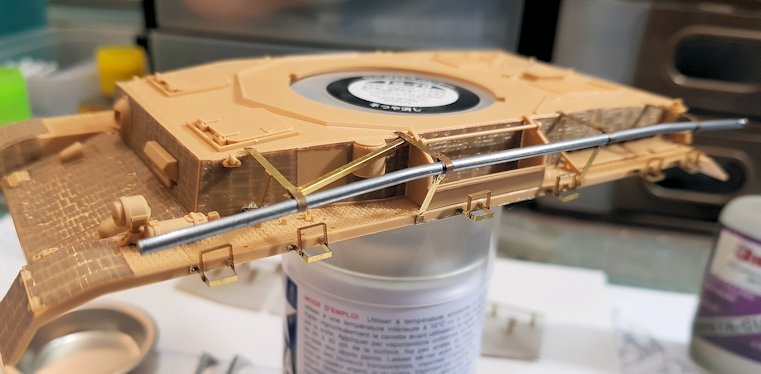
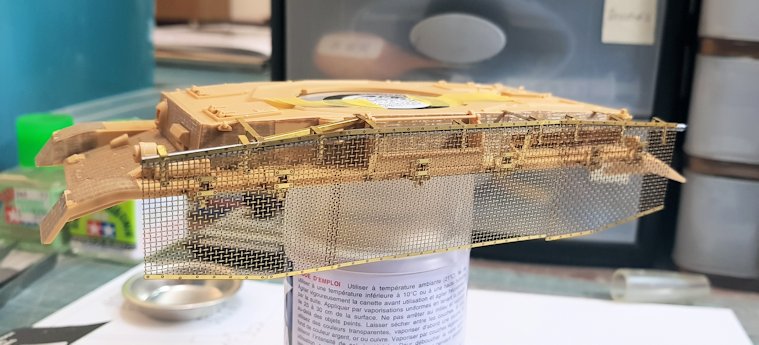
Time to play with the PE wire mesh schurzen. First up, the left side.
Lots of hangers to fold
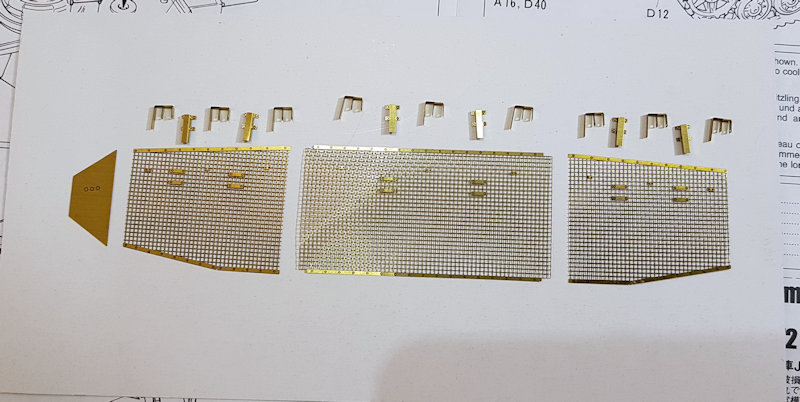
Attached to the wire mesh
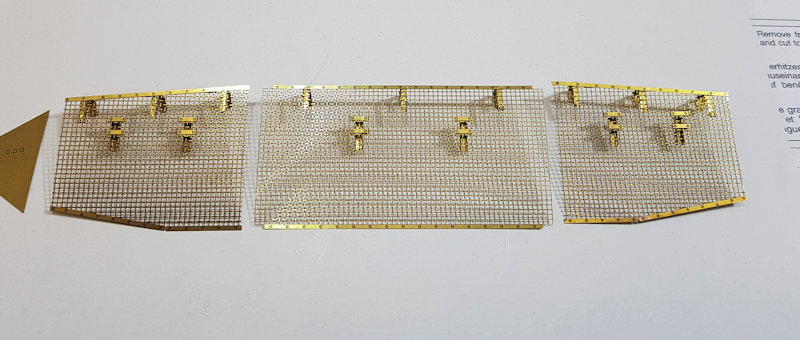
Close-up of the hangars attached to the mesh.
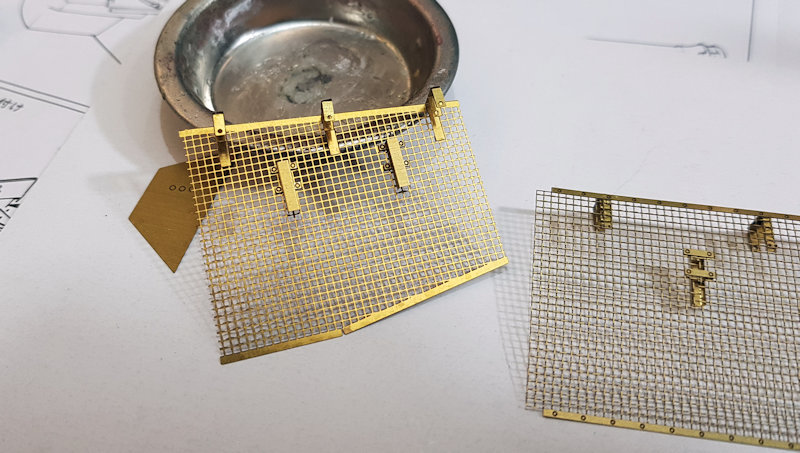
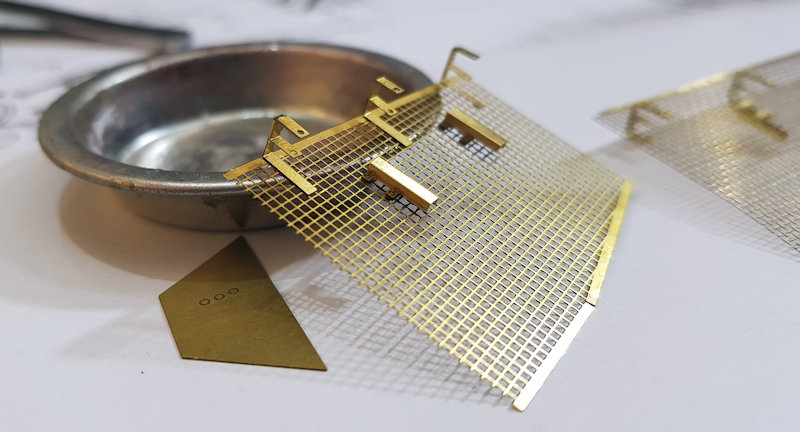
The brackets and pipe are attached to the hull.

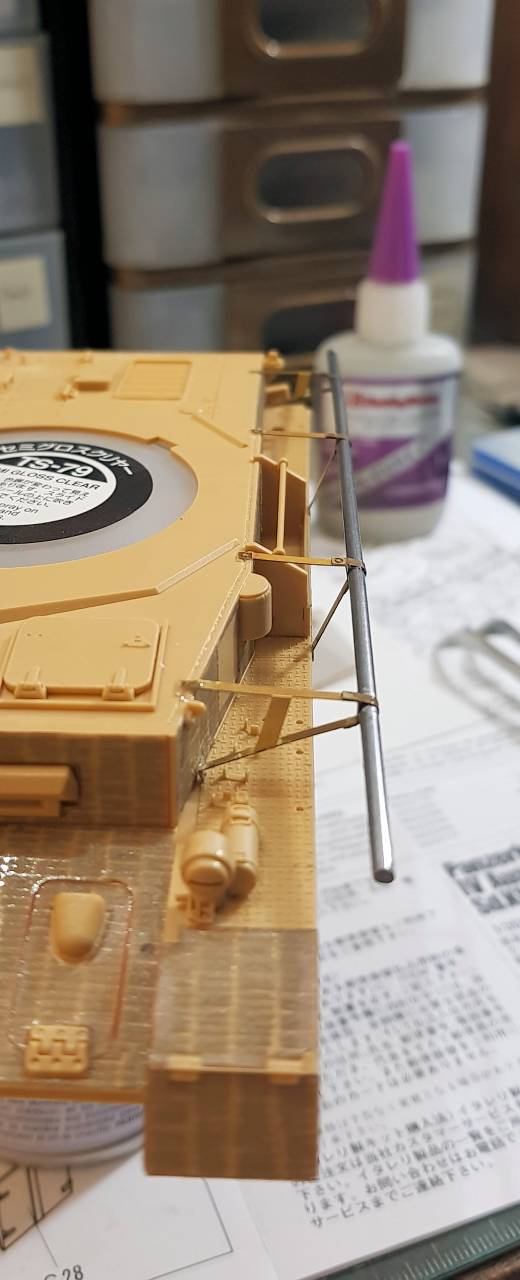
Next, need to repeat for the right side.
Lots of hangers to fold
Attached to the wire mesh
Close-up of the hangars attached to the mesh.
The brackets and pipe are attached to the hull.
Next, need to repeat for the right side.
d6mst0
#453
Joined: August 28, 2016
KitMaker: 1,925 posts
Armorama: 601 posts
Posted: Sunday, April 01, 2018 - 10:16 PM UTC
Mark,
Great PE work you have done there. Those support brackets for the pipe are spot on.
Mark
Great PE work you have done there. Those support brackets for the pipe are spot on.
Mark
MichaelSatin
Joined: January 19, 2008
KitMaker: 3,909 posts
Armorama: 510 posts
Posted: Sunday, April 01, 2018 - 10:30 PM UTC
Agreed, really excellent work everyone!
Michael
Michael
d111298pw
#456
Joined: September 22, 2016
KitMaker: 654 posts
Armorama: 638 posts
Posted: Monday, April 02, 2018 - 05:54 AM UTC
Thanks for the comments guys
Conrad86
Joined: January 01, 2018
KitMaker: 25 posts
Armorama: 25 posts
Posted: Monday, April 02, 2018 - 02:58 PM UTC
A little more progress, glossed, washed, and decals on. Matte coated in preparation for weathering which I'll do later this week. Apologies for the phone photo.
d111298pw
#456
Joined: September 22, 2016
KitMaker: 654 posts
Armorama: 638 posts
Posted: Tuesday, April 03, 2018 - 08:29 AM UTC
Conrad, your T34 looks fantastic. No apologies necessary for using your phone. I take all my pics with my phone.
d111298pw
#456
Joined: September 22, 2016
KitMaker: 654 posts
Armorama: 638 posts
Posted: Tuesday, April 03, 2018 - 08:45 AM UTC
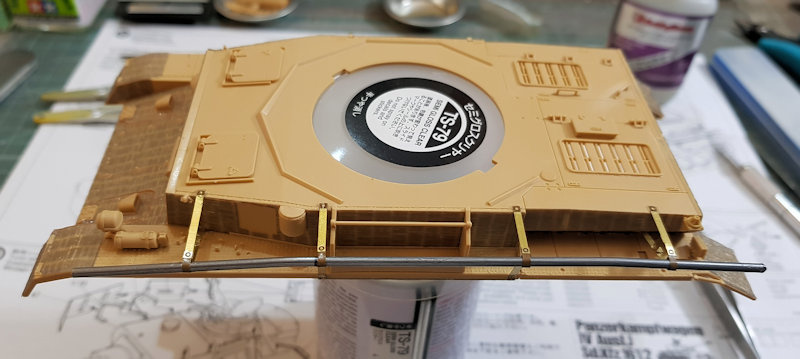
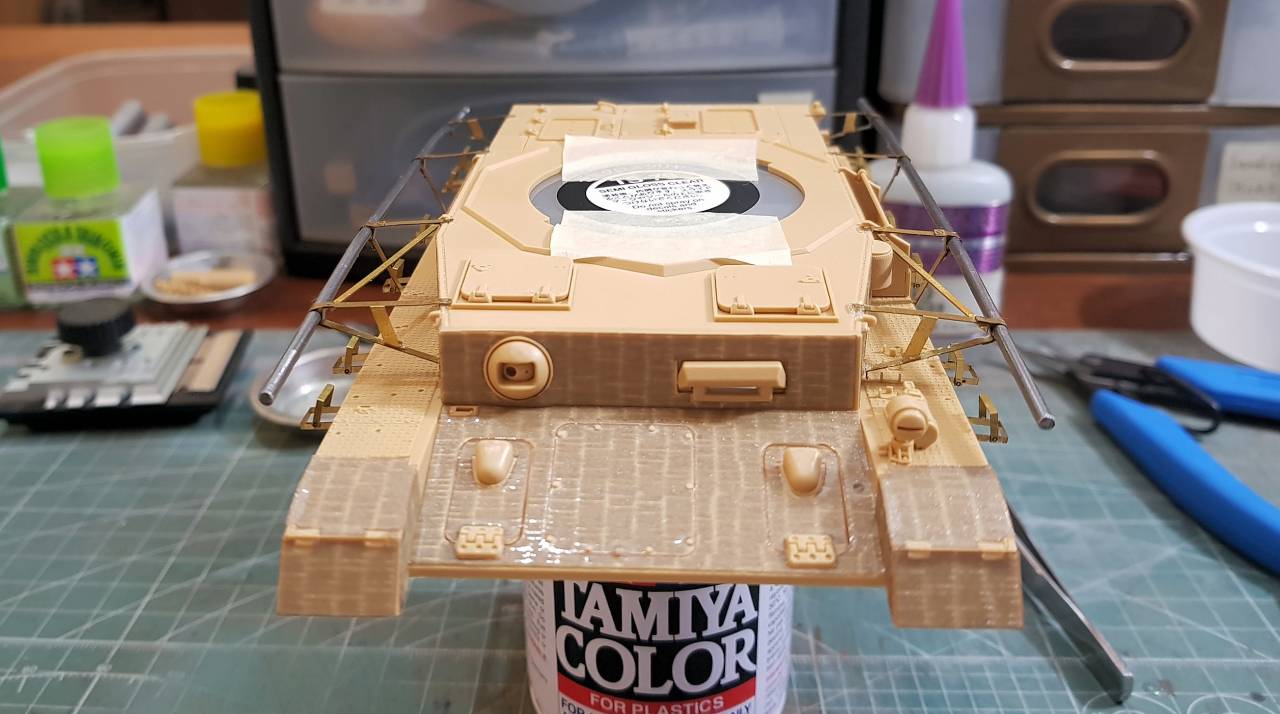
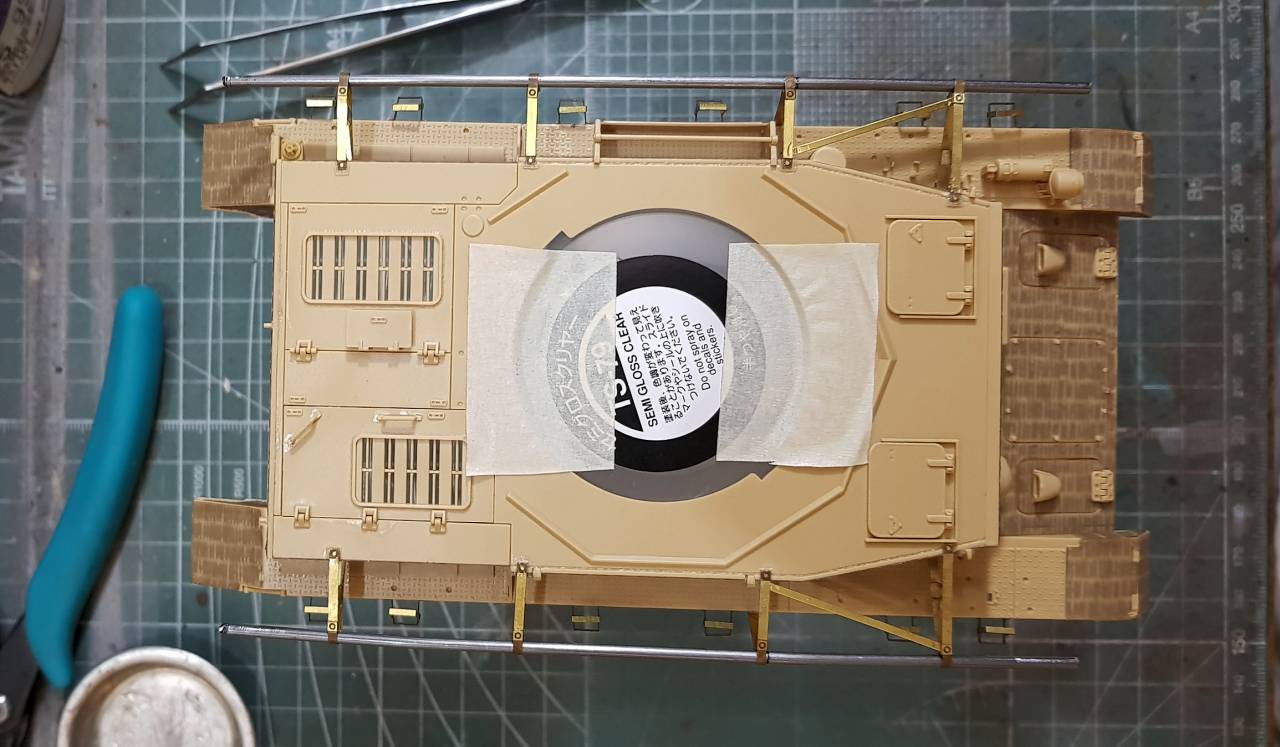
The right side is now complete for mounting the wire mesh schurzen.
There are two configurations for mounting the wire mesh. The areas in the red circles highlight the differences between configuration 1 and 2. The instructions do not give you any guidance on which to use. After looing through my Panzer Tracts 4-3, I discovered the difference between the two configurations.
Configuration 1 - This is used only if the vehicle is fitted with ostketten tracks.
Configuration 2 - This is the standard installation with the normal tracks installed.
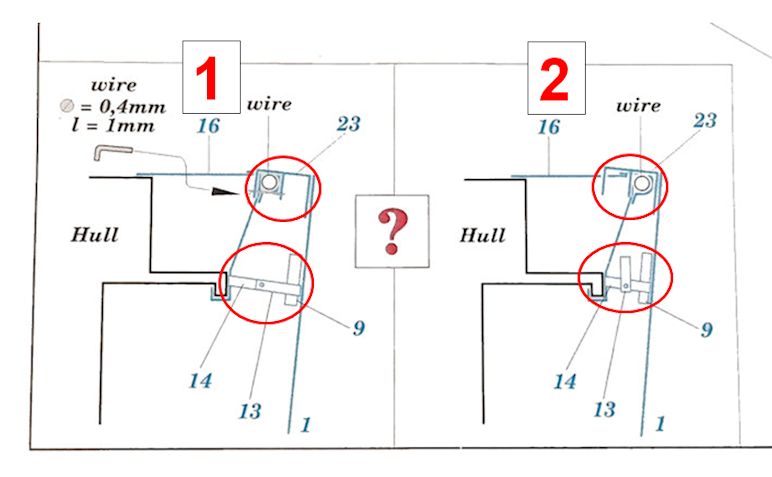
Fender brackets installed with part 13 in the folded up position.
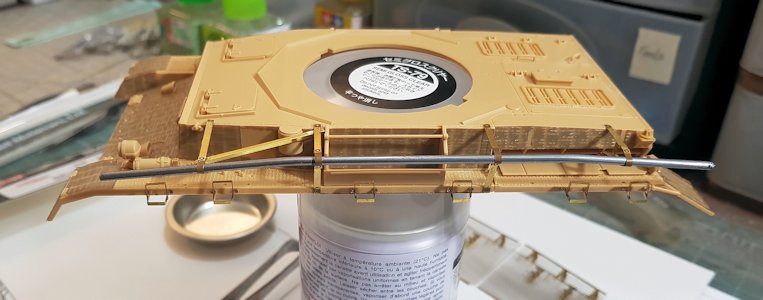
Test fitting the middle panel
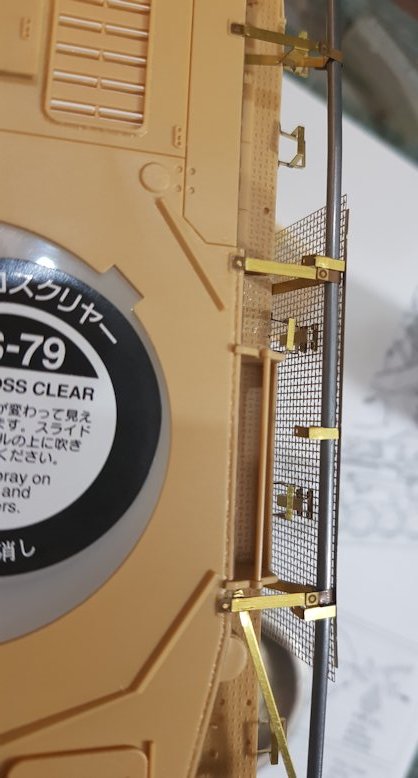
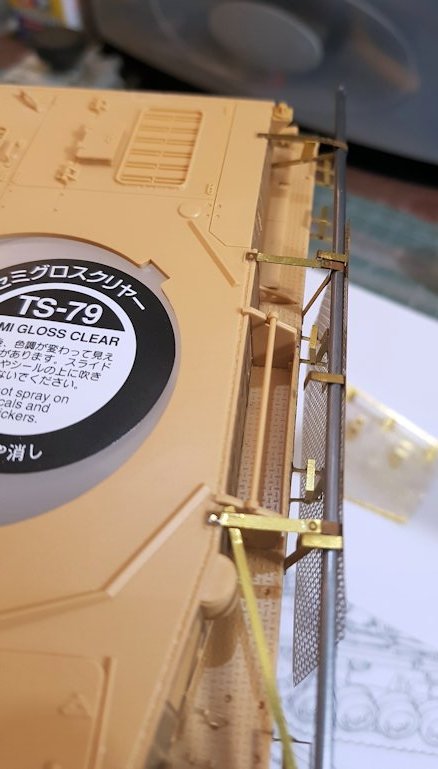
Test fitting all three panels
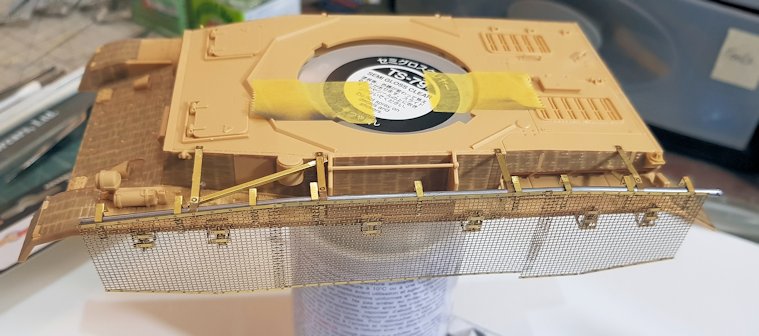
Screens test fitted
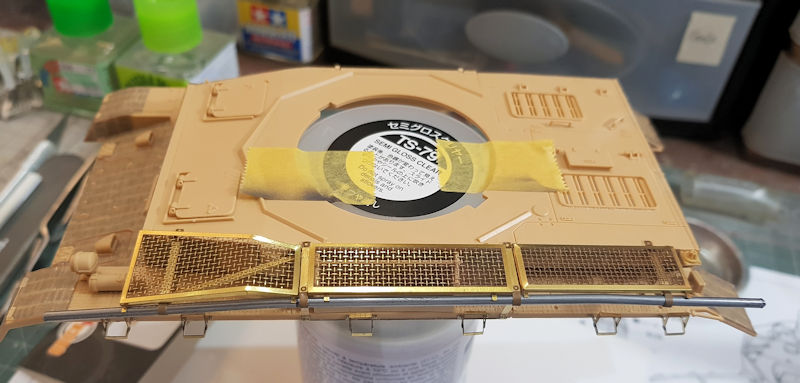
Now I get to do it all over again for the right side.
There are two configurations for mounting the wire mesh. The areas in the red circles highlight the differences between configuration 1 and 2. The instructions do not give you any guidance on which to use. After looing through my Panzer Tracts 4-3, I discovered the difference between the two configurations.
Configuration 1 - This is used only if the vehicle is fitted with ostketten tracks.
Configuration 2 - This is the standard installation with the normal tracks installed.
Fender brackets installed with part 13 in the folded up position.
Test fitting the middle panel
Test fitting all three panels
Screens test fitted
Now I get to do it all over again for the right side.
kunjuro
Joined: October 27, 2013
KitMaker: 520 posts
Armorama: 488 posts
Posted: Wednesday, April 04, 2018 - 10:44 AM UTC
Quoted Text
Nigel,
Nice finish on the Sherman.
Mark
Thanks Mark! Really appreciate it.
@Conrad - that is a handsome looking T-34, good job

@d111298pw/Mark - awesome work with the PE on the Panzer IV. I ain't brave enough to tackle that level of detail yet haha.
d111298pw
#456
Joined: September 22, 2016
KitMaker: 654 posts
Armorama: 638 posts
Posted: Friday, April 06, 2018 - 07:24 PM UTC
Thanks for the comment Nigel. The PE is a handful.
Completed the right side. Glad the PE is finished. Was more than a pain in the backside. Not perfect, but good enough for me.
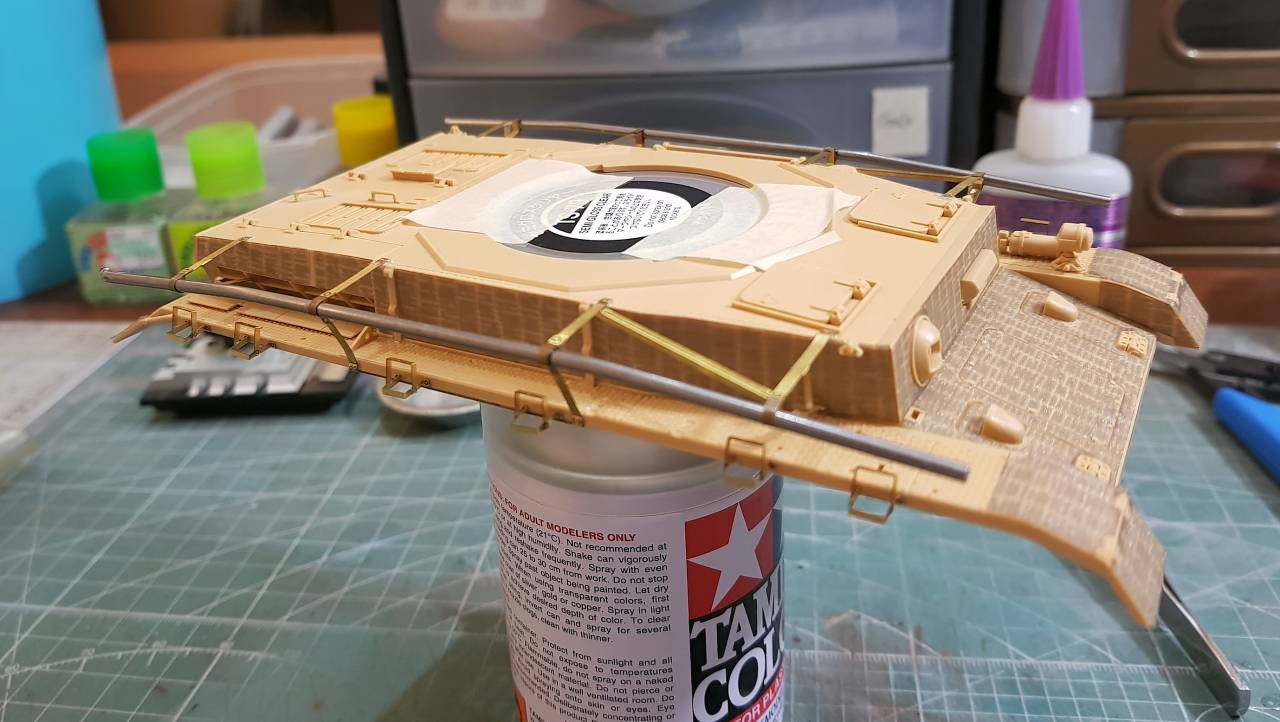
Time to start spraying primer and paint.
Completed the right side. Glad the PE is finished. Was more than a pain in the backside. Not perfect, but good enough for me.
Time to start spraying primer and paint.
d111298pw
#456
Joined: September 22, 2016
KitMaker: 654 posts
Armorama: 638 posts
Posted: Saturday, April 07, 2018 - 05:43 PM UTC
The basecoat has been applied.

Next need to detail paint the tooling.
Next need to detail paint the tooling.
Conrad86
Joined: January 01, 2018
KitMaker: 25 posts
Armorama: 25 posts
Posted: Sunday, April 08, 2018 - 02:33 AM UTC
Thanks for all the comments guys!
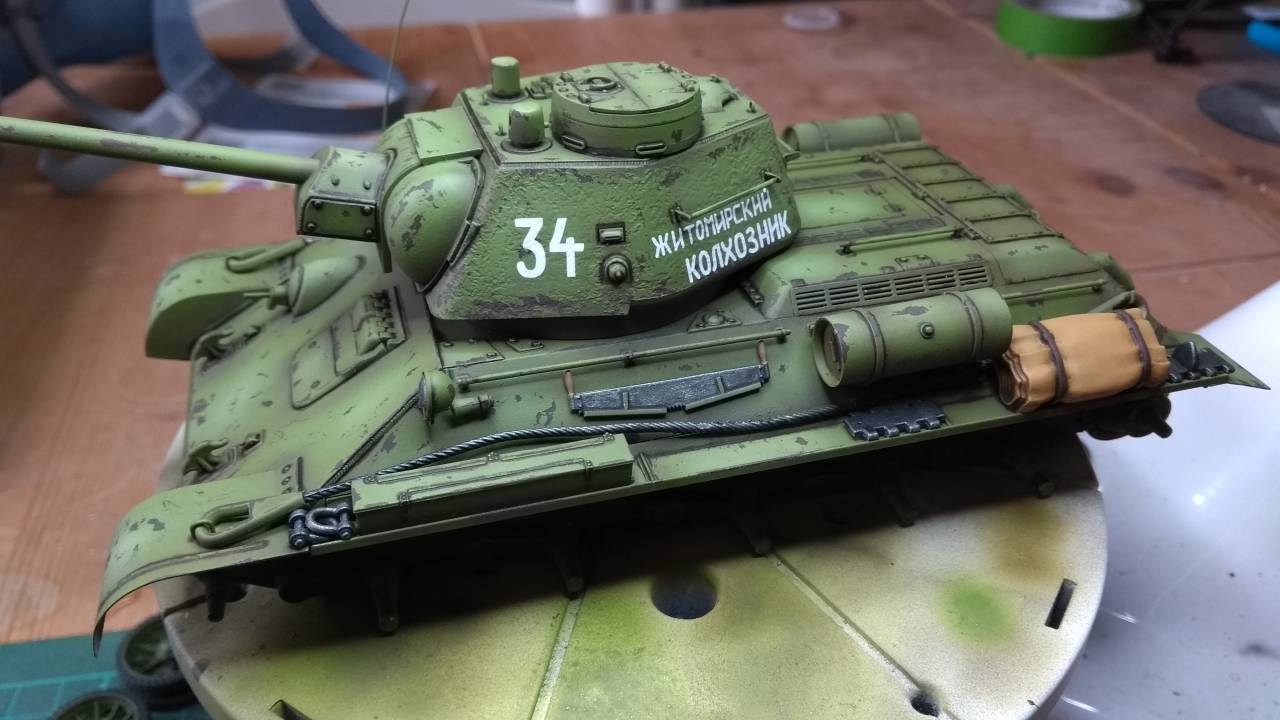
A little more progress, dust and some rain streaking done, and mud and tracks on. Details, a little more refinement on the mud, and grime/oil and rust to do. Still undecided on whether to use the figures, I've built them up and they do look nice, so i may give it a try.
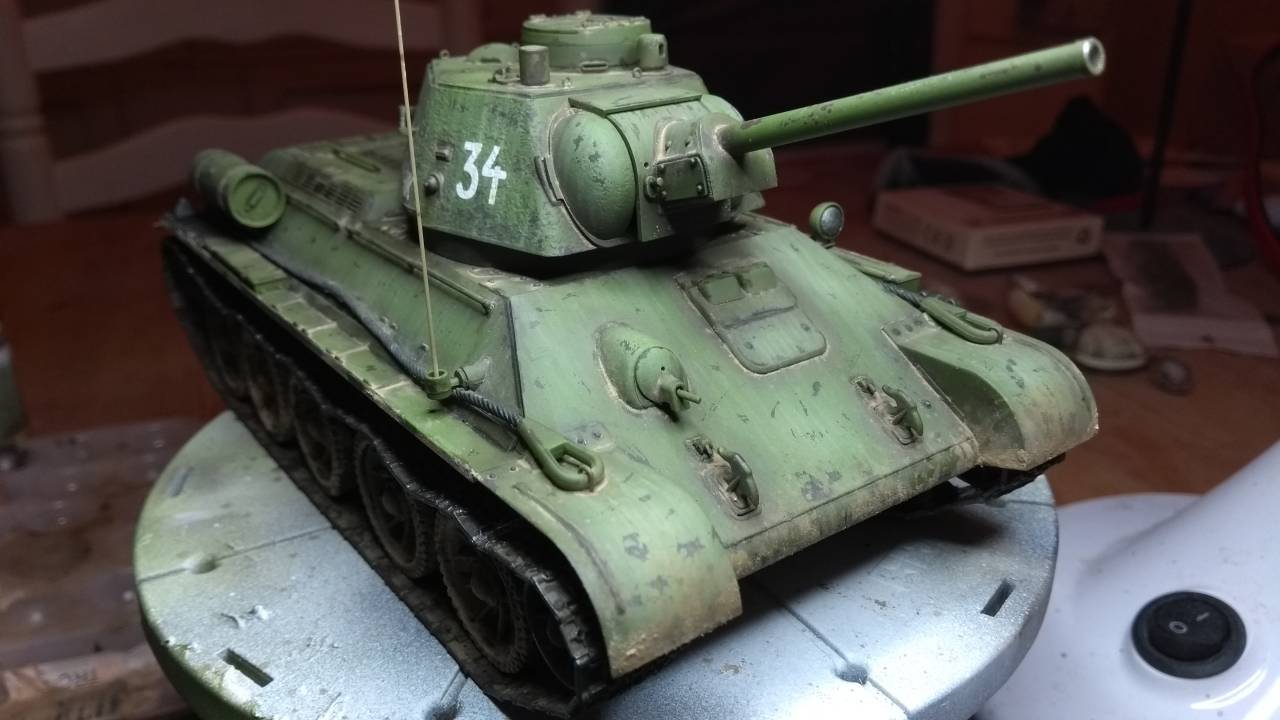

A little more progress, dust and some rain streaking done, and mud and tracks on. Details, a little more refinement on the mud, and grime/oil and rust to do. Still undecided on whether to use the figures, I've built them up and they do look nice, so i may give it a try.
d111298pw
#456
Joined: September 22, 2016
KitMaker: 654 posts
Armorama: 638 posts
Posted: Sunday, April 08, 2018 - 07:20 AM UTC
Conrad,
Your T34 looks fantastic. Weathering looks great they way you have done it.
Your T34 looks fantastic. Weathering looks great they way you have done it.
 |

WEB HOSTING BY


Copyright ©2021 Armorama and Kitmaker Network, a subsidiary of Silver Star Enterprises
All Rights Reserved. Please read our Conditions of Use and Privacy Policy.
All Rights Reserved. Please read our Conditions of Use and Privacy Policy.