

Darius,
I have this kit in my stash so this will be interesting build for me to follow.
Mark
Hosted by Richard S.
Dragon Campaign 2018

d6mst0

#453

Joined: August 28, 2016
KitMaker: 1,925 posts
Armorama: 601 posts

Posted: Sunday, March 18, 2018 - 04:33 PM UTC
SGTJKJ

#041

Joined: July 20, 2006
KitMaker: 10,069 posts
Armorama: 4,677 posts

Posted: Saturday, March 24, 2018 - 02:02 PM UTC
I am in with the He 162 fighter.
More to follow

More to follow


RedDuster

Joined: March 01, 2010
KitMaker: 7,078 posts
Armorama: 248 posts

Posted: Sunday, March 25, 2018 - 11:48 PM UTC
Latest progress on Z39.
Time to attack the main armament & light AA. The light AA sprues & etch.

The twin 20mm mounts that go on the bridge wings,

Looking this one, it doesn't look right compared to drawings too bulky in front of the pedestal.
Test fitting proves something is up, either I have built it wrong, or something isn't quite right.

Even with the barrels elevated it does not fit comfortable fore & aft, and the shield fouls the bulwark when if rotating from abeam. I will have a think about this, might try re jigging this one, or detailing up a couple of mounts from the spates box.
Meantime basic assembly of the main armament


With the floats fitted.

More soon
Si
Time to attack the main armament & light AA. The light AA sprues & etch.
The twin 20mm mounts that go on the bridge wings,
Looking this one, it doesn't look right compared to drawings too bulky in front of the pedestal.
Test fitting proves something is up, either I have built it wrong, or something isn't quite right.
Even with the barrels elevated it does not fit comfortable fore & aft, and the shield fouls the bulwark when if rotating from abeam. I will have a think about this, might try re jigging this one, or detailing up a couple of mounts from the spates box.
Meantime basic assembly of the main armament
With the floats fitted.
More soon
Si
d6mst0
#453
Joined: August 28, 2016
KitMaker: 1,925 posts
Armorama: 601 posts
Posted: Monday, March 26, 2018 - 12:25 AM UTC
Si,
Something doesn't look right with that gun shield but I really can't make it out that well. I am unable to blow up the photo for a closer look. I sure you will figure it out. The build looks to be progressing nicely.
Mark
Something doesn't look right with that gun shield but I really can't make it out that well. I am unable to blow up the photo for a closer look. I sure you will figure it out. The build looks to be progressing nicely.
Mark

Soojet
Joined: March 22, 2018
KitMaker: 22 posts
Armorama: 20 posts
Posted: Monday, March 26, 2018 - 06:47 PM UTC
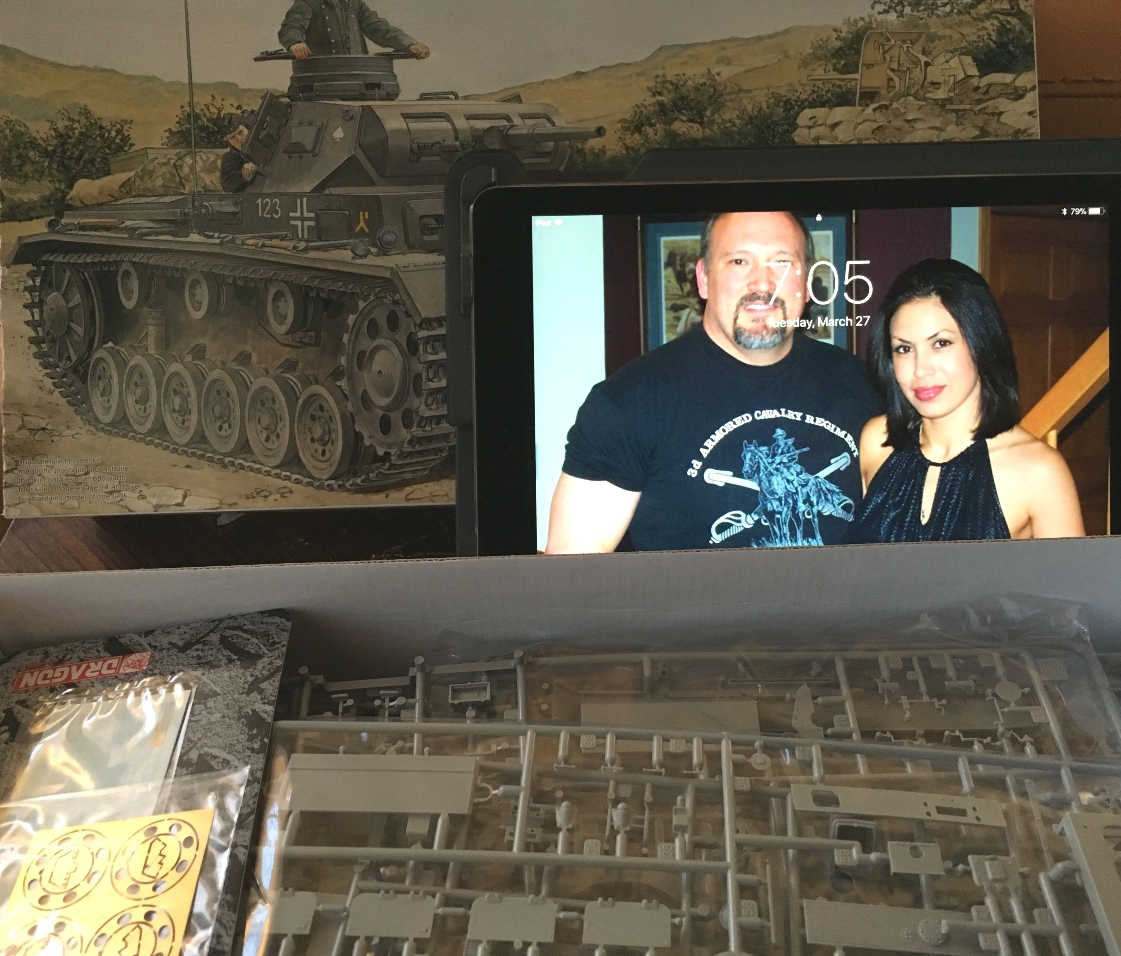
I just joined the campaign, here is my submission. I bought this from a guy at my local IPMS show, he was selling his deceased brother's stash. It was sad, but he seemed to just be happy to be rid of it. He gave me a heck of a deal, all this for $30!


Charlie-66
#186
Joined: May 24, 2006
KitMaker: 771 posts
Armorama: 750 posts
Posted: Tuesday, March 27, 2018 - 06:11 AM UTC
Time to get moving on this campaign. Here is my entry. One can never have enough Panzer III's (or Shermans!)

d6mst0
#453
Joined: August 28, 2016
KitMaker: 1,925 posts
Armorama: 601 posts
Posted: Tuesday, March 27, 2018 - 06:30 AM UTC
Matt,
You did get a deal, you have a lot of extras there. Hope you don't get buyers remorse putting all of it on.
Mark
You did get a deal, you have a lot of extras there. Hope you don't get buyers remorse putting all of it on.
Mark
d6mst0
#453
Joined: August 28, 2016
KitMaker: 1,925 posts
Armorama: 601 posts
Posted: Tuesday, March 27, 2018 - 06:33 AM UTC
Guy,
Agree, you can never have enough Panzer IIIs. Looking at the markings on the tank it looks to be in the 2nd Panzer Division 3rd Panzer Rgt, Balkans campiagn. It looks like the main gun is a 37mm?
Enjoy the build.
Mark
Agree, you can never have enough Panzer IIIs. Looking at the markings on the tank it looks to be in the 2nd Panzer Division 3rd Panzer Rgt, Balkans campiagn. It looks like the main gun is a 37mm?
Enjoy the build.
Mark
Charlie-66
#186
Joined: May 24, 2006
KitMaker: 771 posts
Armorama: 750 posts
Posted: Tuesday, March 27, 2018 - 08:36 AM UTC
Quoted Text
Guy,
Agree, you can never have enough Panzer IIIs. Looking at the markings on the tank it looks to be in the 2nd Panzer Division 3rd Panzer Rgt, Balkans campiagn. It looks like the main gun is a 37mm?
Enjoy the build.
Mark
Mark, sharp eye on the markings! There are 2 other markings options as well, and I haven't decided on which to use. This will be the first Panzer 3 I build where I plan to leave the side turret hatches open, and populate with some crew figures.

ColinEdm


Joined: October 15, 2013
KitMaker: 1,355 posts
Armorama: 1,229 posts
Posted: Saturday, March 31, 2018 - 04:27 AM UTC
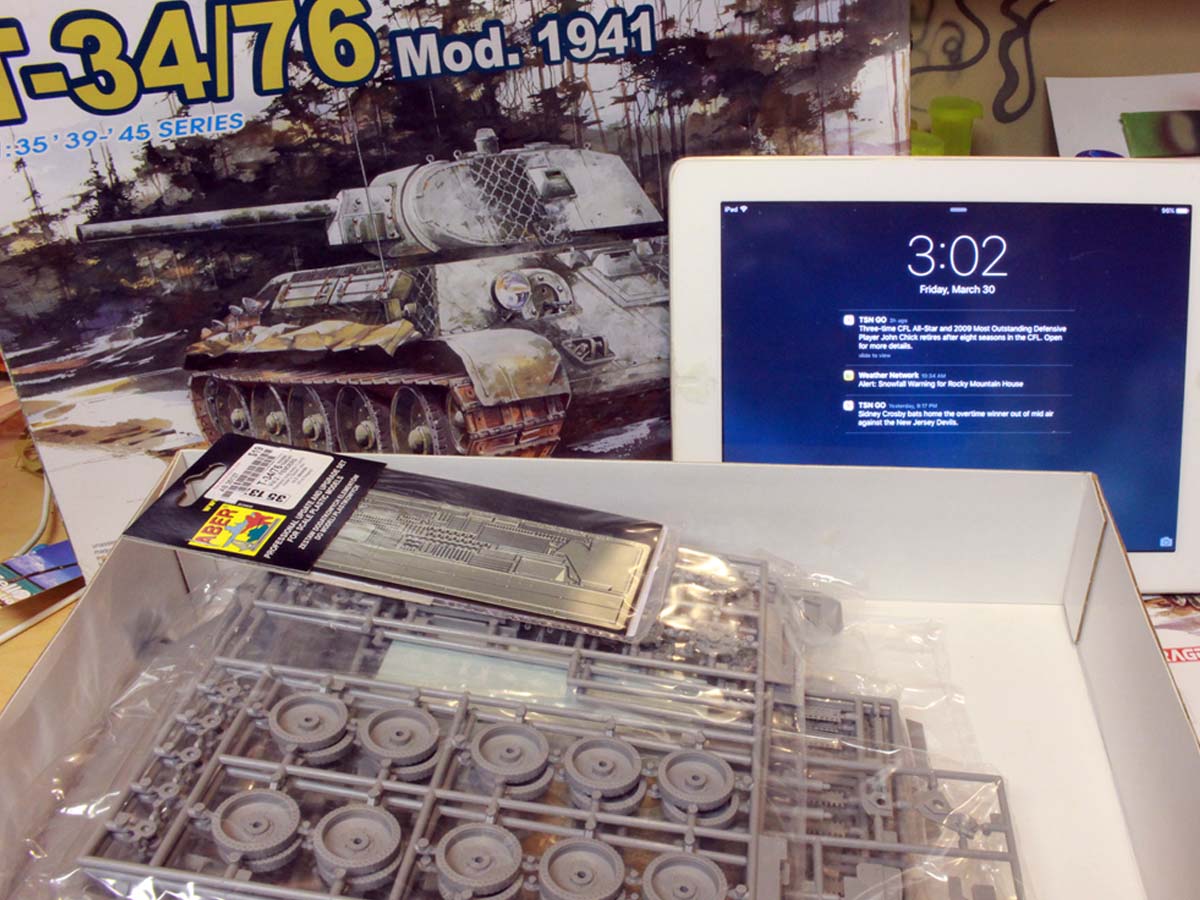
Finally getting started on this one. With my Scammel build getting so involved, I needed something relatively simple to build, so I picked the T-34/76 Mod 1941 with Aber photo-etch.

Kaktusas

Joined: April 12, 2017
KitMaker: 196 posts
Armorama: 196 posts
Posted: Monday, April 02, 2018 - 12:15 PM UTC
Some progress on mine Pak 40/4 RSO "ohne allwetterverdeck" (i decided to leave deck off in favor of better display appearance. I don't like shoe boxes on tracks. Besides, its mostly "transport" configuration, therefore muzzle neads to be wrapped also. The deck itself prevents opening of the side boards. There are pictures of it on V4 prototype, but i doubt if it was used much in action. After all, its the standard RSO cargo tarp, with appendix to cover driver/co driver (hence bi-color tarp in the V4 photos).

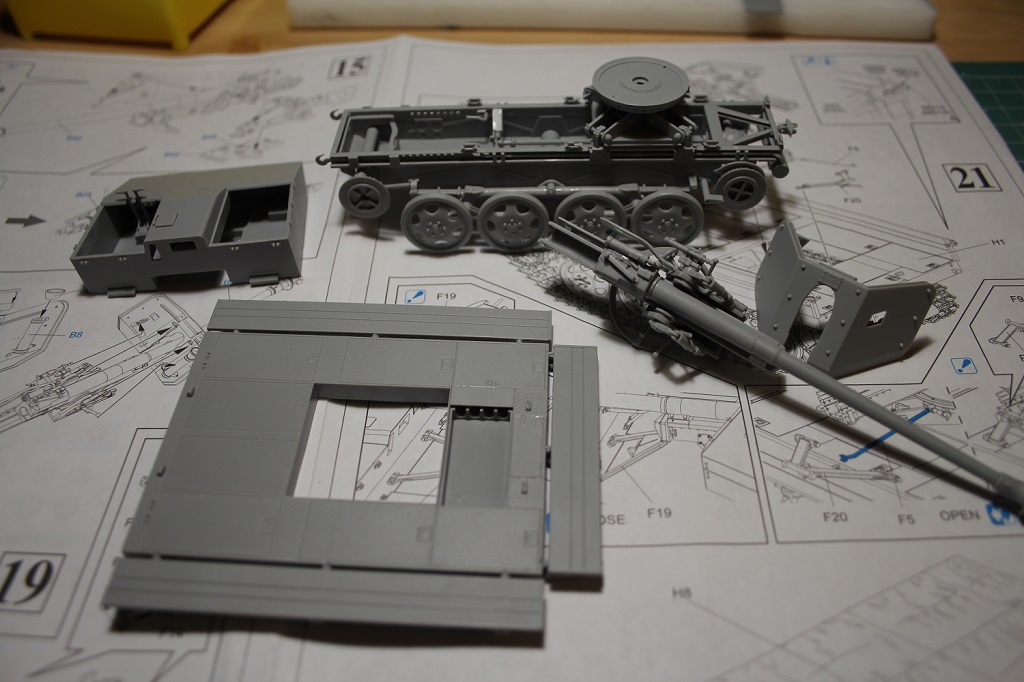
now lets review the assembly so far:
Step 1&2 Ammunition and the engine. This is a bad joke to tell people where you place the decals you don't have. Kit is out for a long time, its well known problem, and not solved. No point to comment it any further.
Engine is nice, however, not without flaws. There is no offset between cylinder banks, but probably we can live with this, as it wont be visible anyway. Next, is position of engine oil coolers on the fans. I suspect it is wrong, coolers should be placed on top of fans on RSO engine. Ok, i admit that this engine looks the same as one in the Munster museum, but we dont know if it was replaced before restoration, as this type of engines was still produced and used after the war. Besides, it could be used due to shortage of engines etc. However, on assembly, restoration pictures of other RSO, oil coolers are on top. Even on twin engine prototype. This might be for a reason. If mounted on the side, hot air would be heating panel next to driver. Not very comfortable, isnt? On the Steyr 1500, louvers on the side panels to lets this hot air out, so it is logical layout of the coolers. I left my coolers on the side, as they are not visible anyway, however, i still feel it is wrong.
Fan details on the cooler are nice, but they dont represent the radial fan at all. It was easily possible to make this part better, by sacrificing fan details on the inside (hardly visible at all), but making nice radial fans from both sides of the engine.
I suggest to keep part A14 off the engine. Attach it to the tub in step 5, and install engine AFTER painting.
As well, it is good idea not to connect who halves of the driveshaft at this stage (A3+A37). (it is more important that the driveshaft reaches the differential, rather than bulkhead that will be invisible. Adjust length when you have differential housing, and gearbox mounting bulkhead inside the tub)
Step 3 Do nothing with engine, bulkheads and driveshaft in this stage. Will make things difficult when you will try to "convince" them in to the tub.
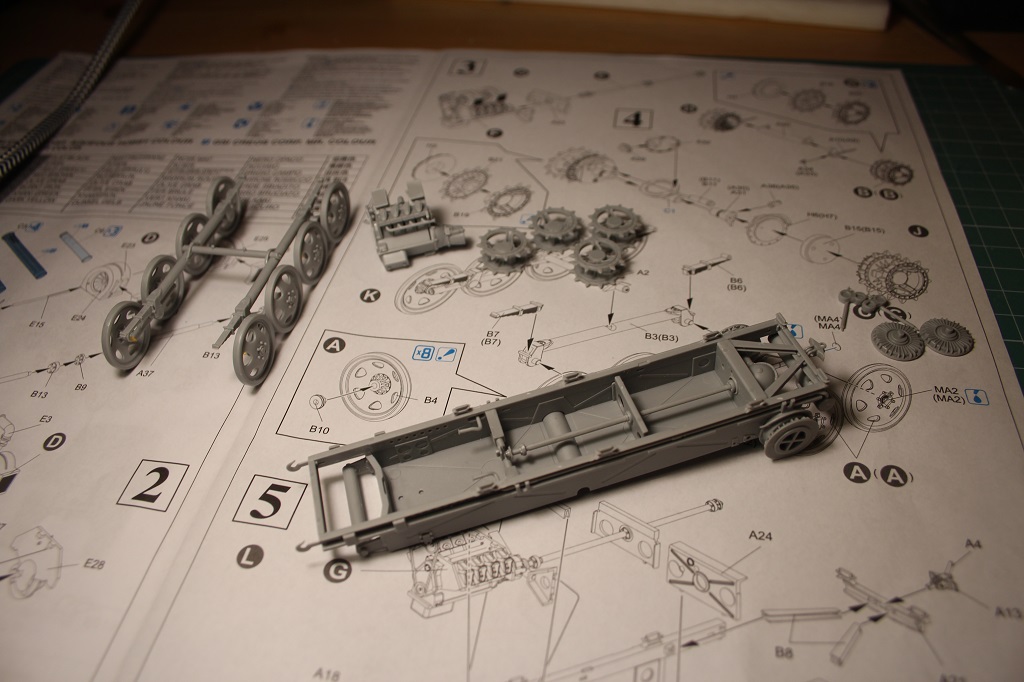
Step 4 Assembly of the front, and drive axle should be done ON the tub. It is MUCH easier to keep everything aligned. Fit on the parts of these assemblies is very loose.
Assemble the drive wheels and idlers, but dont attach them to break housings (H3-H4). This will ensure you can position them for track alignment.
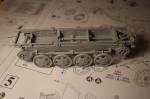
Assembly of road wheel "dolly" went like a dream. Perfect fit, almost no need to check the alignment. Brilliant. Just keep leaf springs Off the dolly untill you are ready to attach it to the tub. You will need to align them a little bit during assembly.
Step 5 The TUB. Almost everything according instructions, just make sure you put in the exhaust tubes before you glue the inner walls in (parts A15 and A18).
There is no locators for the part A19. you have to guess.
Leave the tow hooks A11/12 off. They will be breaking off every now and then, until you attach the drivers cab. You will need to shorten them for correct length too. It is best to attach parts like this at the final stage off the assembly.
Attach parts A26 from step 7 now. It will not affect later assembly, but will protect those tinny loops from breaking off during handling.
Do not attach part A1 yet. Installing part A22 will be so much easier without it.
Now, you can assemble front and rear axles. As you have A26 parts on the tub (that's where the track tension rods go), you can attach the front axle, swing arms and break hubs H4. You can also align everything to the tub.
For the rear axle, note that the pars H6/H7 have tabs to align them on the tub. Assemble the axle, and while glue hasn't set, align the the hubs properly.
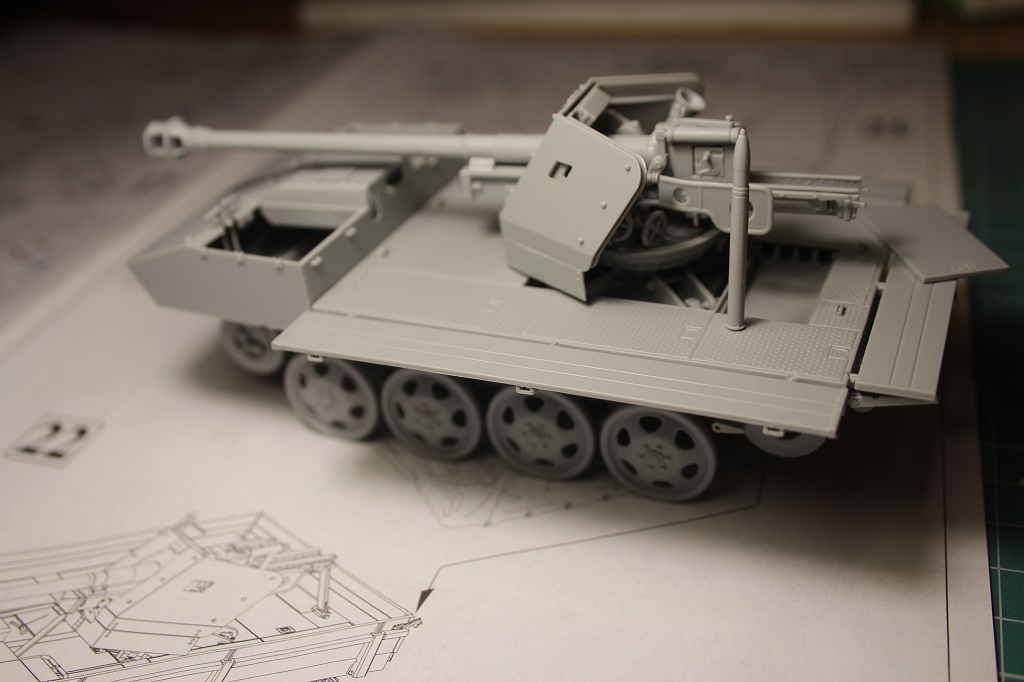
Note, you will have to trim the tabs in front of gun mount, in order to fit the fighting platform (check picture)
Step 7 Straight forward, if notes above taken.
Step 8&9 You need to make panels of some sort to cover engine. Nuts&bolts 9 show the driver side plate on page 35.
You will need to trim the PE door parts, to fit them properly. Plastic parts are too thick too.
Leave small parts like D7/8 off, to prevent them from breaking off.
Step 10 Parts D13 and D15 need major sanding, they are WAY too thick.
There is no hatch cover right behind the ammo hatch D15. You have to cut it out from the donor part D16. Bottom cover is not mentioned on the instructions also, but you can use "unused part" D25.
Steps 11 to 13 as par instructions. On the second thought, you might want big sub assemblies off the kit for initial painting.
Step 14 Parts B26/27 swap sides.
Step 15,16&17 Trim of the tabs from the lower gun shield (part F12). This shield must be flush with from the shield. Tabs will prevent this. I left the shield assembly off for the initial painting. It is possible to drive muzzle break and install it assembled. Painting completely assembled gun might be too challenging, due to hard to reach spots.
All the rest is more less ok.
Cleaning of the tracks now. Almost finished major assembly.
now lets review the assembly so far:
Step 1&2 Ammunition and the engine. This is a bad joke to tell people where you place the decals you don't have. Kit is out for a long time, its well known problem, and not solved. No point to comment it any further.
Engine is nice, however, not without flaws. There is no offset between cylinder banks, but probably we can live with this, as it wont be visible anyway. Next, is position of engine oil coolers on the fans. I suspect it is wrong, coolers should be placed on top of fans on RSO engine. Ok, i admit that this engine looks the same as one in the Munster museum, but we dont know if it was replaced before restoration, as this type of engines was still produced and used after the war. Besides, it could be used due to shortage of engines etc. However, on assembly, restoration pictures of other RSO, oil coolers are on top. Even on twin engine prototype. This might be for a reason. If mounted on the side, hot air would be heating panel next to driver. Not very comfortable, isnt? On the Steyr 1500, louvers on the side panels to lets this hot air out, so it is logical layout of the coolers. I left my coolers on the side, as they are not visible anyway, however, i still feel it is wrong.
Fan details on the cooler are nice, but they dont represent the radial fan at all. It was easily possible to make this part better, by sacrificing fan details on the inside (hardly visible at all), but making nice radial fans from both sides of the engine.
I suggest to keep part A14 off the engine. Attach it to the tub in step 5, and install engine AFTER painting.
As well, it is good idea not to connect who halves of the driveshaft at this stage (A3+A37). (it is more important that the driveshaft reaches the differential, rather than bulkhead that will be invisible. Adjust length when you have differential housing, and gearbox mounting bulkhead inside the tub)
Step 3 Do nothing with engine, bulkheads and driveshaft in this stage. Will make things difficult when you will try to "convince" them in to the tub.
Step 4 Assembly of the front, and drive axle should be done ON the tub. It is MUCH easier to keep everything aligned. Fit on the parts of these assemblies is very loose.
Assemble the drive wheels and idlers, but dont attach them to break housings (H3-H4). This will ensure you can position them for track alignment.
Assembly of road wheel "dolly" went like a dream. Perfect fit, almost no need to check the alignment. Brilliant. Just keep leaf springs Off the dolly untill you are ready to attach it to the tub. You will need to align them a little bit during assembly.
Step 5 The TUB. Almost everything according instructions, just make sure you put in the exhaust tubes before you glue the inner walls in (parts A15 and A18).
There is no locators for the part A19. you have to guess.
Leave the tow hooks A11/12 off. They will be breaking off every now and then, until you attach the drivers cab. You will need to shorten them for correct length too. It is best to attach parts like this at the final stage off the assembly.
Attach parts A26 from step 7 now. It will not affect later assembly, but will protect those tinny loops from breaking off during handling.
Do not attach part A1 yet. Installing part A22 will be so much easier without it.
Now, you can assemble front and rear axles. As you have A26 parts on the tub (that's where the track tension rods go), you can attach the front axle, swing arms and break hubs H4. You can also align everything to the tub.
For the rear axle, note that the pars H6/H7 have tabs to align them on the tub. Assemble the axle, and while glue hasn't set, align the the hubs properly.
Note, you will have to trim the tabs in front of gun mount, in order to fit the fighting platform (check picture)
Step 7 Straight forward, if notes above taken.
Step 8&9 You need to make panels of some sort to cover engine. Nuts&bolts 9 show the driver side plate on page 35.
You will need to trim the PE door parts, to fit them properly. Plastic parts are too thick too.
Leave small parts like D7/8 off, to prevent them from breaking off.
Step 10 Parts D13 and D15 need major sanding, they are WAY too thick.
There is no hatch cover right behind the ammo hatch D15. You have to cut it out from the donor part D16. Bottom cover is not mentioned on the instructions also, but you can use "unused part" D25.
Steps 11 to 13 as par instructions. On the second thought, you might want big sub assemblies off the kit for initial painting.
Step 14 Parts B26/27 swap sides.
Step 15,16&17 Trim of the tabs from the lower gun shield (part F12). This shield must be flush with from the shield. Tabs will prevent this. I left the shield assembly off for the initial painting. It is possible to drive muzzle break and install it assembled. Painting completely assembled gun might be too challenging, due to hard to reach spots.
All the rest is more less ok.
Cleaning of the tracks now. Almost finished major assembly.

Bluestab
Joined: December 03, 2009
KitMaker: 2,160 posts
Armorama: 1,906 posts
Posted: Wednesday, April 04, 2018 - 10:21 AM UTC
EDIT- Nevermind. I found Dragon made pieces that will work or can be made to work.
A quick question about what's allowed...I am doing a Sd.Kfz 250 Nue and was looking at stowage and adding items like gas mask cannisters, ammunition boxes, helmets, etc. Do I have to use Dragon sourced items or can I snag items from the spares, no matter which manufacturer they were made by?
A quick question about what's allowed...I am doing a Sd.Kfz 250 Nue and was looking at stowage and adding items like gas mask cannisters, ammunition boxes, helmets, etc. Do I have to use Dragon sourced items or can I snag items from the spares, no matter which manufacturer they were made by?
Charlie-66
#186
Joined: May 24, 2006
KitMaker: 771 posts
Armorama: 750 posts
Posted: Saturday, April 07, 2018 - 12:27 AM UTC
First shots of what I've gotten done thus far. I've built a bunch of these Dragon Panzer 3's and Stug 3's. They are very modular in the way they go together, and I really enjoy that.
Lower hull is done, now onto the back deck and upper hull.
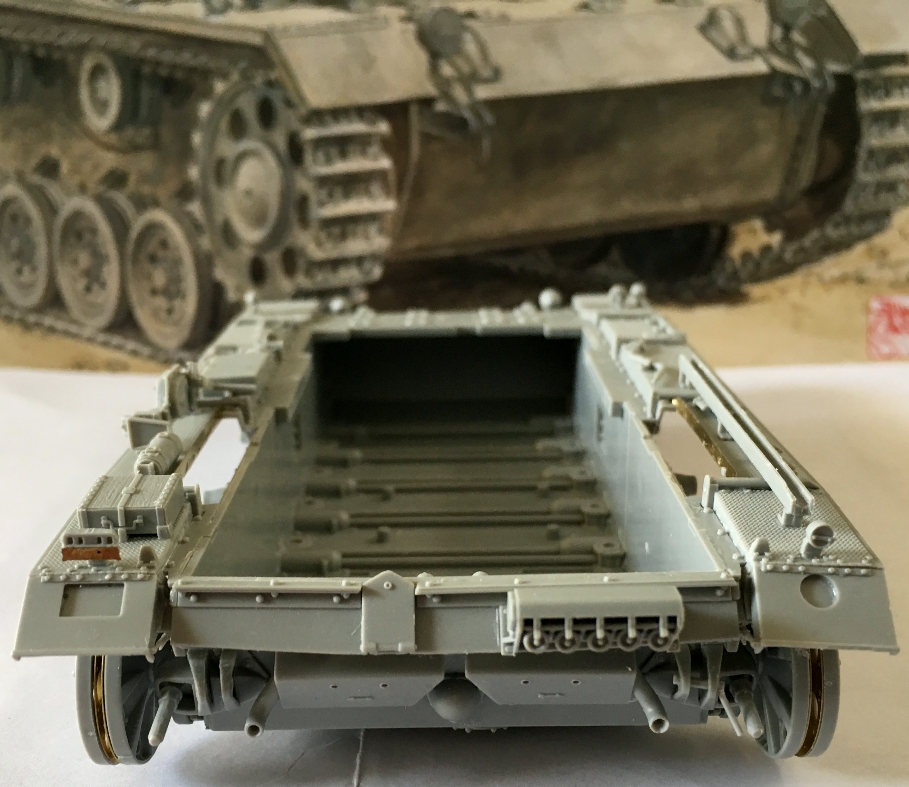
Lower hull is done, now onto the back deck and upper hull.
Charlie-66
#186
Joined: May 24, 2006
KitMaker: 771 posts
Armorama: 750 posts
Posted: Saturday, April 07, 2018 - 12:31 AM UTC
Kaktusas,
thanks for the detailed notes on what you are finding. I'm going to copy all your observations for when I build this kit.
thanks for the detailed notes on what you are finding. I'm going to copy all your observations for when I build this kit.

johhar
Joined: September 22, 2008
KitMaker: 476 posts
Armorama: 447 posts
Posted: Saturday, April 07, 2018 - 05:01 AM UTC
Guy, your Pz III is coming together the way we wish all kits would come together, looking flawless.
Charlie-66
#186
Joined: May 24, 2006
KitMaker: 771 posts
Armorama: 750 posts
Posted: Saturday, April 07, 2018 - 11:27 AM UTC
Quoted Text
Guy, your Pz III is coming together the way we wish all kits would come together, looking flawless.
thank you sir!
Klaus-Adler

Joined: June 08, 2015
KitMaker: 1,505 posts
Armorama: 840 posts
Posted: Sunday, April 08, 2018 - 03:05 AM UTC
Well i pulled out the Dragon shilka that i got cheap from a well known auction site that steals all my money lol. also purchased some after market tracks from Masterclub and some replacemnt gun barrels which have yet to arrive.

as you can see i have managed to build the radar tracking system that goes on the upper hull as well as making a start on the lower hull and adding the wheels and drive sprockets.


I was hoping from some quality modelling time tomorrow (monday) however, i have had to rush our pet guinea pig to the vets for emergency out of hours treatment this evening. so monday might be a busy day depending on what the vet has to say tomorrow at 7am.
i will keep you all posted on the current events
as you can see i have managed to build the radar tracking system that goes on the upper hull as well as making a start on the lower hull and adding the wheels and drive sprockets.
I was hoping from some quality modelling time tomorrow (monday) however, i have had to rush our pet guinea pig to the vets for emergency out of hours treatment this evening. so monday might be a busy day depending on what the vet has to say tomorrow at 7am.
i will keep you all posted on the current events
Charlie-66
#186
Joined: May 24, 2006
KitMaker: 771 posts
Armorama: 750 posts
Posted: Sunday, April 08, 2018 - 05:19 AM UTC
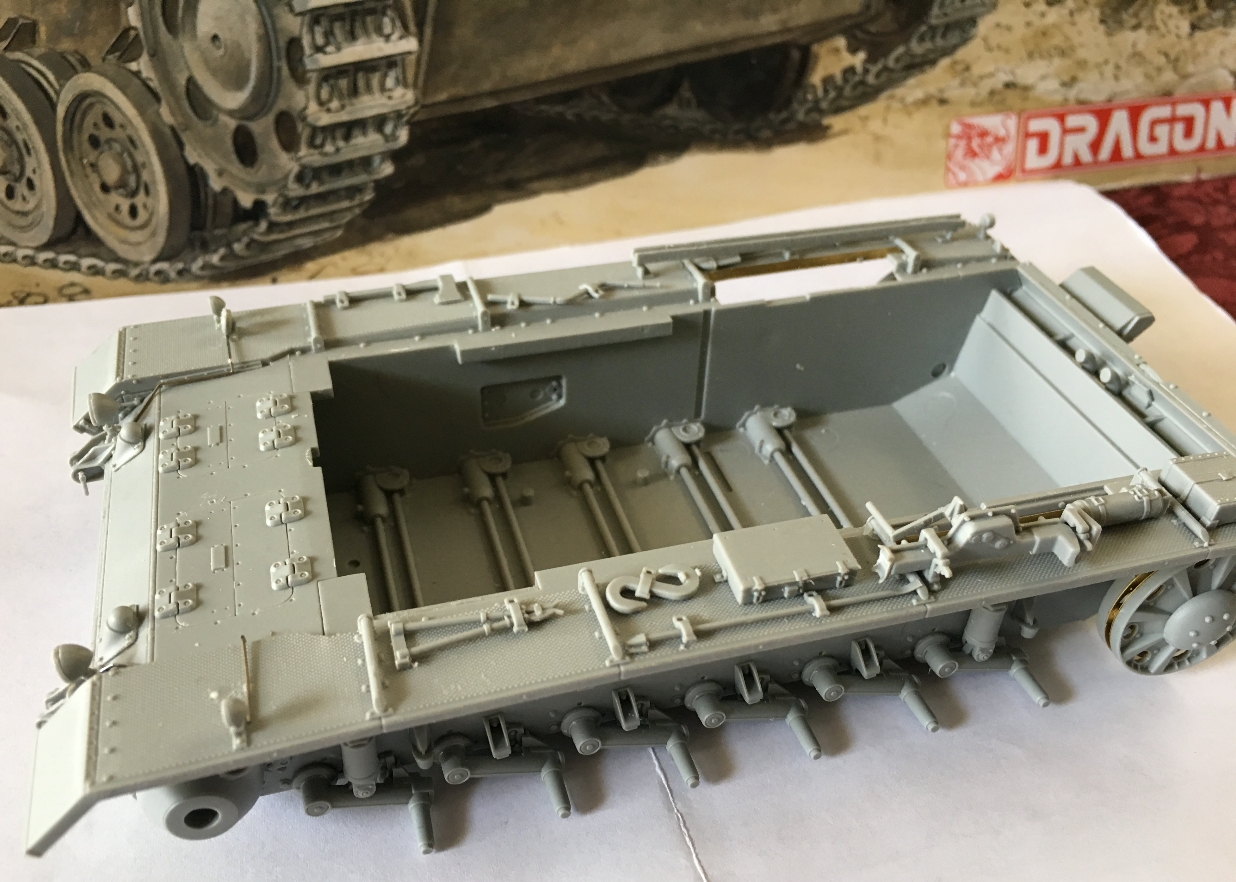
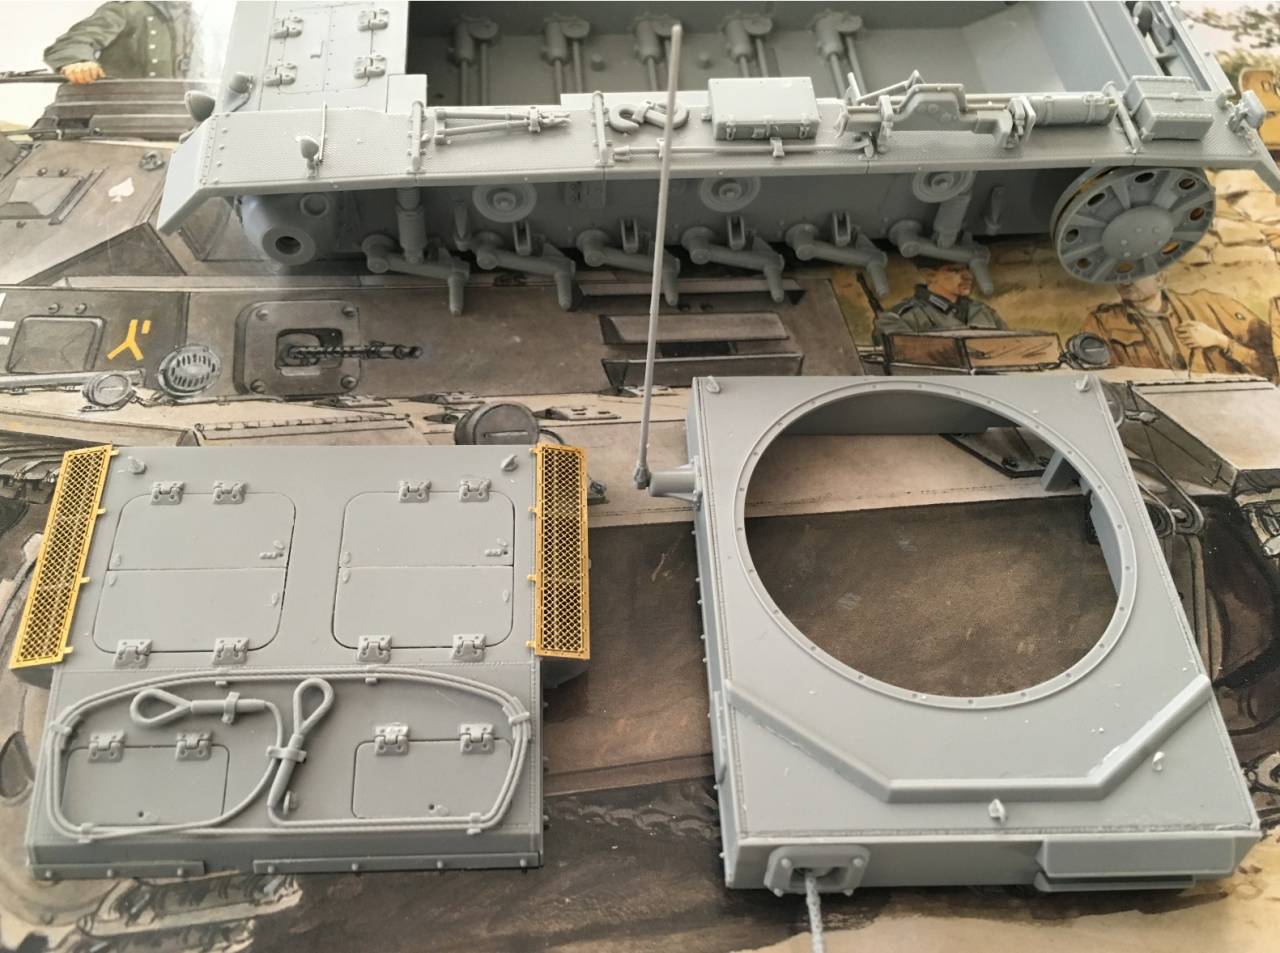
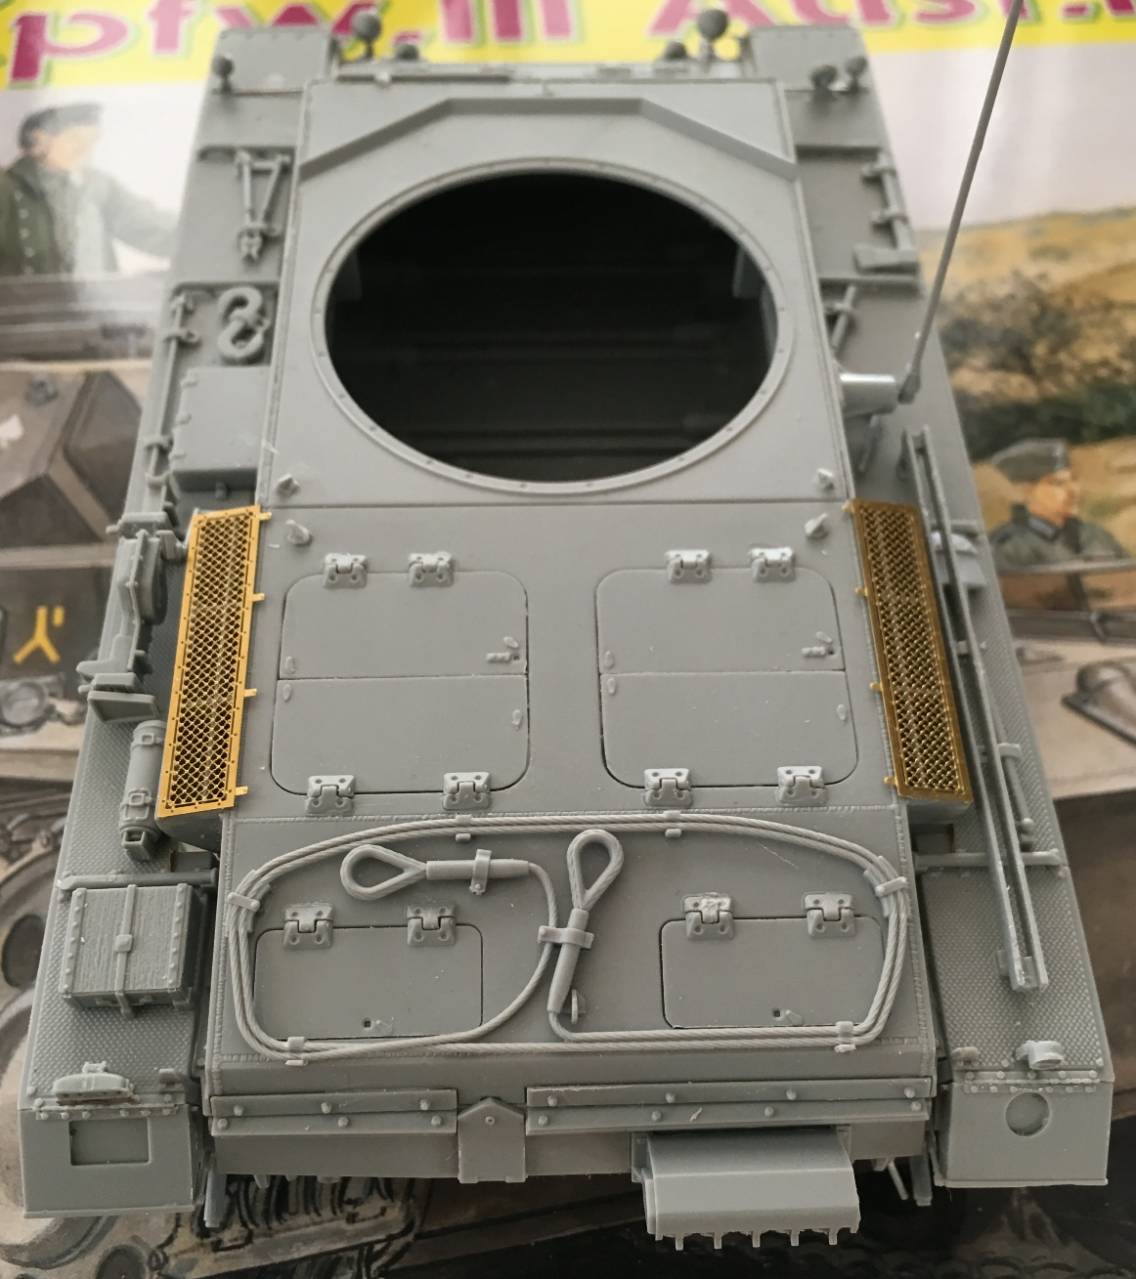
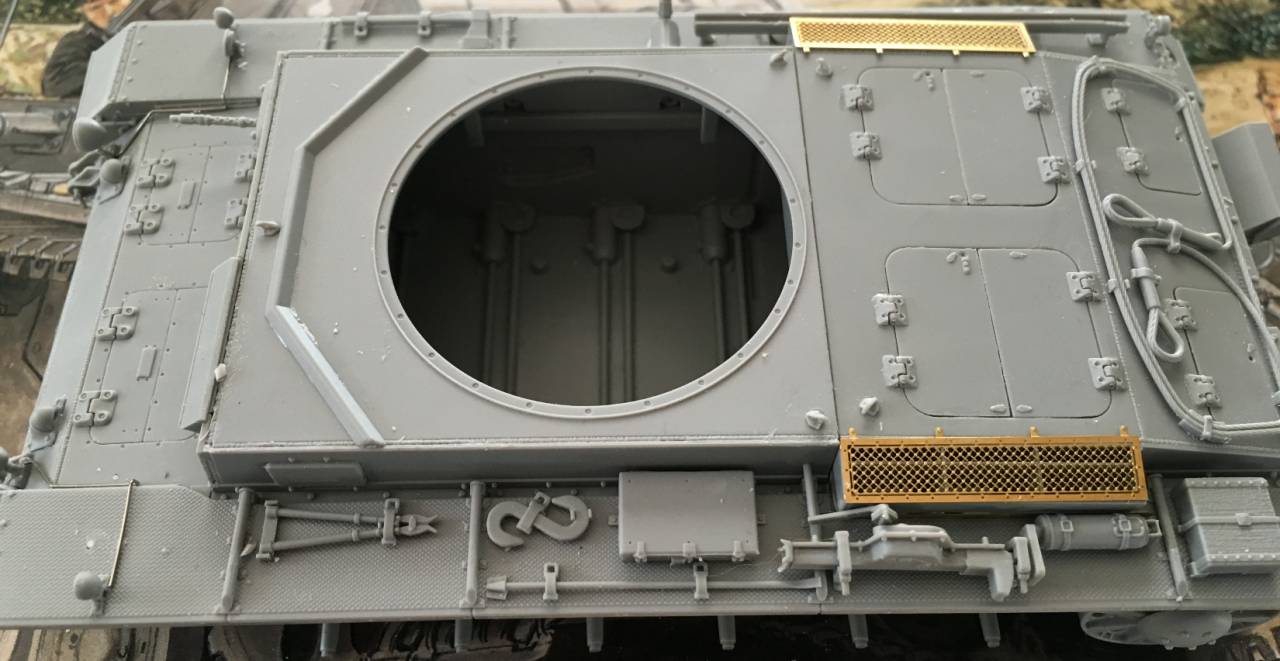
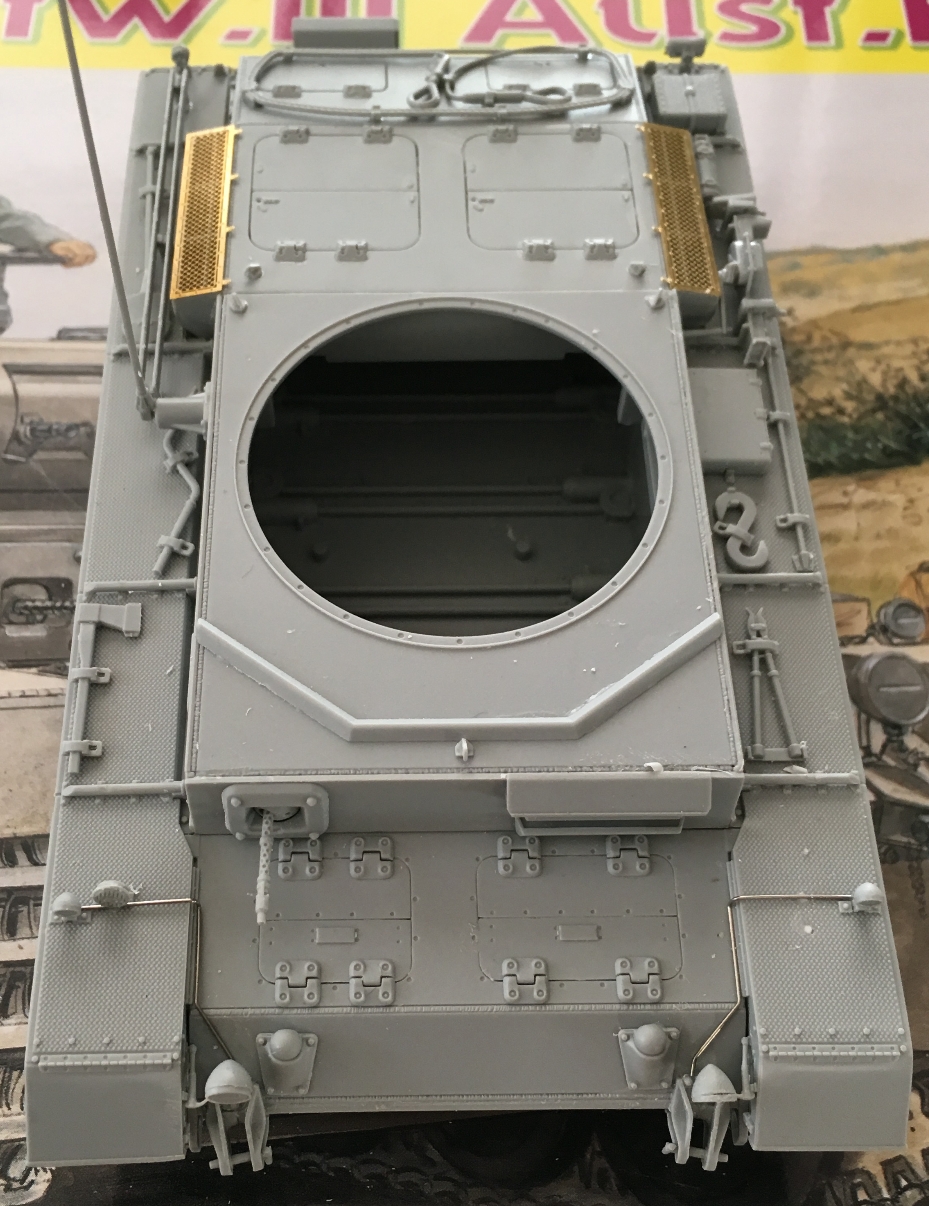
More progress. The back deck and upper hull are complete. Still dry fit at this stage.
johhar
Joined: September 22, 2008
KitMaker: 476 posts
Armorama: 447 posts
Posted: Sunday, April 08, 2018 - 05:50 AM UTC
You're just flying through that Pz III.
Charlie-66
#186
Joined: May 24, 2006
KitMaker: 771 posts
Armorama: 750 posts
Posted: Sunday, April 08, 2018 - 06:42 AM UTC
Quoted Text
You're just flying through that Pz III.
Thanks, hopefully the quality isn't suffering. I've been fortunate in having a good chunk of bench time the last several weeks. Already thinking about which PZ 3 to build next!
Klaus-Adler
Joined: June 08, 2015
KitMaker: 1,505 posts
Armorama: 840 posts
Posted: Sunday, April 08, 2018 - 05:44 PM UTC
well the emergency medical help for the guinea pig continues and i have now taken him to our regular vet who have insisted he stay with them. they will be giving the poor little guy some pain relief and antibiotics as well as nutritional drinks to help keep his strength up since he isn't eating regular food.
well i have managed to get some work done on the upper hull section but it's not been easy.

well i have managed to get some work done on the upper hull section but it's not been easy.
Charlie-66
#186
Joined: May 24, 2006
KitMaker: 771 posts
Armorama: 750 posts
Posted: Monday, April 09, 2018 - 01:10 AM UTC
Quoted Text
well the emergency medical help for the guinea pig continues and i have now taken him to our regular vet who have insisted he stay with them. they will be giving the poor little guy some pain relief and antibiotics as well as nutritional drinks to help keep his strength up since he isn't eating regular food.
well i have managed to get some work done on the upper hull section but it's not been easy.
David, I have several old Dragon kits of Warsaw Pact vehicles from that era. Is the kit any good? What have you found so far?
Klaus-Adler
Joined: June 08, 2015
KitMaker: 1,505 posts
Armorama: 840 posts
Posted: Monday, April 09, 2018 - 01:29 AM UTC
Quoted Text
Quoted Textwell the emergency medical help for the guinea pig continues and i have now taken him to our regular vet who have insisted he stay with them. they will be giving the poor little guy some pain relief and antibiotics as well as nutritional drinks to help keep his strength up since he isn't eating regular food.
well i have managed to get some work done on the upper hull section but it's not been easy.
David, I have several old Dragon kits of Warsaw Pact vehicles from that era. Is the kit any good? What have you found so far?
Thus far I would say the fit is good and the details are fine for it's age. The newer versions by other companies will be more accurate but this will be reflected in the price difference.
There are some fit issues with the upper hull which will need back filling with Perfect Putty. There is some flash which will need to deal with but so far so good.
johhar
Joined: September 22, 2008
KitMaker: 476 posts
Armorama: 447 posts
Posted: Monday, April 09, 2018 - 02:01 AM UTC
Time to show some progress, now that Im done with the Crusader campaign. I saw color reference photos that showed wood seats that looked stained, so I went for that look, though it needs to be lightened a bit. I also didnt build half the rifles since the crew was not large because they carried six extra rockets and frames inside, though a lot of reference photos show a lot of soldiers. Anyway, enough explaining. The interior is not done but its ready to close up by putting the top on, with final weathering and whatever else Ill put in to come. Unfortunately right now I have almost no infantry equipment of any kind.
Question: I found a few reference photos of soldiers using hand held devices with wires leading from them, but nothing tells how to connect wires and build components that fire the rockets. I would be very appreciative if anyone knows of any references.


Question: I found a few reference photos of soldiers using hand held devices with wires leading from them, but nothing tells how to connect wires and build components that fire the rockets. I would be very appreciative if anyone knows of any references.
Klaus-Adler
Joined: June 08, 2015
KitMaker: 1,505 posts
Armorama: 840 posts
Posted: Monday, April 09, 2018 - 06:10 PM UTC
hi all, a brief not to say that i have started on the turret, this maybe the last post for a while due the current pet situation.

 |

WEB HOSTING BY


Copyright ©2021 Armorama and Kitmaker Network, a subsidiary of Silver Star Enterprises
All Rights Reserved. Please read our Conditions of Use and Privacy Policy.
All Rights Reserved. Please read our Conditions of Use and Privacy Policy.