


Hosted by Richard S.
Armored CARMax...
BogiBg

Joined: May 29, 2018
KitMaker: 397 posts
Armorama: 388 posts
Posted: Sunday, July 15, 2018 - 11:21 PM UTC
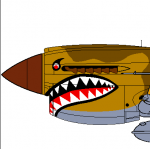
Next - I masked everything and put as much as I can parts together, to avoid color difference on different parts.
Removed by original poster on 07/16/18 - 11:33:00 (GMT).
BogiBg
Joined: May 29, 2018
KitMaker: 397 posts
Armorama: 388 posts
Posted: Sunday, July 15, 2018 - 11:27 PM UTC
Then I sprayed hair spray first, then color.

BogiBg
Joined: May 29, 2018
KitMaker: 397 posts
Armorama: 388 posts
Posted: Sunday, July 15, 2018 - 11:31 PM UTC
Finnaly, carefully washed everything with solution for glass washing.

BogiBg
Joined: May 29, 2018
KitMaker: 397 posts
Armorama: 388 posts
Posted: Monday, July 16, 2018 - 12:40 PM UTC
After few hours I applied my home made wash, filtered coffee mixed with floor polish. Then I washed everything again with glass washing liquid. Good thing about this technique is that I can continue working on my model immediately. 
petbat

Joined: August 06, 2005
KitMaker: 3,353 posts
Armorama: 3,121 posts
Posted: Monday, July 16, 2018 - 08:09 PM UTC
Quoted Text
Good thing about this technique is that I can continue working on my model immediately.
..and the model smells like freash coffee.... mmmmmmmm

Quite a lot achieved in a short time Vlad. The resin wheels do look good. The weathering is looking great too. Looking forward to the next instalement.
I have asked for an extension to the end date for completion for the few of us lagging, but keep building guys. From past experience, sometimes more time means less done in the interim and I want to see all these cars on the lot ASAP


Nito74

Joined: March 04, 2008
KitMaker: 5,386 posts
Armorama: 4,727 posts
Posted: Tuesday, July 17, 2018 - 03:25 AM UTC
Ok fellas, as requested, extension granted.
ENDS: August 31st, 2018
ENDS: August 31st, 2018
Removed by original poster on 07/17/18 - 17:17:00 (GMT).

GulfWarrior

Joined: January 05, 2010
KitMaker: 1,051 posts
Armorama: 1,029 posts

Posted: Tuesday, July 17, 2018 - 05:18 AM UTC
I forgot I joined this campaign! I'm well on my way with the Trumpy M1117 Guardian!
https://imgur.com/1hQJhnv
I'm having some issues getting my images to display. In the past I'm used PostImg's website. Is there a free site that works better?
https://imgur.com/1hQJhnv
I'm having some issues getting my images to display. In the past I'm used PostImg's website. Is there a free site that works better?

BogiBg
Joined: May 29, 2018
KitMaker: 397 posts
Armorama: 388 posts
Posted: Tuesday, July 17, 2018 - 10:50 AM UTC
Finaly, I brushed everithing with Alclad Dirt and Grime wash. Then, airbrushed matt lack. And... I am calling this finished.

Now my Sd.Kfz. 221 is not alone anymore.

Now my Sd.Kfz. 221 is not alone anymore.
BogiBg
Joined: May 29, 2018
KitMaker: 397 posts
Armorama: 388 posts
Posted: Tuesday, July 17, 2018 - 11:15 AM UTC


BogiBg
Joined: May 29, 2018
KitMaker: 397 posts
Armorama: 388 posts
Posted: Tuesday, July 17, 2018 - 11:20 AM UTC
Thanks for watching and good luck to those who did not finished yet.
petbat
Joined: August 06, 2005
KitMaker: 3,353 posts
Armorama: 3,121 posts
Posted: Tuesday, July 17, 2018 - 08:21 PM UTC
Thanks for agreeing to the extension John.
Okay guys, get cracking, especially you Richard, a ways to go and that looks like a nice addition to the build. I have one in the stash and would be interested on your thoughts.
Vlad, looks superb. How did you do the finish on the cannon and MG? They are excellent.
Okay guys, get cracking, especially you Richard, a ways to go and that looks like a nice addition to the build. I have one in the stash and would be interested on your thoughts.
Vlad, looks superb. How did you do the finish on the cannon and MG? They are excellent.
BogiBg
Joined: May 29, 2018
KitMaker: 397 posts
Armorama: 388 posts
Posted: Tuesday, July 17, 2018 - 09:25 PM UTC
Thanks Peter. It's really easy. I mix Revell aqua steel and black to some lighter gunmetal shade. But you can as well use any gunmetal paint. Airbrushed it, let it dry hour or two and then wet brushed it with Revell aqua 09 tar black diluted with floor polish to some semi transparent point, like a dense black wash. Final step, airbrushed matt lack.
GulfWarrior
Joined: January 05, 2010
KitMaker: 1,051 posts
Armorama: 1,029 posts
Posted: Wednesday, July 18, 2018 - 12:56 AM UTC
Quoted Text
Thanks for agreeing to the extension John.
Okay guys, get cracking, especially you Richard, a ways to go and that looks like a nice addition to the build. I have one in the stash and would be interested on your thoughts.
Vlad, looks superb. How did you do the finish on the cannon and MG? They are excellent.
No sweat! It's only got a little over 300 parts. I'm about halfway thru assembly. Planning on entering it in my club's contest the second week of September.
So far the only thing that required some thought was the assembly of the axles. The upper A-Frame arms have just a slight little bit of an angle to them so you've gotta keep up with which way they're oriented.
Removed by original poster on 07/18/18 - 14:54:47 (GMT).
Removed by original poster on 07/18/18 - 14:55:38 (GMT).
GulfWarrior
Joined: January 05, 2010
KitMaker: 1,051 posts
Armorama: 1,029 posts
Posted: Wednesday, July 18, 2018 - 02:56 AM UTC

Ha! Finally figured out how to get my images on the screen!

petbat
Joined: August 06, 2005
KitMaker: 3,353 posts
Armorama: 3,121 posts
Posted: Thursday, July 19, 2018 - 08:05 PM UTC
Quoted Text
Ha! Finally figured out how to get my images on the screen!
Okay, you can tick that one off the bucket list then !

Working on the Otter again. Have almost finished painting the interior, and have scratch built a few items to go inside - some to replace way oversized kit ones, others just missing. I have also changed my mind and will be doing a Radio equipped car, in lieu of one with the Boys AT Rifle. (Rarely were both used at the same time). This means some casting to do, as the ICM radio is a bit basic and the switch boxes, etc need replacing, especially the wafer thin ones on the roof next to the driver. Also need to add a Variometer to the rear wall where the aerial mounts bolts are. This is not included. The donor for the mould is AFV Club's Valentine which has a nicely detailed radio, switch boxes and the variometer.
Glad we got the extension to time!

LikesTanks

Joined: May 07, 2013
KitMaker: 242 posts
Armorama: 234 posts
Posted: Monday, July 23, 2018 - 11:15 AM UTC
Very nice battered looking Sd.Kfz.222
Progress on the Boxer


I can see the finishing line
Progress on the Boxer
I can see the finishing line
petbat
Joined: August 06, 2005
KitMaker: 3,353 posts
Armorama: 3,121 posts
Posted: Monday, July 23, 2018 - 07:55 PM UTC
Looking great Richard. A bit closer to the line than I am!
SGTJKJ

#041

Joined: July 20, 2006
KitMaker: 10,069 posts
Armorama: 4,677 posts

Posted: Monday, July 23, 2018 - 08:23 PM UTC
Looks Great, Boglevic! Nice wear and tear without overdoing it.
Richard, nice job on the camo. Looking forward to see more.
Richard, nice job on the camo. Looking forward to see more.

BogiBg
Joined: May 29, 2018
KitMaker: 397 posts
Armorama: 388 posts
Posted: Monday, July 23, 2018 - 09:28 PM UTC
Thanks for compliments guys. Nice airbrushing job Richard.
GulfWarrior
Joined: January 05, 2010
KitMaker: 1,051 posts
Armorama: 1,029 posts
Posted: Thursday, July 26, 2018 - 03:59 AM UTC
I've got the hull done on the M1117 Guardian.

Starting on the turret now.

Starting on the turret now.
petbat
Joined: August 06, 2005
KitMaker: 3,353 posts
Armorama: 3,121 posts
Posted: Thursday, July 26, 2018 - 09:19 AM UTC
Looking like another great little addition Richard. Good clean build.
 |

WEB HOSTING BY


Copyright ©2021 Armorama and Kitmaker Network, a subsidiary of Silver Star Enterprises
All Rights Reserved. Please read our Conditions of Use and Privacy Policy.
All Rights Reserved. Please read our Conditions of Use and Privacy Policy.