_GOTOBOTTOM
Dioramas: Small Scale
Dioramas of subjects smallers than 1/32 scale.
Hosted by Darren Baker
T34 Night in the Ruts
Stickframe
#362
Visit this Community
California, United States
Joined: December 01, 2013
KitMaker: 1,661 posts
Armorama: 1,202 posts
Posted: Thursday, July 06, 2017 - 12:46 AM UTC
Hello model builders. Sorry - can't change the heading now - this is 1/35 scale - just not a big base....

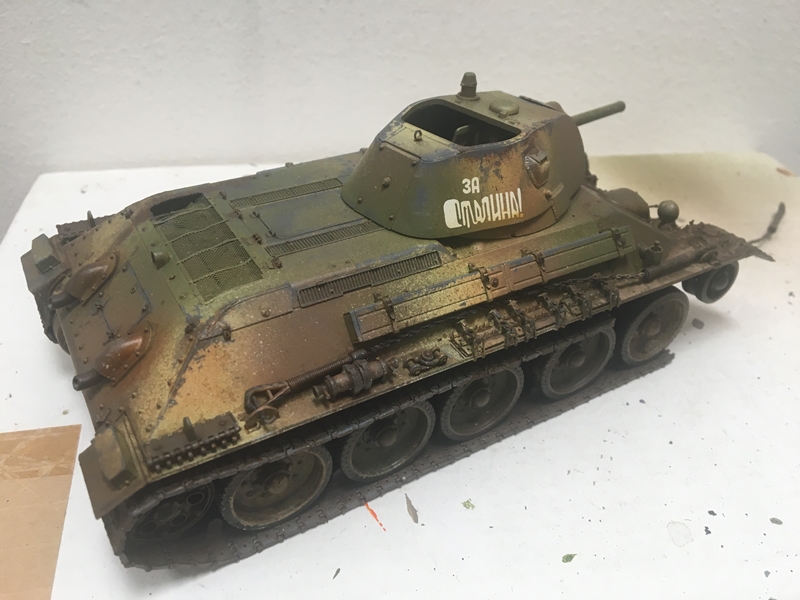
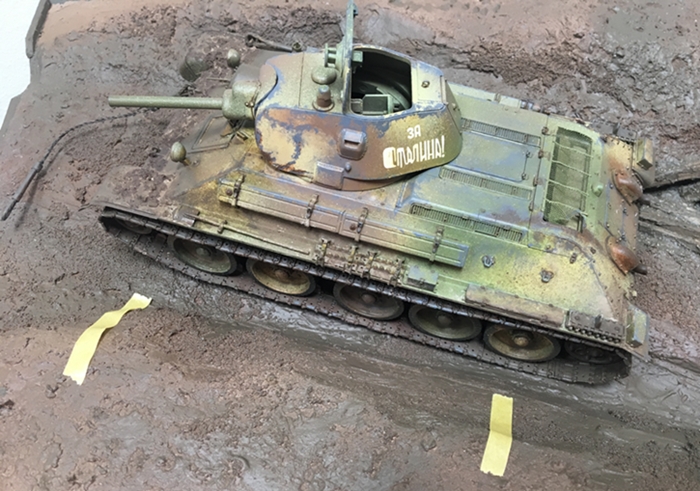
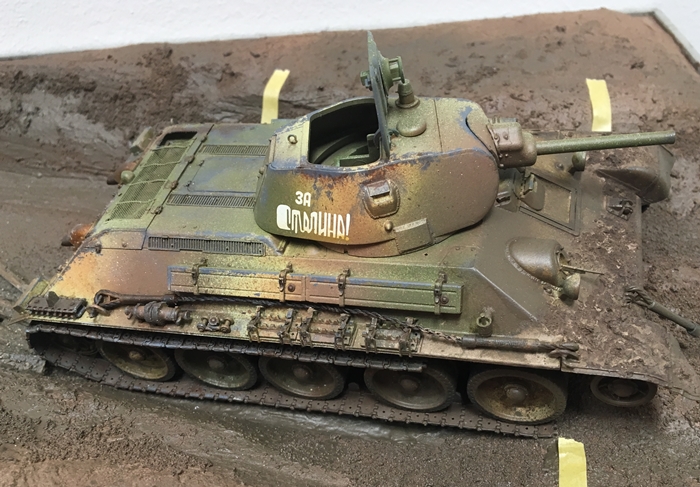
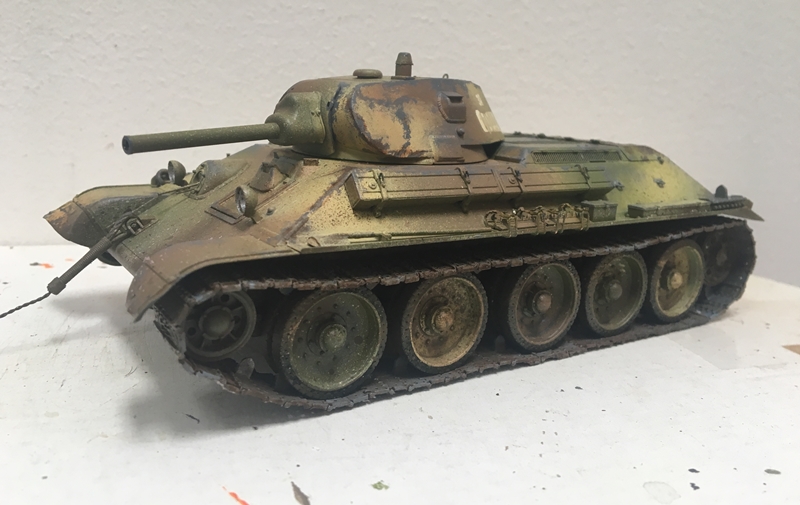
As Monty Pytrhon was known to say, "and now for something completely different"...for me anyway - no CARC sand will be seen on this build - instead, WWII T34/76 1940....why not?

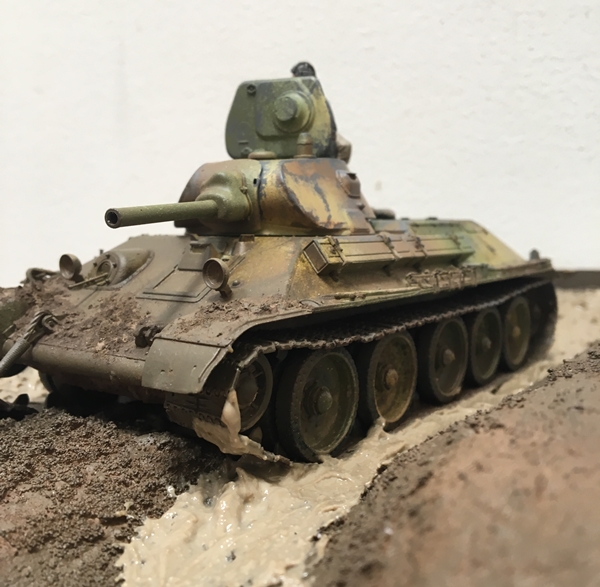
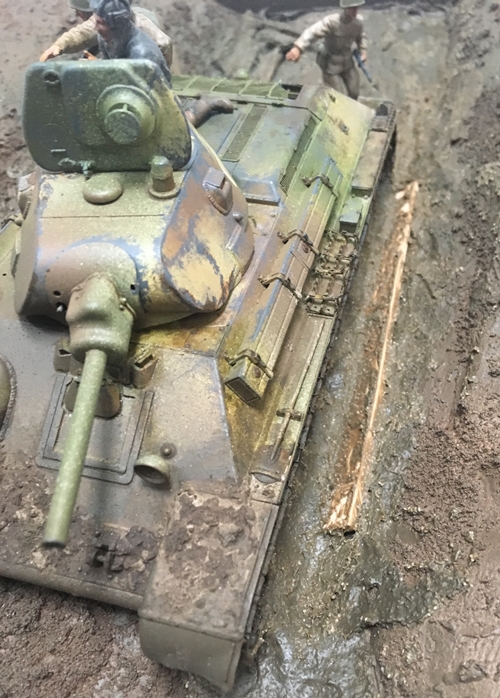
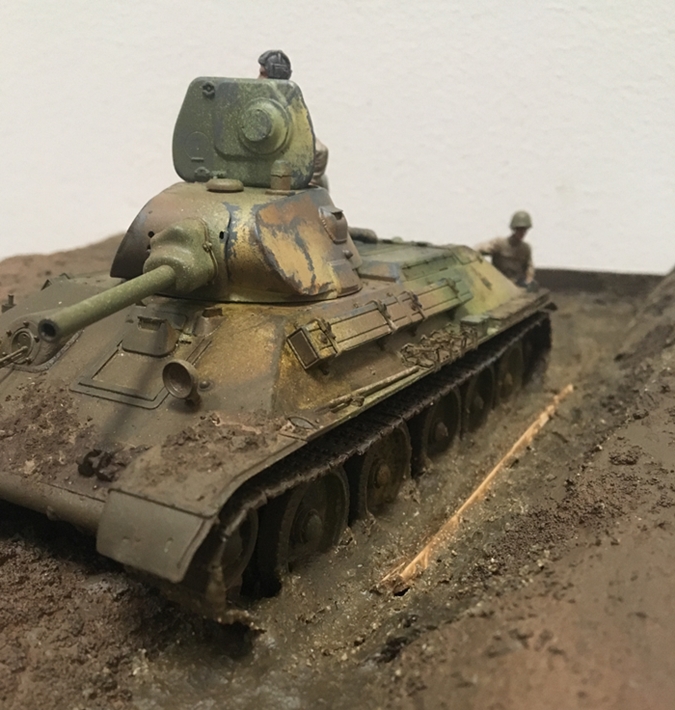
On an impulse I purchased a Cyber Hobby kit of the tank - the price was right. It turns out, it was a great kit for a non-tank expert like me to build. All went together as advertised no warping gaps etc - I added a new barrel and a small PE set for a screen over the rear deck, and as always some bits of lead foil and thin wire where I didn't like the plastic.

Before getting into the build I read up on the T34 and learned more of its storied past - very interesting - I did though, see many images of these knocked out. It seems early transmission/driveline problems, along with not great communications and tactics were quite damaging - maybe not more than the enemy, but clearly problematic. Again, I am NOT an expert on this subject or claim to be - just sharing what I read.

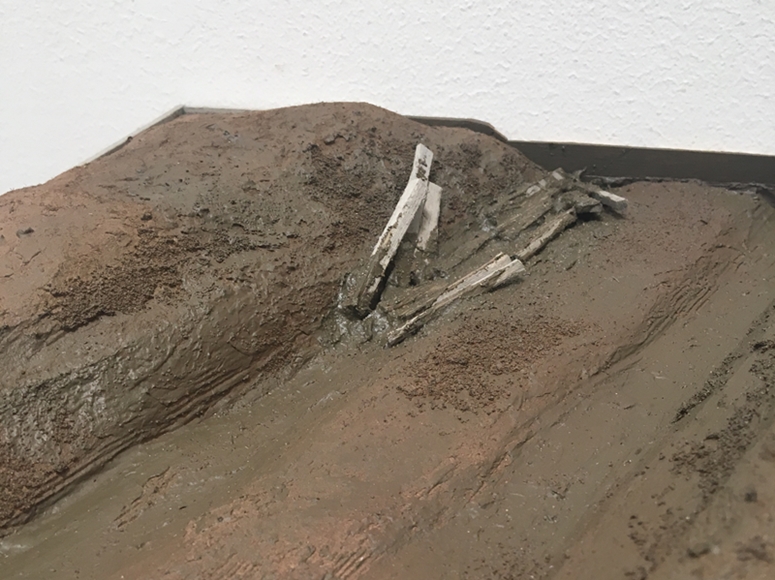
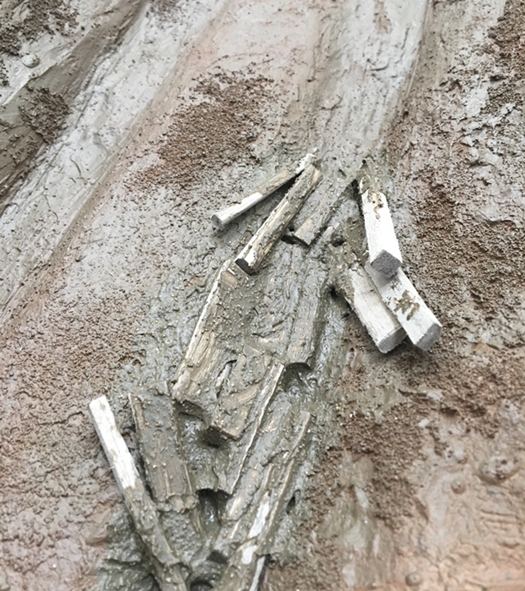
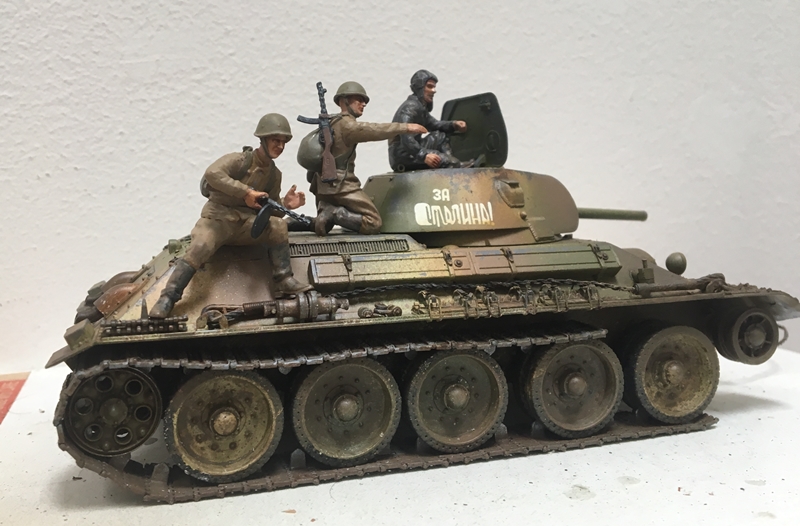
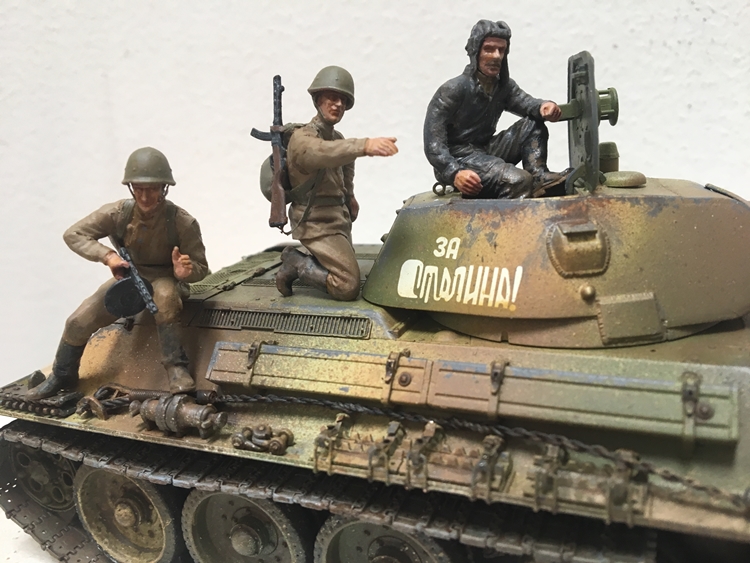
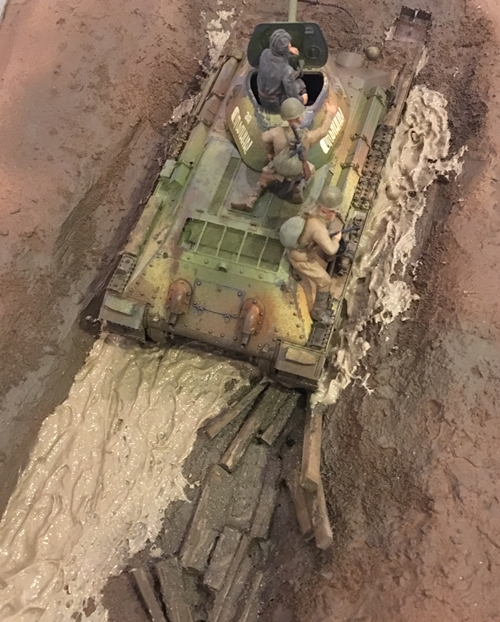
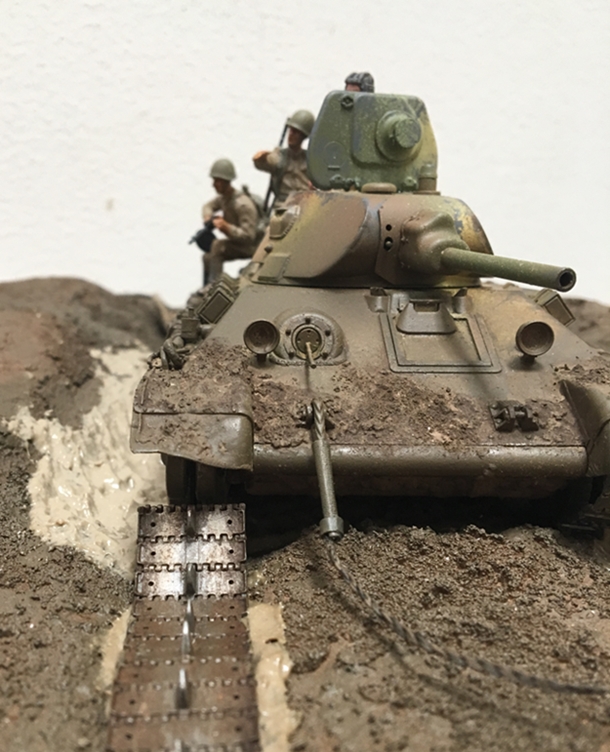
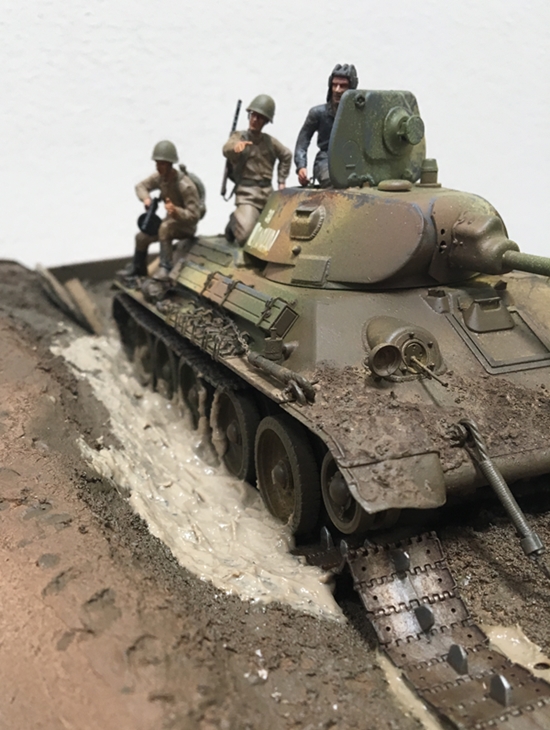
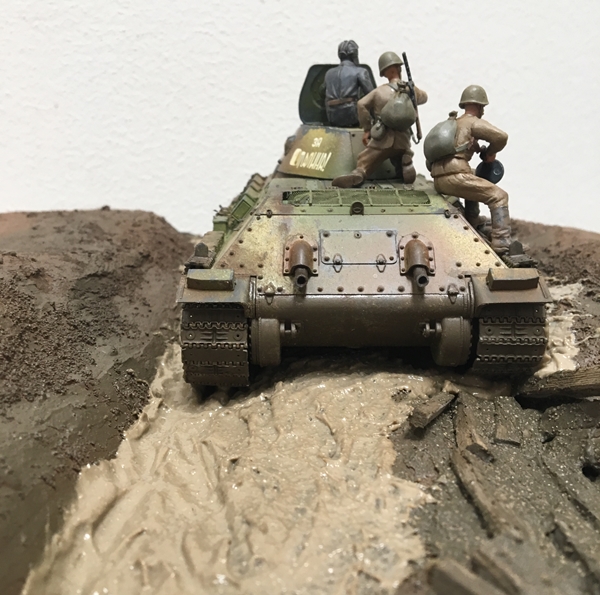
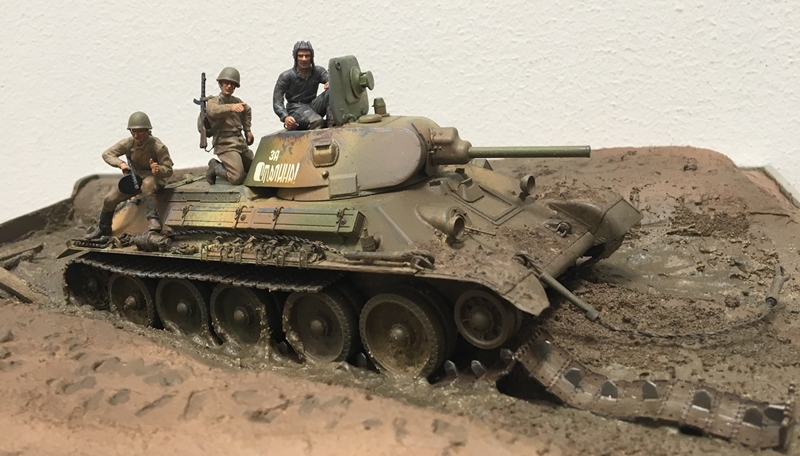
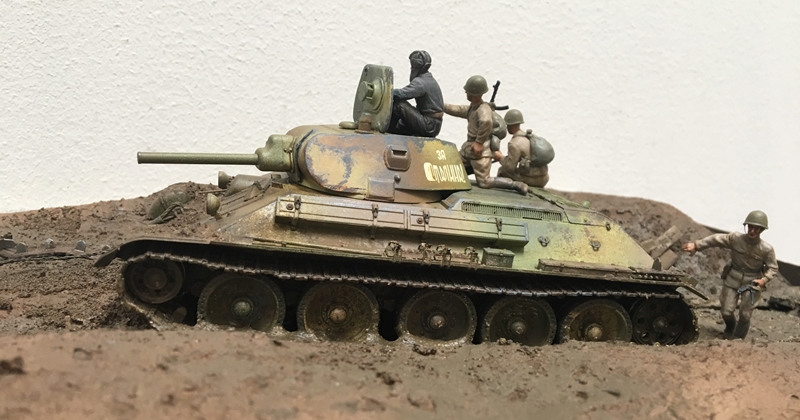
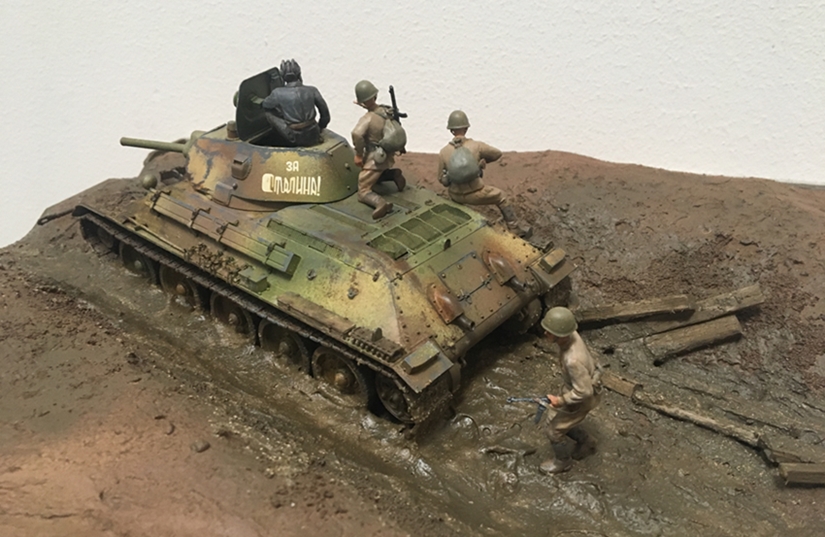
For this build, I'm planning to show the tank (according to box art, from an "unidentified unit")...yes, stuck in the ruts with a thrown track - and am adding a mix of crew and field soldiers - so far, so good - nice change for me - please take a look:
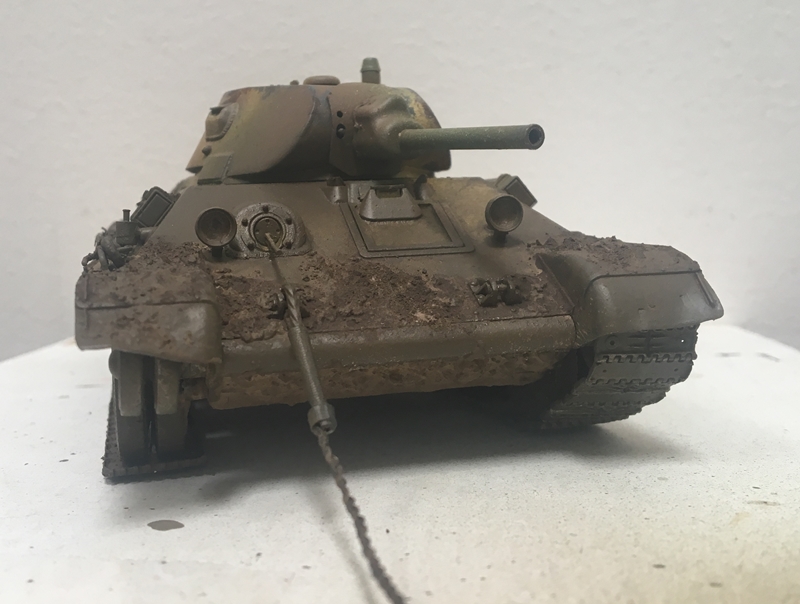
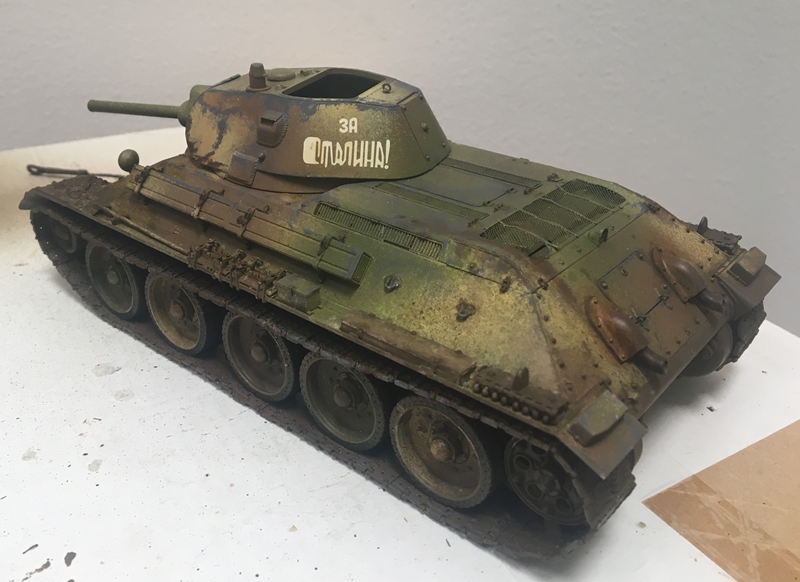
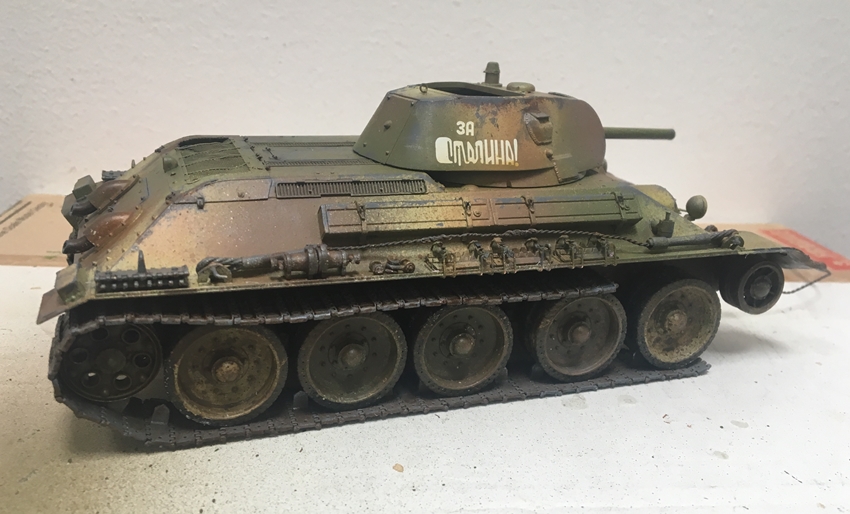
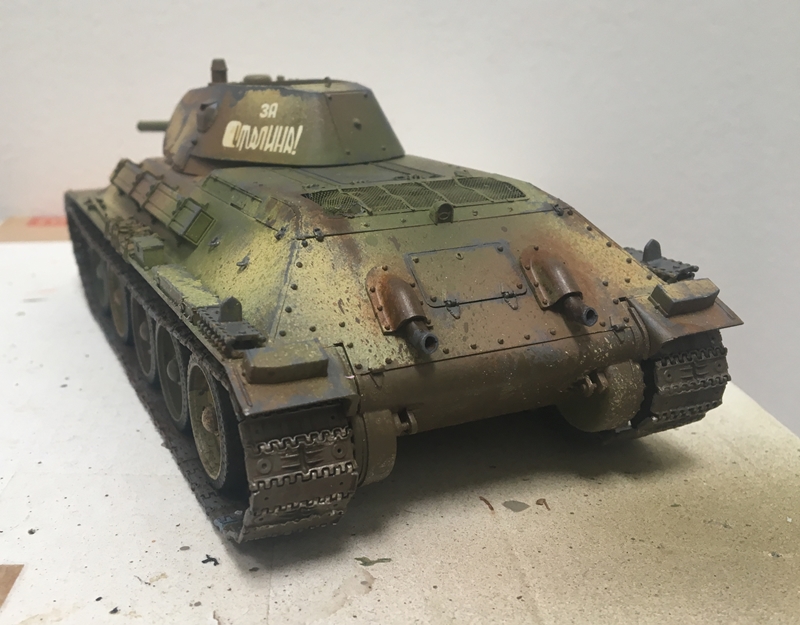
First up, the T34:


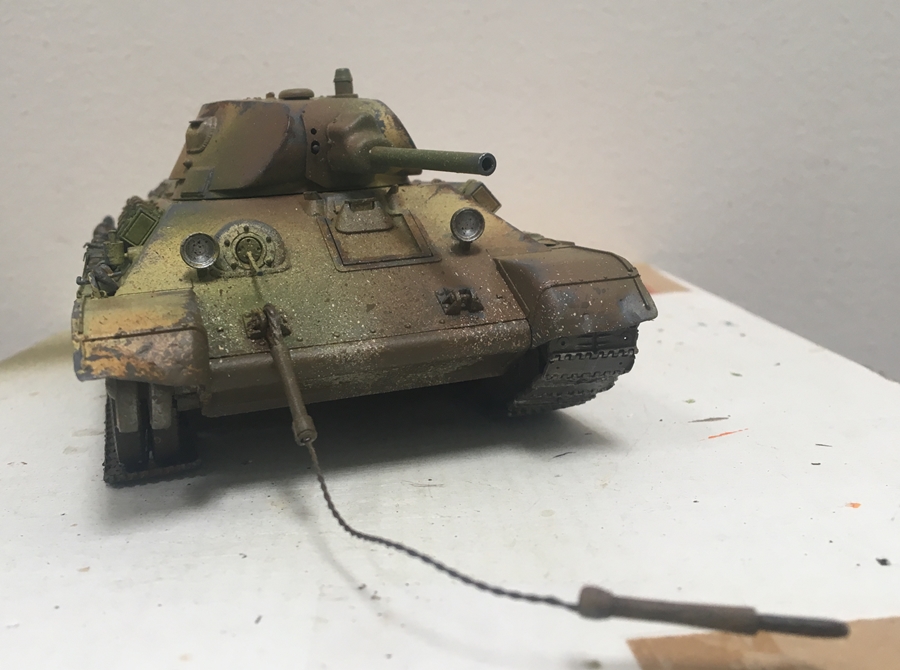
All seems to have worked out OK - I didn't forget the hatch - will install it with a figure - and I have a thrown track length sitting on the bench - trying not to lose or ruin it! the track links went together fine....

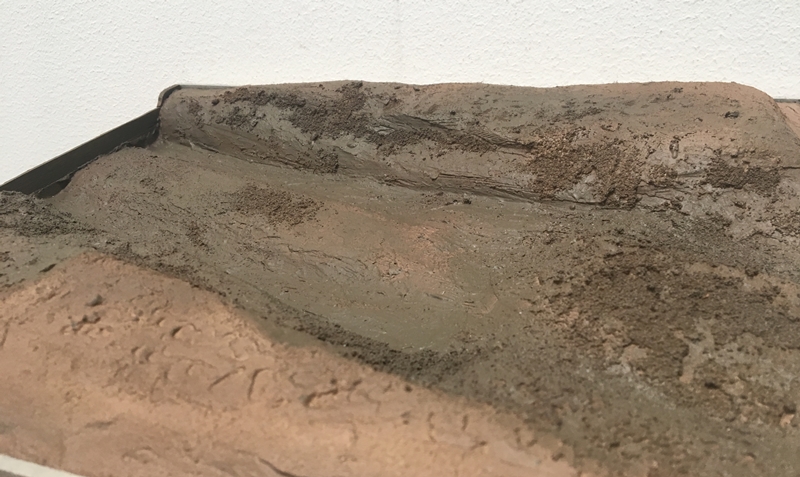
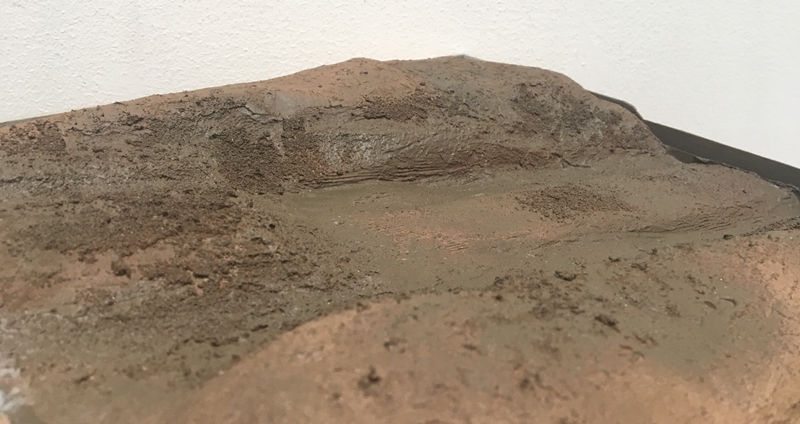
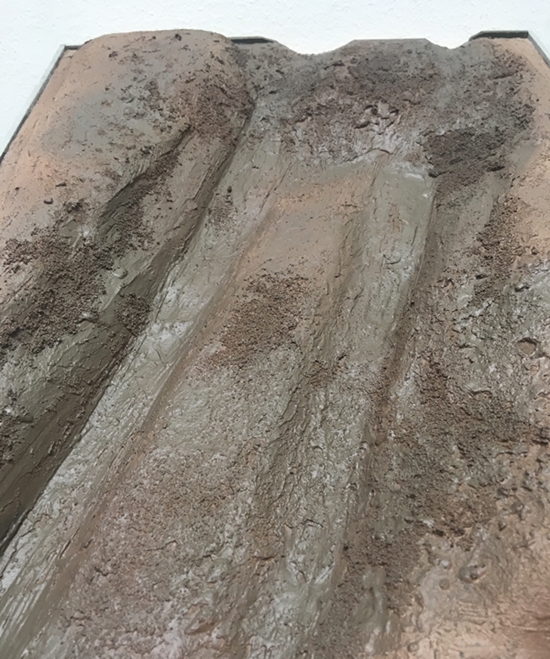
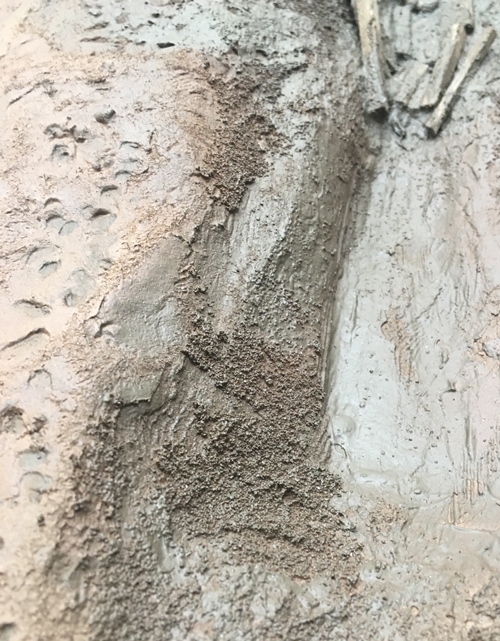
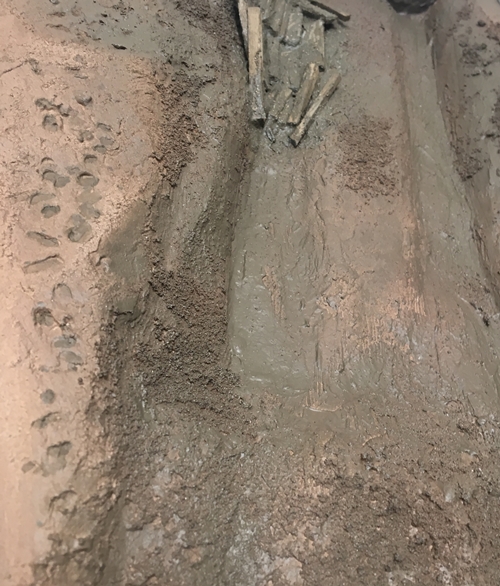
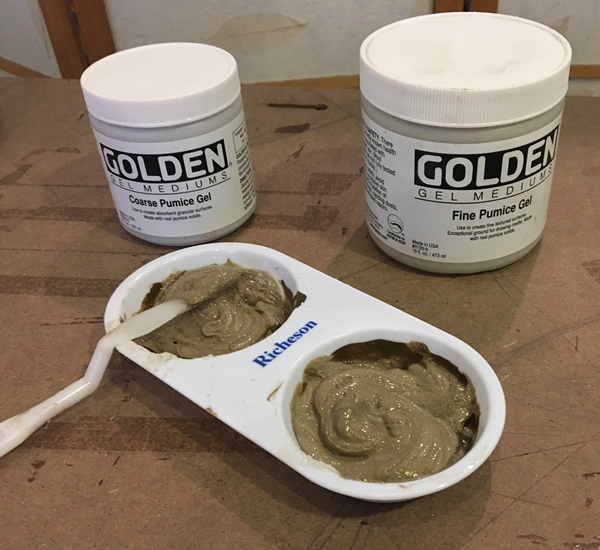
Now - on to the dio. I've built a few extravaganzas - and this won't be one of them - instead, almost all made from odds and ends in the shop...artists wood frame for base, rigid foam for land form, a Woodland Scenics sheet (cotton material over aluminum foil), hydrocal, and finally some pumice gel - actually easier than it sounds...please take a look:


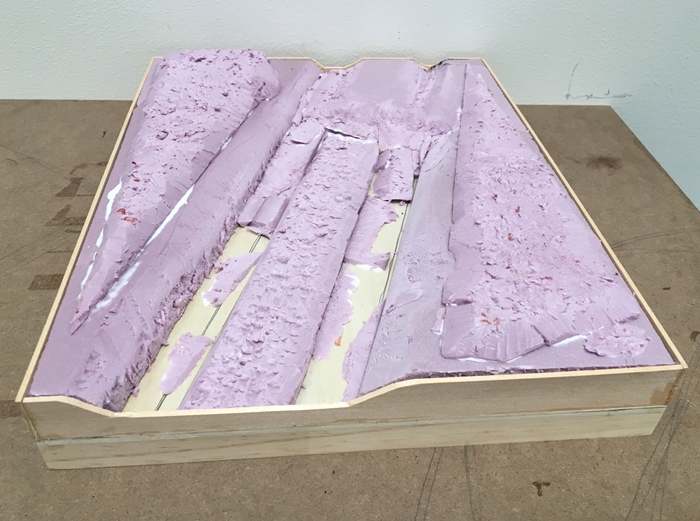
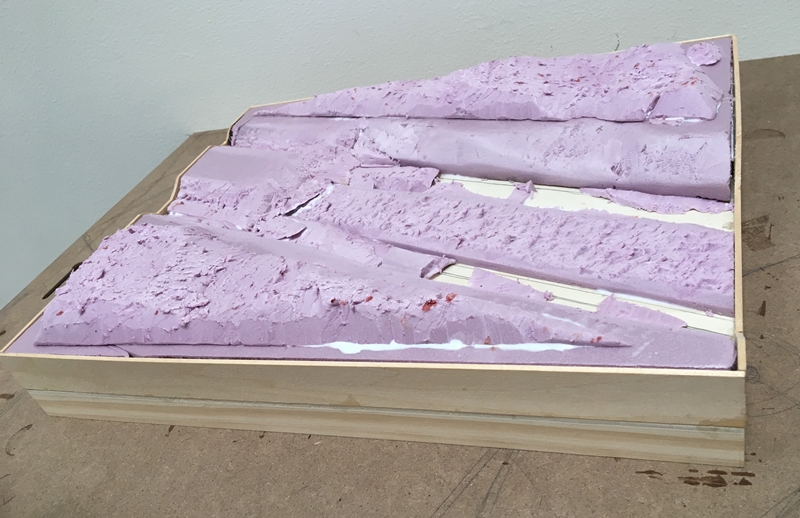
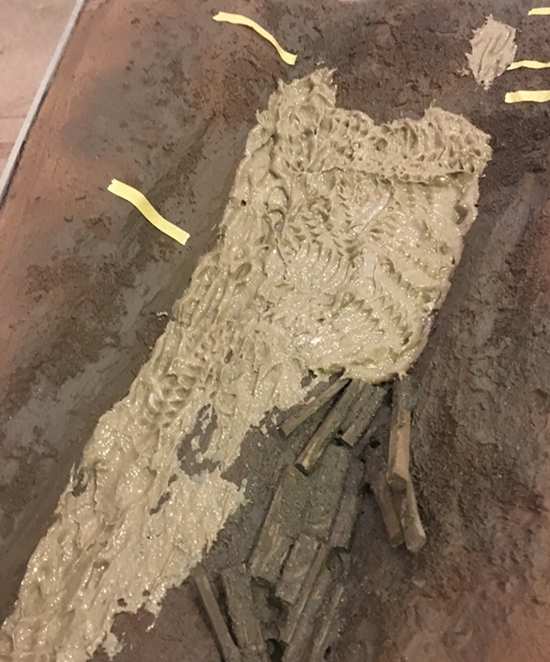
Yes....the special effect comes from me stabbing my finger along the way...perfect....


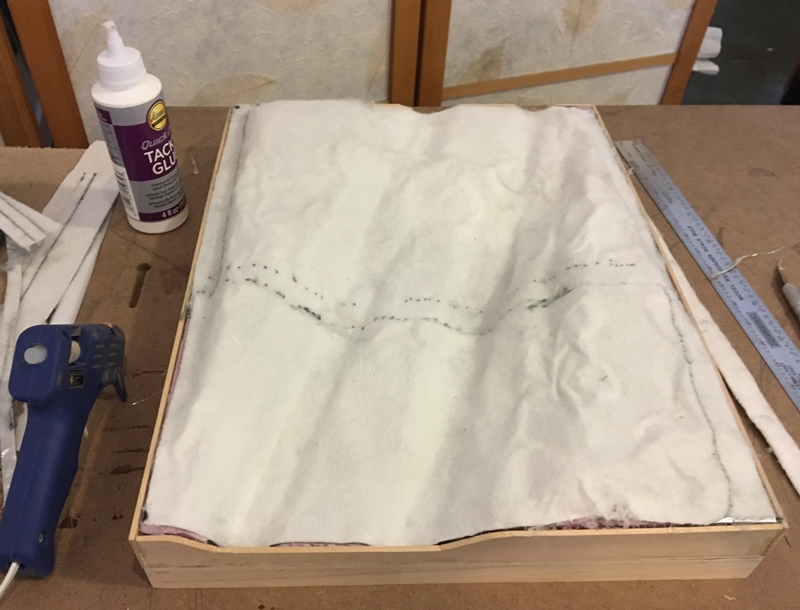
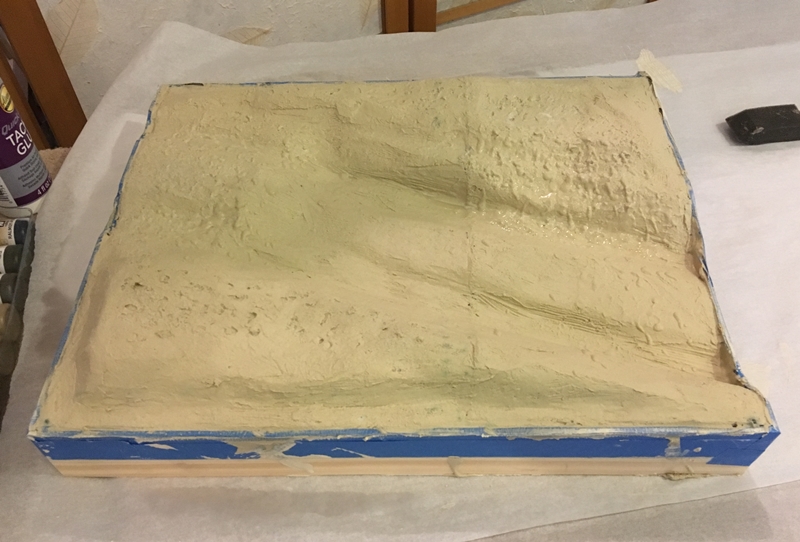
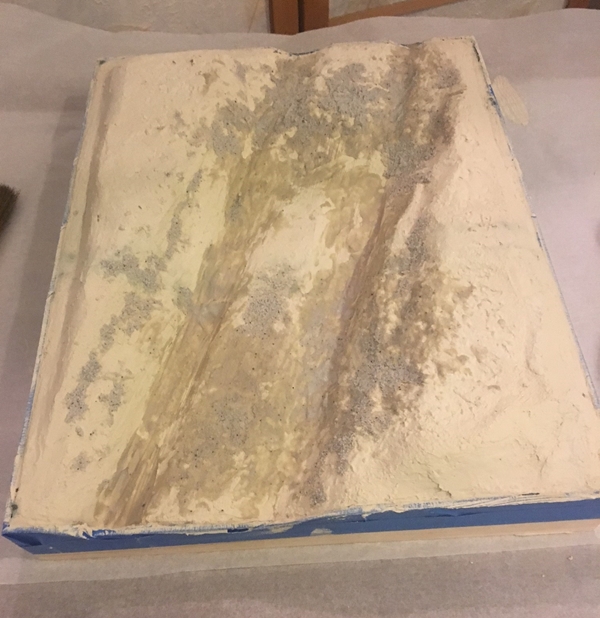
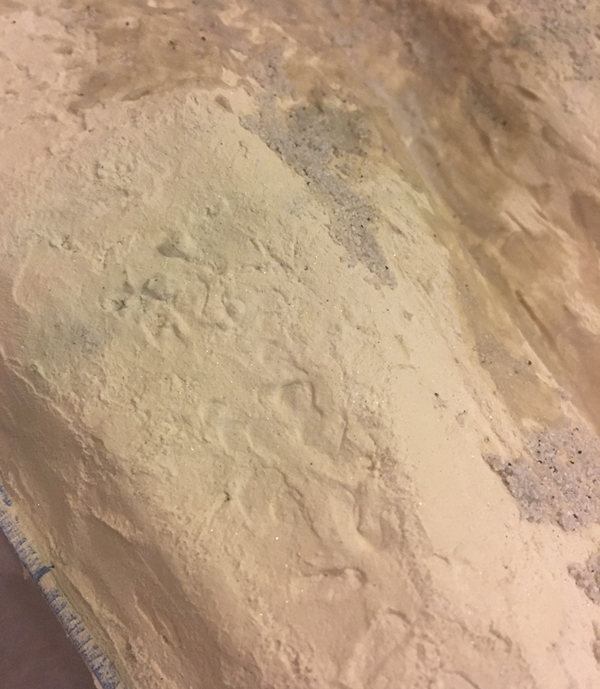
Above, you can see the combo - topo, plaster, pumice, and foot prints in the mud - next up, some paint!

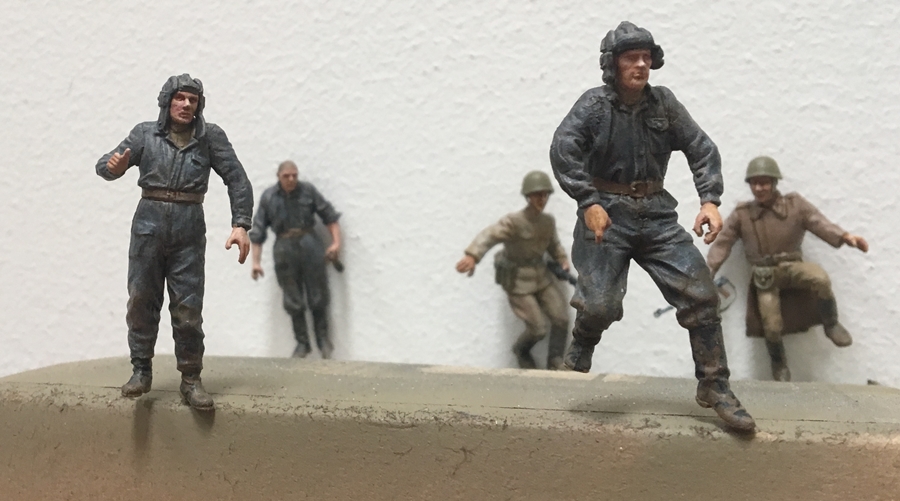
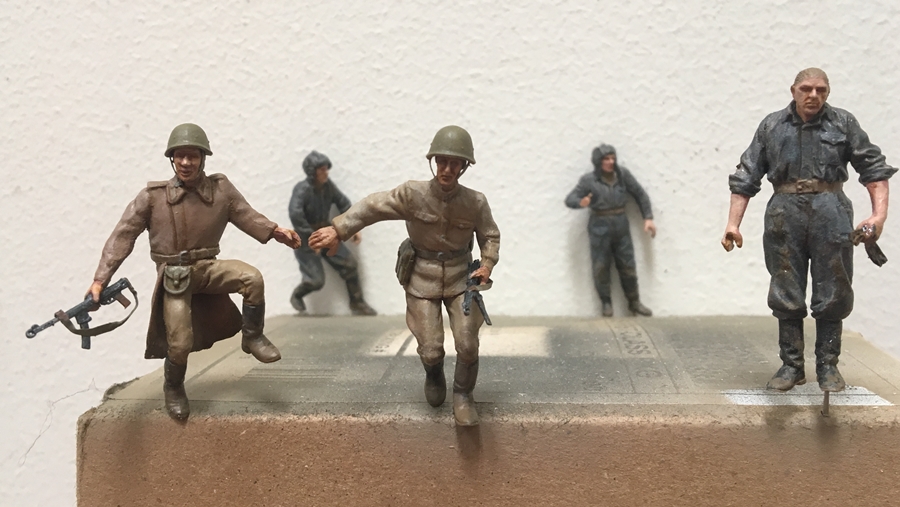
I've built up some of the figures - some plastic guys with resin heads from the junk box- plust lead foil straps etc -

Until the next post, thanks for having a look and happy model building!

Nick


Armorsmith
Visit this Community
Pennsylvania, United States
Joined: April 09, 2015
KitMaker: 1,063 posts
Armorama: 1,000 posts
Posted: Thursday, July 06, 2017 - 12:52 AM UTC
Off to a great start. Waiting for more.
callmehobbes
Visit this Community
England - North West, United Kingdom
Joined: April 17, 2005
KitMaker: 751 posts
Armorama: 740 posts
Posted: Thursday, July 06, 2017 - 01:33 AM UTC
Looking good.
Invincible
Visit this Community
United Kingdom
Joined: May 03, 2017
KitMaker: 148 posts
Armorama: 122 posts
Posted: Thursday, July 06, 2017 - 02:10 AM UTC
Very good work on the t34, but for some reason I seem to have read the title as 'T34 right in the nuts' lol
jrutman
Visit this Community
Pennsylvania, United States
Joined: April 10, 2011
KitMaker: 7,941 posts
Armorama: 7,934 posts
Posted: Thursday, July 06, 2017 - 02:31 AM UTC
Nice beginnings and it really is a big change-up for you man ! Nice. Given your excellence at terrain,i look forward to the "mud portion" of the build.
J
cheyenne
Visit this Community
New Jersey, United States
Joined: January 05, 2005
KitMaker: 2,185 posts
Armorama: 1,813 posts
Posted: Thursday, July 06, 2017 - 02:38 PM UTC
Nick , lookin good , really like the paint job on the 34 .
Lookin forward to the Russian mud work .
Namabiiru
Staff MemberAssociate Editor
MODEL SHIPWRIGHTS
#399
Visit this Community
Rhode Island, United States
Joined: March 05, 2014
KitMaker: 2,888 posts
Armorama: 1,920 posts
Posted: Thursday, July 06, 2017 - 04:19 PM UTC
Stickframe,
The finish and weathering on the tank are superb, and the base looks to be coming along nicely. One thing I have to mention, though, are your tow cables. I think you should consider reworking those. The eyelets are appropriately beef, but the cable spans appear to be just two twisted strands. Since the towing aspect seems like it will be a key feature of this dio, those tow cables are going to draw attention so they really need to look appropriate.

Just some constructive input. I really like the T-34!

Dioramartin
Visit this Community
New South Wales, Australia
Joined: May 04, 2016
KitMaker: 1,476 posts
Armorama: 1,463 posts
Posted: Thursday, July 06, 2017 - 05:43 PM UTC
Hey Nick, so was the title actually supposed to be “T34 – Right in the Nuts”?

Whatever great to see you tackling something I know a tad more about than nuthin’ - are we in winter, summer or ahem the rasputitsa? That’s the 2nd time I’ve been able to use that word on this site this week & it’s so versatile. I like your dio too – purple foam, purple foam, etc,
btw how’s not-Bladerunner going? I’ve been missing it.

KoSprueOne
Visit this Community
Myanmar
Joined: March 05, 2004
KitMaker: 4,011 posts
Armorama: 1,498 posts
Posted: Friday, July 07, 2017 - 09:59 PM UTC
Interesting change in subject from you. Looks like it will be as detailed as your other blog subjects

I too have recently gained an interest in Russian armor.


strongarden
Visit this Community
Florida, United States
Joined: May 14, 2012
KitMaker: 730 posts
Armorama: 624 posts
Posted: Saturday, July 08, 2017 - 04:27 PM UTC
Stick this is already a beauty, and nice work on the subtle-camo-under-the-weathering paint job, or just a great overall finish!
When you ref the early war fotos (I know there's a ton out there), and that you have your figgies in the que, and that it's 1940, then the figures would be the bewildered young Soviets.
But you switch up to 1941, and you could change over to the amused young German troops! (a ton of those pics too!).
Whichever,a real nice start all the same, and thanks for posting. Something quick, light, and easy sure seems like fun, no?

Cheers
Dave
panzerconor
Visit this Community
Massachusetts, United States
Joined: February 08, 2012
KitMaker: 1,271 posts
Armorama: 1,253 posts
Posted: Sunday, July 09, 2017 - 06:05 AM UTC
Nick did you see the new release from Stalingrad? A group of those "curious" German soldiers would make a fun scene as well. But your idea here is more interesting at the end of the day too.

Nice new subject to see you tackle!

-Conor
Stickframe
#362
Visit this Community
California, United States
Joined: December 01, 2013
KitMaker: 1,661 posts
Armorama: 1,202 posts
Posted: Tuesday, July 11, 2017 - 03:35 AM UTC
Hi Guys -

I'm glad this project has sparked some interest! I need to say, I'm hustling to get this post out today - during a really short lunch break - but, there are some words to be said - -

First, thanks to all of you for checking in - I appreciate you all taking the time to leave some comments!

About the title, yes, a funny wordplay that I didn't invent - some of us rock and rollers remember even the worst albums...in this case, one in the late 70's by Aerosmith - "night in the ruts"...as I recall, a forgettable album, but clever title....that I didn't forget...

The subject has been interesting - now having read a few more good and not so good reports of the success or failure of the T-34. And, the mud Tim describes as "Rasputitsa"...(it's a real word), which means soupy and deep mud - which is perfect for this! very good reference -

I'm thinking spring, as this is supposed to be early in the war, I'm speculating the tank wouldn't have looked this bad in the fall, and instead, having survived a rough winter, only to throw a track and get stuck...

A few other notes, Mark...uh, yeah about those "tow-threads"...you are absolutely right and they don't look good. They are actually paired segments of braided wire...just way too fine, so I tore them off, and added another pair of wires. I'm not sure they are now "good" but I think less bad.

Jerry, Cheyenne - as you'll see below, the mud work has begun. Up first, some pigment on the tank.

Please take a look, you'll also see the "repaired" cable:


The rest of the mud so far is only done with paint over the base. You'll see some decent effects - so far so good. The pics are incremental, going from base colors on to various additive elements - some wood blocks to help get the tank unstuck, and the task of painting in footprints to emphasize contrast -


Ok - that's it for today - thanks again for taking the time to leave some comments- until next time, I need to get back to work!

Cheers

Nick


Namabiiru
Staff MemberAssociate Editor
MODEL SHIPWRIGHTS
#399
Visit this Community
Rhode Island, United States
Joined: March 05, 2014
KitMaker: 2,888 posts
Armorama: 1,920 posts
Posted: Tuesday, July 11, 2017 - 04:51 PM UTC
I love the way that base is coming along!

timcc2008
Visit this Community
United States
Joined: May 12, 2010
KitMaker: 139 posts
Armorama: 135 posts
Posted: Tuesday, July 11, 2017 - 06:40 PM UTC
This is really looking great, Nick! The T34 weathering is superb.

What brand of pumice gel did you use on the terrain?

vr

Tim
jrutman
Visit this Community
Pennsylvania, United States
Joined: April 10, 2011
KitMaker: 7,941 posts
Armorama: 7,934 posts
Posted: Tuesday, July 11, 2017 - 08:35 PM UTC
Looking good ! Taking notes as I have a small mud project on the way.
J
parrot
Visit this Community
Ontario, Canada
Joined: March 01, 2002
KitMaker: 1,607 posts
Armorama: 1,581 posts
Posted: Tuesday, July 11, 2017 - 08:37 PM UTC
As always,looking good Jerry.

Tom
bill_c
Staff MemberCampaigns Administrator
MODEL SHIPWRIGHTS
Visit this Community
New Jersey, United States
Joined: January 09, 2008
KitMaker: 10,553 posts
Armorama: 8,109 posts
Posted: Wednesday, July 12, 2017 - 10:39 PM UTC
Looks like a ****ing mess, haha, just the way you would want it to look. Congratulations, that's NASTY looking mud.
justsendit
Visit this Community
Colorado, United States
Joined: February 24, 2014
KitMaker: 3,033 posts
Armorama: 2,492 posts
Posted: Thursday, July 13, 2017 - 12:26 AM UTC
Hi Nick!
Talk about changing gears — you're slammin' them! This is awesome already and looks like a lesson in "Rasputitsa" done really well! 📚

Can't wait to see the T34 and its tankers stuck into that goop — although, I hear they were'nt as bad off as the Germans were!

About the tow cable: Have you looked into Ureeka XXL? They make very realistic looking braided tow cables (easy to shape and can be purchased with or w/o resin eyelets) — available on eBay.

Keep up the great work, comrade!🍺 ... Oops, should be Vodca!
—Майкл
Stickframe
#362
Visit this Community
California, United States
Joined: December 01, 2013
KitMaker: 1,661 posts
Armorama: 1,202 posts
Posted: Sunday, July 16, 2017 - 07:40 AM UTC
Hi guys - thanks for having a look and leaving some comments - I appreciate them!

Hi Mark - glad to hear you like it so far - really a different type of build for me, thanks! I think I'll keep fooling around with armor - not just soft skins in the future.

Hi Tim - thanks, and glad you're liking it so far. The pumice gel is made by a company called Golden. I picked it up at Blick's art supply. And...am learning a lesson or two -

First, you can mix some Vallejo acrylic with it, and get a nice color blend...second, on a less happy note, I'm discovering that even though it's hot and dry here, you probably should not place thick layers of the stuff on your dio. There is enough moisture in the mix, that it doesn't seem to want to set up below the surface - sort of like a mud filled pie!

The top is nice and firm, but push with your finger and it's still mushy below...perfect. I'll give it another day to set up. If no luck, I'll dig out the mush and gradually refill in a series of shallow lifts..and try not to destroy the dio - as the T-34 is now set in the muck!! Life of the dio builder is always intense! Haha

Hi Jerry, thanks for dropping by! Yeah, about the mud...please see above...looks great, but taking some time to set up....will keep the group updated on what happens!

Hi Tom - thanks!

Hi Bill - glad you had a look and left a comment - thanks! Yeah...again, see above, just like really being stuck in the mud...it's a mess!

Hi Mike, thanks! Yeah - I was really needing a change and this has been fun! The kit was perfect for a tank amateur like me, I really couldn't ask for a more straight forward kit to build - compared say to my favorite Panda M-ATV...a pain to build, but I keep doing it! Thanks for the tip on the tow cable - maybe next time...I've alread pryed them off once...at this point I'll do more harm than good fooling around with them anymore!

Ok - I'll post a step by step update tomorrow - I took pics along the way. I'll also report on the status of my mud setting up more overnight - I'm hoping...the dio is upstairs in an uncomfortably warm room - hopefully baking the moisture out of my mud!

Thanks for having a look
Cheers
Nick
Dioramartin
Visit this Community
New South Wales, Australia
Joined: May 04, 2016
KitMaker: 1,476 posts
Armorama: 1,463 posts
Posted: Sunday, July 16, 2017 - 05:48 PM UTC
Reminds me of the first dio base I attempted years ago, 2-inch thick papier mache left in the garden shed to cure in high summer. 5 days later I opened the door – a forest of ? fungal spores half an inch high all over it…and jeez did it stink. Somehow I couldn’t find a way of using it as I wasn’t into sci-fi. The missing ingredient was a capful of antiseptic

jrutman
Visit this Community
Pennsylvania, United States
Joined: April 10, 2011
KitMaker: 7,941 posts
Armorama: 7,934 posts
Posted: Sunday, July 16, 2017 - 06:39 PM UTC
So the mud is behaving like when you paint a second coat on paint that has not properly dried yet. Been there,done that frustrating thing a few times. It really retards the drying process.
J
Stickframe
#362
Visit this Community
California, United States
Joined: December 01, 2013
KitMaker: 1,661 posts
Armorama: 1,202 posts
Posted: Monday, July 17, 2017 - 01:56 AM UTC
Hi guys -

yes, today some pictures!

Tim -yeah....good and the bad that comes with experimenting....yes...I'll keep doing so - you never know when something cool might happen -

Jerry - you nailed it exactly! I should not have experimented, and instead put down thin layers....

So, the result this AM before I left for work was the mush is getting firmer, so maybe a day of getting baked without me fooling around with it will net some good results.

Meanwhile at the office, another lunch time post - sort of a step by step - please have a look:


Before dropping a perfectly good model in the muck - I want to be able to find the right place again on the layout, so some tape was used to bracket the location


I didn't want to need to install these guys once the kit was mounted, so there you have them....


and more guys...and below - the pumice underway - mixed with some vallejo color:


nice huh? after the above photo time to get serious, and to drop your kit into that mess....


above, you can see - my tank looks to be on the mud, and not in it...so:


As above, you can see I kept adding my fake mud....


And as you can see above, the surface of this has dried to look right. However, just beneath is a mushy mess just like the real thing - let's hope it solidifies - as I want to add water...but need to/will wait...and before that, maybe more mud too....we'll see -

thanks for checking it out -

Nick


Stickframe
#362
Visit this Community
California, United States
Joined: December 01, 2013
KitMaker: 1,661 posts
Armorama: 1,202 posts
Posted: Tuesday, July 18, 2017 - 03:12 AM UTC
Hi guys - just a brief update today. It turns out that the mud remained a muddy soft area, so , I dug the center portion out, and added a piece of wood for fill. Weird thing, the "top" of the mud was so solid i could cut it cleanly with a knife, so just lifted out the cut area and the goo beneath it lifted out too.

Please see the attached - I'll add a new layer of "mud" over my wood fill material:


The plan it to add more mud, let it set up, then add some woodland scenics water - but, I cant do the latter until the former is set -

OK, thanks for checking it out -

Nick

JPTRR
Staff MemberManaging Editor
RAILROAD MODELING
#051
Visit this Community
Tennessee, United States
Joined: December 21, 2002
KitMaker: 7,772 posts
Armorama: 2,447 posts
Posted: Tuesday, July 18, 2017 - 06:10 AM UTC
Tanks, mud, guns - boys will be boys.

Great concept and execution. I'll be watching. This is neat diorama you are making.
Dioramartin
Visit this Community
New South Wales, Australia
Joined: May 04, 2016
KitMaker: 1,476 posts
Armorama: 1,463 posts
Posted: Tuesday, July 18, 2017 - 09:31 AM UTC
Glorious mud Nick I’m sure it’ll go hard eventually, as the actress… oh never mind. May I make a couple of obs?

1) Looks like they threw some timber at the rear of the starboard track…an abandoned attempt (and reverse movement) to drive it out backwards (?)…so now it’s being towed forwards (?). If I’m reading that right, while I’ll defer to any tanker/vet I would have thought towing it forwards would create problems with the broken track, the upper run will just spill out the back. If I was the tow-er I’d attach a 2nd cable or rope to the upper run – your crew could be doing that – to pull it forwards to take up the slack at the same rate the tank was being pulled. Once it was free, repairing the broken ends with new pins would be relatively easy because the ends would be close together.

2) Those tank-riders look really naff – sorry I don’t mean your work, I mean whoever manufactured them, and they don’t really make sense in the dio anyway if your primary aim is showing a recovery. If you agree with (1) I would have thought the only crew in the tank might be the invisible driver (ideally visible if his hatch still opens?), and the others would all be out working their butts off helping with the towing, & the infantry would have already transferred to a more viable ride.

About cables, ordinary picture wire (as in hanging framed pictures, the steel type’s obviously better than the brass when it comes to painting it) comes in several useful 1/35th gauges with a reasonable “bend-memory” - I’ve used it for years & never found a better solution.

Cheers

 _GOTOTOP