

Hosted by Richard S.
JEEPS!

johhar

Joined: September 22, 2008
KitMaker: 476 posts
Armorama: 447 posts
Posted: Sunday, February 18, 2018 - 02:48 AM UTC
Pawel, the weathering is superb. Looks very well used.
ryally

Joined: July 29, 2005
KitMaker: 879 posts
Armorama: 330 posts
Posted: Sunday, February 18, 2018 - 09:05 AM UTC
Saw these on the weekend and thought of you guys, most likely late but thought some of you may still like them for future builds.

justsendit
Joined: February 24, 2014
KitMaker: 3,033 posts
Armorama: 2,492 posts
Posted: Sunday, February 18, 2018 - 09:37 PM UTC
@ Pawel Nicely done!
@ Peter Great reference. Thanks for sharing!
mike
@ Peter Great reference. Thanks for sharing!
mike

Ramanathan

#477

Joined: March 21, 2007
KitMaker: 133 posts
Armorama: 131 posts

Posted: Monday, February 19, 2018 - 02:55 PM UTC
Eight days to go and I haven't started weathering yet... 


petbat
Joined: August 06, 2005
KitMaker: 3,353 posts
Armorama: 3,121 posts
Posted: Monday, February 19, 2018 - 03:50 PM UTC
Nice Job Pawel. Thanks for joining in.
I haven't laid paint down yet, just primer.
Hit a snag though, I can't find my archer vehicle registration numbers. I need the early war blue drab ones not the white in the kit as I am doing this well known vehicle.


It is actually a decal option in the kit, just the decals are not correct and some markings are not provided (large stars on the rear sides, the 'ATS' chalked on, the rego numbers are wrong, etc.
I have to order another set, but it likely won't be here in time. I'll have the GPA painted and other decals on, but the weathering will have to wait.
Quoted Text
Eight days to go and I haven't started weathering yet...
I haven't laid paint down yet, just primer.
Hit a snag though, I can't find my archer vehicle registration numbers. I need the early war blue drab ones not the white in the kit as I am doing this well known vehicle.
It is actually a decal option in the kit, just the decals are not correct and some markings are not provided (large stars on the rear sides, the 'ATS' chalked on, the rego numbers are wrong, etc.
I have to order another set, but it likely won't be here in time. I'll have the GPA painted and other decals on, but the weathering will have to wait.

johhar
Joined: September 22, 2008
KitMaker: 476 posts
Armorama: 447 posts
Posted: Thursday, February 22, 2018 - 03:00 AM UTC
Update 4 (I think). More wiring than I think anyone should have the patience for, and still need to paint it. Biggest problem is not damaging what's there as you trial and error new stuff to bend it about 50 times before getting it close enough to right. I think historical accuracy takes a back seat to a sort of composite semi-realistic look. Going to be really tight to make the deadline though all construction is finished today.


justsendit
Joined: February 24, 2014
KitMaker: 3,033 posts
Armorama: 2,492 posts
Posted: Thursday, February 22, 2018 - 11:01 PM UTC
Wow! Johhar, thats a lot of wiring more than Ive seen in most exposed model engines! Looking good!
Now, will somebody please answer that phone!
mike
Now, will somebody please answer that phone!
mike
johhar
Joined: September 22, 2008
KitMaker: 476 posts
Armorama: 447 posts
Posted: Friday, February 23, 2018 - 12:16 AM UTC
Some of the reference photos show a lot of wiring and I kind of liked the look. I'm basically done and just waiting for the dullcote to dry before final touch ups and pictures. The problem is that all the handling now is literally making wheels and doors fall off and I foresee having to spend time fixing two bits of damage for every added bit of detail, and I can't think of any other detail that I really want that badly. Photos at least will be in before the campaign ends.
petbat
Joined: August 06, 2005
KitMaker: 3,353 posts
Armorama: 3,121 posts
Posted: Friday, February 23, 2018 - 03:22 AM UTC
Johhar, so much spaghetti but no meatballs!
Another tip for handling models to avoid damage:
Some people screw a handle into the bottom of the model but that leaves a big hole. I made myself a selection of different size mortar boards from a sheet of thin MDF and a cut down wooden broom handle as a spindle.
Cut the MDF to sizes that are a bit bigger than your average model. Drill a hole in the centre and also one in the top of the cut broom handle (or dowel)so that a reasonably long wood screw will slide in the mortar board and it can be screwed securely in the handle. Pop some wood glue on top of the handle and screw it all together.
Then when you are painting the model place Blu-tac where the wheels are, or the tracks are, to hold the model down on the board. Then you can turn it any way you want for detail painting without actually holding the model as well.
If the tracks are loose and not secured to the bottom of the road wheels, you can Blu-Tac a piece of wood narrow enough to fit between the tracks to the mortar board
and the Blu-Tac the model to the wood.
Also, if you can get a separate large block of wood you can drill a hole in that and pop the mortar board handle in the hole to hold up the mortar board like a turntable and for just storing the model while it dries ready for the next session.
johhar
Joined: September 22, 2008
KitMaker: 476 posts
Armorama: 447 posts
Posted: Friday, February 23, 2018 - 05:25 AM UTC
I may try that on my next kit, perhaps even the 251.
johhar
Joined: September 22, 2008
KitMaker: 476 posts
Armorama: 447 posts
Posted: Friday, February 23, 2018 - 07:39 AM UTC
Calling this done but probably will notice things that need touching up every time I look at it.


goofmuilwijk

Joined: April 19, 2013
KitMaker: 179 posts
Armorama: 117 posts
Posted: Saturday, February 24, 2018 - 12:37 AM UTC
Great work on the wiring. Looks really convincing 
petbat
Joined: August 06, 2005
KitMaker: 3,353 posts
Armorama: 3,121 posts
Posted: Saturday, February 24, 2018 - 01:53 AM UTC
Looks great Johhar. The wiring really does pop out and adds a lot of interest to keep the viewer looking - exactly what a model should do. Thanks for joining in, I have enjoyed watching this one come together.
One thing I just noticed, something to think of next time, the spouts on your jerry cans are centred. German Jerry cans had the spout off centre due to the weld seam of the two halves like this:

When I first started modelling, many, many moons ago, this was one of the Rookie mistakes I made (and I made a lot of others too )
)
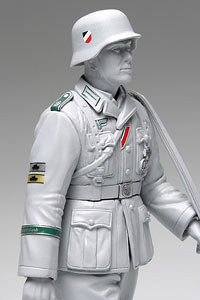
Also, if you want to make your figures a little more interesting, consider getting some uniform patch decals for things like the shoulder boards and eagle emblem on the tunic and feldmutz (cap). There are a few manufacturers that do them, even Tamiya. Thye do a set that covers Afrika Corp, Heer and SS
One thing I just noticed, something to think of next time, the spouts on your jerry cans are centred. German Jerry cans had the spout off centre due to the weld seam of the two halves like this:
When I first started modelling, many, many moons ago, this was one of the Rookie mistakes I made (and I made a lot of others too
)Also, if you want to make your figures a little more interesting, consider getting some uniform patch decals for things like the shoulder boards and eagle emblem on the tunic and feldmutz (cap). There are a few manufacturers that do them, even Tamiya. Thye do a set that covers Afrika Corp, Heer and SS

LinusB
Joined: March 21, 2016
KitMaker: 247 posts
Armorama: 126 posts

Posted: Saturday, February 24, 2018 - 07:23 AM UTC
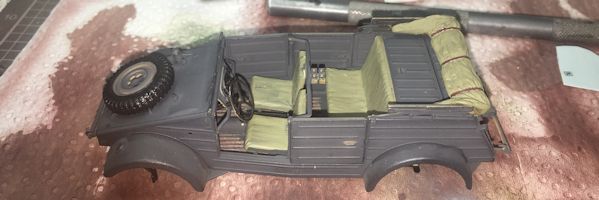
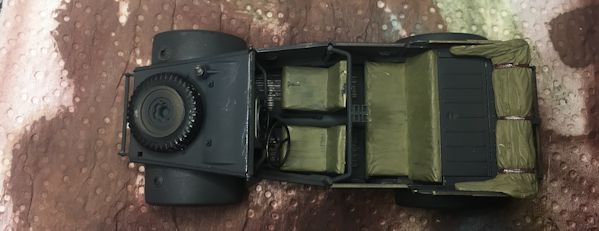
Progress on my Kubelwagen
petbat
Joined: August 06, 2005
KitMaker: 3,353 posts
Armorama: 3,121 posts
Posted: Saturday, February 24, 2018 - 07:43 AM UTC
So far so good Linus.
justsendit
Joined: February 24, 2014
KitMaker: 3,033 posts
Armorama: 2,492 posts
Posted: Sunday, February 25, 2018 - 02:48 AM UTC
Looking good, guys!
@ Ken To answer your earlier question, heres the basic gist of what I have in the works: The diorama will include a GPW, an M21 Half-Track, and approx. nine figures. Heres a rough scenario:
During the battle of the Hürtgen Forest, Autumn, 1944. ... US vehicles are parked at a roadway bottleneck, drivers idle their engines ready to move out at a moments notice. Officers step out of their respective vehicles in order to pore over battle maps. Bewildered at their current location, they attempt to make some sense of the unmarked road upon which theyve been traveling in opposite directions. During the stop, GIs are allowed to dismount and take a short break. ... This mission is FUBAR!
Heres a related thread: M21 Mortar Motor Carriage
Cheers!🍺
mike
johhar
Joined: September 22, 2008
KitMaker: 476 posts
Armorama: 447 posts
Posted: Sunday, February 25, 2018 - 04:58 AM UTC
Thanks for the kind words. I've probably built a million jerry cans and all with the spout in the center. I guess I've been a rookie for a long time.

27-1025
Joined: September 16, 2004
KitMaker: 1,281 posts
Armorama: 1,222 posts
Posted: Sunday, February 25, 2018 - 09:47 AM UTC
still in progress. Way too much very fiddly PE and lack of instructions for accurate placement of said PE


RobinNilsson

Joined: November 29, 2006
KitMaker: 6,693 posts
Armorama: 5,562 posts
Posted: Sunday, February 25, 2018 - 11:55 AM UTC
Not much time left now 
Knuckles, the campaign leader has not visited Armorama since the 14th of August 2017.
/ Robin
Knuckles, the campaign leader has not visited Armorama since the 14th of August 2017.
/ Robin
petbat
Joined: August 06, 2005
KitMaker: 3,353 posts
Armorama: 3,121 posts
Posted: Sunday, February 25, 2018 - 03:05 PM UTC
Quoted Text
Thanks for the kind words. I've probably built a million jerry cans and all with the spout in the center. I guess I've been a rookie for a long time.
I meant me as the rookie... with all the mistakes I have made over time - like painting M3 Halftrack tracks a rusty brown...... not knowing at the time they are all rubber.
That is one thing about this hobby and joining forums, you always learn something new.
RobinNilsson
Joined: November 29, 2006
KitMaker: 6,693 posts
Armorama: 5,562 posts
Posted: Sunday, February 25, 2018 - 03:24 PM UTC
Quoted Text
Thanks for the kind words. I've probably built a million jerry cans and all with the spout in the center. I guess I've been a rookie for a long time.
I have been spared that particular mistake, made plenty of others though, since my dad had Jerry-cans with diesel to fill our car. I think the taxes for heating fuel (oil) were lower than for diesel fuel and since the car ran just as good on heating fuel ....
The technique was to hold the can flat with spout facing left, the side with the spout was upwards and the handle was level with the spout when starting to pour. When a third of the can had been poured it was time to switch sides so that the spout was on the lower side, spout to the right. When a third or less was left in the can it was tilted to vertical with the spout at the lowest point.
With the spout to the left the right hand holds the handle and the left hand lifts the bottom of the can. Spout to the right means shifting hands so that the left hand holds the handle and the right hand lifts the bottom.
Since the handle has three bars it is easier to get a good grip on the handle.
/ Robin
Removed by original poster on 02/26/18 - 15:49:45 (GMT).
69mudbone
Joined: April 26, 2016
KitMaker: 362 posts
Armorama: 285 posts
Posted: Sunday, February 25, 2018 - 08:52 PM UTC
Mike: any thoughts on what you will do about the trees?
johhar
Joined: September 22, 2008
KitMaker: 476 posts
Armorama: 447 posts
Posted: Sunday, February 25, 2018 - 09:45 PM UTC
Who knew that something as simple as jerry cans could be so complicated.
RobinNilsson
Joined: November 29, 2006
KitMaker: 6,693 posts
Armorama: 5,562 posts
Posted: Sunday, February 25, 2018 - 10:09 PM UTC
Quoted Text
Who knew that something as simple as jerry cans could be so complicated.
There is two ways to handle a jerry can:
1. The right way
2. Any other way which usually leads to petrol or diesel getting spilled all over the place.
The advanced jerry can handling course deals with situations such as filling petrol in a BV-206 where the lid on the gas tank is about 7 feet up from the ground. Getting ones clothes drenched in petrol when the outdoors temperature is 30 Centigrade below zero is not pleasant ....
I have practiced filling a BV-206 and thanks to the training received when filling the family car I managed without problems
/ Robin
 |

WEB HOSTING BY


Copyright ©2021 Armorama and Kitmaker Network, a subsidiary of Silver Star Enterprises
All Rights Reserved. Please read our Conditions of Use and Privacy Policy.
All Rights Reserved. Please read our Conditions of Use and Privacy Policy.