

Hosted by Darren Baker
Building the M1 Assault Breacher from RFM

HeavyArty


Joined: May 16, 2002
KitMaker: 17,694 posts
Armorama: 13,742 posts
Posted: Wednesday, April 19, 2017 - 02:24 AM UTC
I would just leave the top run off. As you say, you won't be able to see it at all once the side skirts are installed. I always use the top run of tracks off when using indi link or link and length tracks and they are behind side skirts.

OldWarloke
Joined: October 14, 2012
KitMaker: 2,663 posts
Armorama: 2,649 posts
Posted: Wednesday, April 19, 2017 - 10:26 PM UTC
I removed the center section between the return rollers.
This way for shure you won't see that something is missing.


Now to move on to the Upper Hull.
That's all for now.
Donald
This way for shure you won't see that something is missing.
Now to move on to the Upper Hull.
That's all for now.
Donald
OldWarloke
Joined: October 14, 2012
KitMaker: 2,663 posts
Armorama: 2,649 posts
Posted: Friday, April 21, 2017 - 01:51 AM UTC
I glued on the Upper Hull.

I assembled the side skirts separate from the hull to get them really straight.

They needed a little reinforcing .
You have to be really careful with the Pe. strips that go on top, some are wrong & some need a little trimming .

I assembled the side skirts separate from the hull to get them really straight.
They needed a little reinforcing .
You have to be really careful with the Pe. strips that go on top, some are wrong & some need a little trimming .
OldWarloke
Joined: October 14, 2012
KitMaker: 2,663 posts
Armorama: 2,649 posts
Posted: Friday, April 21, 2017 - 01:58 AM UTC
There's no interlock on the rear right side.
That's all for now.
Donald
OldWarloke
Joined: October 14, 2012
KitMaker: 2,663 posts
Armorama: 2,649 posts
Posted: Sunday, April 23, 2017 - 01:20 AM UTC
I started work on the upper hull. The front fender hold down springs are very fragile, mine broke while I was trying to tale them off the Sprue.

I made some new ones out of florists wire.

I drilled out the mount spots and used some thin solder to hold them in place.


The ones on the Meng kit are molded on.
Finished for now.
Donald
I made some new ones out of florists wire.
I drilled out the mount spots and used some thin solder to hold them in place.
The ones on the Meng kit are molded on.
Finished for now.
Donald

Thirian24
Joined: September 30, 2015
KitMaker: 2,493 posts
Armorama: 2,344 posts
Posted: Sunday, April 23, 2017 - 02:10 AM UTC
Looking good sir
OldWarloke
Joined: October 14, 2012
KitMaker: 2,663 posts
Armorama: 2,649 posts
Posted: Monday, April 24, 2017 - 01:00 AM UTC
I finished up the small parts on the upper hull.
If you have this kit you should check the 2 # N Sprue for parts N110 , they are held to the sprue by 2 tiny spots.
I found one in the bag and the other was long gone.
I had to scratch build a replacement from a piece of sprue.

The Pe. screens are tricky to get on without plugging them up with super glue.

The Drivers Hatch will be glued in after painting.

I'm finished for today.
Donald
If you have this kit you should check the 2 # N Sprue for parts N110 , they are held to the sprue by 2 tiny spots.
I found one in the bag and the other was long gone.
I had to scratch build a replacement from a piece of sprue.
The Pe. screens are tricky to get on without plugging them up with super glue.
The Drivers Hatch will be glued in after painting.
I'm finished for today.
Donald
OldWarloke
Joined: October 14, 2012
KitMaker: 2,663 posts
Armorama: 2,649 posts
Posted: Monday, April 24, 2017 - 09:38 PM UTC
Today I have the lane Marker dispensers .
First I have to say that the instructions aren't very clear exactly where the parts go. If it looks a little rough in some areas , that is from making the corrections needed.
Not a really good fit here, some trimming is needed.

This is how it should be.


First I have to say that the instructions aren't very clear exactly where the parts go. If it looks a little rough in some areas , that is from making the corrections needed.
Not a really good fit here, some trimming is needed.
This is how it should be.
OldWarloke
Joined: October 14, 2012
KitMaker: 2,663 posts
Armorama: 2,649 posts
Posted: Monday, April 24, 2017 - 09:42 PM UTC
I'm not shure if I got this in right, Maby it's upside down?
Man this build is really turning into a big pain in the rear.
I'm not giving up yet.
Donald

youngtiger1
Joined: May 14, 2008
KitMaker: 534 posts
Armorama: 344 posts

Posted: Tuesday, April 25, 2017 - 10:48 AM UTC
Donald, outstanding work in progress on another cool project. I'm enjoying every update. Keep up the good work.
OldWarloke
Joined: October 14, 2012
KitMaker: 2,663 posts
Armorama: 2,649 posts
Posted: Tuesday, April 25, 2017 - 10:36 PM UTC
Now for the rear rack and the boxes.
The red spots show where the boxes mount.

The bottom of the rack.

The boxes in order of placement.

The red spots show where the boxes mount.
The bottom of the rack.
The boxes in order of placement.
OldWarloke
Joined: October 14, 2012
KitMaker: 2,663 posts
Armorama: 2,649 posts
Posted: Tuesday, April 25, 2017 - 10:43 PM UTC
You will need to take care on assembling the boxes, the bottoms and tops will fit in either position. The small lug on the left box goes on the outside.


Test fitted to the frame.

I'm finished for now.
Donald
Test fitted to the frame.
I'm finished for now.
Donald
OldWarloke
Joined: October 14, 2012
KitMaker: 2,663 posts
Armorama: 2,649 posts
Posted: Thursday, April 27, 2017 - 12:47 AM UTC
A little more finished.
I used aluminum metalizer for the stakes on the lane markers.
I didn't do a really good job on the stakes , I've been having trouble with my eyes lately.

The groups of stakes go horizontally varying in amounts per layer.

Markers mounted to the frame.


I used aluminum metalizer for the stakes on the lane markers.
I didn't do a really good job on the stakes , I've been having trouble with my eyes lately.
The groups of stakes go horizontally varying in amounts per layer.
Markers mounted to the frame.
OldWarloke
Joined: October 14, 2012
KitMaker: 2,663 posts
Armorama: 2,649 posts
Posted: Thursday, April 27, 2017 - 12:55 AM UTC
I glued the boxes to the frame from the bottom.
The holes you see are from where the toothpicks went for holding the parts while painting them.


Next I'll be working on the mount for the mine plow.
I'm not looking forward to that.
Donald
The holes you see are from where the toothpicks went for holding the parts while painting them.
Next I'll be working on the mount for the mine plow.
I'm not looking forward to that.
Donald

Kenaicop

#384
Joined: August 23, 2005
KitMaker: 1,426 posts
Armorama: 1,316 posts

Posted: Thursday, April 27, 2017 - 02:24 AM UTC
Donald, something to inspire you! DEF Models conversion, about 10 pounds of resin

Made mine the US Army version.
pascalbausset

Joined: February 05, 2002
KitMaker: 1,416 posts
Armorama: 1,379 posts

Posted: Thursday, April 27, 2017 - 01:50 PM UTC
Donald you're doing an excellent job !! I read lately your post as my RFM kit is on the way, and it is alway interesting to see the work from other modellers.
My first question is for the phone box at the rear of the hull; In my ref pictures there is no phone box on the ABV
My first question is for the phone box at the rear of the hull; In my ref pictures there is no phone box on the ABV
OldWarloke
Joined: October 14, 2012
KitMaker: 2,663 posts
Armorama: 2,649 posts
Posted: Friday, April 28, 2017 - 01:12 AM UTC
I'm not shure where anything goes on this kit, I have no refrences books.
When I started I wasn't shure if it was real or a modern paper panzer. The phone box could be or not be there.
Of note, the mounts for the boxes and the rear rack are completely different in the Pic. than what is in the kit.
Regards.
Donald
When I started I wasn't shure if it was real or a modern paper panzer. The phone box could be or not be there.
Of note, the mounts for the boxes and the rear rack are completely different in the Pic. than what is in the kit.
Regards.
Donald
OldWarloke
Joined: October 14, 2012
KitMaker: 2,663 posts
Armorama: 2,649 posts
Posted: Friday, April 28, 2017 - 01:18 AM UTC
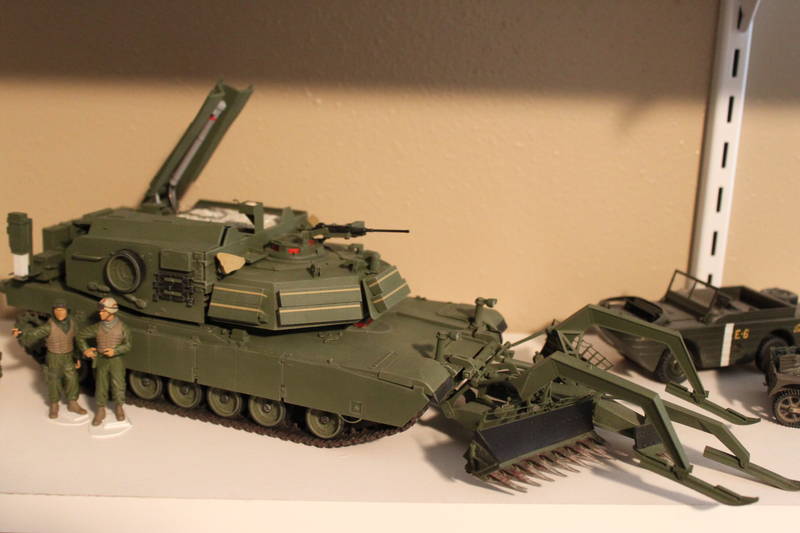
Now on to the mount for the Mine Plow.
First off a lot of care is needed here as the instructions are a little screwed up.
Here is step by step how I did it.
First the right side.

The right side assembled .

The left side mirrors the right side.


First off a lot of care is needed here as the instructions are a little screwed up.
Here is step by step how I did it.
First the right side.
The right side assembled .
The left side mirrors the right side.
OldWarloke
Joined: October 14, 2012
KitMaker: 2,663 posts
Armorama: 2,649 posts
Posted: Friday, April 28, 2017 - 01:22 AM UTC
Note the position of the hole.
Note the position of the 2 lugs on the center connector .
The lower parts on the front.
OldWarloke
Joined: October 14, 2012
KitMaker: 2,663 posts
Armorama: 2,649 posts
Posted: Friday, April 28, 2017 - 01:29 AM UTC
Here is the part of the instructions for this assembly.
There's only 1 Pic showing the right assembly none showing the left one. This could be very confusing.
Part P67 is shown on top when it should go to the end.
Pic. #120 shows it in the right place.
Well I hope this helps.
I'll have more later.
Donald
OldWarloke
Joined: October 14, 2012
KitMaker: 2,663 posts
Armorama: 2,649 posts
Posted: Saturday, April 29, 2017 - 07:00 PM UTC
I have the Center Mine Plow assembly finished.


The instructions would have you install the plow first.
It's easier to install the arm first then the plow.


The instructions would have you install the plow first.
It's easier to install the arm first then the plow.
OldWarloke
Joined: October 14, 2012
KitMaker: 2,663 posts
Armorama: 2,649 posts
Posted: Saturday, April 29, 2017 - 07:08 PM UTC
I installed the bottom first.

Then the top, note how close it all is in that area.


This finishes this part.
Donald
Then the top, note how close it all is in that area.
This finishes this part.
Donald
Thirian24
Joined: September 30, 2015
KitMaker: 2,493 posts
Armorama: 2,344 posts
Posted: Saturday, April 29, 2017 - 08:36 PM UTC
You're making quick work of this kit, Donald. Looking good.

Davidstingray
Joined: March 14, 2013
KitMaker: 61 posts
Armorama: 60 posts
Posted: Saturday, April 29, 2017 - 09:31 PM UTC
You have no idea how glad I am that you are doing this project. Wasn't expecting all the issues you've encountered. Thanks for sharing it with us.
OldWarloke
Joined: October 14, 2012
KitMaker: 2,663 posts
Armorama: 2,649 posts
Posted: Monday, May 01, 2017 - 10:42 PM UTC
I have a little more done, this is going to take a while.
The instructions are very confusing . I hope this helps those of you who are planning this build.


Parts H3 & H6 have small angles on them.

The instructions are very confusing . I hope this helps those of you who are planning this build.
Parts H3 & H6 have small angles on them.
 |

WEB HOSTING BY


Copyright ©2021 Armorama and Kitmaker Network, a subsidiary of Silver Star Enterprises
All Rights Reserved. Please read our Conditions of Use and Privacy Policy.
All Rights Reserved. Please read our Conditions of Use and Privacy Policy.