Dioramas
Do you love dioramas & vignettes? We sure do.
Buffalo and a Backhoe
Dioramartin
Visit this Community
New South Wales, Australia
Joined: May 04, 2016
KitMaker: 1,476 posts
Armorama: 1,463 posts
Posted: Wednesday, April 19, 2017 - 09:43 AM UTC
Hi Nick yeah think I sussed the head shops now, there’s some in the black-light district of Sydney

Dave’s diversion idea is a good one…alternatively there’s always the old “Field Conversion/non-standard repair” ploy, Jerry might holster his slide-rule.

Stickframe
#362
Visit this Community
California, United States
Joined: December 01, 2013
KitMaker: 1,661 posts
Armorama: 1,202 posts
Posted: Wednesday, April 19, 2017 - 10:59 AM UTC
Well guys...I thought I was well past succumbing to peer pressure...apparently not!

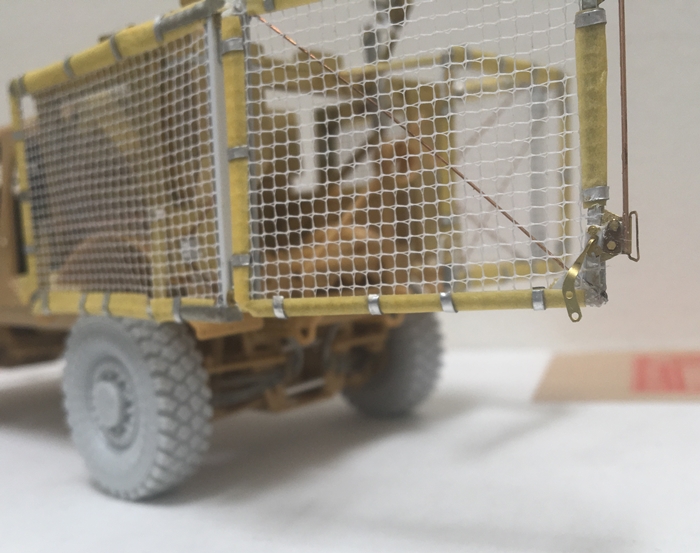
Dave - as you recently tore apart your church to add lights, I went to work on fixing that mesh. I loaded up a fresh number 11 blade, strapped on the optivisor and went to work. I cut out the diagonal mesh, careful not to cut the yellow tape, and installed a new mesh panel on the inside of the frame. The yellow tape represents the fabric that's used to hold the mesh to the frame - it overlaps, which provided me with a surface to mount the new material. While not exactly easy, I didn't destroy or warp the frame - and now, ALL of the mesh is oriented correctly!

Ok - this project will now sit for a few days - work will keep me tied up for a while...but, I'll be back at it soon enough! Thanks for the encouragement!

Cheers and happy model building!

Nick
cheyenne
Visit this Community
New Jersey, United States
Joined: January 05, 2005
KitMaker: 2,185 posts
Armorama: 1,813 posts
Posted: Wednesday, April 19, 2017 - 02:38 PM UTC
Hi Nick , from working on painstaking idiotically small parts and fiddly scratch built brain storms , I know what a chore those screens and their attachments must have been .
Whatever head banging on the wall the screens produced , they came out beautiful .
jrutman
Visit this Community
Pennsylvania, United States
Joined: April 10, 2011
KitMaker: 7,941 posts
Armorama: 7,934 posts
Posted: Wednesday, April 19, 2017 - 07:47 PM UTC
You are a better man than me gunga din. I would have passed on the repair !
Great work,
J
matt
Staff MemberCampaigns Administrator
Visit this Community
New York, United States
Joined: February 28, 2002
KitMaker: 5,957 posts
Armorama: 2,956 posts
Posted: Wednesday, April 19, 2017 - 08:42 PM UTC
bowing to the Master!!!!
WXerock
#450
Visit this Community
California, United States
Joined: July 19, 2015
KitMaker: 672 posts
Armorama: 668 posts
Posted: Wednesday, April 19, 2017 - 09:16 PM UTC
Nick, can you estimate the size of the net that is used in the Q-Net? It looks to me like the holes are about 3" across in the photos I've seen.

Regards,

Eric
PolishBrigade12
Visit this Community
Washington, United States
Joined: January 31, 2009
KitMaker: 380 posts
Armorama: 366 posts
Posted: Saturday, April 29, 2017 - 09:53 PM UTC
Some serious PE action goin on here, Bravo!
Stickframe
#362
Visit this Community
California, United States
Joined: December 01, 2013
KitMaker: 1,661 posts
Armorama: 1,202 posts
Posted: Monday, May 01, 2017 - 01:53 AM UTC
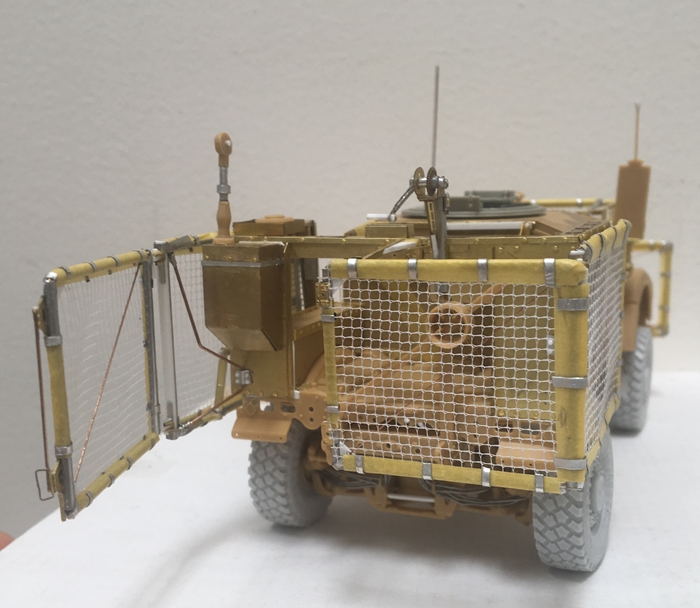
Hi fellow model builders - back with an update - the mesh is done! and the truck is in the paint shop! For those of you wondering about the armor, attached is a reference photo - I don't recall the source:
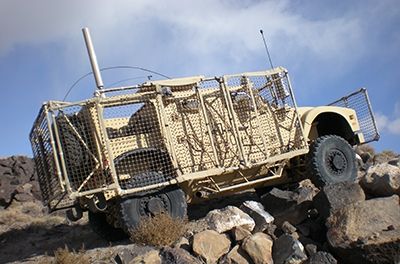


The above is what I'm trying to achieve - on to the update -

Hi Cheyenne - yes! you'd think a "little screen" would be easy to build...you'd be wrong! sounds like you've made one or two of these!

Hi Jerry - About your comment...I wonder? - you always nail all the details - I'll bet you'd fix it! or, not make the mistake to begin with!

Hi Matt - thanks - this has turned into a remarkably challenging build...between this and the slat armor on the buffalo...ugh!

Hi Eric - I'm guessing the spacing is 2"x 2" only a guess, but compare the openings to the support frame - that looks like 1.5" or 2" tubing to me - I have a few other pics too for reference...

Hi Ski - yes, this build has involved a lot of all sorts of stuff - the kit, brass, resin, plastic, metal rod, solder, wire, and mesh...woohoo!! a materials extravaganza...haha...

Ok - enough fun and games, on to the build:
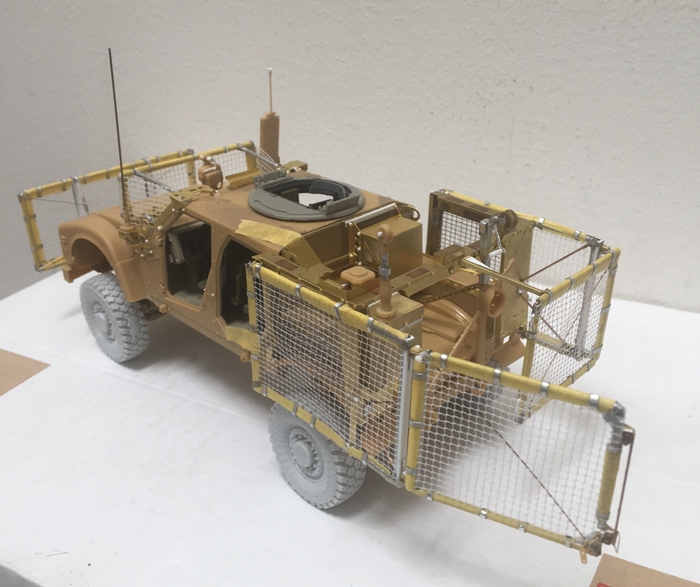


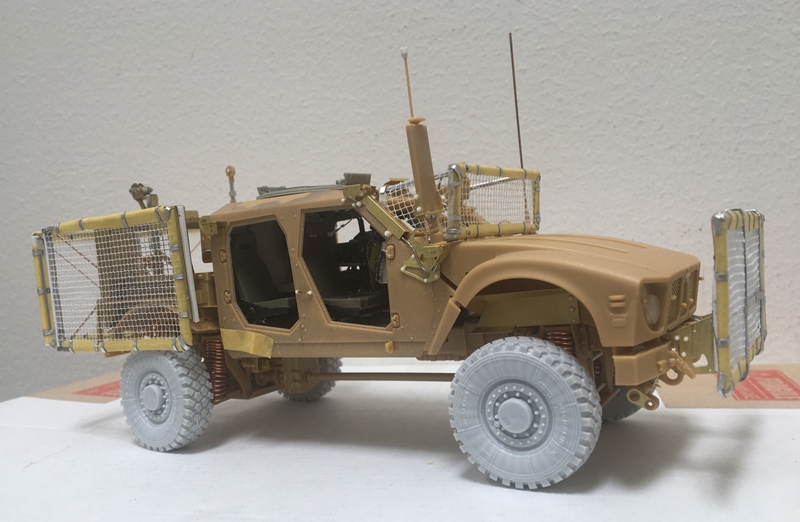
As you can see, the mesh cage moved right along - this has required a lot of thought and patience - not to mention "calm" - that is, to not destroy the build while making the build....

and, while i was at it, I scratch built a boomerang for grins -seems to have turned out fine:
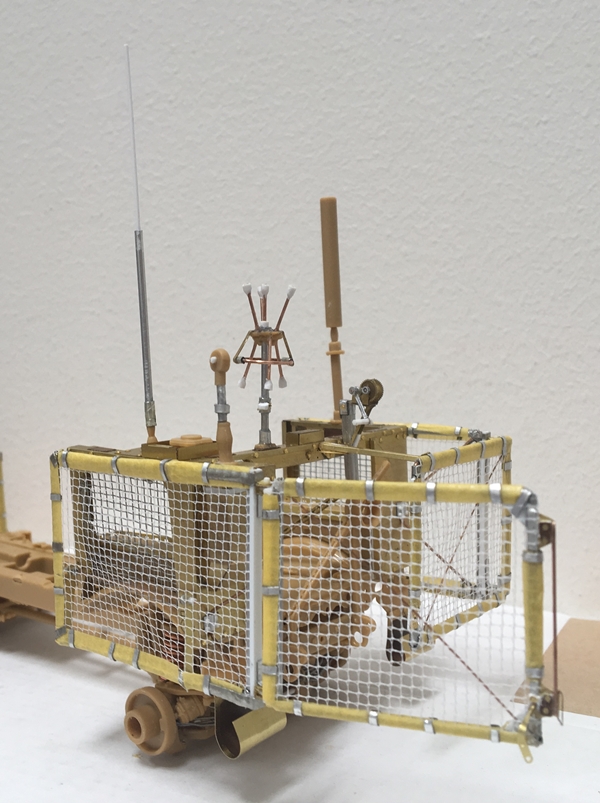


Talk about a junk box special!! odds, ends, and more patience!

Next, to the paint shop:
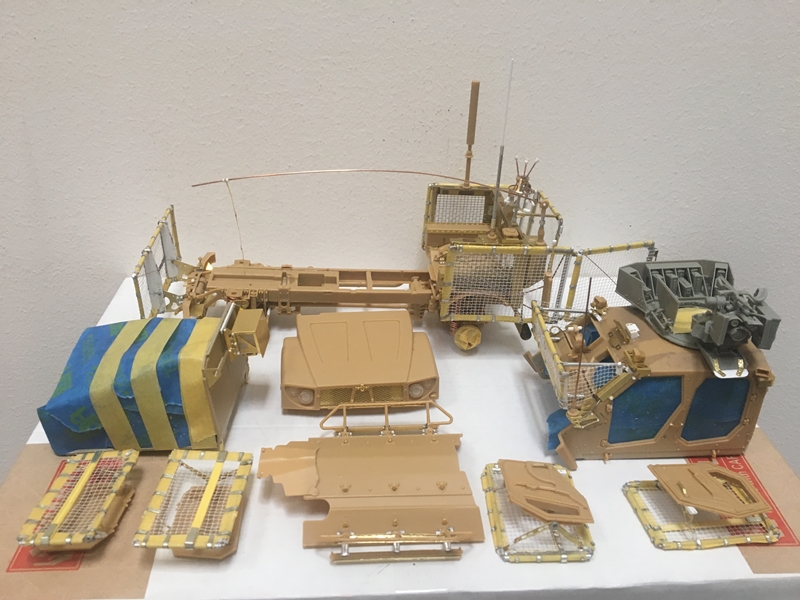


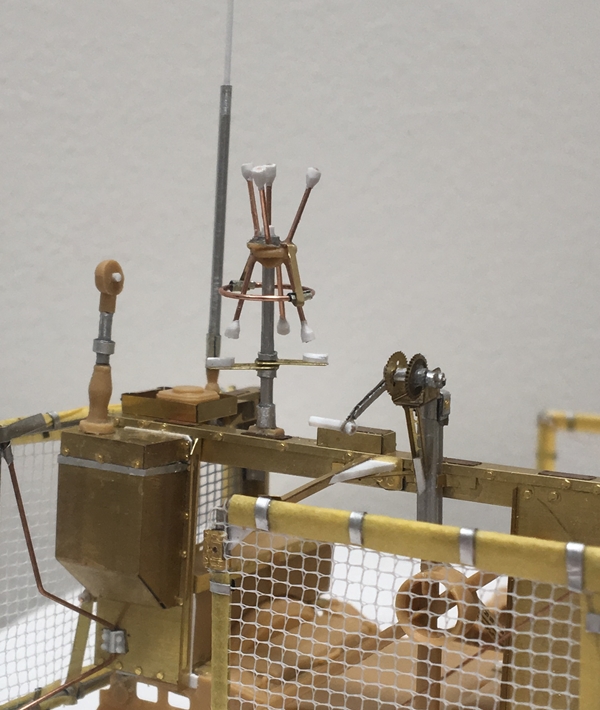
Above, all is taped up and, since last night, primed! You'll also see a pretty cool CROWS - it's from Live Resin - and is very nice - that said, and having built my share of their kits....the instructions leave a lot to be desired.....

OK - I've got to get to the real job! thanks for having a look and your comments -

Cheers

Nick


jrutman
Visit this Community
Pennsylvania, United States
Joined: April 10, 2011
KitMaker: 7,941 posts
Armorama: 7,934 posts
Posted: Monday, May 01, 2017 - 04:44 AM UTC
That just blows mt freekin mind dude.
J
ahandykindaguy
Visit this Community
Alberta, Canada
Joined: August 20, 2008
KitMaker: 1,295 posts
Armorama: 1,191 posts
Posted: Monday, May 01, 2017 - 04:44 AM UTC
Stick, I'm glad you weren't to put off by the decision to "fix" the door screen! The amount of detail you always put into your builds blows me away every time! Your scratchbuilding skills are so good, your models look awesome enough to win awards even without paint...

Great work Nick!

terminators
Visit this Community
France
Joined: February 20, 2012
KitMaker: 1,932 posts
Armorama: 1,907 posts
Posted: Monday, May 01, 2017 - 10:30 PM UTC
Awesome work. RPG nets are very nice.
Stickframe
#362
Visit this Community
California, United States
Joined: December 01, 2013
KitMaker: 1,661 posts
Armorama: 1,202 posts
Posted: Monday, May 08, 2017 - 02:49 AM UTC
HI guys - thanks for having a look, and taking the time to leave some comments - they are appreciated!

So, the MATV is out of the paint shop this was not easy on any level, but, as is the case with this kit, I still think it looks good when done - next, on to weathering - in the meantime, some "glamor" shots of this beast:


And, as this will eventually become a dio...some figures!


I'm really limited with time, so for today, the pictures must speak for themselves! hope you all enjoy - -

OK, happy model building -

Nick


m4sherman
Visit this Community
Arizona, United States
Joined: January 18, 2006
KitMaker: 1,866 posts
Armorama: 1,808 posts
Posted: Monday, May 08, 2017 - 05:15 PM UTC
Superb work.

On your broken down civilian truck, the old Trumpeter Chinese tank transporter as a base, do you remember where the tires came from? I am looking for similar tires for a model.
cheyenne
Visit this Community
New Jersey, United States
Joined: January 05, 2005
KitMaker: 2,185 posts
Armorama: 1,813 posts
Posted: Monday, May 08, 2017 - 05:43 PM UTC
Nice work nick , the ride and camo on the figs came out great .

I know when I scratch stuff I'm always knocking crap off the build with my ham hands and sausage fingers .
Howinnahell do you pick that vehicle up without knocking stuff off ?
HeavyArty
Visit this Community
Florida, United States
Joined: May 16, 2002
KitMaker: 17,694 posts
Armorama: 13,742 posts
Posted: Monday, May 08, 2017 - 05:57 PM UTC

Quoted Text


On your broken down civilian truck, the old Trumpeter Chinese tank transporter as a base, do you remember where the tires came from?


Nick will chime in too, but I am pretty sure they are straight out of the box tires (w/slightly modified wheels) from the Trumpeter Chinese Tank Transporter kit.
jrutman
Visit this Community
Pennsylvania, United States
Joined: April 10, 2011
KitMaker: 7,941 posts
Armorama: 7,934 posts
Posted: Monday, May 08, 2017 - 06:14 PM UTC
Awesome work once again ! The truck looks great even without any weathering. Figs are lookin good as well bubba !
J
WXerock
#450
Visit this Community
California, United States
Joined: July 19, 2015
KitMaker: 672 posts
Armorama: 668 posts
Posted: Monday, May 08, 2017 - 06:27 PM UTC
Nick, the M-ATV looks awesome. The mesh really did turn out amazing sir. The only issue with the finished product is that the hatch assembly should be fixed forward, The plate that angles down would prevent it from rotating. Only the CROWS turret can rotate.

Regards,

Eric
m4sherman
Visit this Community
Arizona, United States
Joined: January 18, 2006
KitMaker: 1,866 posts
Armorama: 1,808 posts
Posted: Tuesday, May 09, 2017 - 02:32 AM UTC

Quoted Text


Quoted Text


On your broken down civilian truck, the old Trumpeter Chinese tank transporter as a base, do you remember where the tires came from?


Nick will chime in too, but I am pretty sure they are straight out of the box tires (w/slightly modified wheels) from the Trumpeter Chinese Tank Transporter kit.


The box art shows military tread. I finaly found a truck for sale on E-bay that had pictures of the kit, and the tires are the ones he used. 100 US is a bit too much for a set of tires.
Stickframe
#362
Visit this Community
California, United States
Joined: December 01, 2013
KitMaker: 1,661 posts
Armorama: 1,202 posts
Posted: Tuesday, May 09, 2017 - 08:17 AM UTC
Hi guys - thanks for taking some time to leave some comments.

Randall and Gino - yes, the tires are the stock parts provided by Trumpeter on the 50 ton transport truck. They are indeed exceptionally nice - both in terms of quality appearance and in their "receptiveness" to weathering. It's too bad they aren't avaialable otherwise. The kit is discontinued.

Hi Cheyenne - you're right - this kit is very hard to physically (and mentally!!) handle. I nearly destroyed it trying to glue all the assemblies together. The generally awkward fit plus all the stuff I added make the whole thing very hard to hold - and worse when trying to "force" the parts together - such as the interior of the cab to the shell, then onto the chassis, plus chassis protection....but - it is generally not fragile - I pinned several of the more awkward parts together with CA and small diameter metal rods....nonetheless, I'm glad it's assembled, or was...read on...

Hi Jerry - glad it passes your "eye test"!! One thing I'll point out...notice the face on one of the close ups - the acrylic left a texture...not great. This is a weird problem, as it doesn't always happen. I might try a glaze....or, let it go.

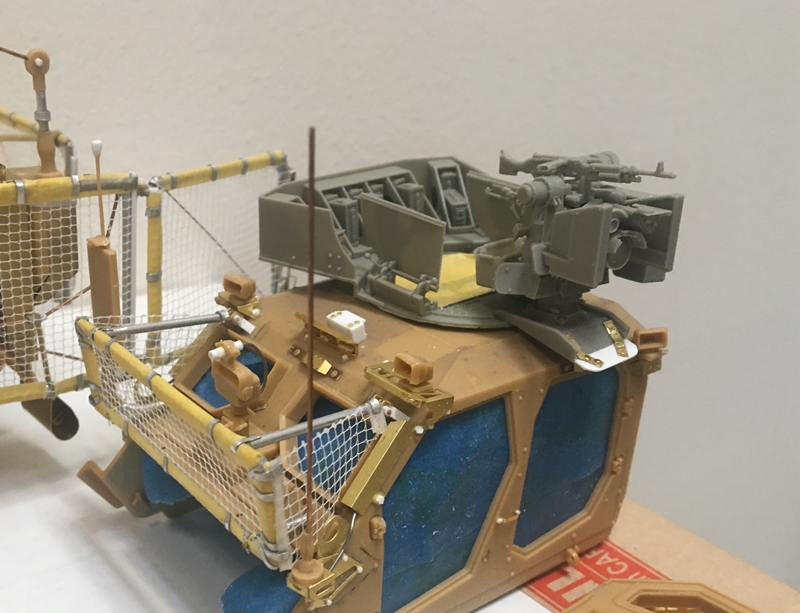
Next...Mr Eric....argh!!! You're likely right. My thought was that the hatch could be operable if desired - and the weapon used manually. I even cut off a segment of the extension and modified it to rotate around the lights etc. That said, today I looked for pics on line - just to find a single example photo...even on a HMMWV...NO luck...crap. So, to the point I note to Cheyenne above regarding handling and limiting destruction, off came the turret. The only good news is the CROWS etc is all resin and attached to the truck with CA - so, I wedged my knife between the parts and snapped them apart - glad the parts aren't plastic - I'd have had no luck at all. The assembly is now removed and paint being retouched. I'm glad to report relatively little damage, and what did happen is reattached. Looks like some slightly heavy weathering will follow! Haha..

So - one more disaster resolved...I think - I'll reassemble tonight!

Thanks for having a look,

Nick


jrutman
Visit this Community
Pennsylvania, United States
Joined: April 10, 2011
KitMaker: 7,941 posts
Armorama: 7,934 posts
Posted: Tuesday, May 09, 2017 - 06:23 PM UTC
I sometimes get that chalky texture to my flesh tones as well. It may be from improperly mixed paint or from the paint drying too rapidly,I don't know. Frustrating though. Specially when painting faces which can be very concentration intensive.
J
Stickframe
#362
Visit this Community
California, United States
Joined: December 01, 2013
KitMaker: 1,661 posts
Armorama: 1,202 posts
Posted: Wednesday, May 10, 2017 - 12:22 AM UTC
Hi Jerry - your thoughts on this might be right. I use Scale 75 for figures - and really like the results. I use Vallejo thinner medium with the acrylic, which typically includes more than one color - and the paint often sites for a while - maybe it is setting up a bit as the time passes? and hence the random texture effect?...I'll keep that in mind - maybe periodically mix again...


OK - on to the truck - and a reworked weapons station. Sorry about the pics - taken on the way out the door this AM:


And there you have it - forward facing turret/roof weapon apparatus. I thought about reorienting the weapon station too - for about a minute - I don't want to push my luck and really destroy something -

thanks for having a look -

Nick
jrutman
Visit this Community
Pennsylvania, United States
Joined: April 10, 2011
KitMaker: 7,941 posts
Armorama: 7,934 posts
Posted: Wednesday, May 10, 2017 - 01:09 AM UTC
Very very impressive. And here I am thinking a PzIV is complicated !
J
Stickframe
#362
Visit this Community
California, United States
Joined: December 01, 2013
KitMaker: 1,661 posts
Armorama: 1,202 posts
Posted: Monday, May 22, 2017 - 01:46 AM UTC
Hi model builders - I've finally gotten going on the dio part of this dio - the concept is a patrol on a dirt road - bound by a mud wall on one side, and a drainage ditch on the other - narrow but not too narrow, with a couple of obstructions - one burned out truck and other broken down - thereby blocking the path of the patrol...but, remember, the patrol includes a backhoe....


OK - please take a look - the basics of building grade change - fairly quickly and cheaply - a picture frame, some illustration board, bass wood and glue...gets you this:


then put it together...and add some florists foam - which is a bit too fragile in my opinion for dio work....I'd never tried it before...not my favorite....


and...as this is next to a canal and some field crops, I need a little check dam/gate:


And, on to adding some texture - this is a combo of all sorts of stuff -fine and coarse pumice gel, green and pink foam, and corkboard - part of my on-going effort to win the prize for ugliest WIP!!!


getting there..and some weather on the check gate:


And there you have it! some way to go -but not too far - I want this to look like a long narrow road -and be able to take pictures showing the procession of vehicles coming and going.

Next up, more/better weather on that gate, more texture on the ground plane, more work on the figures, add water to the canal...and so on -

thanks for taking a look

Nick


jrutman
Visit this Community
Pennsylvania, United States
Joined: April 10, 2011
KitMaker: 7,941 posts
Armorama: 7,934 posts
Posted: Tuesday, May 23, 2017 - 06:37 PM UTC
This update must have slipped in between my checking the forum somewhere.
Excellent way of handling the mission I think. That irrigation gate is da bomb mate ! Hey,I think I may have just come up with "The Clashs'" newest hit lyrics.
I love the colors on the gate area though,looks the part.
I forgot to tell you about the chalky paint thing. You may want to try Vallejo paint drying retarder agent. Worth a shot? It is also good for blending,which I desperately need help with.
J
27-1025
Visit this Community
North Carolina, United States
Joined: September 16, 2004
KitMaker: 1,281 posts
Armorama: 1,222 posts
Posted: Tuesday, May 23, 2017 - 06:46 PM UTC
Stunning work. The attention to detail is amazing. Looking forward to the next installment.