Idaho, United States
Joined: February 12, 2017
KitMaker: 18 posts
Armorama: 18 posts
Posted: Sunday, February 12, 2017 - 03:42 AM UTC
Hello all!
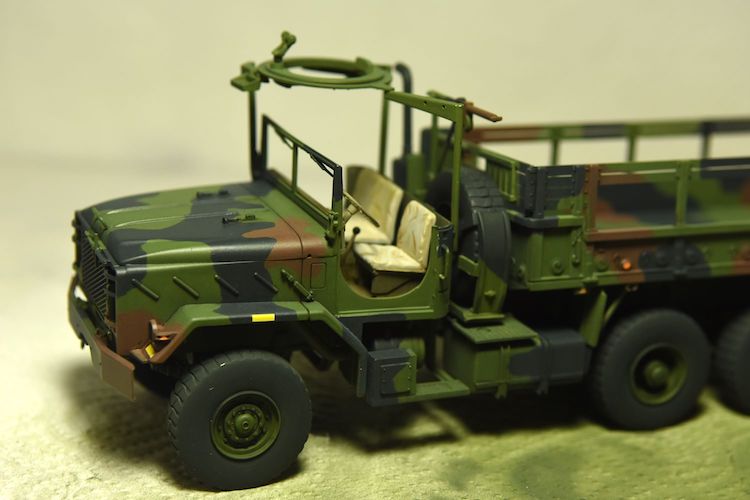
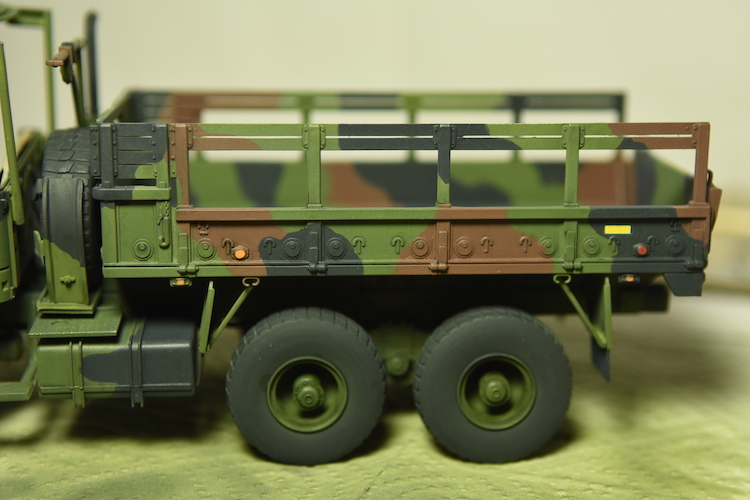
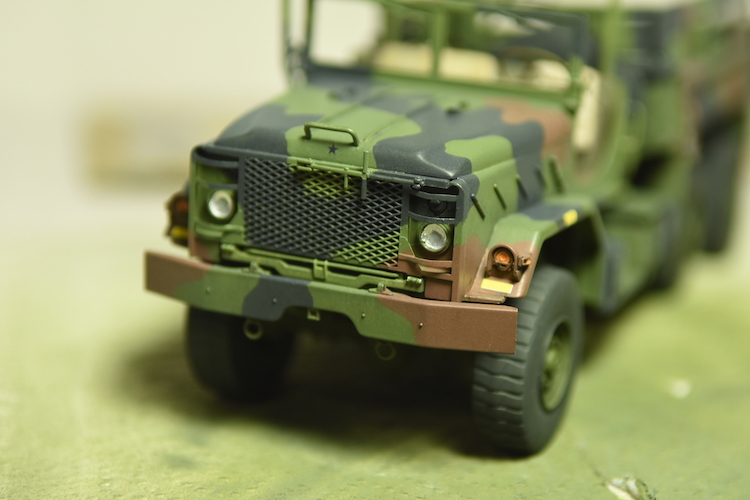
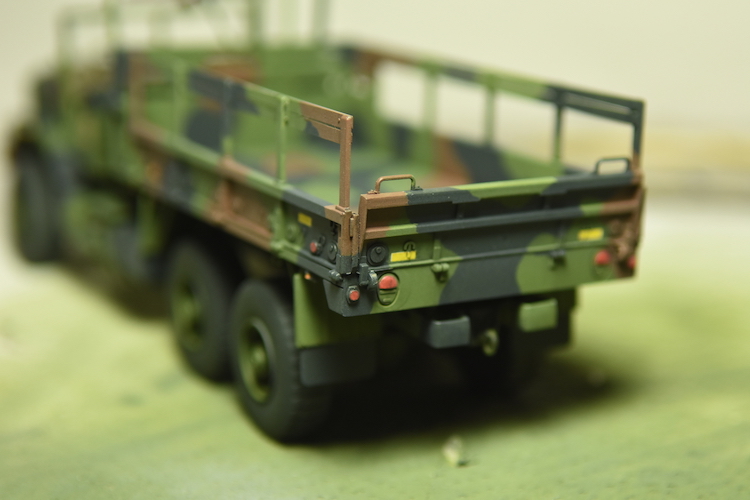
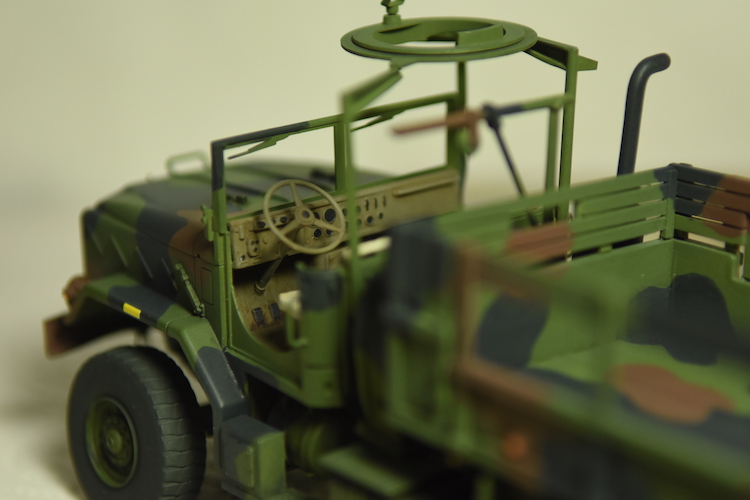
After 19 years, I am back to modeling. I decided to do an easier OOB build to brush up on my skills and test some of the new techniques. I picked this model, because it was inexpensive, so if things did not work out, I would not be mad. I am aware of the model imprecisions, but I decided not to fix them, since my focus is mainly on the painting and finishing it.
Here are things I did:
- Primed the model with white primer (I had it on hand) (acrylic from Testors)
- Pre-shading with black. First time pre-shading. It turned out that white and black are too contrasting, see below.
- Base coat of diluted nato green (acrylic Tamiya). While it was covering the black parts ok, the white ones were too white, so I ended up removing all the pre-shading with more layers.
- Hand brushing the camouflage, NATO black and red brown (acrylic Tamiya). From all pictures I found online the edges were closer to hard edge than soft edge. I admit I did a mediocre job here, the acrylics were drying too fast. Airbrushing would have been a better choice, but I am not able to do a fine edge with my airbrush setup. Anyway, I do not plan on doing a lot of models with camo, so that should not be an issue in future.
- Applied decals. Used Microsol for the first time. Very nice product.
- Used oil paints to do a black wash. Second time in my life. It looked too heavy on the picture I took, so I toned it down. It still looks a bit heavier in places on the pictures below, but it is not that much pronounced on the real model. Not sure what is going on.
- Used burnt siena for weathering the cabin. It gives the model rusty look, which is not what I was after. Any advice welcome here.
- Used aluminum foil for headlights. That seemed to work pretty good.
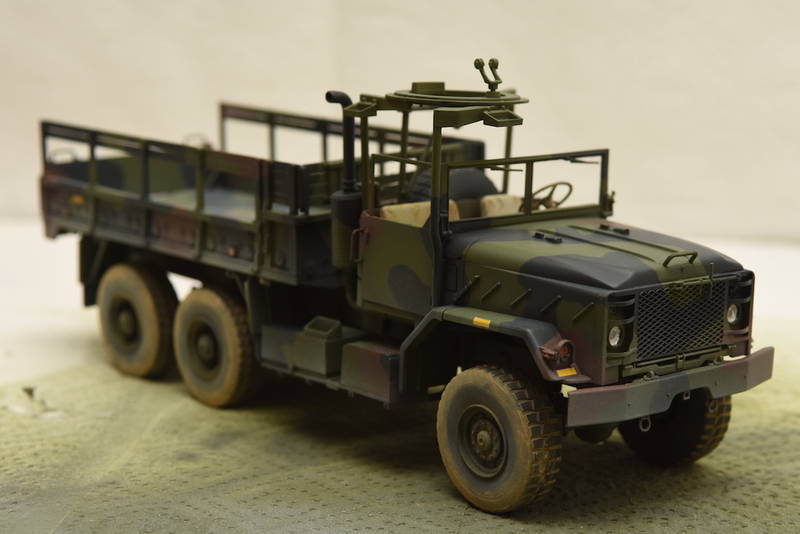
Here are the pictures:
Thanks for reading/looking.
North Carolina, United States
Joined: September 16, 2004
KitMaker: 1,281 posts
Armorama: 1,222 posts
Posted: Sunday, February 12, 2017 - 03:50 AM UTC
Nice clean build. Paintwork looks good too.

#159
Massachusetts, United States
Joined: April 07, 2008
KitMaker: 803 posts
Armorama: 564 posts
Posted: Sunday, February 12, 2017 - 04:46 AM UTC
what a great build especially after a few years in the background!!!! THe paints are really nice looking in particular!
Only suggestion I have is take this model and practice dirtying it up with washes, filters, dust effects, dirt effects etc.... you really cant go wrong with a 5 ton that looks worked hard and put away dirty!!! Try some chipping effects in the body, take a few ideas from youtube videos and have fun with it !
Membership Secretary
www.amps-armor.org
Florida, United States
Joined: May 16, 2002
KitMaker: 17,694 posts
Armorama: 13,742 posts
Posted: Sunday, February 12, 2017 - 05:09 AM UTC
It looks really nice. Good job. A couple pointers...The interior should be the same green as the outside. Also, the kit tires suck and are of a fictional tread pattern. They are best replaced w/resin ones. Lastly, I second what Brian says, some weathering would really make this one look great.
Field Artillery --- The KING of BATTLE!!!
"People sleep peaceably in their beds at night only because rough men stand ready to do violence on their behalf." -- George Orwell
Showcase
Idaho, United States
Joined: March 09, 2010
KitMaker: 557 posts
Armorama: 217 posts
Posted: Sunday, February 12, 2017 - 10:32 AM UTC
Nice clean build. Question on my mind is what is the point of weathering if the subject is not dented,bent, missing parts, shot up? scuffed. then I can see including weathered paint etc.This is the problem I have run into on my builds. I have trouble deciding to have no weathering at all or go all the way since anything in between just does not look right?
War is cruelty.There is no use trying to reform it.The crueler it is, the sooner it will be over.
New Zealand
Joined: March 25, 2009
KitMaker: 152 posts
Armorama: 119 posts
Posted: Sunday, February 12, 2017 - 12:16 PM UTC
Really nice paint job. You obviously haven't lost your skills after so long. Look forward to seeing more in future.

Florida, United States
Joined: May 16, 2002
KitMaker: 17,694 posts
Armorama: 13,742 posts
Posted: Sunday, February 12, 2017 - 05:44 PM UTC
Quoted Text
Nice clean build. Question on my mind is what is the point of weathering if the subject is not dented,bent, missing parts, shot up? scuffed. then I can see including weathered paint etc.This is the problem I have run into on my builds. I have trouble deciding to have no weathering at all or go all the way since anything in between just does not look right?
Weathered does not mean damaged. Weathered is road grime and dirt. It makes the vehicle come alive and look lived-in. You will very rarely see a totally clean military vehicle, or any vehicle for that matter. Take a look at your car, it will at least have some dirt and grime on the tires. Weathering also brings out details that otherwise blend into the vehicle background.
This truck is weathered, but has no damage. It just looks more interesting than a nice, clean, lifeless finish.

Field Artillery --- The KING of BATTLE!!!
"People sleep peaceably in their beds at night only because rough men stand ready to do violence on their behalf." -- George Orwell
Showcase
Virginia, United States
Joined: December 01, 2001
KitMaker: 666 posts
Armorama: 598 posts
Posted: Sunday, February 12, 2017 - 07:47 PM UTC
Let him build it the way he wants to.

Steel on Target !
Bco 3/68th Armor
Aco 2/68th Armor
NCOA/DSS
HHC 2/13th Armor USA Armor Training Center
19K3HB8
Florida, United States
Joined: May 16, 2002
KitMaker: 17,694 posts
Armorama: 13,742 posts
Posted: Sunday, February 12, 2017 - 08:01 PM UTC
Quoted Text
Let him build it the way he wants to.
Hhmm, isn't the forum called Constructive Feedback?? That implies the builder is looking for some comments on his build and how to improve. What is the point of not providing them? Also, the builder can take them or leave them. No one is forcing anyone to build their model in any particular way.
Field Artillery --- The KING of BATTLE!!!
"People sleep peaceably in their beds at night only because rough men stand ready to do violence on their behalf." -- George Orwell
Showcase
Idaho, United States
Joined: February 12, 2017
KitMaker: 18 posts
Armorama: 18 posts
Posted: Sunday, February 12, 2017 - 08:45 PM UTC
First, thanks for all the kind words. The initial pictures show a work in progress. I do plan on doing some weathering. Mainly dust and I want to try some chipped paint, but it may be almost invisible by eye, because of the dark colors (it will be more visible on a close up photos I think).
Gino, I did the interior in olive drab as the instructions said. I looked at some pictures online and it did not seem like NATO green. I guess it could be caused by the overexposure on those pictures (a lot of light coming though windows, so the camera adjusted to it).
As for weathering, I did some reading (and still have some more to do) on the subject. I understand it as a 2 component deal. One part is a wear caused by operating the vehicle (like grease points, contact points), the other is the elements. A good advice I came across was to find a reference photo and replicate the pattern on the model. Most of the images I found showed fairly clean, well maintained vehicles (probably because they were privately owned ?). So operational wear was minimal. While I understand why people do heavily weather vehicles (and all the respect to those modelers), I currently lean towards the opposite side.
Idaho, United States
Joined: March 09, 2010
KitMaker: 557 posts
Armorama: 217 posts
Posted: Monday, February 13, 2017 - 02:13 AM UTC
I guess since this behemoth trucks body is so far off the ground it would not show much wear and tear....typically?.Everyone please accept my apologies if I come across as being obnoxious

just wondering about how one defines weathering. To me it reflects a moment in time and definitely is a random unique look to each subject.
War is cruelty.There is no use trying to reform it.The crueler it is, the sooner it will be over.
#159
Massachusetts, United States
Joined: April 07, 2008
KitMaker: 803 posts
Armorama: 564 posts
Posted: Monday, February 13, 2017 - 04:30 AM UTC
Quoted Text
I guess since this behemoth trucks body is so far off the ground it would not show much wear and tear....typically?.Everyone please accept my apologies if I come across as being obnoxious just wondering about how one defines weathering. To me it reflects a moment in time and definitely is a random unique look to each subject.
Its not obnoxious at all, its a good way to understand how different people percieve tones of wear and useage....
For me, with 15 years in the military, mostly time in the National Guard, I very rarely if EVER saw a brand spanking new vehicle. When I DID see brand new vehicles come in, they frequently sat in "cold Storage" for several months while the units got the proper training and equipment to maintain and operate them. I specifically remember seeing 6 brand new D-7 bulldozers that sat for 3 months.. they still had the plastic over the operators seats, but they were dusty and showed rust and rainmarks after just a short sit in a desert environment!! So, I guess IMO, if you are doing a military vehicle... it HAS to show some kind of at least dust and rain streaking. If it sat in the desert for any time, its dusty. If its been anywhere BUT the desert, its probably gotten a little rain added to the mix. Rust, especially on tracked components or on parts that collect water, is a reality also for even the new stuff. Its all in the..... thickness... of what you apply... the more you ding it, dust it, and rust it, the more wear and tear shown..... sometimes just a light wash of dirt or dust colored filters is all it takes..... but as someone already said.... the beauty of the hobby is that you control the piece.... weather you are going for accuracy down to the scratch (as many do in the case of commission builds), or a period accurate representation of a real vehicle, or even the brand spanking new spit shined commanders car..... its YOU're option..... whatever you do, take what others have to offer, and give them a try on SOMETHING.... your skills will thank you!
Membership Secretary
www.amps-armor.org
Singapore / 新加坡
Joined: May 29, 2007
KitMaker: 119 posts
Armorama: 53 posts
Posted: Monday, February 13, 2017 - 01:58 PM UTC
Weathering is half the fun of AFV modeling. Just a simple wash and the model starts coming alive.
Idaho, United States
Joined: February 12, 2017
KitMaker: 18 posts
Armorama: 18 posts
Posted: Monday, February 13, 2017 - 06:59 PM UTC
Added some dust and mud on tires. Dust is a sprayed testor's sand (my tamiya buff was dead ;-() and mud is done by artist pastels (maybe it should be more yellowish?)
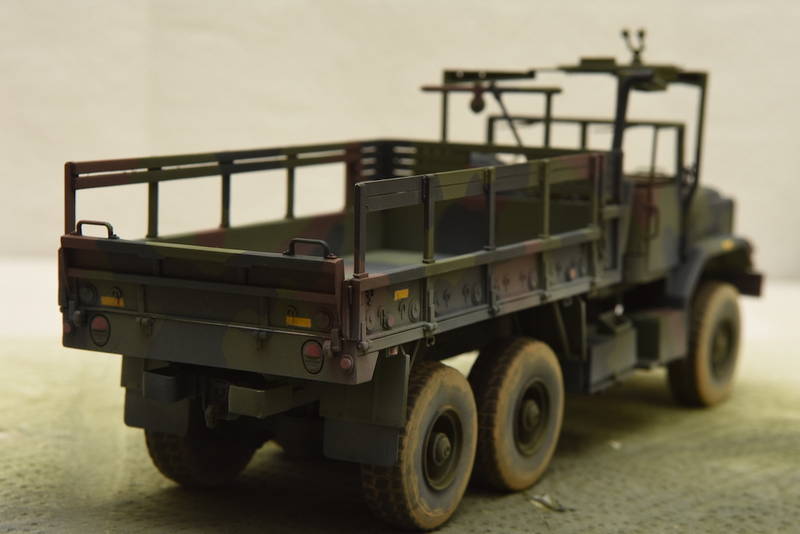
Also, using a different method for lights (bouncing flash light off of ceiling).
Florida, United States
Joined: May 16, 2002
KitMaker: 17,694 posts
Armorama: 13,742 posts
Posted: Monday, February 13, 2017 - 07:03 PM UTC
The weathering is coming along nicely. The mud on the tires looks good to me. It depends on where you are depicting the mud from since it is different colors in different locations around the world.
Field Artillery --- The KING of BATTLE!!!
"People sleep peaceably in their beds at night only because rough men stand ready to do violence on their behalf." -- George Orwell
Showcase
Idaho, United States
Joined: March 09, 2010
KitMaker: 557 posts
Armorama: 217 posts
Posted: Saturday, February 18, 2017 - 04:53 AM UTC
nice work, looks realistic

War is cruelty.There is no use trying to reform it.The crueler it is, the sooner it will be over.
Idaho, United States
Joined: March 09, 2010
KitMaker: 557 posts
Armorama: 217 posts
Posted: Saturday, February 18, 2017 - 04:57 AM UTC
Quoted Text
Quoted Text
I guess since this behemoth trucks body is so far off the ground it would not show much wear and tear....typically?.Everyone please accept my apologies if I come across as being obnoxious just wondering about how one defines weathering. To me it reflects a moment in time and definitely is a random unique look to each subject.
Its not obnoxious at all, its a good way to understand how different people percieve tones of wear and useage....
For me, with 15 years in the military, mostly time in the National Guard, I very rarely if EVER saw a brand spanking new vehicle. When I DID see brand new vehicles come in, they frequently sat in "cold Storage" for several months while the units got the proper training and equipment to maintain and operate them. I specifically remember seeing 6 brand new D-7 bulldozers that sat for 3 months.. they still had the plastic over the operators seats, but they were dusty and showed rust and rainmarks after just a short sit in a desert environment!! So, I guess IMO, if you are doing a military vehicle... it HAS to show some kind of at least dust and rain streaking. If it sat in the desert for any time, its dusty. If its been anywhere BUT the desert, its probably gotten a little rain added to the mix. Rust, especially on tracked components or on parts that collect water, is a reality also for even the new stuff. Its all in the..... thickness... of what you apply... the more you ding it, dust it, and rust it, the more wear and tear shown..... sometimes just a light wash of dirt or dust colored filters is all it takes..... but as someone already said.... the beauty of the hobby is that you control the piece.... weather you are going for accuracy down to the scratch (as many do in the case of commission builds), or a period accurate representation of a real vehicle, or even the brand spanking new spit shined commanders car..... its YOU're option..... whatever you do, take what others have to offer, and give them a try on SOMETHING.... your skills will thank you!
Indeed, my ship was about eight year old by the time I arrived on board. I guess I am in the minority

I like to see what the original paint looked like, what these armored vehicles looked like brand new.this is what I want to present to my house guests.I do appreciate weathering, especially after viewing the movie fury
War is cruelty.There is no use trying to reform it.The crueler it is, the sooner it will be over.
England - East Anglia, United Kingdom
Joined: June 09, 2009
KitMaker: 670 posts
Armorama: 410 posts
Posted: Wednesday, March 01, 2017 - 12:45 AM UTC
Quoted Text
Let him build it the way he wants to.
Amen to that brother rat - I love my models in that "just off the line" look or what I consider to be museum display.
Just my tuppence worth.
Anything Will Fit If You Use A Big Enough Hammer !!
If you produce it in Injection Moulded Plastic SOMEONE is bound to buy it !
If you want it 100% accurate - SCRATCHBUILD IT !!
Wisconsin, United States
Joined: July 30, 2013
KitMaker: 584 posts
Armorama: 525 posts
Posted: Thursday, March 09, 2017 - 08:26 AM UTC
looks great, build them the way you want too, two things you will always hear here are the following
1. I would have weathered it more
2. I would have done a wash
And that's if you build one clean, with no weathering. I like to build clean or go nuts with weathering, it depends on the subject.
England - East Anglia, United Kingdom
Joined: March 17, 2017
KitMaker: 17 posts
Armorama: 14 posts
Posted: Friday, March 17, 2017 - 03:45 PM UTC
Hi, quick question - should the floor of the truck be painted in camo as well? I do not know the answer to this, it just seems a little unusual (but then again, it is good camouflage from the air...)
Idaho, United States
Joined: February 12, 2017
KitMaker: 18 posts
Armorama: 18 posts
Posted: Friday, March 17, 2017 - 05:22 PM UTC
The TB 43-0209 manual says yes, see this page from it

Kansas, United States
Joined: December 25, 2012
KitMaker: 441 posts
Armorama: 441 posts
Posted: Thursday, April 20, 2017 - 10:10 AM UTC
Looks nice! I like how the pattern worked out even hand painted. The new TriColor is so precisely applied at the factory that this looks like the real deal in scale.
You can play around with chipping paint and rust but in the real deal these modern TriColor vehicles painted at the factory have such tough paint coatings that chipping and such is pretty minimal.
I'd just focus on shadows and highlights that bring out the details.
In Shepard Pain days that'd mean washes and dry brushing. Today, there's all sorts of modulation techniques and pigments to use - but I'm still old school.
With an airbrush - for TriColor - I shoot the base NATO green all over. And then add black to the green and do the shadows. I dry brush w NATO green and white/yellow fir the highlights and then and the black and brown doing the same thing. The green, being the major lighter color is usually the layer that shows off the shadows/highlights and gives the model depth.
I can believe talking scarecrows and wizards in great emerald cities, but I refuse to believe there is no paperwork involved when your house lands on a witch.
Idaho, United States
Joined: February 12, 2017
KitMaker: 18 posts
Armorama: 18 posts
Posted: Thursday, April 20, 2017 - 07:14 PM UTC
Quoted Text
Looks nice! I like how the pattern worked out even hand painted. The new TriColor is so precisely applied at the factory that this looks like the real deal in scale.
Thanks. I looked at a lot of reference photos and concluded that I won't be able to do it with my airbrush and that hand painting would be better a better choice.
Quoted Text
You can play around with chipping paint and rust but in the real deal these modern TriColor vehicles painted at the factory have such tough paint coatings that chipping and such is pretty minimal.
The photos I looked at did not show much weathering. I thought it was mainly because the vehicles were in private hands and therefore cared for more. I already tried to do some of it but it doesn't show much on these dark colors...
Quoted Text
I'd just focus on shadows and highlights that bring out the details.
In Shepard Pain days that'd mean washes and dry brushing. Today, there's all sorts of modulation techniques and pigments to use - but I'm still old school.
With an airbrush - for TriColor - I shoot the base NATO green all over. And then add black to the green and do the shadows. I dry brush w NATO green and white/yellow fir the highlights and then and the black and brown doing the same thing. The green, being the major lighter color is usually the layer that shows off the shadows/highlights and gives the model depth.
I started to practice dry brushing, but I had a problem with the paint drying too fast, so the brush did not leave any paint on the surface. I got a paint retarder and it helped, still need to get the feeling for how much paint I need to leave on the brush. Sometimes I leave too much there.
I also tried some chipping, but used to light of a grey so it looks awful. I need to revisit this...
England - South East, United Kingdom
Joined: November 19, 2008
KitMaker: 2,249 posts
Armorama: 2,007 posts
Posted: Sunday, April 23, 2017 - 02:07 AM UTC
Quoted Text
I started to practice dry brushing, but I had a problem with the paint drying too fast, so the brush did not leave any paint on the surface. I got a paint retarder and it helped, still need to get the feeling for how much paint I need to leave on the brush. Sometimes I leave too much there.
Hi David, the fact that you mentioned retarder suggests that you are trying to dry brush with acrylic paint - ? Some people may have techniques that enable them to do that, but I think it is more usual, and much easier, to dry brush with either enamel or oil paint. These both give considerably longer working times, allowing for more precise application, blending, or even removal should you want to correct any mistakes. I think with enamel, it is often suggested that the paint is not stirred, but that some of the thick sludgy pigment is dragged up from the bottom of the tin, and the brush dipped in that, before being wiped off to the point of nearly dry.
Idaho, United States
Joined: February 12, 2017
KitMaker: 18 posts
Armorama: 18 posts
Posted: Sunday, April 23, 2017 - 09:23 PM UTC
Quoted Text
Quoted Text
I started to practice dry brushing, but I had a problem with the paint drying too fast, so the brush did not leave any paint on the surface. I got a paint retarder and it helped, still need to get the feeling for how much paint I need to leave on the brush. Sometimes I leave too much there.
Hi David, the fact that you mentioned retarder suggests that you are trying to dry brush with acrylic paint - ? Some people may have techniques that enable them to do that, but I think it is more usual, and much easier, to dry brush with either enamel or oil paint. These both give considerably longer working times, allowing for more precise application, blending, or even removal should you want to correct any mistakes. I think with enamel, it is often suggested that the paint is not stirred, but that some of the thick sludgy pigment is dragged up from the bottom of the tin, and the brush dipped in that, before being wiped off to the point of nearly dry.
Hi Matthew! Yes, I am using acrylics (from Tamiya). I tried dry brushing with Vallejo this weekend and it seemed a bit easier than with Tamiya - no retarder used. I did consider using enamels, but somebody recommended that retarder for acrylics should help, so I wanted to give it a try first. It also seems that I will need to use it for spraying clear coats, so that would kill two birds with one stone.
As for dry brushing oil paints, how do you go about it?
Thanks!


