


Hosted by Richard S.
Artillery Campaign 2017

johhar

Joined: September 22, 2008
KitMaker: 476 posts
Armorama: 447 posts
Posted: Thursday, June 15, 2017 - 05:43 PM UTC
Thanks to highlighters, the first page of instructions has been made manageable, assuming I made no mistakes. Yellow=NOT DO, Orange=DO.

ClaytonFromEllijay

#454
Joined: July 10, 2016
KitMaker: 1,273 posts
Armorama: 1,138 posts
Posted: Thursday, June 15, 2017 - 06:57 PM UTC
Quoted Text
Thanks to highlighters, the first page of instructions has been made manageable, assuming I made no mistakes. Yellow=NOT DO, Orange=DO.
The instructions on assembling the real thing probably weren't that complicated...

johhar
Joined: September 22, 2008
KitMaker: 476 posts
Armorama: 447 posts
Posted: Thursday, June 15, 2017 - 08:45 PM UTC
There's a bit of surgery to add Eduard PE in step 2 on parts B1 and B2 but nothing a new blade and caution can't handle, and some looking ahead to step 3 where Dragon throws in some PE for good measure.

SpeedyJ

Joined: September 17, 2013
KitMaker: 1,617 posts
Armorama: 1,150 posts
Posted: Thursday, June 22, 2017 - 04:23 PM UTC
Hello all.
Finally some results to show. I made some construction with resin over the last weeks. As mentioned before in early post, not without problems. Some poor fit with the somewhat poor resin.
Some parts were real thin and came off broken, were simply to brittle to use, so had to make some replacement parts in styrene.
Rest of the kit is just nice and with extraordinary detail. Going through the etch fret there are some questions in were to use, but reference will tell later on.
Pictures of the piece:


Assembly for the brakes were replaced with styrene. Will have to thin that, but comes later on. The rods for the cilinders were replaced with brass tube from stash. I drilled out the cilinders to fix the exact measure of the rods.
The Limber was just a whole lot of fun to build. Easy and only a handful of parts involved to get such a nice piece. Can't wait to paint. But humidity is far from perfect. Rain season is just get started now. After some house moving the coming months I will get a climate controlled hobby room with perfect conditions to do, so must wait.
Hope you all like it so far. More pictures to come later this weekend.
Kind regards,
Robert Jan

Finally some results to show. I made some construction with resin over the last weeks. As mentioned before in early post, not without problems. Some poor fit with the somewhat poor resin.
Some parts were real thin and came off broken, were simply to brittle to use, so had to make some replacement parts in styrene.
Rest of the kit is just nice and with extraordinary detail. Going through the etch fret there are some questions in were to use, but reference will tell later on.
Pictures of the piece:
Assembly for the brakes were replaced with styrene. Will have to thin that, but comes later on. The rods for the cilinders were replaced with brass tube from stash. I drilled out the cilinders to fix the exact measure of the rods.
The Limber was just a whole lot of fun to build. Easy and only a handful of parts involved to get such a nice piece. Can't wait to paint. But humidity is far from perfect. Rain season is just get started now. After some house moving the coming months I will get a climate controlled hobby room with perfect conditions to do, so must wait.
Hope you all like it so far. More pictures to come later this weekend.
Kind regards,
Robert Jan
brekinapez
Joined: July 26, 2013
KitMaker: 2,272 posts
Armorama: 1,860 posts
Posted: Sunday, June 25, 2017 - 07:53 AM UTC
Update on the sFH18: She is decaled and sealed, and soon I will have her weathered. She will be done at that point, but while I wait out the clock I am going to see if I can get the crew set done and make a little base for it.

ClaytonFromEllijay
#454
Joined: July 10, 2016
KitMaker: 1,273 posts
Armorama: 1,138 posts
Posted: Sunday, June 25, 2017 - 06:57 PM UTC
Robert- Looking great
Shell- Very nice clean work!
Shell- Very nice clean work!

ayovtshev
#490

Joined: September 22, 2016
KitMaker: 1,432 posts
Armorama: 1,390 posts

Posted: Thursday, June 29, 2017 - 12:16 PM UTC
I was forced to change my subject-life got in the way so I don't have enough time for scratchbuilding.
My new subject is the 15 cm. schwere Feldhaubitze sFH 18 from the inventory of Royal Bulgarian Army 1944-1945.
Here is my starting picture(June 26 207).

Some pictures on progress follow:


The piece will be towed by Sd.Kfz.6/1.
My new subject is the 15 cm. schwere Feldhaubitze sFH 18 from the inventory of Royal Bulgarian Army 1944-1945.
Here is my starting picture(June 26 207).
Some pictures on progress follow:
The piece will be towed by Sd.Kfz.6/1.

bison126

Joined: June 10, 2004
KitMaker: 5,329 posts
Armorama: 5,204 posts
Posted: Thursday, June 29, 2017 - 12:46 PM UTC
Wow Angel,
that was a quick build ! Nice job.
that was a quick build ! Nice job.

ayovtshev
#490
Joined: September 22, 2016
KitMaker: 1,432 posts
Armorama: 1,390 posts
Posted: Thursday, June 29, 2017 - 01:01 PM UTC
Quoted Text
Wow Angel,
that was a quick build ! Nice job.
Thanks Olivier!
The kit built straightforward-no big issues

ClaytonFromEllijay
#454
Joined: July 10, 2016
KitMaker: 1,273 posts
Armorama: 1,138 posts
Posted: Thursday, June 29, 2017 - 06:48 PM UTC
Very nice, and very fast, Angel!
ayovtshev
#490
Joined: September 22, 2016
KitMaker: 1,432 posts
Armorama: 1,390 posts
Posted: Thursday, June 29, 2017 - 08:46 PM UTC
Quoted Text
Very nice, and very fast, Angel!
Thanks Clayton!
Still the piece needs weathering and for me that's the slow part...
SGTJKJ

#041

Joined: July 20, 2006
KitMaker: 10,069 posts
Armorama: 4,677 posts

Posted: Thursday, June 29, 2017 - 09:34 PM UTC
Nice progress, Shell. Camo looks good.
Nice build, Angel.
Nice build, Angel.


ltb073
Joined: March 08, 2010
KitMaker: 3,662 posts
Armorama: 3,078 posts
Posted: Monday, July 03, 2017 - 01:45 AM UTC
My entry will be this Pz IV Brummbar

Its still sealed in plastic don't know when I will get started yet hopefully soon
Its still sealed in plastic don't know when I will get started yet hopefully soon

SpeedyJ
Joined: September 17, 2013
KitMaker: 1,617 posts
Armorama: 1,150 posts
Posted: Monday, July 03, 2017 - 07:20 AM UTC
Hi all.
Some little details to add, but the piece is near to a bath and ready for base coat.


Waiting for slightly improvement on the weather conditions in Thailand. The humidity now is a problem to give it a first coat of primer. We'll see.
More projects on the table waiting...
Kind regards,
Robert Jan
Some little details to add, but the piece is near to a bath and ready for base coat.
Waiting for slightly improvement on the weather conditions in Thailand. The humidity now is a problem to give it a first coat of primer. We'll see.
More projects on the table waiting...
Kind regards,
Robert Jan
ClaytonFromEllijay
#454
Joined: July 10, 2016
KitMaker: 1,273 posts
Armorama: 1,138 posts
Posted: Monday, July 03, 2017 - 07:11 PM UTC
Very nice, clean work! Looking forward to seeing your paint!
SGTJKJ
#041
Joined: July 20, 2006
KitMaker: 10,069 posts
Armorama: 4,677 posts
Posted: Tuesday, July 04, 2017 - 09:53 AM UTC
Looks good, Robert Jan. There are some really nice details in this kit. Be careful they do not break of in the bath before basecoat.
None of the resin issues are visible to me on the finished kit. Looks to be a great model with some paint on it. Looking forward to see more.
None of the resin issues are visible to me on the finished kit. Looks to be a great model with some paint on it. Looking forward to see more.
SpeedyJ
Joined: September 17, 2013
KitMaker: 1,617 posts
Armorama: 1,150 posts
Posted: Tuesday, July 04, 2017 - 10:05 AM UTC
Thank you guys for the nice words. TLC is the key 
Kind regards,
Robert Jan
Kind regards,
Robert Jan
ayovtshev
#490
Joined: September 22, 2016
KitMaker: 1,432 posts
Armorama: 1,390 posts
Posted: Wednesday, July 05, 2017 - 10:47 AM UTC
I decided to withdraw my sFH18 from Artillery campaign and will build an 1:48 Soviet 37 mm AA Gun instead.
The reason for this: my sFH 18 is to be towed by a Sd.Kfz 6/1- as it was used in Royal Bulgarian Army-and this pair fits better into another running campaign-Truck and Trailers.
The rules for Artillery Campaign explicitly state build for this campaign only so my change of subject is to follow them.
I will post starting picture of UM's 1:48 37 mm AAG kit soon.

Scipio2010
#401
Joined: December 08, 2013
KitMaker: 323 posts
Armorama: 221 posts
Posted: Wednesday, July 05, 2017 - 08:04 PM UTC
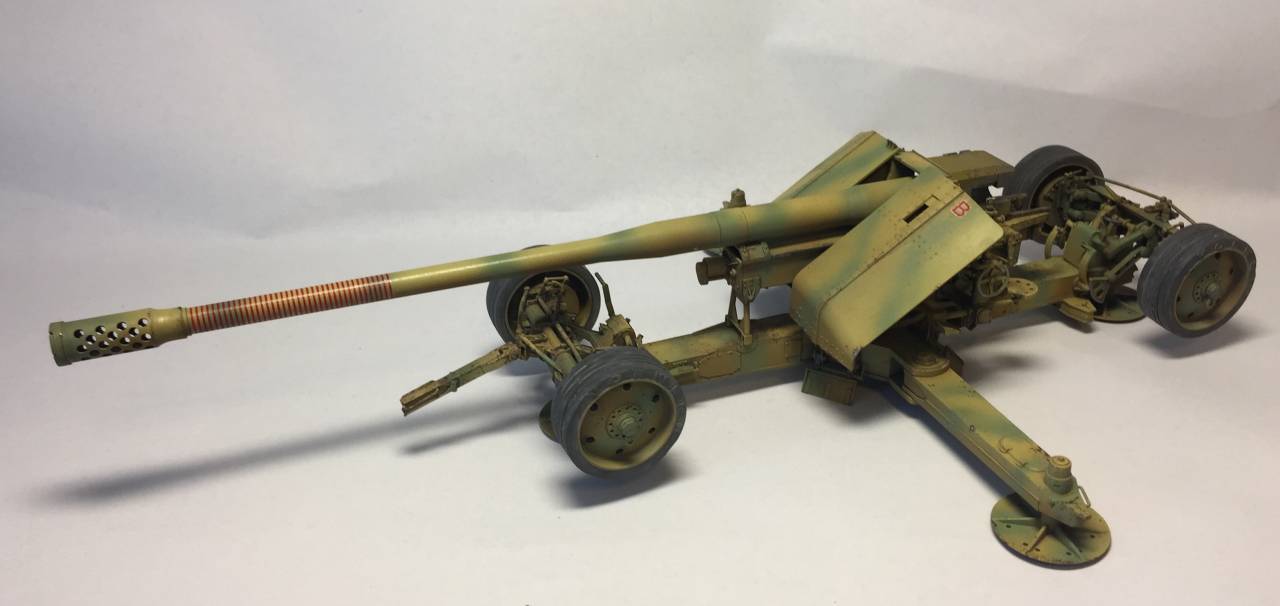
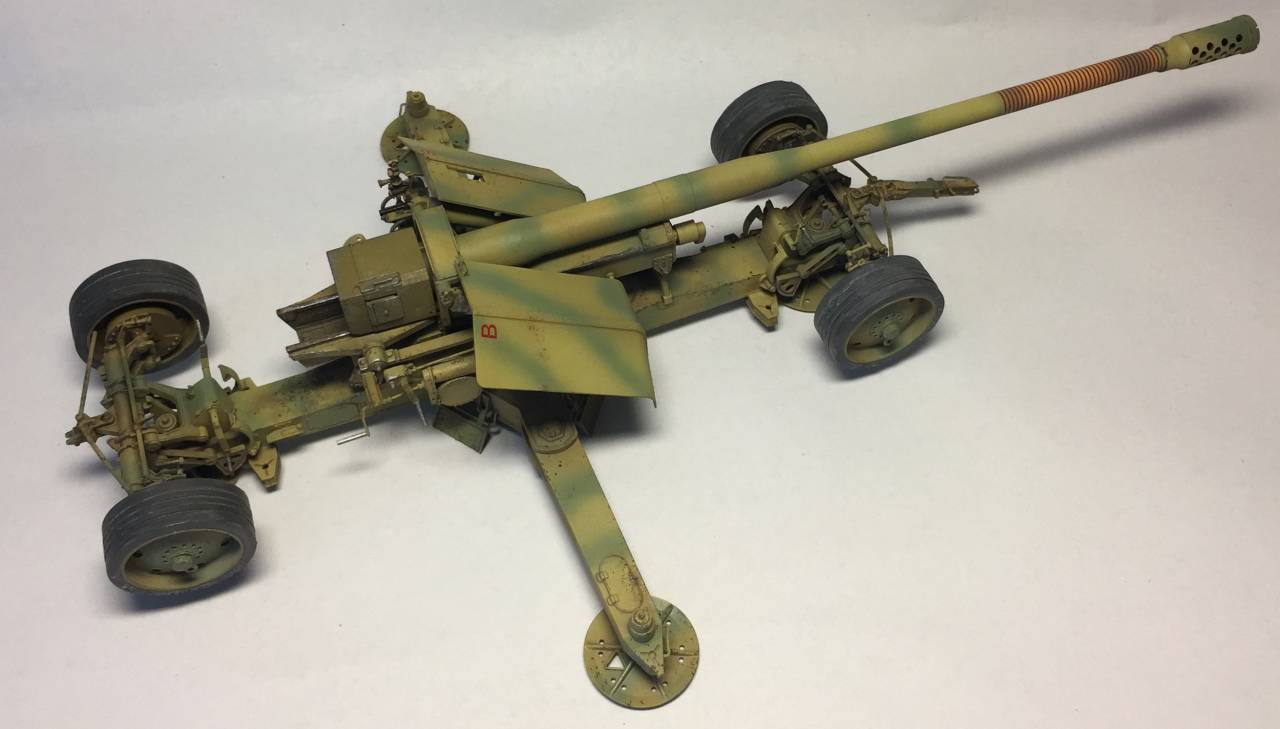
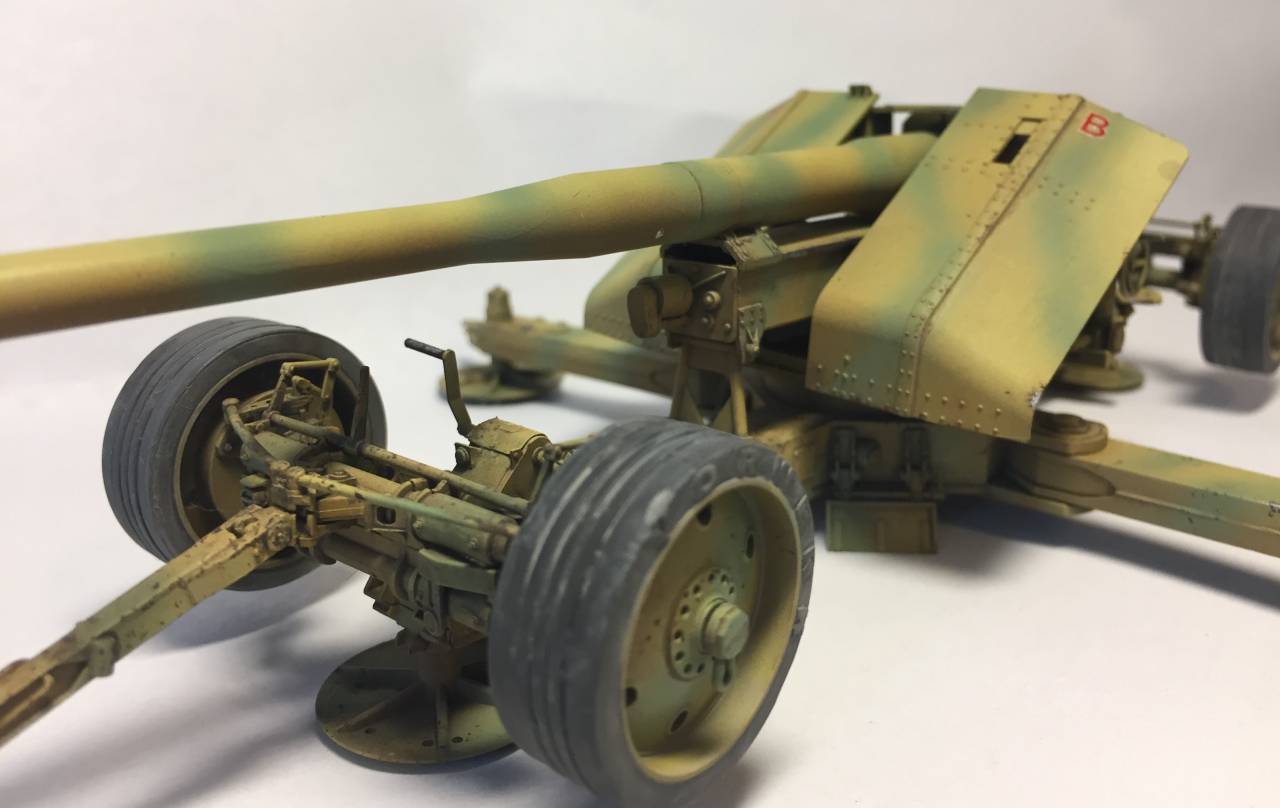
I finished up the Krupp 12.8 CM PAK 44 over the weekend. I wanted to make it look like it had seen some heavy action (to match the number of kill rings on the barrel)
Overall this was a fun build, and a first artillery piece for me. If anyone recalls, I had a mishap a while back when I dropped the finished model on the concrete floor prior to priming it. I was able to repair most of the damages but there are some details that were completely obliterated.
feedback is welcome
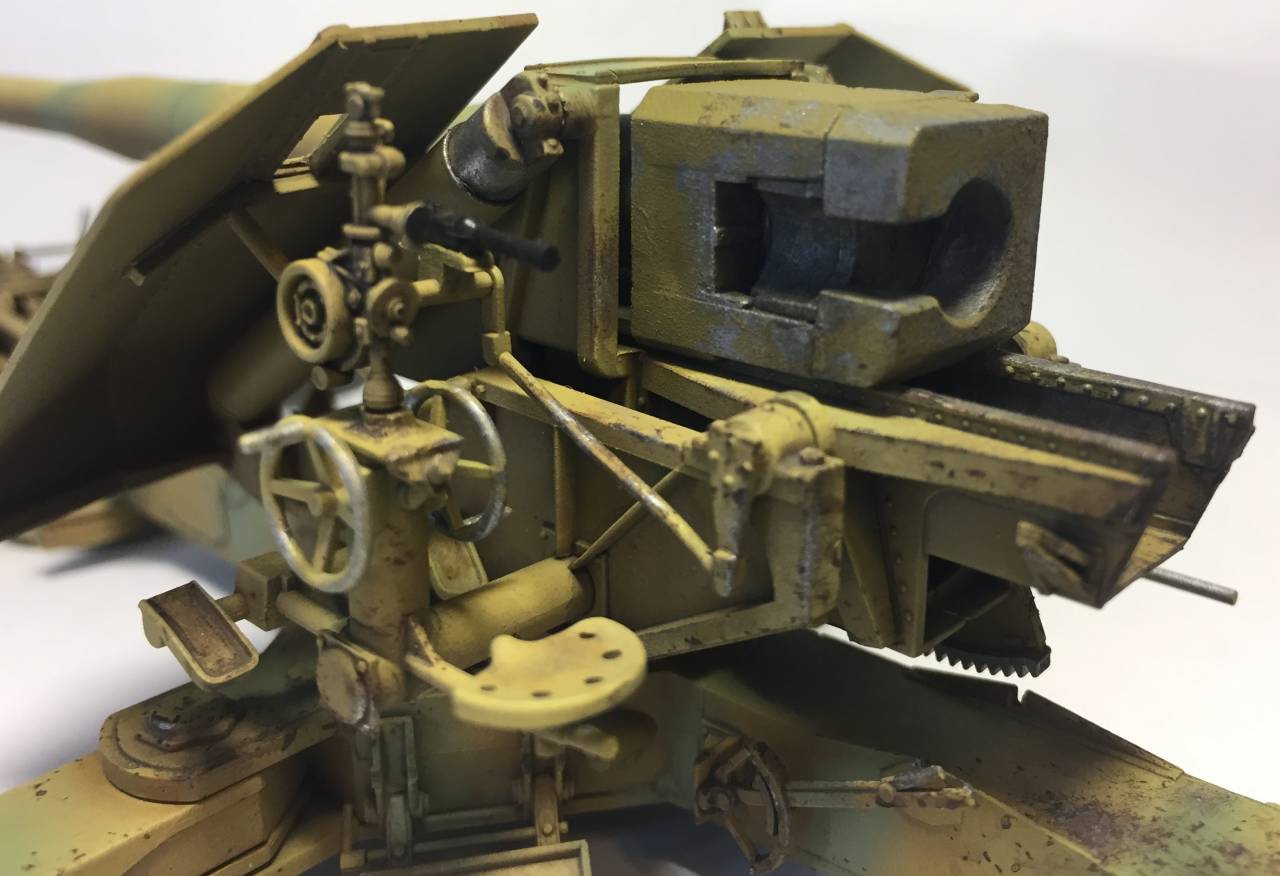
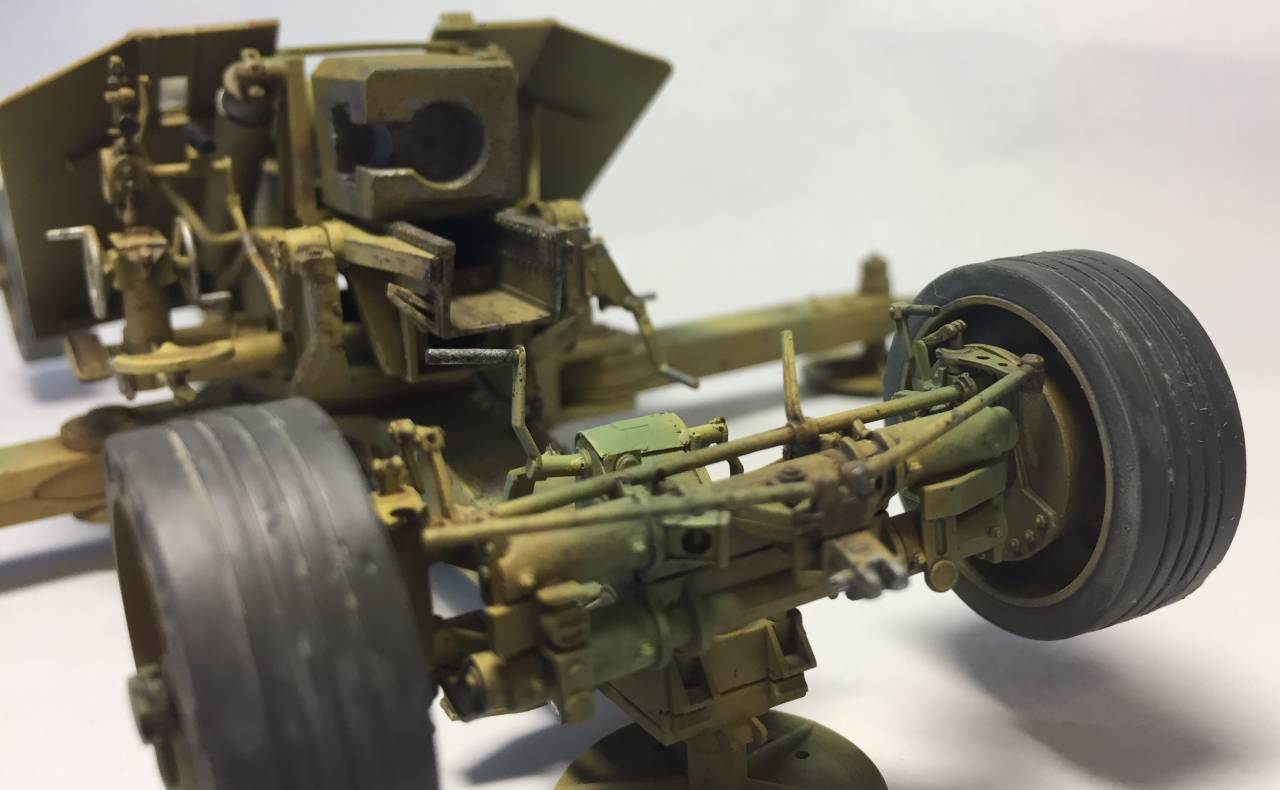
ClaytonFromEllijay
#454
Joined: July 10, 2016
KitMaker: 1,273 posts
Armorama: 1,138 posts
Posted: Wednesday, July 05, 2017 - 08:15 PM UTC
I didn't notice any parts missing, Shawn,  , and your close-ups show some fantastic detailed wear and tear! Excellent work!
, and your close-ups show some fantastic detailed wear and tear! Excellent work!
andyman
Joined: October 11, 2002
KitMaker: 142 posts
Armorama: 134 posts
Posted: Wednesday, July 05, 2017 - 09:51 PM UTC
Looks good Shawn. I like the painting good camouflage.
Andy
Andy
bprice1974
#436
Joined: August 10, 2014
KitMaker: 196 posts
Armorama: 182 posts
Posted: Thursday, July 06, 2017 - 10:32 PM UTC
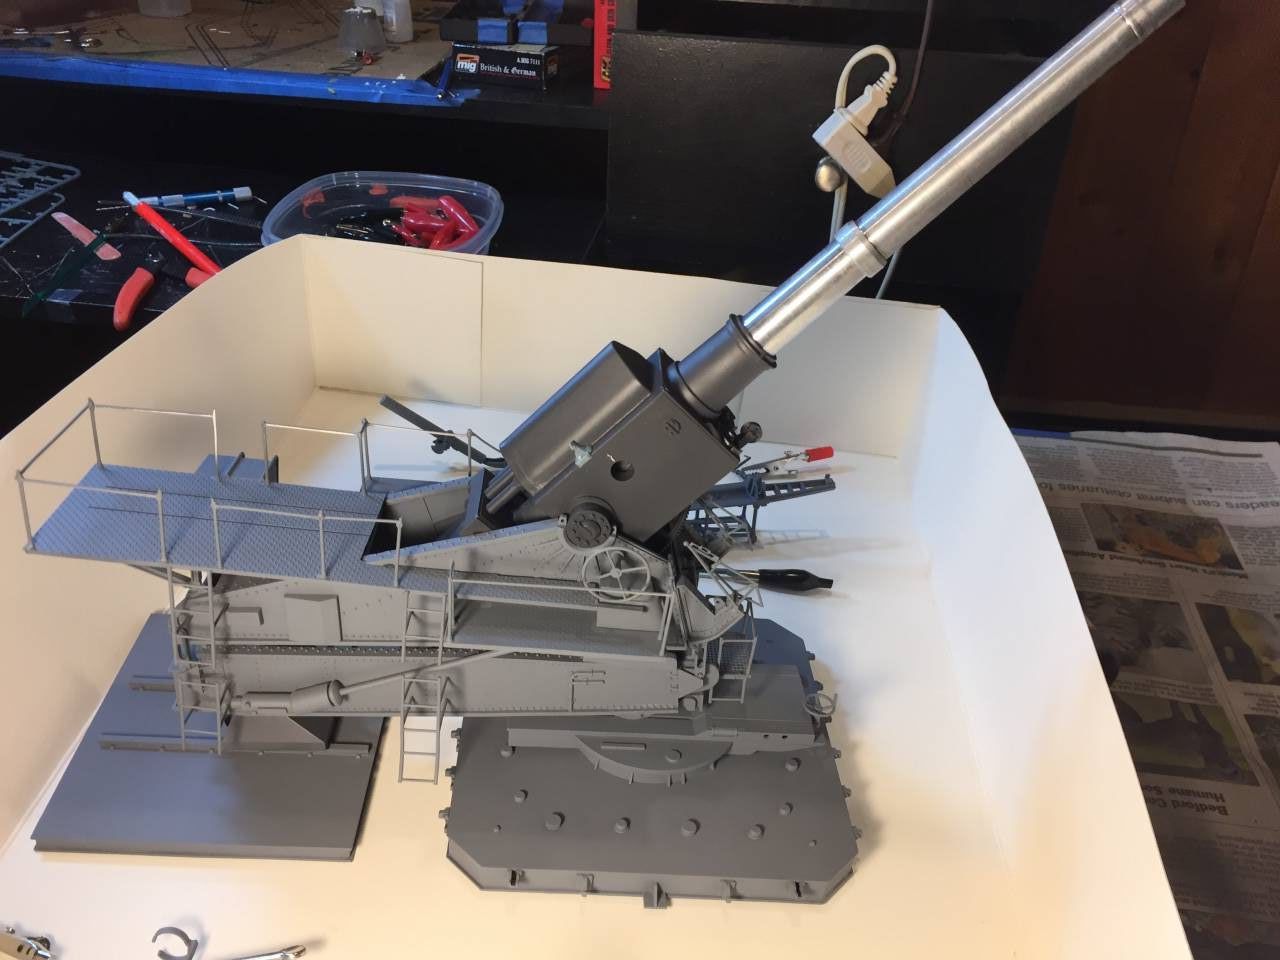
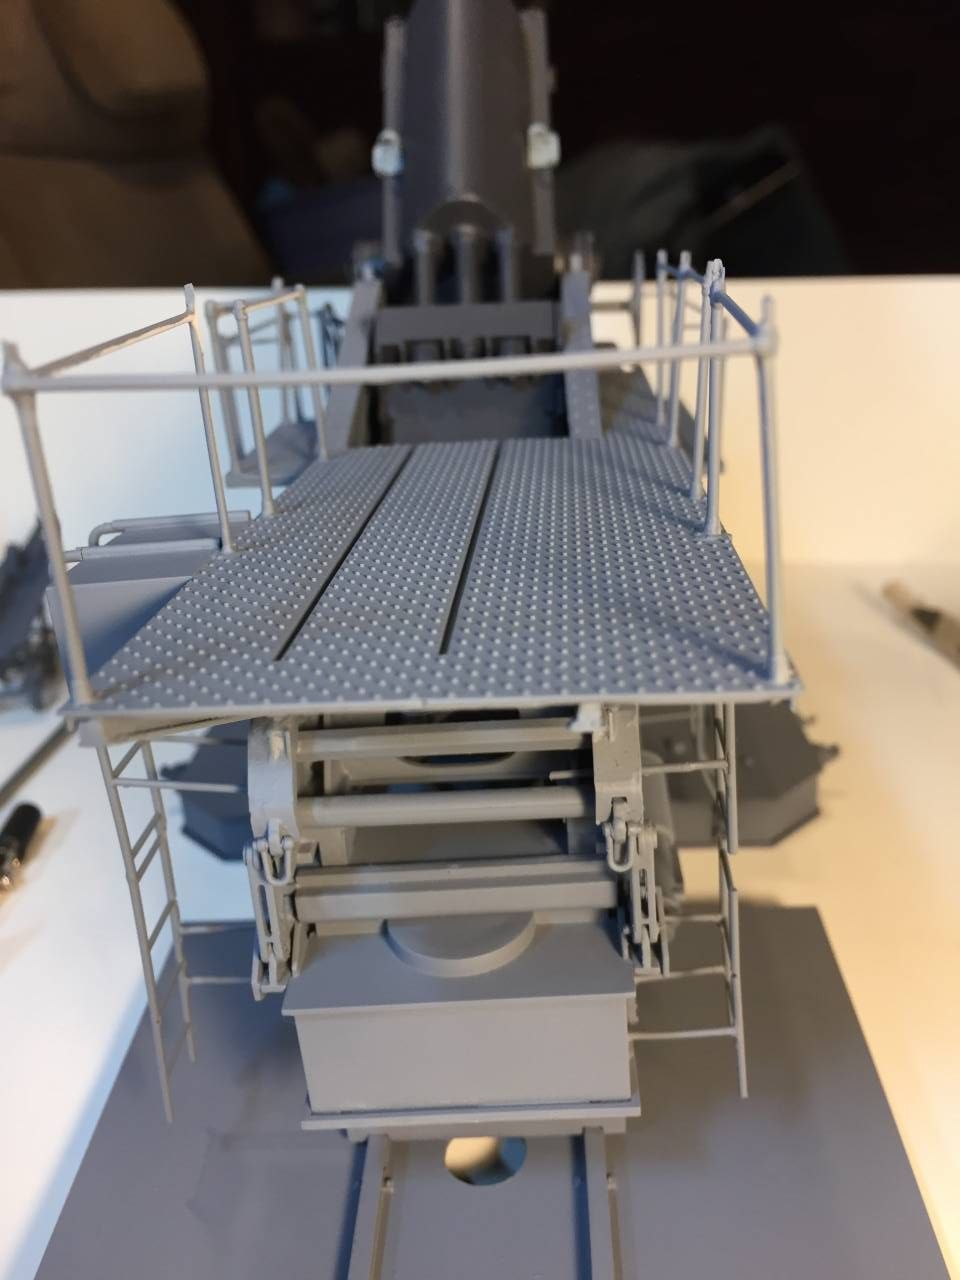
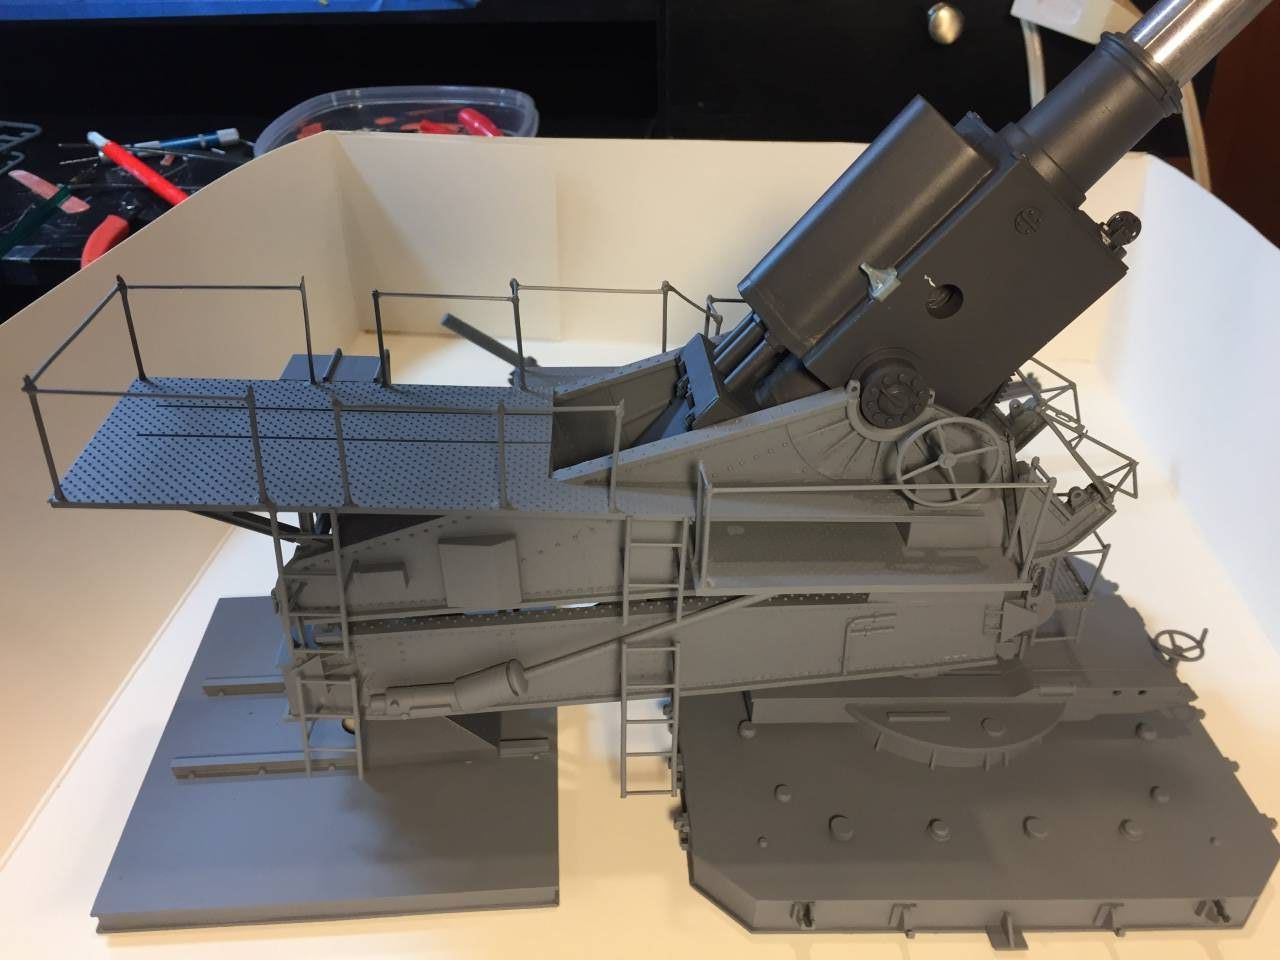
Here is some of the progress I have made so far on the German 35.5cm Super Heavy Howitzer by Soar Art.
johhar
Joined: September 22, 2008
KitMaker: 476 posts
Armorama: 447 posts
Posted: Friday, July 07, 2017 - 12:23 AM UTC
The whole Photobucket kerfuffle has left me out in the cold so I'm trying imgur. Using the Eduard PE on this kit, the main gun, so far, hasn't really improved it so much IMHO, and I might not use the set if I were starting again. Part of that is that I don't see the dark color of the PE so well, and part is that I'm not so happy with the details. That said, I have a couple of images of the trailer fenders, one before and one after the initial shaving and surgery called for in the Eduard instructions. It gives an idea of what has to be done and the hope I have for the fenders.

 " BORDER="0">
 " BORDER="0">
And it looks like a successful divorce from photobucket.
" BORDER="0"> " BORDER="0"> And it looks like a successful divorce from photobucket.
Chaman911
Joined: August 28, 2015
KitMaker: 319 posts
Armorama: 308 posts
Posted: Wednesday, July 12, 2017 - 05:57 PM UTC
Hi everyone,
I wanted to get a quick update in. I have finished assembly of my AFV Club leFH18/40. I will begin painting soon. I need to build a new paint station and buy a new compressor so hopefully in the next couple weeks I can wrap everything up. Now I just need a new half track campaign to motivate me to build the half track that will be towing this gun!


I wanted to get a quick update in. I have finished assembly of my AFV Club leFH18/40. I will begin painting soon. I need to build a new paint station and buy a new compressor so hopefully in the next couple weeks I can wrap everything up. Now I just need a new half track campaign to motivate me to build the half track that will be towing this gun!
ayovtshev
#490
Joined: September 22, 2016
KitMaker: 1,432 posts
Armorama: 1,390 posts
Posted: Wednesday, July 12, 2017 - 07:20 PM UTC
Nice work Bryan!
I've built this kit recently-it is a small gem,except for the tiny moon-shaped conection points for the wheels.I had to drill the shafts, insert some copper wire and CA the wheels to get rid of wobbling.
Looking forward to the next step,
I've built this kit recently-it is a small gem,except for the tiny moon-shaped conection points for the wheels.I had to drill the shafts, insert some copper wire and CA the wheels to get rid of wobbling.
Looking forward to the next step,
 |

WEB HOSTING BY


Copyright ©2021 Armorama and Kitmaker Network, a subsidiary of Silver Star Enterprises
All Rights Reserved. Please read our Conditions of Use and Privacy Policy.
All Rights Reserved. Please read our Conditions of Use and Privacy Policy.