_GOTOBOTTOM
Armor/AFV: Modern Armor
Modern armor in general.
Hosted by Darren Baker
T-15 Armata Build Blog
LeoCmdr
Visit this Community
Alberta, Canada
Joined: January 19, 2005
KitMaker: 4,085 posts
Armorama: 3,917 posts
Posted: Wednesday, August 24, 2016 - 03:59 AM UTC
Good day everyone! I am very excited to start a build blog on the Panda T-15 Armata Object 149, PH-35017.

The 1/35 T-15 Armata kit is a massive vehicle rivalling the size of modern Main Battle Tanks. Designed as a Heavy Infantry Fighting Vehicle it has the capability to keep up with current Russian Main Battle Tanks such as the T-90 series and the T-14 Armata. I'll cover more on the technical specs as the blog continues.

My intent with this build blog is to provide background information on the real vehicle, provide an in box review of the parts, conduct a build review of the kit, and round it off with a Feature Article.

I initially thought that this was going to be an out of box build. But, Voyager Model has some detail sets designed for the Takom T-14 Armata that might work well on this kit Voyager Model is also about to release a detail set for the Panda T-15 Armata kit that I think will enhance details during the build process.

For starters here's a gratuitous shot of the box to wet your appetite...the box is very sturdy in case you needed to know that as part of this build blog/review. The box art shows a mean looking T-15 Armata engaged in combat amongst urban ruins. Could this be coming to a turmoil wrought town near you in the future?


More to come...
hugohuertas
Visit this Community
Buenos Aires, Argentina
Joined: January 26, 2007
KitMaker: 1,024 posts
Armorama: 1,013 posts
Posted: Wednesday, August 24, 2016 - 04:59 AM UTC
Great! I'll be following your build-log closely, Jason.
I'm very interested in this kit's quality and buildability.
LeoCmdr
Visit this Community
Alberta, Canada
Joined: January 19, 2005
KitMaker: 4,085 posts
Armorama: 3,917 posts
Posted: Wednesday, August 24, 2016 - 05:56 AM UTC
Thanks Hugo! This is my first Panda kit and I am very interested to see how it turns out too.

On first glance some of the details on the parts is really impressive while on other parts the sprue attachment points deem to dominate and will slow down clean up to ensure they are removed properly. I'll get into this much more in depth as I show the sprues and then once the build actually starts in the blog.
LeoCmdr
Visit this Community
Alberta, Canada
Joined: January 19, 2005
KitMaker: 4,085 posts
Armorama: 3,917 posts
Posted: Wednesday, August 24, 2016 - 11:50 AM UTC
May 9, 2015 marked the 70th anniversary of the capture of Berlin in 1945. The Moscow Victory Day parade is a massive display of Russian military power.

Featured for the first time in public was the new Armata series of Russian AFVs. You may already be familiar with the T-14 Armata Main Battle Tank. A kit already exists produced by Takom. Panda has also planned a T-14 Armata in 1/35.

The Armata series of AFVs is based on a Universal Combat Platform to permit multiple common components to be integrated into a variety of versions. The Armata variants include the T-14 Main Battle Tank, the T-15 Heavy Infantry Fighting Vehicle, a heavy APC, an ARV, a tank support AFV, self propelled Artillery, and a mortar carrier.

The use of the same common platform is not a new concept in Russian or for that matter NATO military forces. However, the technology that is apparently integrated into the Armata platforms make them major new kids on the AFV block.

The T-15 Armata is a monster vehicle plain and simple. It is designed for combat and to survive during battles. The critical element of crew survivability has not been a major consideration with previous Soviet/Russian AFVs but that appears to have shifted...at least for now.

So, what is so special about the T-15 Armata other than the huge size?

For starters the weight is 48 tons. This is a significant increase from a BMP-2 that weighs in at around 15 tons.

To power the T-15 Armata a 1500 hp multi-fuel front mounted engine is utilized. To put it in perspective the Leopard 2 and M1A1 Abrams both use power packs producing 1500 hp. The road speed of the T-15 Armata is stated to be 65-70 km/hr. I suspect that this is a governed speed and in combat operations the speed of the T-15 Armata could likely approach 90 - 100 km/hr.

Technology runs amuck in the T-15 Armata with a variety of passive and reactive armour packages mounted to protect the vehicle and the crew. Ranging from steel and ceramic composite armor to ERA panels to slat armour the T-15 is alleged to be able to protect it's crew and Infantry against current tank rounds used in the Leopard 2 and Abrams as well as against the latest ATGMs with top attack capabilities. The hull is also mine resistance reinforced.

Moving to Active Protection Systems (APS) the T-15 is bristling from head to toe with soft-kill and hard-kill technology to reduce the ability for the enemy weapons to be defeated before reaching the T-15.

What is soft-kill and hard-kill you ask? Soft-kill systems are designed to confuse or reduce the ability of enemy ATGMs to properly track and target the T-15. These systems would include smoke projectiles, launched decoy devices, and electronic jammers. Hard-kill systems can be passive or active. They are designed to defeat an enemy projectile by destroying it prior to it reaching the vehicle and penetrating the armour. As simple as slat armour and as complicated as high pressure shock waves the hard-kill systems must ensure they have 360 degree coverage to be effective.

APS is not new to Russian AFVs. The Drozd and Arena-E are two examples of previous Russian APS technology.

On the T-15 soft-kill and hard-kill systems are easily visible if you know what you are looking for. I will go into more depth on the placement of the systems during the build. The Armata series, including the T-15, use the Russian "Afganit" APS. It is stated to be a generation ahead of current deployed Western APS technology.

This is not the end of the integrated technology in the T-15. Standard on most AFVs is an NBCW system to filter out contaminates in a hostile chemical environment. Also constructed into the T-15 are countermeasures against IEDs. This is a step up from previous technology of add-on systems to counter IEDs.

One of the unique design considerations in the T-15 was the use of externally mounted fuel tanks. Not a new concept at all but when you are running a 1500 hp engine you are going to burn lots of fuel. Having the fuel mounted on the outside definitely lessens the chances of harm to the occupants of the vehicle.

In my next post I'll talk about the variety of weapons bristling on the T-15 and how they also work in conjunction with enhancing crew protection.

Let's take a look at some images of the T-15 Armata. The images are from a variety of internet sources.


If you have any technical input to add or questions about the T-15 please post them on my blog for everyone to see.
LeoCmdr
Visit this Community
Alberta, Canada
Joined: January 19, 2005
KitMaker: 4,085 posts
Armorama: 3,917 posts
Posted: Thursday, August 25, 2016 - 01:12 AM UTC
My approach to military vehicle modelling is to know about the vehicle I am building. It makes it interesting and fun to learn about an AFV. With the T-15 only shown in public in 2015 there is lots to learn about this great looking AFV. I guess my passion for knowing about what I am building comes from my time as a tank commander where knowing the enemy capabilities means I can engage and destroy it faster.

The T-15 Armata is no slouch when it comes to weapons. The vehicle is equipped with a crewless turret. The remote control turret is operated from the gunner's station located in the hull. The Bumerang-BM turret mounts a 30 mm 2A42 cannon. This is an impressive weapon with dual feed for both HE-T and AP-T rounds. Depending on the ammunitions selected soft and armoured targets can be engaged up to 4000 metres. Aircraft are not safe either if they get below a 2000 metre altitude. The 2A42 cannon has been in service since the 1980s and has been proven successful in a variety of Russian AFVs. It is aptly suited for the T-15 with a rate of fire of up to 550 rounds per minute. 500 rounds of ammunition are carried in the turret.

Mounted along side the 30 mm cannon is the coaxial 7.62 mm PKT general purpose machine gun. In service in a variety of versions since the 1960s this is a solid proven machine gun. With a rate of fire of around 700-800 rounds per minute it is certainly slower than a NATO MG3 counterpart but is still very suitable with its 2000 rounds as a secondary weapon for the T-15.

The T-15 obviously is not a tank even though it is as big as one. With range and penetration limitations of the 30 mm cannon the T-15 has additional firepower to stop enemy tanks. Mounting two banks of two 9M133 Kornet ATGMs the T-15 has some serious tank killing capabilities.

The Kornet missle has been in service since the mid 1990s and it has evolved over time to a very deadly missile. The T-15 uses the Kornet-EM missiles. The four missiles on the T-15's turret are "fire and forget" versions of the Kornet.

I mentioned previously that crew protection is evident in the T-15. With a remote turret controlled by the crew in an armoured capsulated hull and Kornet-EM missiles capable of engagement ranges up to 10,000 metres the T-15 provides the crew with enhanced protection by reducing turret exposures and providing extended range engagements. If you consider that the most modern NATO tanks are capable of main gun engagements at 4000 metres the Kornet-EM can engage at double that range. That is very impressive and concerning at the same time.

The Kornet missile has been battle tested. The Kornets have been used in Iraq and Lebanon where both M1A1 Abrams and Merkavas have been engaged. The armour on both Abrams and Merkavas have been penetrated to a certain degree and allegations made that Kornet missiles have both disabled and destroyed some of the Abrams and Merkavas that have been engaged.

The T-15 turret is purposely designed to be low profile. There is no crew in it so weapons, ammunition, and fire control systems fill the turret. This is a great idea when it comes to crew protection as long as everything works all the time.

Multiple sensors are visible on the turret gleaming with gold hued anti-laser coatings. It gives the turret an almost alien or bug like appearance...very menacing indeed!

Here's a good look at the turret showing the 30 mm cannon, the coaxial PKT GPMG, the Kornet-EM missile banks, and the variety of optics and sensors on the turret.

As I will explain as the blog continues Panda got some the details completely correct and in other cases they are lacking or absent.


LeoCmdr
Visit this Community
Alberta, Canada
Joined: January 19, 2005
KitMaker: 4,085 posts
Armorama: 3,917 posts
Posted: Sunday, September 04, 2016 - 02:55 AM UTC
The Russians are coming! The Russians are coming!

Actually, it is Panda Hobby that has brought us this Russian beast called the T-15 Armata.

Let's take a look at what is inside the sturdy cardboard box.

The T-15 Armata kit consists of the following parts:

432 x (I did my best to accurately count them) styrene parts moulded in olive green.

20 x clear plastic parts.

65 x photo etched parts

1 x braided metal cable

2 x decals

768 x individual track link components

8 x track building jigs

User manual (aka instructions)

Painting & Marking guide

The sprue parts are deceivingly well detailed. What throws you off are the relatively large attachment points on the sprues. They are chunky and solid even on delicate parts and it almost makes the parts look less detailed...almost.

The parts are nearly void of any hint of flash. Any flash present is very minute and will be easily cleaned up.

Both raised and recessed details look very appealing. The tiny bolt details on parts such as the turret top and hull armour components does stand out as refined.

Looking at the overall detail on the hull I was notably impressed by the size of the upper and lower hull tubs. This is a big rig! The bare bones upper hull is about 25 centimetres long. That is without any of the additional rear hull details or the extended frontal armour added.

Lots of modellers complain about a lack of grab handles. You want grab handles? The Panda Hobby T-15 Armata has grab handles! There are some very small D ring shaped handles moulded on the upper hull but there are many plastic and PE grab handles included in the kit for that extra level of detailing that should be expected in a modern kit.

On the upper hull the commander's and driver's hatches are provided open with separate hatches. The gunner's hatch is moulded closed. Since the turret is remote controlled the gunner would likely be hatches down all the time so an open hatch is really not required. There is no interior provided so no harm, no foul on the closed gunner's hatch. The rear hull ramp/door combination is provided separate but not designed to articulate in any manner. A very nicely moulded slat armour piece is provided for the rear ramp.

The road wheels are interesting and may cause some rolling of the eyes. The road wheels are very nicely moulded and even include bolt details on the back side of the inner road wheels. The side walls of the road wheels include multiple recessed striations around the circumferences. This is correct! It gets even better with tiny raised road wheel manufacturing data on the side walls of both the outer and inner road wheels. This is impressive detail that should stand out very clearly on a parade clean T-15.

With all of the great detail provided on the road wheels something stands out to me that is odd and likely inaccurate. The road wheels surfaces have this weird recessed groove down the centerline giving each wheel a concave look. On real new road wheels you can usually see a raised mould line from the manufacturing process. Some modellers cringe when they see this on a build but it is actually correct. On the T-15 that raised feature is visible on some vehicles. On other T-15s the road wheel surface is smooth. Somehow Panda Hobby created the reverse effect with their T-15 road wheels and it looks odd. How odd it will look on the build is yet to be determined.

Here are some sprue images of the main upper and lower hull parts to take a gander of before the in box portion continues.

Lower hull...


Upper Hull...


hugohuertas
Visit this Community
Buenos Aires, Argentina
Joined: January 26, 2007
KitMaker: 1,024 posts
Armorama: 1,013 posts
Posted: Sunday, September 04, 2016 - 04:18 AM UTC
Overall detail level looks really nice -stating that I know nothing about the eventual accuracy of these details-.

I eagerly expect the moment of truth, when you start building this beast.
Your brave experience will decide me to buy this kit or not -no pressure-....
LeoCmdr
Visit this Community
Alberta, Canada
Joined: January 19, 2005
KitMaker: 4,085 posts
Armorama: 3,917 posts
Posted: Sunday, September 04, 2016 - 04:25 AM UTC
As I previously stated the road wheels have some great details on the front and back sides but the surface detail is questionable. I would be interested in hearing from others if their kits have the same issue. Perhaps this is just a moulding error rather than a design error.

Even with current online images and available walkarounds of the T-15 it is difficult to speak to the accuracy of suspension components that as fairly well hidden under the side hull armour and skirts. The suspension cannot be articulated when assembled but I am sure that at some point modellers will attempt to do so in order to take advantage of the individual link tracks.

Here are images of the road wheels and suspension sprues. Above and beyond the great outer and inner detail and suspect recessed surface detail on the road wheels the overall detail on the suspension components is very good. The front mounted drive sprockets and the rear mounted idler wheels will need only a minimal amount of cleanup after careful removal to get them ready for mounting.

Inner road wheel detail:


Outer road wheel face detail:


The bolt detail on the back side of the inner road wheels is visible:


I'll chat about the large add-on armour components for the hull next.
LeoCmdr
Visit this Community
Alberta, Canada
Joined: January 19, 2005
KitMaker: 4,085 posts
Armorama: 3,917 posts
Posted: Sunday, September 04, 2016 - 05:59 AM UTC
Regardless of all the electronic and armour technology that you incorporate or bolt on to a vehicle some skilled gunner with an eagle eye looking through his sight is going to send a projectile down range and hit you. The key is to ensure that your levels of protection do their job and you survive to fight another day.

While sipping on ice chilled Vodka I am sure that the designers of the T-15 Armata were never naïve enough to think that their state of the art AFV would never be hit by enemy fire. Soft and Hard Kill systems are great but not every round will be stopped. The T-15 is designed to keep pace with the T-14 Armata and the T-90s. That means they will be targeted at the forward edge of battle.

Boasting an impressive array of reactive and passive armour packages the T-15 has transformed a huge amount from the now ancient BMP-1. While the U.S. Bradley has evolved as well with armour protection it sort of looks like a Bumble Bee on steroids. The T-15 Armata has emerged to become something that looks like a cross between a Hammerhead shark and a Scorpion!

On the top of the hull ERA tiles protect the crew compartment from top attack missiles.

On the hull sides passive modular armour blocks protect the Infantry inside the T-15.

At the front of the T-15 a series of stand off angled passive armour panels protect the vehicle by both absorbing projectile impacts and deflecting small rounds.

Going old school at the hull rear is a slab of slat armour to add in the protection of the rear ramp.

All of this armour adds weight. Oh, remember the 1500 hp powerpack taking up a third of the front end? That power easily overcomes any additional armour weight.

The detail on these parts is very nice. Terrific lines, no sink marks, super bolt detail. The side hull armour also incorporates the thick rubber lower skirts. Panda Hobby actually included a subtle wavy feature to the rubber skirts to show they are flexible. No need to replace them with any PE skirts.

I am impressed with the slat armour panel for the rear ramp. Not too thick and nicely moulded. Could this be replaced by PE parts? Sure, we'll see how the new Voyager set looks when it is released.

Let's take a look at the kit parts related to the armour package.


More hull details to come.
LeoCmdr
Visit this Community
Alberta, Canada
Joined: January 19, 2005
KitMaker: 4,085 posts
Armorama: 3,917 posts
Posted: Monday, September 12, 2016 - 10:01 AM UTC
Picking up where I left off if we look at the rear hull parts more details of the kit and the design of the T-15 Armata come to light.

The Russian designers incorporated external fuel tanks on the right side of the T-15's hull. They are big and multiple in order to feed the 1500 hp powerpack. This is a huge crew survivability feature when compared to previous Russian/Soviet BMP designs of placing cells in crew access doors or under the feet of Infantrymen.

Keeping with the Spartan appearance of Russian armour the hull is not festooned with stowage bins and racks. However, compartmentalized stowage bins are present from mid-hull rearwards and an open stowage bin is located on the right rear side of the hull. These strategically placed bins would also provide additional passive protection against incoming rounds to a limited degree. The open bin provided in the kit is very nice but super delicate when it comes to the plastic. On my sample one bar is broke or molded improperly and great care will need to be taken in order to remove and clean up the bin. PE parts compliment the bin once it is mounted. The solid stowage bins are provided with separate lids for an additional detailed look. The bin lids are only designed to be attached in the closed position.

The rear hull is bolstered by a series of bolt on armour panels that cover the vertical surfaces. This simple approach aided by the slat armour over the crew ramp provides the final passive armour additions to the T-15.

When looking at the upper hull it is obvious that the turret is mounted at least 2/3s back on the hull. The turret is remote controlled so there should not be a turret basket. The T-15 Armata is supposed to carry six to nine Infantrymen. Given the very large size of the T-15 I think they have accomplished this and there are images to prove it.

Let's look at some images of the rear hull and the actual crew compartment.

Left rear upper hull. Note the stowage bins.


The right rear hull side. Note the large banks of externally mounted fuel tanks. The open storage bin and an additional closed top stowage bin mounted on top of the fuel tanks during assembly.


T-15 Infantry compartment. They fit!


T-15 Infantry compartment looking towards the hull front.


Looking at the hull rear the bolt on armour is visible. Above the left rear mudflap is the box for an Infantry telephone.


To get the real size of the vehicle check out this image of Putin along side a T-15 Armata. The open storage bin over the fuel tanks is also visible.


I'll finish off looking at the hull details and the active systems in the next installment.
Maki
Staff MemberSenior Editor
ARMORAMA
Visit this Community
Croatia Hrvatska
Joined: February 13, 2002
KitMaker: 5,579 posts
Armorama: 2,988 posts
Posted: Monday, September 12, 2016 - 01:27 PM UTC
Jason, I love reading your build logs. Very interesting info on the vehicle and I can't wait to see how the model turns out.

Mario
Thirian24
Visit this Community
Oklahoma, United States
Joined: September 30, 2015
KitMaker: 2,493 posts
Armorama: 2,344 posts
Posted: Monday, September 12, 2016 - 07:07 PM UTC
Dang that is huge.
okievit
Visit this Community
Cadiz, Spain / España
Joined: June 18, 2003
KitMaker: 225 posts
Armorama: 206 posts
Posted: Friday, September 16, 2016 - 06:12 PM UTC

Quoted Text

The Bumerang-BM turret mounts a 30 mm 2A42 cannon. This is an impressive weapon with dual feed for both HE-T and AP-T rounds. Depending on the ammunitions selected soft and armoured targets can be engaged up to 4000 metres. Aircraft are not safe either if they get below a 2000 metre altitude. The 2A42 cannon has been in service since the 1980s and has been proven successful in a variety of Russian AFVs. It is aptly suited for the T-15 with a rate of fire of up to 550 rounds per minute. 500 rounds of ammunition are carried in the turret.


I didn't realise they were re-using the standard BMP-2 gun... Interesting...
flugwuzzi
Visit this Community
Lower Austria, Austria
Joined: November 02, 2007
KitMaker: 633 posts
Armorama: 599 posts
Posted: Friday, September 16, 2016 - 07:45 PM UTC
Phantastic start on this one Jason. Love the in depht article with plenty of useful information ... keep up the good work.

Cheers
Walter
ruzzaa
Visit this Community
England - South East, United Kingdom
Joined: October 17, 2007
KitMaker: 197 posts
Armorama: 189 posts
Posted: Saturday, September 17, 2016 - 03:55 PM UTC
It's a good kit, and fit is good.

A small modification you may wish to add, as it is not in the kit. exhaust deflector/cover.


My T-15 a wip

phantom8747
Visit this Community
Alabama, United States
Joined: March 09, 2015
KitMaker: 281 posts
Armorama: 273 posts
Posted: Saturday, September 17, 2016 - 05:23 PM UTC
That looks like a big vehicle.Look how small Putin is next to it.
skyhawk174
Visit this Community
Canada
Joined: June 06, 2003
KitMaker: 2 posts
Armorama: 2 posts
Posted: Monday, September 19, 2016 - 08:31 PM UTC
Jason

Thanks for letting me know about this blog when we were yakking after the show on Saturday. Looks like a real nice kit and you may even convince me to build something monotone Well it does have some colourful stripes though.

But I do have to wonder if the Takom version would be any better. A wait and see thing I guess.

LeoCmdr
Visit this Community
Alberta, Canada
Joined: January 19, 2005
KitMaker: 4,085 posts
Armorama: 3,917 posts
Posted: Wednesday, September 21, 2016 - 12:41 AM UTC
Let’s finish of looking at the upper hull details.

As I have stated before the T-15 Armata has a series of Soft and Hard kill defensive systems. In layman’s terms shooty things that fire off smoke and explosive projectiles to stop incoming rockets and missiles from disintegrating the occupants of the T-15 Armata.

The Active Protective Systems (APS) provided in the kit include the following:

1. Rear Hull- Vertical static mounted APS arrays x 2. These consist of two banks or pods or 12 x projectiles. I suspect that they are some type of screening smoke or chaf emitting projectiles that are fired in a series or volleys depending on the threat detected. They are positioned at the very rear of the hull. In the kit these systems are provided in a solid mould of the 12 x tubes, a mount, and a nice PE shroud.

2. Mid Hull- 2 x arrays of the above mentioned APS banks are positioned horizontally to front fire mid-hull. The same parts are used as the rear hull systems.

3. Forward Hull- On both sides of the hull mounted at various angled arcs are 5 x large APS tubes. These are most likely the Hard Kill systems that would assist in protecting the frontal arc of the T-15 from incoming missiles and rockets. The 10 x tubes are simple moulded parts with attached mounts. They will require cleanup after removal from the sprue to eliminate the attachment marks and a small seam. Locator points are easily identified on the upper hull.

4. APS Sensors/Receivers- In order for the APS system to work properly it has to detect incoming missiles and rockets. A human can do this but under the stress of battle they will not be fast enough to react. The T-15 Armata mounts multiple sensor/receiver components on the hull in order to detect, analysis, and take action in regards to deploying the appropriate APS systems. In the kit Electro-Optical/Infrared receivers are provided as 2 x three piece assemblies for the frontal area of the hull. An additional sensor/radar comprising of 4 x parts is positioned between the Commander and Driver’s hatches. Additional sensor plates are attached to either side of the superstructure that mounts the turret. Finally, at the upper rear hull a rearward sensor made up of three parts in attached. In reviewing my reference material the only minor omissions to these components are some retaining wires. I am not sure if the covers are removed from the sensors when they are operational or just removed for maintenance. Either way it is a minor detail to add.

During the assembly of the upper hull several details are placed from underneath the hull as work takes place.

1. Exhaust ports are added to the side hull of the powerpack location. They are open ports. As shown by Geoff Ruzgar in his post on September 18, 2016 there is also an angled exhaust deflector attached to the port. This can be scratchbuilt fairly easily. But, once the angled add-on armour panels are added to the front hull this likely won’t be visible unless you are giving the T-15 the “up the skirt” treatment. Who would ever do that?

2. Clear parts are provided for periscopes and for the Russian style taillights. They are attached from the underside of the hull.

3. A nice pair of PE engine grills is provided and adds to the detail of the massive glacis plate. It is great to see small additions like this as they make a big impact in the level of detail.

4. PE lifting points or tie down points are also provided for the upper hull. Another small but excellent detail instead of moulded on parts.

5. PE engine louvers are also provided for the front hull. More PE how awesome is that. These parts will be covered by the angle add-on armour but it is the thought that counts!

6. There are some other small parts that attach around the hatch area. The hatches themselves can be positioned open or closed. Separate grab handles area provided as well as clear periscopes for the Driver’s hatch.

7. Final assembly of the hull and prep for adding the hull side add-on armour comes with attaching the support arms along the rear hull sides. There are three small rod-like supports on each side of the hull. I can see these breaking off during handling of the hull so take care and determine if you can add them while attaching the add-on armour rather than having them floating in the air waiting to be broken off and disappear.

One last point I want to touch on is the headlights. The headlights are added during the assembly of the add-on nose armour. The headlight guards are fragile so take care removing them and cleaning them up. The headlights are provided as clear parts. Great you say! But, on the real T-15 the headlights are actually multi-lens halogen type lights in a single housing. This is obviously a limitation of simple clear plastic parts. My solution is to use the inexpensive and yet detailed Voyager Model headlight/taillight set for the Takom T-14 Armata. Voyager has created the look of the multiple lenses by using what appear to be a metal background and an epoxy overcoat. I am hoping they are the same size and a swap can occur. On a side note the Voyager Model set for the T-15 Armata should be out now and hitting stores soon. They do provide replacement headlights but they only appear to be a PE base with etched multiple lenses. I am not sure if the same effect can be obtained as the T-14 lenses. We shall see as I have ordered both sets.

The hull add-on armour components are large but quite simple and I’ll cover them next.

Here are images of the photoetch parts and the clear plastic parts. Most of the PE parts are used on the upper hull.


LeoCmdr
Visit this Community
Alberta, Canada
Joined: January 19, 2005
KitMaker: 4,085 posts
Armorama: 3,917 posts
Posted: Wednesday, September 21, 2016 - 01:05 AM UTC
Here are a couple of images showing the APS components on the T-15.

You can see the retaining wires on the sensor covers I mentioned and the multi-lens headlights in the first image.

You can also see in the first image how the 12 tubes in the Soft Kill APS are staggered slightly from the top to bottom tubes. Panda got this detail correct on their T-15 Armata. Missing from the kit is cabling running from the rear hull sensor to the upper hull.

It is difficult to see in these images but there is also some type of optical system mounted in the hull turret superstructure to the rear of the side mounted APS sensors. These optics appear on both sides of the superstructure and are angled at about 45 degree to the rear. Could these be additional sensors or part of an external camera system for increased crew situational awareness?


LeoCmdr
Visit this Community
Alberta, Canada
Joined: January 19, 2005
KitMaker: 4,085 posts
Armorama: 3,917 posts
Posted: Thursday, September 29, 2016 - 10:21 AM UTC
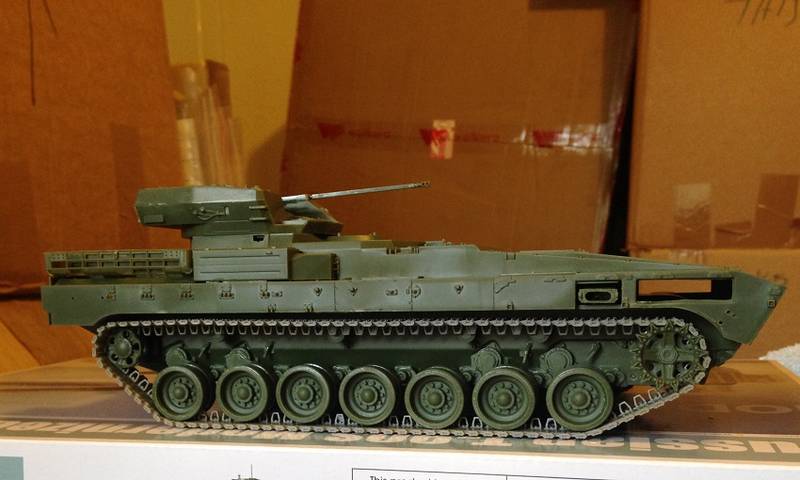
The hull passive armour components add even more to the already bulky size of the T-15 Armata.

Designed to reduce the ability for those nasty shaped charge warheads to spray hot molten metal and shrapnel all over the crew and Infantry the add-on armour modules flank the entire hull sides and frontal arc.

The kit parts depicting the add-on armour components are well detailed from bolts to hinges to mounting brackets. Panda did a great job of including a good amount of detail while keeping the assembly process quite simple.

The side hull armour components are broken down into the right and left side armour. There are only four parts for each of the left and right side armour sections.

There is a main part that will run the length of the hull. Integrated into the part is the rubberized side skirt. What I like about the side skirt is that it includes small but well molded hinge and pin detail at each section that a molded in wave appearance is present giving it a more realistic look. Added to the rear of the main part is a support piece. This piece will aid in supporting and placing the third and fourth parts. The third part is a small section of add-on armour that sits along the upper rear side hull. Panda could have chosen to mold this part into the main part but did not. I suspect it was to add an additional level of detail as the fourth part is the rear mounting bracket for the third part. Remember the small support arms that I mentioned that are to be attached to the hull for the add-on armour? Well, the fourth part which is the rear mounting bracket is designed to take those three small support arms. Again, be careful when attaching the support arms as they are delicate and if they are not at the correct downward angle they might not attached properly to the mounting bracket.

Once the four parts are assembles locating pins in the main part line up with holes on the hull side. The support arms attach to the mounting bracket and the big slabs of add-on armour are attached to the hull sides.

Side hull armour details...I do like the retaining pin detail on the side skirt sections.


The sharply angled frontal armour is the next component to be assembled and attached to the hull.

The frontal armour consists of:
1. Upper glacis plate armour panel part
2. Lower front hull armour panel part
3. Side angle armour parts
4. Tow cable and related parts
5. Headlights and guards
6. Counter- IED devices (not confirmed)

The upper glacis plate armour panel requires only the headlights and guards to be added. I have previously addressed the inaccuracy of the headlights. Having now received the Voyager Model T-14 Armata MBT headlight set I do believe that this small and inexpensive headlight set is a good option for replacement headlights.

The lower hull part requires towing points and the tow cable with mounting brackets to be attached in order for it to be complete. It is a positive that Panda has provided the tow cable as braided metal cable instead of string. You have to be careful and not jump the gun and attach the tow cable ends right away. First you need to slip on the two mounting brackets. Don’t glue the brackets in place and let them slide freely along the cable. This will aid in the correct placement and attachment to the lower hull part mounting holes.

The point angled side armour parts have angle support frames that attach to the left and right parts prior to attachment to the components.

The upper and lower parts mate together and the side angled parts are added to provide a solid single beak like component that essentially slides on to the front of the hull and attaches to two slots in the glacis plate.

What I believe to be Counter-IED devices look like two large H shaped components. Two grab handles are added to each part and they are simply attached to the lower front hull. When looking at the parts it looks like these components can be removed or lowered from the lower front hull stowed position. They are hinged on the bottom and look like they have some type of articulating arms internally. They are held in place by a single rotating clamp. If they are ECM devices they may travel at or near ground level when deployed or lowered. The grab handles would assist in lowering the raising the components. If anyone has more information please do tell.

The final parts to be added to the hull sides are the downward angled add-on armour components providing protection to the engine exhaust areas. The left and right armour panels fit into locator points on the hull side and utilize three support rods to hold them in place. The instructions show the assembly process with the hull place upside down as this will probably greatly assist with the proper placement of the support arms. We will have to see if the lack of proper exhaust shroud makes a difference with these angled parts in place.

However, at least one image exists without the angled shroud...so what is accurate is in the eye of the beholder...or the builder in this case.


The hull assembly comprises of 15 steps of the 19 step instructions.

Upper front hull armour component with headlight mounts and integrated wiring.


Lower front hull add-on armour with mounting points for the front tow cable.


Angled side armour components.


H shaped Counter-IED device.


Add-on armour panel for exhaust area protection. Note that there is some visible flash on the small details.


The high tech remote turret is next so buckle up!

LeoCmdr
Visit this Community
Alberta, Canada
Joined: January 19, 2005
KitMaker: 4,085 posts
Armorama: 3,917 posts
Posted: Sunday, March 12, 2017 - 04:05 AM UTC
After a long hiatus from this build blog I am going to kick it off again. Modelling is a hobby and it is meant to be fun. Unfortunately real life gets in the way and that must become a priority. I completely understand the desire of the Armorama staff to want things done in a timely manner and for model producers to want to highlight their products. Fear not, I will complete this modelling build blog!

The massive T-15 Armata is adorned with active and passive defence capabilities on the hull. Moving to the turret the T-15 goes on the offensive from the turret design all the way up to the incredible amount of firepower that is sporting.

The Bumerang-BM or Epoch turret is controlled by the crew sitting in the armoured modules in the hull. There are no crew members positioned in the turret itself. This is not ground breaking by any means but it adds another dimension to crew survivability and the heavy reliance on fire control and targeting technology in order to ensure the integration of all the weapons systems.

The combination of guns and missiles on the turret gives the T-15 an almost space age look considering the long legacy of generic looking turrets used on the BMP and BMD series of AFVs. But, why mess with something that works should be said of the 30 mm 2A42 auto cannon. The 2A42 cannon has been in use since the 1970s on the BMP-2, BMD-2, BMD-3, BTR-90, BMPT, BTR-T, and the Kurganets-25. The dual feed system for firing both HE-T and AP-T rounds is surely a menace for light AFVs, soft skin vehicles, and helicopters. This is a no nonsense very durable cannon mounted in this high tech turret.

The kit provides the auto cannon as a one piece mould that includes a barrel jacket and a good attempt on moulding the holes in the muzzle brake. This greatly increases the level of detail and makes additional detailing a whiz.


LeoCmdr
Visit this Community
Alberta, Canada
Joined: January 19, 2005
KitMaker: 4,085 posts
Armorama: 3,917 posts
Posted: Sunday, March 12, 2017 - 04:06 AM UTC
Coaxial mounted is the PKT 7.62 mm machine gun. This is the vehicle mounted version of the venerable PK general purpose machine gun used since the 1960s in Soviet and Russian AFVs.

The kit provides the PKT machine gun as a small moulded piece with a flared muzzle and somewhat soft details on the cooling jacket.

LeoCmdr
Visit this Community
Alberta, Canada
Joined: January 19, 2005
KitMaker: 4,085 posts
Armorama: 3,917 posts
Posted: Sunday, March 12, 2017 - 04:09 AM UTC
The turret on the T-15 is definitely low profile compared to the hull. The kit build of the turret consists of steps 16 to 19. Only three steps? Well, not quite, as the turret build continues there are multiple sub steps to build the dual Kornet missile launchers and add all the optics and sensors to the turret.

The basic assembly of the turret consists of a top and bottom. There are a couple of access hatches on the turret top but these are moulded shut. Several antennas are added to the turret and one could surmise they are a combination of radio and GPS antennas. The two antennas on the turret rear actually fold down inwards to stow them on the real vehicle and this might actually be an option on the model given the way the antenna base and frame come together.

Parts E6/E7 and E36 come together to create what appears to be another set of optical sensors that attach to the right and left rearward sides of the turret. In none of my reference images can I find these components actually attached to the turret. In both walkaround and parade images there are four mounting bolts visible where these sensors would likely attach. You’ll have to decide whether to use them or removed the mounting plate mould on the turret and add the bolt details. It is not to say that there is an accuracy issue here but perhaps these sensors are retrofitted for operational use.


LeoCmdr
Visit this Community
Alberta, Canada
Joined: January 19, 2005
KitMaker: 4,085 posts
Armorama: 3,917 posts
Posted: Sunday, March 12, 2017 - 04:13 AM UTC
For long range punching power the turret of the T-15 Armata has two dual missile launchers. Statically mounted on both turret sides these missiles are modern day tank killers. The Kornet anti-tank guided missile began its use with Russian forces in the late 1990s. What is unique about this missile is that it is a fire and forget missile. With a vehicle as big as the T-15 this is a very important asset rather than having to sit static and optically track a missile to the target. Even more impressive is that the Kornet missile can be fired in salvos…i.e…more than one missile at the same target or different targets at the same time. This makes defeating an incoming Kornet missile even harder for passive and active defence systems. Using laser beam riding technology the Kornet missile can travel to impressive ranges to kill tanks. It is suspected that the Kornet-EM missile, which was demonstrated in 2013, can reach ranges up to 10,000 metres. This far out guns any main battle tank in the world.

The kit steps 17 and 18 cover off the assembly of the right and left side Kornet missile pods. The missile tubes themselves are split down the middle so you will encounter some seam lines. Luckily, pretty much all of the missile tubes themselves are covered upon assembly. Added to the end of the tube are end caps. The tubes attach to a multi-piece launcher frame. There is a sizeable photo etch cover provided for both pods. This is a great addition and adds detail over a plastic mould cover. There are even tiny rows of holes in each cover. There is an issue with the PE parts. Each PE part requires three folds in order to create the correct shape of the cover. The parts do a half decent job of defining two of the fold locations but are void of exactly where to make the third bend. The instructions, if studied correctly, give an indication were the fold should be by examining the bolt details on the part. But, there is no room for error with the folds as the part must fit properly on the missile tubes and the launcher frame.

The missile pods attach to the turret sides in step 19. On the real T-15 there are visible electrical cables that run from the turret sides and into the crevices of the launcher frames. Panda did not totally omit this detail and included cables moulded on to the side of the turret. This is better than not including anything but the moulded on detail does not really give the 3D effect of the actual cables. The moulded on cables also end at the attachment point of the launcher frames when in fact they continue to snake into the frame on the T-15.


LeoCmdr
Visit this Community
Alberta, Canada
Joined: January 19, 2005
KitMaker: 4,085 posts
Armorama: 3,917 posts
Posted: Sunday, March 12, 2017 - 04:16 AM UTC
The auto cannon and coax also attach to the turret in step 19 (it is a busy step). The instructions show a mantlet void of any type of cover.

The real T-15 has a rubberized type mantlet cover with plenty of wrinkles and flexibility. However, when you look at the part on the sprues it does in fact have a cover. It is not the best moulded on cover but it is there.

It would not be too hard to enhance the cover shape with some epoxy putty. The mantlet does not move once attached. The gun cannot elevate or depress.


 _GOTOTOP