

Hosted by Richard S.
Poland 1939
Removed by original poster on 04/15/17 - 02:21:32 (GMT).
Removed by original poster on 04/15/17 - 02:23:53 (GMT).
Removed by original poster on 04/15/17 - 02:24:34 (GMT).

d6mst0

#453

Joined: August 28, 2016
KitMaker: 1,925 posts
Armorama: 601 posts

Posted: Friday, April 14, 2017 - 07:37 AM UTC
Time to do a update on my builds. The Panzer III Ausf B is all most finish. Just a few touch ups and some light weathering and she will be done.


The Panzer I is ready for decals. My first attempt at magic tracks was a total failure. I have a set of metal tracks coming in from China. Oh and I still have to add the 2M antenna and headlights.


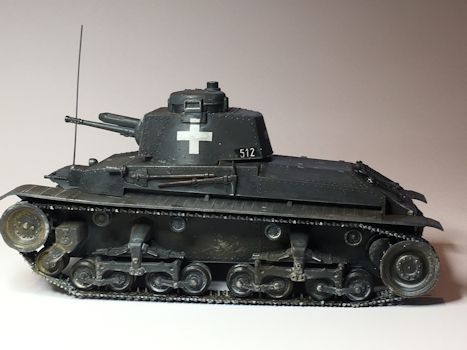
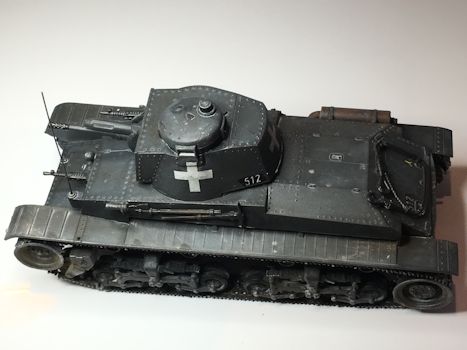
The Polish tankette is waiting on tracks, which I am the progress of painting. Should have them installed in a day or two. The kit didn't come with decals and all the pictures I seen don't show any unit or vehicle numbers. So I guess once the tracks are on its done.
Marcus


The Panzer I is ready for decals. My first attempt at magic tracks was a total failure. I have a set of metal tracks coming in from China. Oh and I still have to add the 2M antenna and headlights.
The Polish tankette is waiting on tracks, which I am the progress of painting. Should have them installed in a day or two. The kit didn't come with decals and all the pictures I seen don't show any unit or vehicle numbers. So I guess once the tracks are on its done.
Marcus

Hudson29
#460
Joined: September 16, 2014
KitMaker: 1,156 posts
Armorama: 1,024 posts
Posted: Monday, April 17, 2017 - 05:42 AM UTC
Marcus - Thanks for the updates, you Panzer III came out well, great job! These were alway among my favorite AFVs.
What happened to the Magic Tracks? I have a number of kits with these but haven't had the courage to try them yet. You can't go wrong with metal, they drape right thanks to gravity and you can get just the right number of track links to make the sag look just the way you want it.
That tankette is a cute little thing. Are you using the kit tracks? I can't recall having ever seen any AM tracks for them.

RadekZ

Joined: March 12, 2013
KitMaker: 125 posts
Armorama: 36 posts
Posted: Tuesday, April 18, 2017 - 01:18 AM UTC
Hello guys,
I see a lot of cool builds around Nice progresses out there.
Mark, what paints did you use on your TKS tankette?
Update #2
It's been a while since I did some progress with 7TP. But finally I can post "something".
Another tough thing in progress - attempting to fit the metal barrel. The one from Aber is universal and can be used both for 7TP and Polish AT gun. It causes barrel is too long for 7TP and must be treated with additional work. So I had to drill the mounting to fit the gun into the port. It now looks like that:

It wouldn't be easy to find out how long barrel should "stick" out of the mounting, but fortunately we have a little hint from Mirage themselves (I hope it was intentional ). There's a piece of coloured sheet showing camo pattern included in the box. I made a discovery that the vehicle on the picture is actually in scale version and fits perfectly to hull and turret, so it's easy to find out the correct placement, like that:

Well... mine is misaligned by 1mm ... or little more... But I call it within error limits
I'm not much of a rivet counter guy, but I hated fact Mirage failed to mould rivets on sides of the turrent while the top had them... So... my wallet bled, because I bought Aber PE set for 7TP (the same one Pawel used in his build):

I hope it won't end up like my last attempt in using PE parts where I bought full set of PE for PzKpfw III and used ... 2 easy to fit parts only
I tried first elements on sides of turret... Little messy with CA glue, but fit is okay.
Here's the picture of turrent at current stage (on pile of my backup plan for this campaign in case I fail miserably with 7TP ):

Cheers,
Radek
I see a lot of cool builds around
Nice progresses out there. Mark, what paints did you use on your TKS tankette?
Update #2
It's been a while since I did some progress with 7TP. But finally I can post "something".
Another tough thing in progress - attempting to fit the metal barrel. The one from Aber is universal and can be used both for 7TP and Polish AT gun. It causes barrel is too long for 7TP and must be treated with additional work. So I had to drill the mounting to fit the gun into the port. It now looks like that:
It wouldn't be easy to find out how long barrel should "stick" out of the mounting, but fortunately we have a little hint from Mirage themselves (I hope it was intentional
). There's a piece of coloured sheet showing camo pattern included in the box. I made a discovery that the vehicle on the picture is actually in scale version and fits perfectly to hull and turret, so it's easy to find out the correct placement, like that:Well... mine is misaligned by 1mm ... or little more... But I call it within error limits
I'm not much of a rivet counter guy, but I hated fact Mirage failed to mould rivets on sides of the turrent while the top had them... So... my wallet bled, because I bought Aber PE set for 7TP (the same one Pawel used in his build):
I hope it won't end up like my last attempt in using PE parts where I bought full set of PE for PzKpfw III and used ... 2 easy to fit parts only
I tried first elements on sides of turret... Little messy with CA glue, but fit is okay.
Here's the picture of turrent at current stage (on pile of my backup plan for this campaign in case I fail miserably with 7TP
):Cheers,
Radek

ClaytonFromEllijay
#454
Joined: July 10, 2016
KitMaker: 1,273 posts
Armorama: 1,138 posts
Posted: Tuesday, April 18, 2017 - 01:48 AM UTC
Radek, your 7TP is coming along very well, you may not need a Back-up plan!
supplyssg
Joined: February 04, 2003
KitMaker: 82 posts
Armorama: 71 posts

Posted: Tuesday, April 18, 2017 - 06:45 AM UTC
Tamiya, 3T Cgo Trk (Opel Blitz), 1/35th
Hey Guys
Well, it's been awhile since I last updated back in January, I think; and, finding myself back in the old routine again - getting all OCD over builds that should just be plain, simple and fun...but Noooo! ...I just can't ever allow myself to that.
I found myself at the point were it's time to assemble the cab, and as I planned, to keep this build simple. I decided to keep the doors assembled simply closed with just the windows open for viewing of the interior. But, now it's time to dig out the paints and decide on the details and accessories to be added because once this cab is assembled there's no accessing it ever again.
Well, painting and detailing and procrastinating away I've been for the last few months...and now it's time to get off the pot or I'll never get this project done and another one will be added to the dungeon of unbuilt kits.
So, below are some not so recent pics of details I now realize will be only somewhat viewable through the tiny 1"x1-1/2" door windows of the finished Blitz....haha...finished!
However this has proved a kind of double edged sword for me after such a long hiatus. Though not very viewable once assembled, except for these digital pics for reference, this assembly has allowed me to experiment with a lot of the new mediums now available that previously I ignored or was never aware of. I have played with acrylics which I previously considered taboo and have also purchased a bunch of Mig and Vallejo pigments and washes, etc. which are new to me and fun to work with. Overall, this cab interior has allowed me the opportunity to stretch my sea legs, so to speak, with a hobby I've long been out of touch with.
Below are some pics of the interior I've dicked around with for long to long and will assemble this week once and for all and continue on with this supposed simple build.
ClaytonFromEllijay
#454
Joined: July 10, 2016
KitMaker: 1,273 posts
Armorama: 1,138 posts
Posted: Tuesday, April 18, 2017 - 06:54 PM UTC
You're right, Richard, it is a shame you won't be able to see some of the detailed interior after the cab goes together, but thanks to the photos, we did see them! And your attention to detail is great! Beautiful work. 
RadekZ
Joined: March 12, 2013
KitMaker: 125 posts
Armorama: 36 posts
Posted: Wednesday, April 19, 2017 - 11:43 AM UTC
Quoted Text
Radek, your 7TP is coming along very well, you may not need a Back-up plan!
Clayton,
I hope it does. If I'm forced to switch to Braille scale my eyes will bleed
Cheers,
Radek
tread_geek

Joined: March 23, 2008
KitMaker: 2,847 posts
Armorama: 2,667 posts
Posted: Wednesday, April 19, 2017 - 08:06 PM UTC
Greetings all! Been a bit but unfortunately non-hobby concerns have seriously monopolized my time and impacted progress of my build. However, I have made a bit of progress but this kit keeps throwing curve balls at me!  Parts fit is less than stellar, to be kind and filing and/or sanding are far from uncommon.
First issue was the drivers' compartment hatches. The "indents" on the side pieces were far too shallow to support the hatch plates. A judicious use of Evergreen styrene strips helped rectify the situation.


Next up was the placement of a couple of parts on the rear plate. Location features for these parts were all but non-existent.

Here's a couple of images of the driver's hatches and please note the spaces top, centre and bottom caused by the poor fit. I'll need to fill these spaces with prepared strips of plastic so it can look correct.


Cheers,
Jan

Been a bit but unfortunately non-hobby concerns have seriously monopolized my time and impacted progress of my build. However, I have made a bit of progress but this kit keeps throwing curve balls at me! Parts fit is less than stellar, to be kind and filing and/or sanding are far from uncommon.First issue was the drivers' compartment hatches. The "indents" on the side pieces were far too shallow to support the hatch plates. A judicious use of Evergreen styrene strips helped rectify the situation.
Next up was the placement of a couple of parts on the rear plate. Location features for these parts were all but non-existent.
Here's a couple of images of the driver's hatches and please note the spaces top, centre and bottom caused by the poor fit. I'll need to fill these spaces with prepared strips of plastic so it can look correct.
Cheers,
Jan

ltb073
Joined: March 08, 2010
KitMaker: 3,662 posts
Armorama: 3,078 posts
Posted: Friday, April 21, 2017 - 07:42 PM UTC
Nice work Richard
I am making some progress on my RAD 8


Hope to get more done this weekend
I am making some progress on my RAD 8


Hope to get more done this weekend

d6mst0
#453
Joined: August 28, 2016
KitMaker: 1,925 posts
Armorama: 601 posts
Posted: Friday, April 21, 2017 - 08:45 PM UTC
Paul,
As for the magic tracks, I finished assembling the tracks for each side I forgot to installed them on the tank before the glue cured. They would not bend enough to look natural around the sprockets, rollers and idlers no matter how much I tried. Lesson learned.
Marcus
As for the magic tracks, I finished assembling the tracks for each side I forgot to installed them on the tank before the glue cured. They would not bend enough to look natural around the sprockets, rollers and idlers no matter how much I tried. Lesson learned.
Marcus
d6mst0
#453
Joined: August 28, 2016
KitMaker: 1,925 posts
Armorama: 601 posts
Posted: Friday, April 21, 2017 - 08:55 PM UTC
Radez,
I used Vallejo paints model air paints, Dark Yellow for the base, Russian Green, Tank Ochre and Hull Red.
I used Vallejo paints model air paints, Dark Yellow for the base, Russian Green, Tank Ochre and Hull Red.
d6mst0
#453
Joined: August 28, 2016
KitMaker: 1,925 posts
Armorama: 601 posts
Posted: Friday, April 21, 2017 - 08:59 PM UTC
Everyone,
Great work going on in this campaign. Really enjoying the detail and effort everyone is doing. I have really glad I signed up.
Marcus
Great work going on in this campaign. Really enjoying the detail and effort everyone is doing. I have really glad I signed up.
Marcus
ltb073
Joined: March 08, 2010
KitMaker: 3,662 posts
Armorama: 3,078 posts
Posted: Sunday, April 23, 2017 - 01:53 AM UTC
Quoted Text
Hope to get more done this weekend
And I did This is what it currently looks like


LinusB

Joined: March 21, 2016
KitMaker: 247 posts
Armorama: 126 posts

Posted: Monday, April 24, 2017 - 06:07 PM UTC
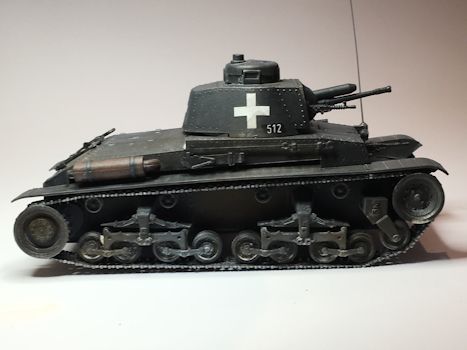
My completed Pz.Kpfw. 35(t)
ClaytonFromEllijay
#454
Joined: July 10, 2016
KitMaker: 1,273 posts
Armorama: 1,138 posts
Posted: Monday, April 24, 2017 - 07:25 PM UTC
Very good work, Linus, that exhaust looks great!
supplyssg
Joined: February 04, 2003
KitMaker: 82 posts
Armorama: 71 posts
Posted: Tuesday, April 25, 2017 - 05:56 AM UTC
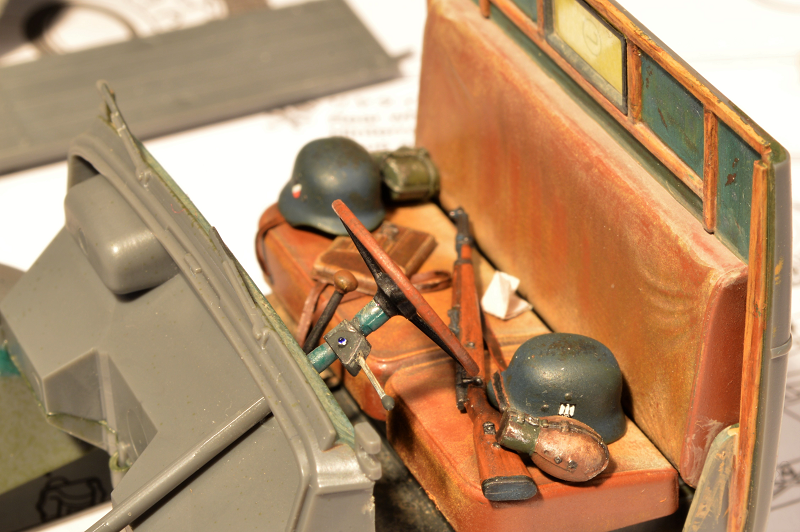
Tamiya, 3T Cgo Trk (Opel Blitz), 1/35
Hey Guys
My civilian impressed Opel Blitz cab is finally assembled, glued and set!
Didn't have time to "nail the lid on the coffin" by gluing roof and doors in place but I'll will get that done tomorrow. Meanwhile this interior is more than done in my book!
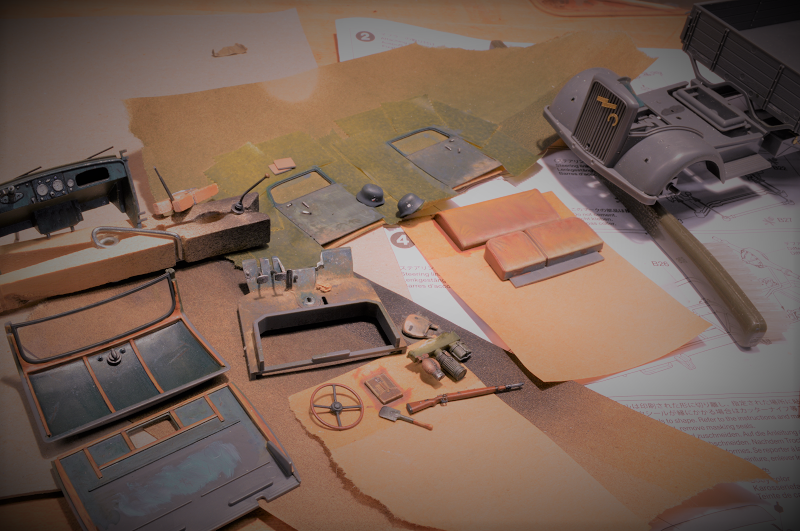
Below: is an overhear cab view. Bread bag appears a little bright in the pic so I toned it down with some pigments and washes, why? ...I don't know. With the lid dry fitted in place the floor boards are too dark and virtually featureless.
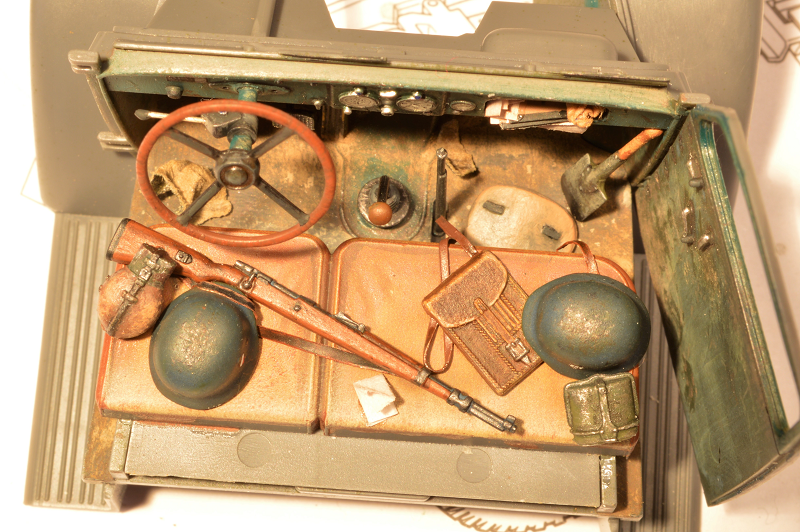
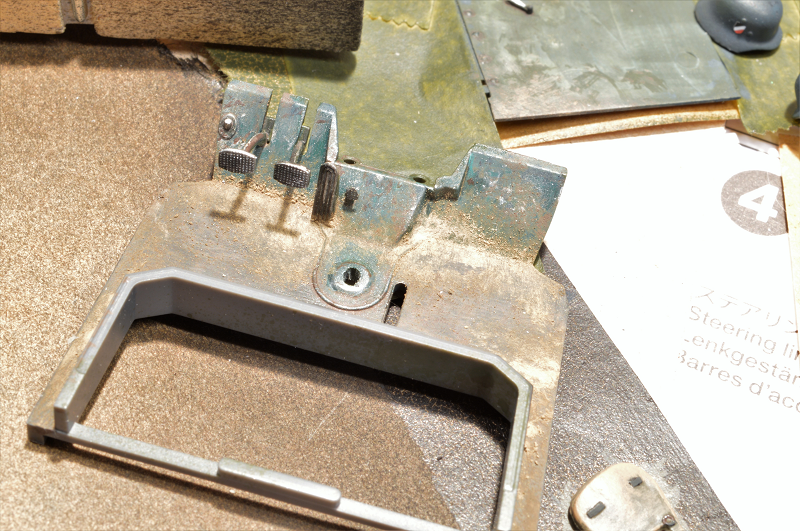
Below: This shot shows some of the details added to Tamiya's doors. The fiberboard door panels which cover the mechanical components of the window cranks and door levers need to be scribed into the otherwise featureless interior. I did this just under the window opening by dragging a razor saw to simulate the panel seem as seen in actual restorations...also small dabs of superglue was used to simulate fasteners at the forward edge of the door panel as seen in the same photos.

Below: Driver side door view with kit window in place for masking only. I will display this vehicle with windows fully retracted but will use the kit windows for masking while painting the exterior and will pop out later.
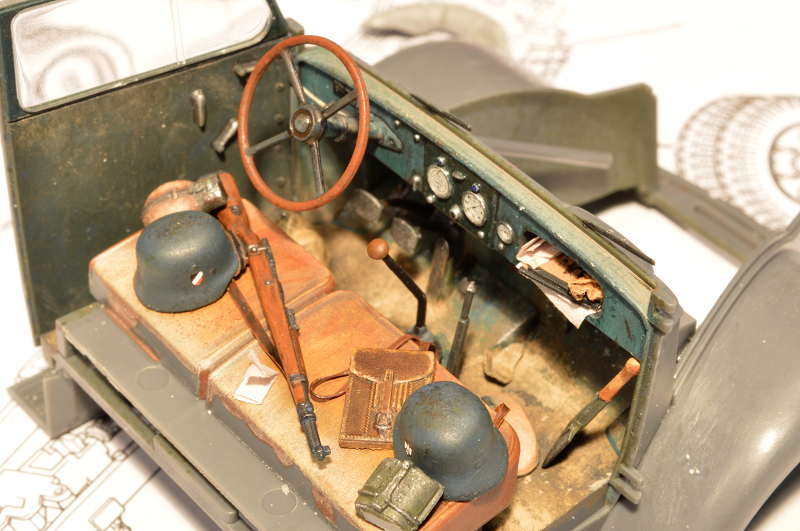
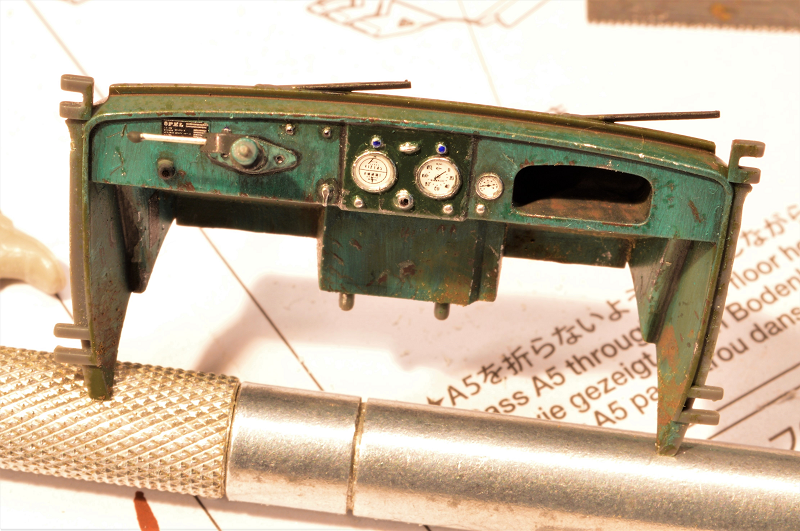
Below: I'm pretty happy with the helmet details in the shot and the civilian green interior dash is highlighted along with a more upper end civilian wood grained steering wheel and gear shift knob.
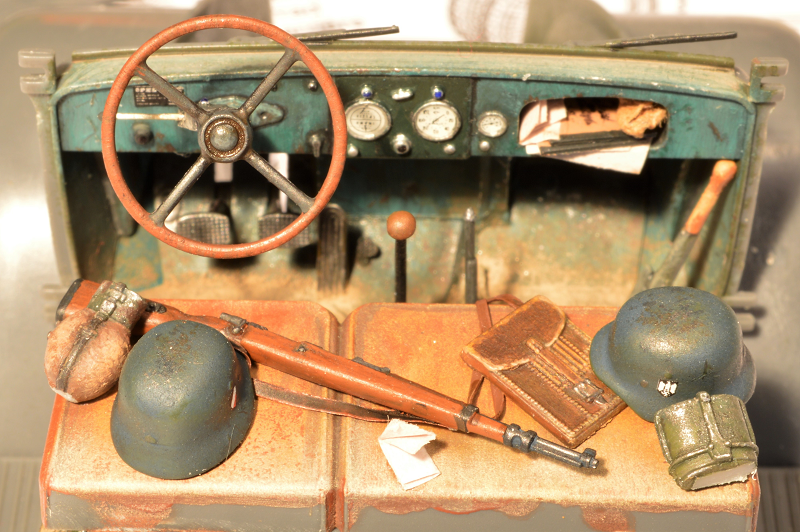
Below: Same view as above only with clear dash and floor board detail with a view of a realistically clutter glove box with fabricated operator/maint manuals I found online.
There are obvious sprue cuts on the canteen and mess tin that I'm not concerned about as they will be unseen with the seat back in place. I had also painted and planned on a gas mask canister to be placed among the clutter but I just got too lazy to fabricate another lead foil strap.
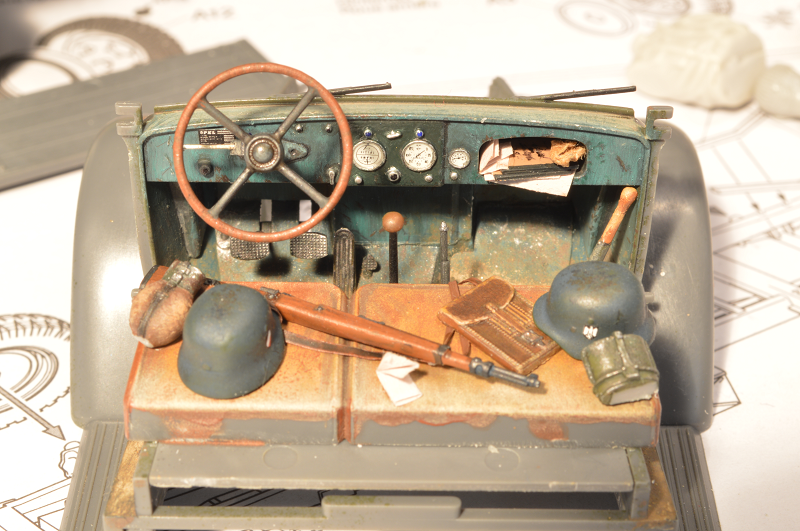
Below: Seat back and rear cab assembly in place. I was surprised to find after researching this vehicle the cab framework was wood and not stamped metal as I had just assumed. Many vehicle restorers highlighted this by choosing not to paint over the wood; but highlight it with stain and lacquer. I chose to do the same here; whether this was a civilian option or not, I do not know, but figured it would be a unique representation that I will probably not have an opportunity to do again.
Below: A view of a little feature I am particularly happy with! The signal light actuator is fabricated from the kit steering column. Tamiya's engine compartment is totally featureless, yet the steering wheel is installed with an entire steering column which ends with a fairly detailed steering control box, serving no purpose what so ever. Well, the angles and shape just couldn't just go unseen, so I cut, drilled and sanded it into what I thought would make an interesting and convincing civilian column signal light switch. The indicator light is a dab of superglue with a Testors MM chrome bezel and artist oil's ultramarine lens.
I went with blue lenses on the dash and switch only because I seen this on many Blitz restoration. All U.S. vehicles I am familiar with are usually red or green with an occasional yellow. However most all the restoration vehicles I have seen online were blue. Is this a German or European feature? Or, is it just a coincidence?

Hey Guys
My civilian impressed Opel Blitz cab is finally assembled, glued and set!
Didn't have time to "nail the lid on the coffin" by gluing roof and doors in place but I'll will get that done tomorrow. Meanwhile this interior is more than done in my book!
Below: is an overhear cab view. Bread bag appears a little bright in the pic so I toned it down with some pigments and washes, why? ...I don't know. With the lid dry fitted in place the floor boards are too dark and virtually featureless.
Below: This shot shows some of the details added to Tamiya's doors. The fiberboard door panels which cover the mechanical components of the window cranks and door levers need to be scribed into the otherwise featureless interior. I did this just under the window opening by dragging a razor saw to simulate the panel seem as seen in actual restorations...also small dabs of superglue was used to simulate fasteners at the forward edge of the door panel as seen in the same photos.
Below: Driver side door view with kit window in place for masking only. I will display this vehicle with windows fully retracted but will use the kit windows for masking while painting the exterior and will pop out later.
Below: I'm pretty happy with the helmet details in the shot and the civilian green interior dash is highlighted along with a more upper end civilian wood grained steering wheel and gear shift knob.
Below: Same view as above only with clear dash and floor board detail with a view of a realistically clutter glove box with fabricated operator/maint manuals I found online.
There are obvious sprue cuts on the canteen and mess tin that I'm not concerned about as they will be unseen with the seat back in place. I had also painted and planned on a gas mask canister to be placed among the clutter but I just got too lazy to fabricate another lead foil strap.
Below: Seat back and rear cab assembly in place. I was surprised to find after researching this vehicle the cab framework was wood and not stamped metal as I had just assumed. Many vehicle restorers highlighted this by choosing not to paint over the wood; but highlight it with stain and lacquer. I chose to do the same here; whether this was a civilian option or not, I do not know, but figured it would be a unique representation that I will probably not have an opportunity to do again.
Below: A view of a little feature I am particularly happy with! The signal light actuator is fabricated from the kit steering column. Tamiya's engine compartment is totally featureless, yet the steering wheel is installed with an entire steering column which ends with a fairly detailed steering control box, serving no purpose what so ever. Well, the angles and shape just couldn't just go unseen, so I cut, drilled and sanded it into what I thought would make an interesting and convincing civilian column signal light switch. The indicator light is a dab of superglue with a Testors MM chrome bezel and artist oil's ultramarine lens.
I went with blue lenses on the dash and switch only because I seen this on many Blitz restoration. All U.S. vehicles I am familiar with are usually red or green with an occasional yellow. However most all the restoration vehicles I have seen online were blue. Is this a German or European feature? Or, is it just a coincidence?
ltb073
Joined: March 08, 2010
KitMaker: 3,662 posts
Armorama: 3,078 posts
Posted: Tuesday, April 25, 2017 - 06:29 AM UTC
Richard one word outstanding
supplyssg
Joined: February 04, 2003
KitMaker: 82 posts
Armorama: 71 posts
Posted: Tuesday, April 25, 2017 - 07:08 AM UTC
Thanks Sal!
I think I'll down all five of those beers ...along with a premium cigar!!!
I wish this site would give you a little more time to edit what you post. I didn't get a chance to clarify everything before I got locked out.
Anyhow, I see guys like you have some serious campaignage under your belts ...so I'd love the constructive critiques as I've got a lot of new mediums and techniques to catch up with you all who've got some serious ribbons on your chests!
LinusB
Joined: March 21, 2016
KitMaker: 247 posts
Armorama: 126 posts
Posted: Tuesday, April 25, 2017 - 12:08 PM UTC
Damn Richard that's great work, very envious.
RadekZ
Joined: March 12, 2013
KitMaker: 125 posts
Armorama: 36 posts
Posted: Tuesday, April 25, 2017 - 06:53 PM UTC
Well, well Richard! Not bad... not bad... or to be more precise ...
A M A Z I N G, jaws dropped when I saw the richness of details (btw. you owe me one dentist visit now ).
Linus, great finishing on Pz35(t).
A M A Z I N G, jaws dropped when I saw the richness of details (btw. you owe me one dentist visit now
). Linus, great finishing on Pz35(t).
ClaytonFromEllijay
#454
Joined: July 10, 2016
KitMaker: 1,273 posts
Armorama: 1,138 posts
Posted: Tuesday, April 25, 2017 - 06:58 PM UTC
Beautiful work, Richard! 

alewar

Joined: December 27, 2006
KitMaker: 773 posts
Armorama: 765 posts
Posted: Wednesday, April 26, 2017 - 02:27 AM UTC
Nice works around!
I start with the most funny part!.....


Regards from the south
Alvaro
I start with the most funny part!.....
Regards from the south
Alvaro
 |

WEB HOSTING BY


Copyright ©2021 Armorama and Kitmaker Network, a subsidiary of Silver Star Enterprises
All Rights Reserved. Please read our Conditions of Use and Privacy Policy.
All Rights Reserved. Please read our Conditions of Use and Privacy Policy.