

 I will build mine after I finish the Ursus A truck. By the way, good work.
Hosted by Richard S.
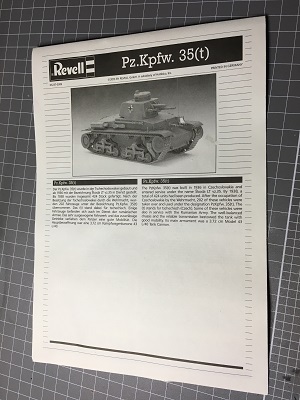
Poland 1939

Ranger74

Joined: April 04, 2002
KitMaker: 1,290 posts
Armorama: 658 posts
Posted: Friday, January 06, 2017 - 07:22 PM UTC
Stephen, thanks for building the tankettes before me..... I will build mine after I finish the Ursus A truck. By the way, good work.
I will build mine after I finish the Ursus A truck. By the way, good work.
ClaytonFromEllijay

#454
Joined: July 10, 2016
KitMaker: 1,273 posts
Armorama: 1,138 posts
Posted: Friday, January 06, 2017 - 08:24 PM UTC
Nice camo jobs on those, did you use a marker for the demarcations?
Bravo1102
Joined: December 08, 2003
KitMaker: 2,864 posts
Armorama: 2,497 posts

Posted: Saturday, January 07, 2017 - 10:49 AM UTC
Quoted Text
Nice camo jobs on those, did you use a marker for the demarcations?
Fine brush and thinned paint.
ClaytonFromEllijay
#454
Joined: July 10, 2016
KitMaker: 1,273 posts
Armorama: 1,138 posts
Posted: Saturday, January 07, 2017 - 07:42 PM UTC
Very nice work, and a very steady hand!

jaeger8

Joined: December 24, 2009
KitMaker: 22 posts
Armorama: 10 posts

Posted: Saturday, January 07, 2017 - 07:44 PM UTC
Hello everybody 
I'm in with this little fighter.


Regards
Darek
I'm in with this little fighter.
Regards
Darek
goofmuilwijk

Joined: April 19, 2013
KitMaker: 179 posts
Armorama: 117 posts
Posted: Sunday, January 08, 2017 - 01:20 AM UTC
Quoted Text
Very nice work, and a very steady hand!
Indeed. Very nice looking Stephen!!

YellowHammer

#513
Joined: March 28, 2006
KitMaker: 554 posts
Armorama: 172 posts
Posted: Sunday, January 08, 2017 - 04:56 AM UTC
Hey guys,
It's been a while since I checked in. I like the choices of kits you all have made and I'm enjoying watching your progress. I'm still plugging along on my gunnery training ship Mazur. Its a plucky little boat. Like its namesake it's been fighting me all the way. Overly thick railings, lack of locator pins, and very brittle decals for the boot stripe have given me some challenges. But I'm still enjoying the build, which is, after all, the whole point of model building. I'll try to post some in-progress photos soon. Thanks
John

Hudson29
#460
Joined: September 16, 2014
KitMaker: 1,156 posts
Armorama: 1,024 posts
Posted: Tuesday, January 10, 2017 - 04:28 AM UTC
Quoted Text
Fine brush and thinned paint.
The results speak for themselves. You are giving me some courage to try one of those camo jobs myself.
Your tankettes are coming together nicely. You mentioned adding rivets. How are you doing this? I see Archer has sheets of rivets in different sizes & scales. Do you have another method?
Hudson29
#460
Joined: September 16, 2014
KitMaker: 1,156 posts
Armorama: 1,024 posts
Posted: Tuesday, January 10, 2017 - 04:31 AM UTC
John - I look forward to seeing pictures of your Mazur. Even if it is a trial, the rewards of building such a historic vessel have to be satisfying.

LinusB

Joined: March 21, 2016
KitMaker: 247 posts
Armorama: 126 posts

Posted: Thursday, January 12, 2017 - 10:49 AM UTC
Here is the sprue layout of my Pz.Kpfw. 35(t)
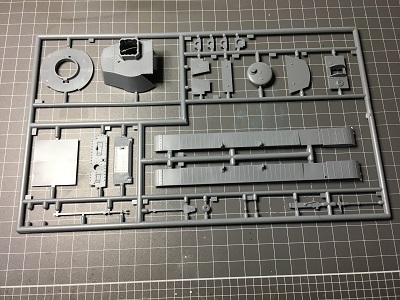
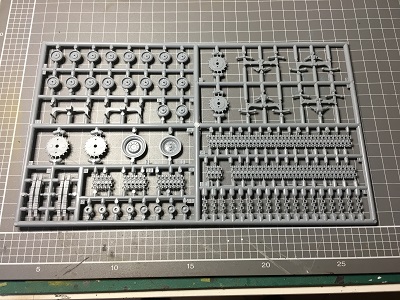
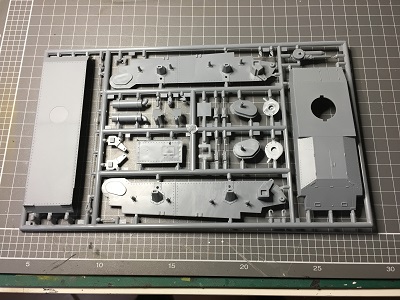
Looks fairly uncomplicated.
Looks fairly uncomplicated.
Bravo1102
Joined: December 08, 2003
KitMaker: 2,864 posts
Armorama: 2,497 posts
Posted: Thursday, January 12, 2017 - 11:59 AM UTC
Quoted Text
Quoted TextFine brush and thinned paint.
The results speak for themselves. You are giving me some courage to try one of those camo jobs myself.
Your tankettes are coming together nicely. You mentioned adding rivets. How are you doing this? I see Archer has sheets of rivets in different sizes & scales. Do you have another method?
The TK-3 with interior came with an extra hull and superstructure so I just transferred the rivets from the pieces I wasn't using.
Hudson29
#460
Joined: September 16, 2014
KitMaker: 1,156 posts
Armorama: 1,024 posts
Posted: Tuesday, January 17, 2017 - 12:35 AM UTC
Linus - That 38T does look clean. What scale is it?
Hudson29
#460
Joined: September 16, 2014
KitMaker: 1,156 posts
Armorama: 1,024 posts
Posted: Tuesday, January 17, 2017 - 12:37 AM UTC
Quoted Text
The TK-3 with interior came with an extra hull and superstructure so I just transferred the rivets from the pieces I wasn't using.
WoW! Did you shave them off with a razor blade? That sounds like a delicate process.
Ranger74
Joined: April 04, 2002
KitMaker: 1,290 posts
Armorama: 658 posts
Posted: Thursday, January 19, 2017 - 03:09 AM UTC
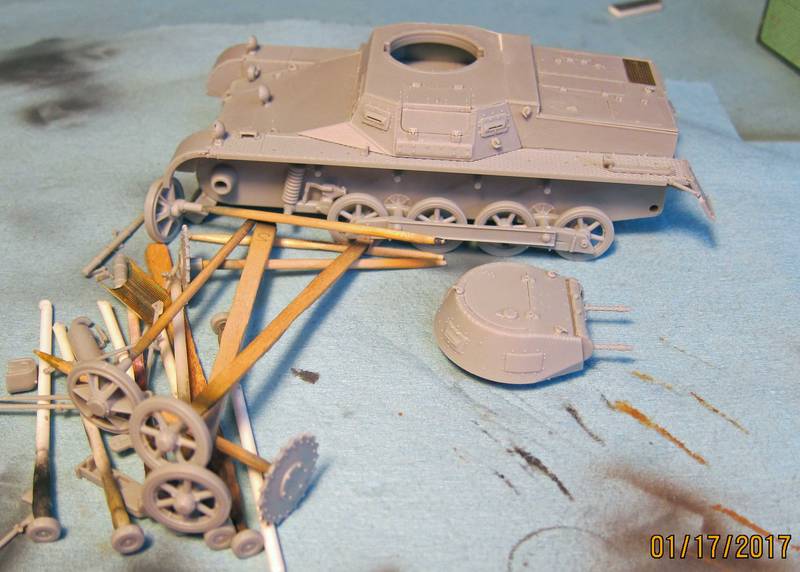
Been back from the Great White Northeast US for about a week. Got started back on the frame for my Ursus truck and discovered a problem with the geometry when test fitting the drive train. The front crossmember is between 1-2mm to far back from front of frame. I mounted the crossmember where the frame pieces have bolt heads on outside. Guess they were mislocated on the mold. Broke the right front park of frame so I have decided to take a break and start on the cargo load while I think how to correct the problem. The cargo with me a Polish TKS tankette, which is the most common cargo I have ssen on available photos of the Ursus truck.


TMoon
#152
Joined: December 07, 2002
KitMaker: 487 posts
Armorama: 441 posts
Posted: Thursday, January 19, 2017 - 05:10 AM UTC
The Pz I Aust B is ready for the paint booth.
TMoon
#152
Joined: December 07, 2002
KitMaker: 487 posts
Armorama: 441 posts
Posted: Thursday, January 19, 2017 - 09:05 PM UTC
After the paint booth and decals. Now on to weathering.
Ranger74
Joined: April 04, 2002
KitMaker: 1,290 posts
Armorama: 658 posts
Posted: Thursday, January 19, 2017 - 09:16 PM UTC
The TKS that will be carried on the back of the Ursus A came with a pretty complete interior. I do not think that the TKS would have open hatches while be transported. So, I decided to also build the TK-3, which is a predecessor to the TKS. It comes with a more open top and I decided to use the interior from the TKS in the TK-3. I started it this morning before the photo below. Hope that is not a problem.

Hudson29
#460
Joined: September 16, 2014
KitMaker: 1,156 posts
Armorama: 1,024 posts
Posted: Thursday, January 19, 2017 - 10:06 PM UTC
Quoted Text
The TKS that will be carried on the back of the Ursus A came with a pretty complete interior. I do not think that the TKS would have open hatches while be transported. So, I decided to also build the TK-3, which is a predecessor to the TKS. It comes with a more open top and I decided to use the interior from the TKS in the TK-3. I started it this morning before the photo below. Hope that is not a problem.
Not a problem at all. We are operating on the honor system and the newspapers & cell phones are really just to show intent. I'm sure we are all happy to see an extra model on your truck.
Hudson29
#460
Joined: September 16, 2014
KitMaker: 1,156 posts
Armorama: 1,024 posts
Posted: Thursday, January 19, 2017 - 10:08 PM UTC
Tom - Looking good! I am impressed with the hand painted look of the markings. Very impressive!
Ranger74
Joined: April 04, 2002
KitMaker: 1,290 posts
Armorama: 658 posts
Posted: Thursday, January 19, 2017 - 11:19 PM UTC
I have installed the interior into the TK-3 lower hull. It required a lot of test fitting of the upper hull parts to make sure it all fit. The instructions provided a top down drawing that was essential in locating all the parts.


Bravo1102
Joined: December 08, 2003
KitMaker: 2,864 posts
Armorama: 2,497 posts
Posted: Friday, January 20, 2017 - 07:28 AM UTC
Jeff, looking good on the interior. Deja vu all over again.
I had to constantly test fit the top hull to make sure everything fit in. There are a couple of interior schematics on the web which are easily found with Google.
I also never managed to get the gun rest to fit in with the gun breech installed.
I had to constantly test fit the top hull to make sure everything fit in. There are a couple of interior schematics on the web which are easily found with Google.
I also never managed to get the gun rest to fit in with the gun breech installed.
Ranger74
Joined: April 04, 2002
KitMaker: 1,290 posts
Armorama: 658 posts
Posted: Friday, January 20, 2017 - 08:05 PM UTC
Steve, Thanks. It required constant dry fitting of hull top before I glued anything. I mashed the kit gun barrel with a MG receiver that came in the interior kit as kit part had no receiver.
Ranger74
Joined: April 04, 2002
KitMaker: 1,290 posts
Armorama: 658 posts
Posted: Sunday, January 22, 2017 - 08:40 AM UTC
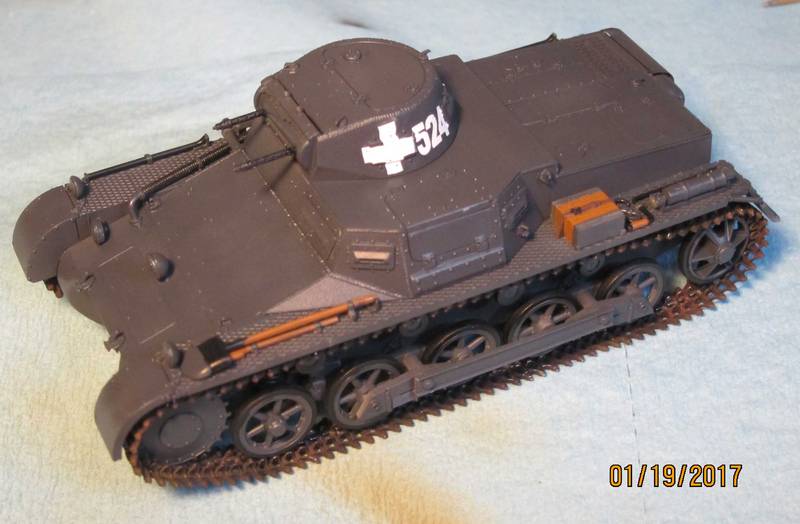
I have completed basic construction of the TKS and TK-3. Still need to add some lights, track, spare road wheels and the hatched on the TK-3. All that will go on after painting.
 I added the exhaust that runs from engine to exhaust on rear of super structure.
 Didn't notice the gap between the super structure and the fender. Will have to fix that.

 I added the exhaust that runs from engine to exhaust on rear of super structure.
 Didn't notice the gap between the super structure and the fender. Will have to fix that.
supplyssg
Joined: February 04, 2003
KitMaker: 82 posts
Armorama: 71 posts

Posted: Monday, January 23, 2017 - 05:40 AM UTC
Tamiya, 3T Cgo Trk (Opel Blitz), 1/35
Hey Guys!
Just a few pics of a dry-fit test run of those challenging Panzer Art wheels I outlined earlier. After all that modifying and guesswork, I'm actually pretty happy with the way the alignment within the wheel wells turned out.
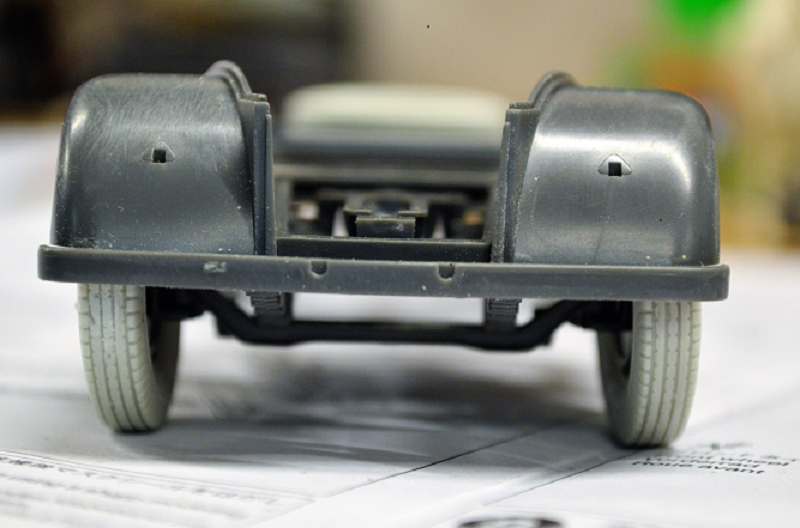
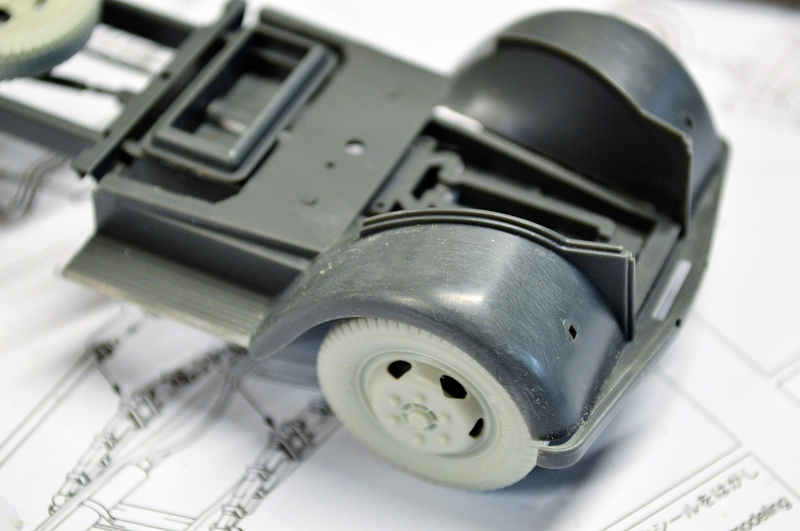
Tamiya's locator holes for tool mounts, Notek Lights, etc. had to be filled-in on the front fenders using my favorite old standby: superglue, accelerator and my wife's nail files.
When completed...just headlights mounted on these early war fenders.
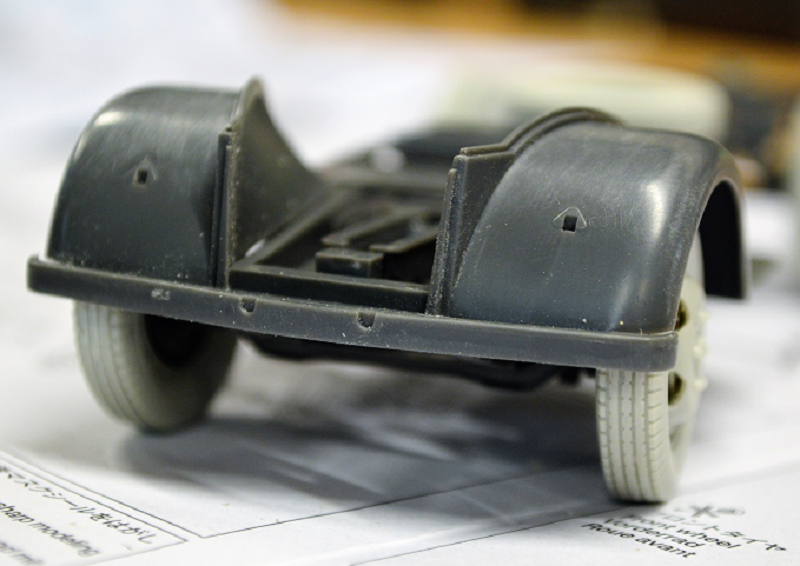
Below, some pics of the hydraulic and mechanical hand-brake lines. I had to put these on hold earlier when I realized I had a major wheel situation to tackle first.
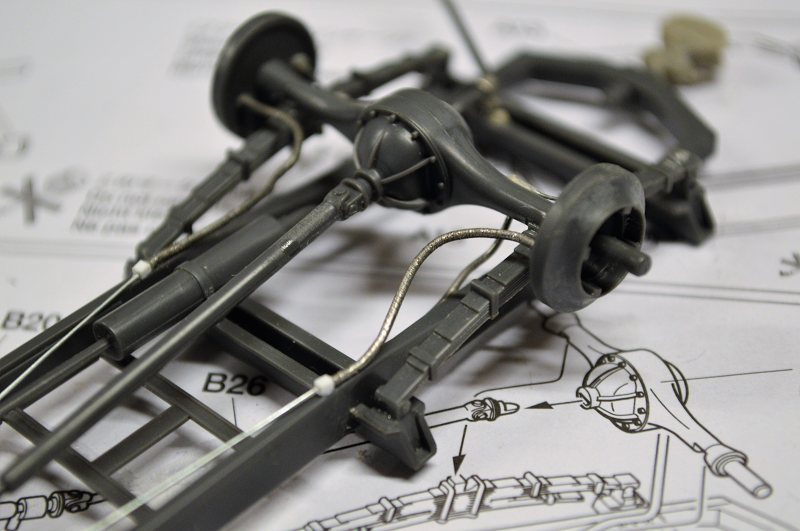

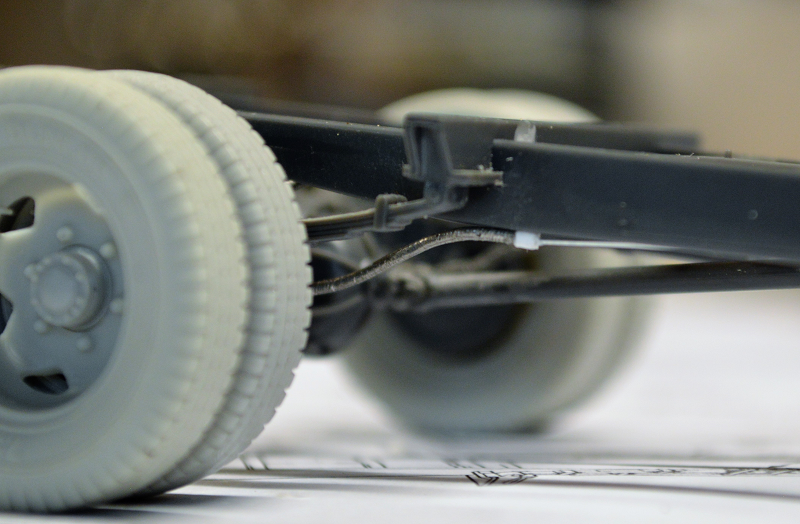
I'm happy with the way the hand-brake line came out along the frame as it's probably the only detail that will be easily viewable on the finished model anyhow.
As she sits overall, wheel assemblies worked out so far.
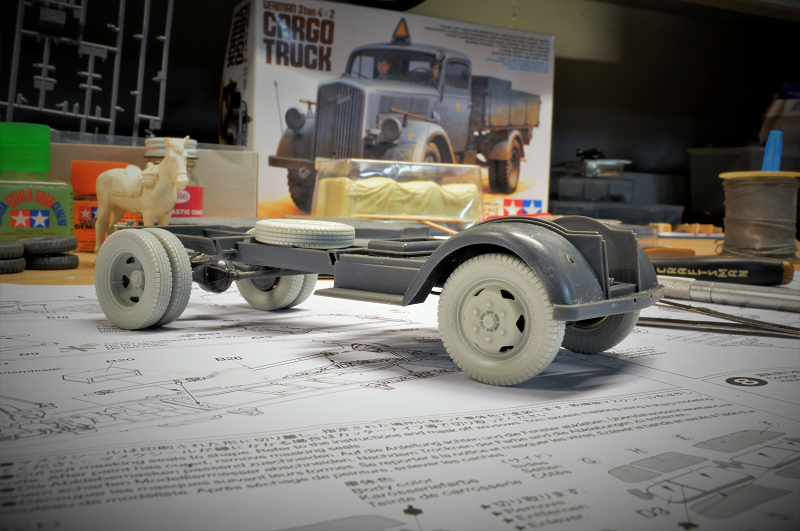
Currently working on the cab interior and finally breaking out some very old bottles of paint along with some of the new age stuff. Cab update just around the corner.
Later...for now!
Hey Guys!
Just a few pics of a dry-fit test run of those challenging Panzer Art wheels I outlined earlier. After all that modifying and guesswork, I'm actually pretty happy with the way the alignment within the wheel wells turned out.
Tamiya's locator holes for tool mounts, Notek Lights, etc. had to be filled-in on the front fenders using my favorite old standby: superglue, accelerator and my wife's nail files.
When completed...just headlights mounted on these early war fenders.
Below, some pics of the hydraulic and mechanical hand-brake lines. I had to put these on hold earlier when I realized I had a major wheel situation to tackle first.
I'm happy with the way the hand-brake line came out along the frame as it's probably the only detail that will be easily viewable on the finished model anyhow.
As she sits overall, wheel assemblies worked out so far.
Currently working on the cab interior and finally breaking out some very old bottles of paint along with some of the new age stuff. Cab update just around the corner.
Later...for now!
Ranger74
Joined: April 04, 2002
KitMaker: 1,290 posts
Armorama: 658 posts
Posted: Monday, January 23, 2017 - 08:52 AM UTC
Richard, very nice work on the undercarriage. The brake lines look great.
 |

WEB HOSTING BY


Copyright ©2021 Armorama and Kitmaker Network, a subsidiary of Silver Star Enterprises
All Rights Reserved. Please read our Conditions of Use and Privacy Policy.
All Rights Reserved. Please read our Conditions of Use and Privacy Policy.