

I think you have a point, Bob. Most of the long tape strips are indeed on the places where tie downs are located, so it could very well be to prevent wear and tear. I also noticed number of shorter strip segments on the roof frame for instance... that could be some kind of anti-slip surface. Perhaps 18Bravo could shed some light on these.
Pete, I think I listed most of the stuff I use here in this thread. Anything in particular you had in mind?
Mario
Hosted by Darren Baker
Special Forces GMV Afghanistan

Maki


Joined: February 13, 2002
KitMaker: 5,579 posts
Armorama: 2,988 posts
Posted: Saturday, December 20, 2014 - 02:49 AM UTC

Maki
Joined: February 13, 2002
KitMaker: 5,579 posts
Armorama: 2,988 posts
Posted: Thursday, December 25, 2014 - 02:12 AM UTC
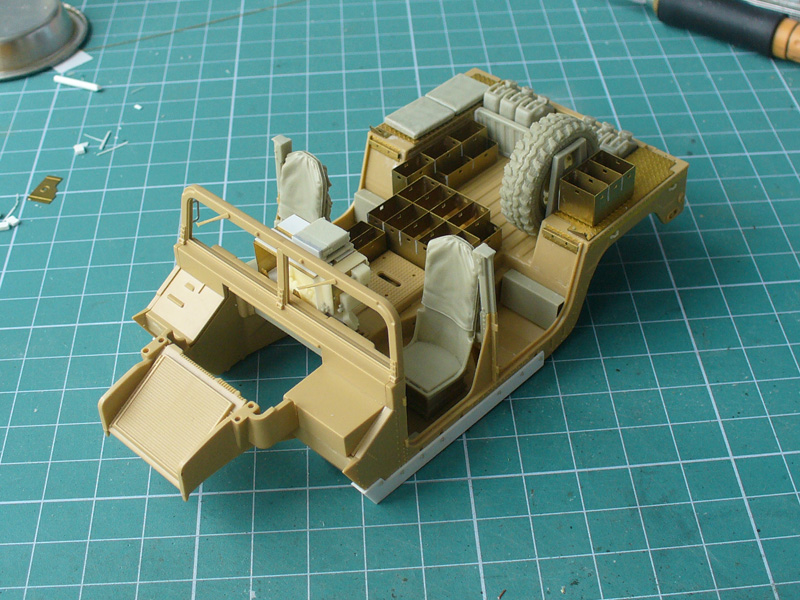
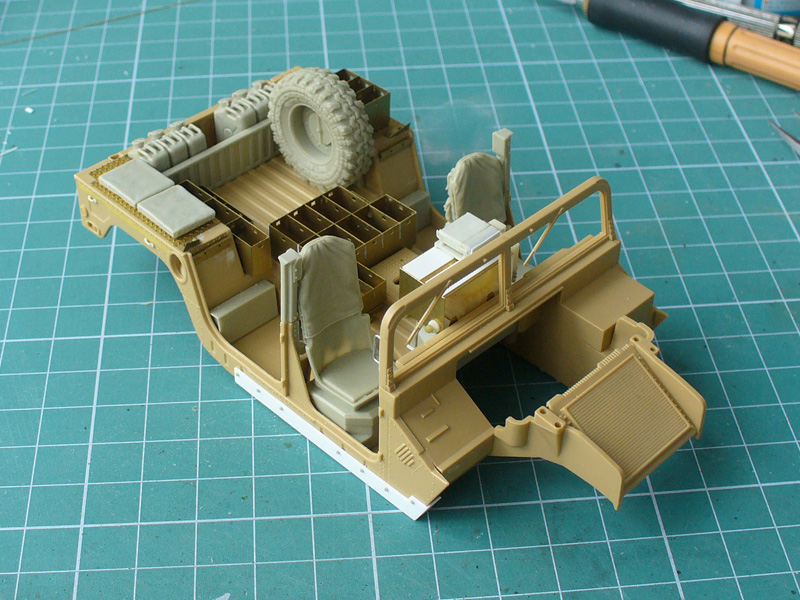
Just a quick update. I finished the side wall fence and fixed it to the roof rollbar... Honestly, I have no idea how these things are called but I hope you know what I'm talking about. Still need to add some welding marks between the fence and the rollbar.
The whole thing is not fixed to the cargo bed, hence the slight gap on the rear end.
Mario
The whole thing is not fixed to the cargo bed, hence the slight gap on the rear end.
Mario
Maki
Joined: February 13, 2002
KitMaker: 5,579 posts
Armorama: 2,988 posts
Posted: Monday, December 29, 2014 - 02:19 PM UTC
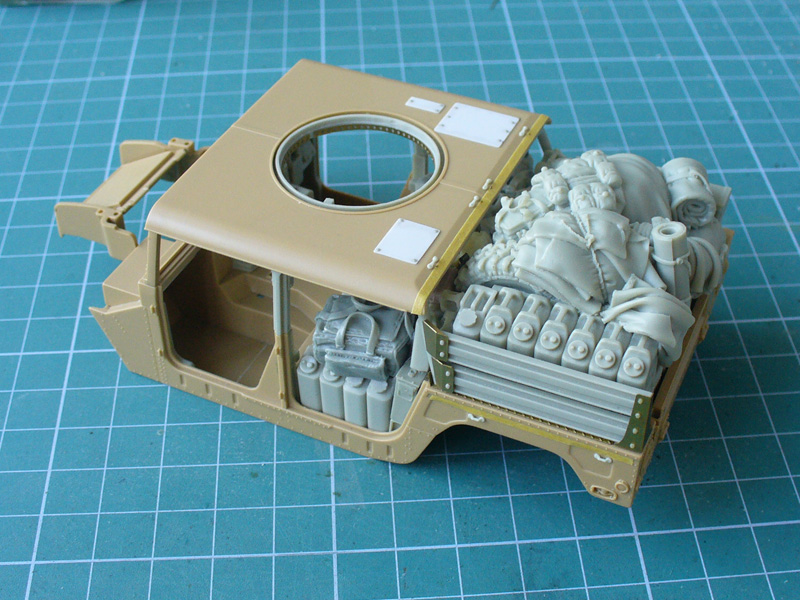
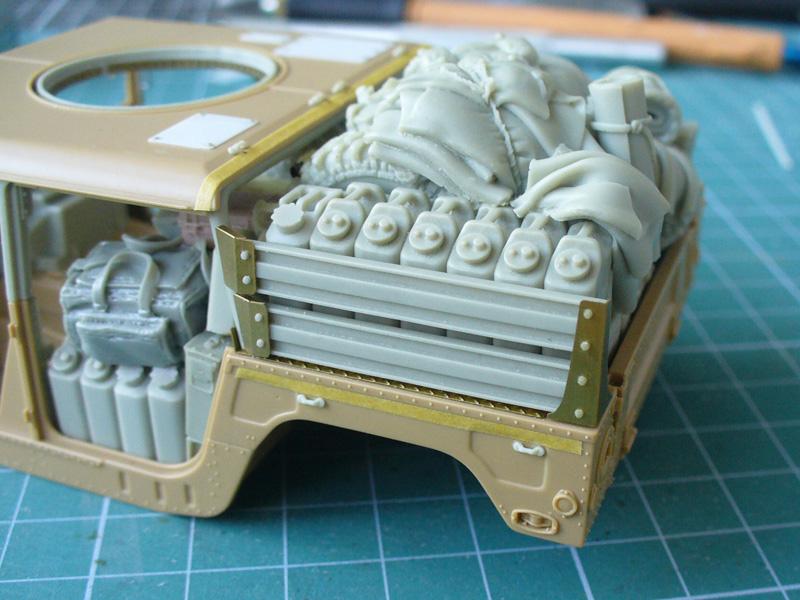
I had to cut the Black Dog resin piece again to accomodate the side fence. After all the work I put into making the darned thing fit, I finally made a decision not to use the Black Dog piece. I'm getting frustrated with it and it still doesn't look right.
So, I will be doing a slightly different version of the truck, with less stowage in the cargo bay.
Stay tuned.
Mario
So, I will be doing a slightly different version of the truck, with less stowage in the cargo bay.
Stay tuned.
Mario

Foxtrot1

Joined: March 03, 2011
KitMaker: 234 posts
Armorama: 200 posts
Posted: Monday, December 29, 2014 - 02:24 PM UTC
Looking very good Mario. Too bad about the fit issues. Your OIF M1025 came out incredibly well, so I cant wait to see how this one comes out. Looks like way more work is going into this one too.

Bessette984

Joined: December 30, 2013
KitMaker: 9 posts
Armorama: 9 posts
Posted: Tuesday, December 30, 2014 - 02:03 AM UTC
Sorry to hear the Black Dog piece didn't work out after all the effort that went into it. Still a great build regardless.

DKeu8726

Joined: December 24, 2011
KitMaker: 36 posts
Armorama: 31 posts
Posted: Tuesday, December 30, 2014 - 02:19 AM UTC
Hi
What is it that makes it not right.
What is it that makes it not right.

spaarndammer

Joined: January 28, 2007
KitMaker: 1,945 posts
Armorama: 282 posts
Posted: Tuesday, December 30, 2014 - 02:30 AM UTC
Too bad that the Black dog stowage doesn't fit, especially after all the efforts of you to make it fit.
Will keep an eye on your next steps.

Jelger
Will keep an eye on your next steps.
Jelger
Maki
Joined: February 13, 2002
KitMaker: 5,579 posts
Armorama: 2,988 posts
Posted: Tuesday, December 30, 2014 - 01:48 PM UTC
Thanks for following the build guys.
As for the Black Dog piece, I somehow liked the idea of fully ladden Humvee when I started this build. With all the work to make the piece fit, I slowly realized this is not the best way to depict SF Dumvee. I decided to make my own stowage with various pieces from Legend conversion and my spares box.
Mario

ptruhe
Joined: March 05, 2003
KitMaker: 2,092 posts
Armorama: 1,607 posts

Posted: Tuesday, December 30, 2014 - 09:38 PM UTC
That tape strip on the side looks like where the old full length soft top cover attached. I wonder if they made a smaller cover to work with the middle hard top.
Paul
Paul
kubisz

Joined: February 18, 2007
KitMaker: 978 posts
Armorama: 977 posts
Posted: Tuesday, December 30, 2014 - 09:52 PM UTC
I must admit I'm glad, that there won't be this terrible BD block at the back. I'm sure the model will be better. Of course pity that You've wasted some time to make it fit, but sometimes we need to make a step back to make two steps forward then 
Best wishes for 2015 and keep this thread alive
Best wishes for 2015 and keep this thread alive

sgtsauer

#065
Joined: March 30, 2002
KitMaker: 2,605 posts
Armorama: 1,814 posts
Posted: Tuesday, December 30, 2014 - 09:56 PM UTC
I second Kubas comments. I was not real attracted to the concept of having all of that 'stuff' in the back. I'm looking forward to seeing what you do with it. Happy New Year!


BobSolo

Joined: August 30, 2014
KitMaker: 331 posts
Armorama: 112 posts
Posted: Tuesday, December 30, 2014 - 10:04 PM UTC
You've done a fantastic job on the model so far, 10/10 for trying to make the Black Dog piece work. I look forward to seeing your new take on it, im sure it will look awesome!
Cheers Bob
Cheers Bob
Maki
Joined: February 13, 2002
KitMaker: 5,579 posts
Armorama: 2,988 posts
Posted: Wednesday, December 31, 2014 - 05:00 PM UTC
Guys, thanks for the support. Kuba and Brent, I knew you would be glad I ditched the big chunk of resin from Black Dog. I tried to make it work but the more I tried the more I realized it is not the best option.
Hope to give you some updates soon.
All the best in the 2015!
Mario
Hope to give you some updates soon.
All the best in the 2015!
Mario

Graywolf

Joined: December 01, 2001
KitMaker: 6,405 posts
Armorama: 1,850 posts
Posted: Wednesday, December 31, 2014 - 10:58 PM UTC
I am sure your own built stowage will be better than this. I am really surprised for such problems on a Blackdog kit. keep safe and happy new year Brother.


RECON22

Joined: February 10, 2012
KitMaker: 665 posts
Armorama: 652 posts
Posted: Monday, January 12, 2015 - 02:30 PM UTC
That's a shame Mario, I was watching with great interest as it was looking good....
Thank you for some great ideas/ techniques.
Cheers mate, Jason
Thank you for some great ideas/ techniques.
Cheers mate, Jason
Maki
Joined: February 13, 2002
KitMaker: 5,579 posts
Armorama: 2,988 posts
Posted: Saturday, January 24, 2015 - 06:39 PM UTC
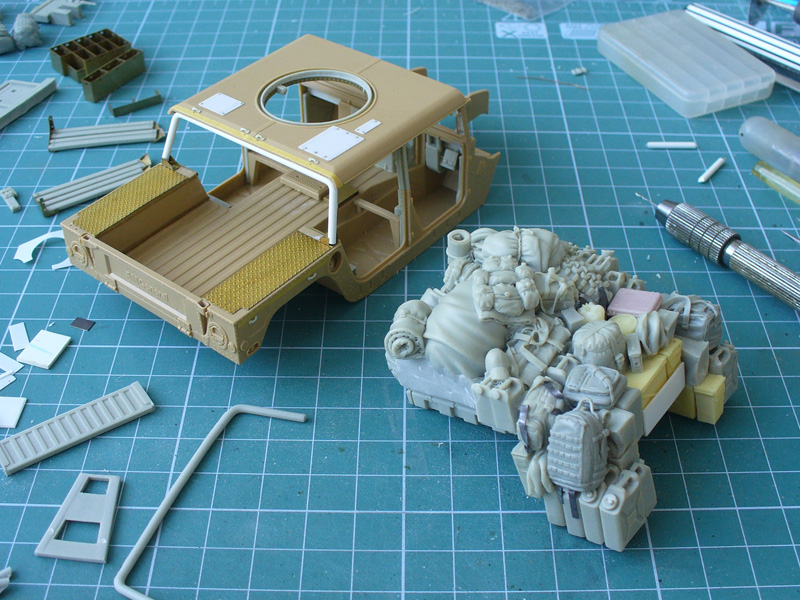
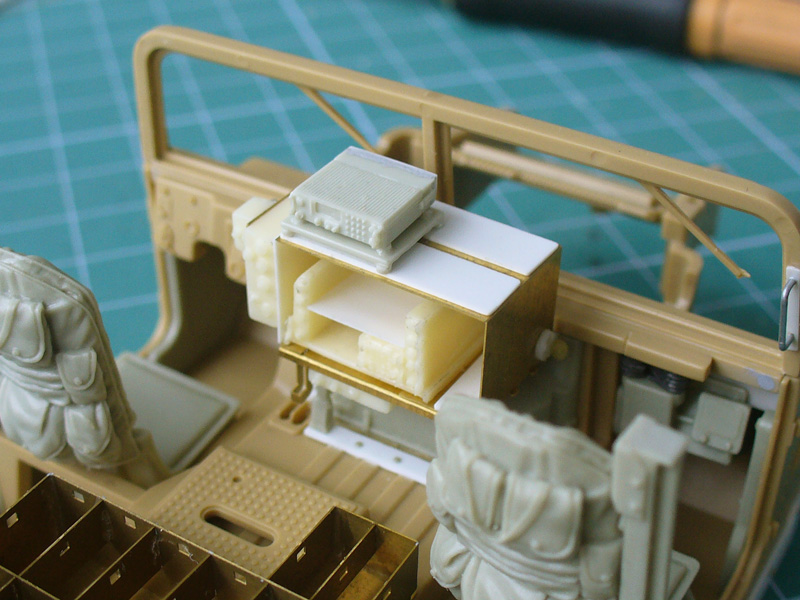
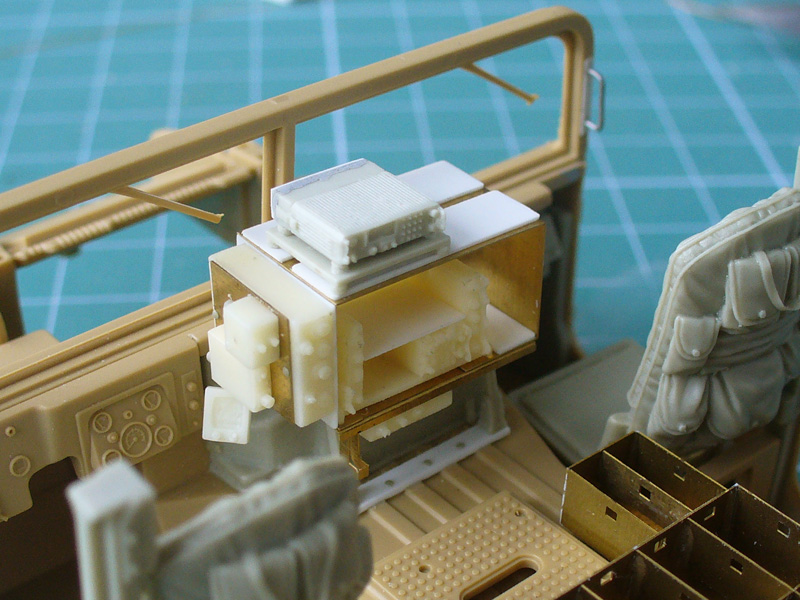
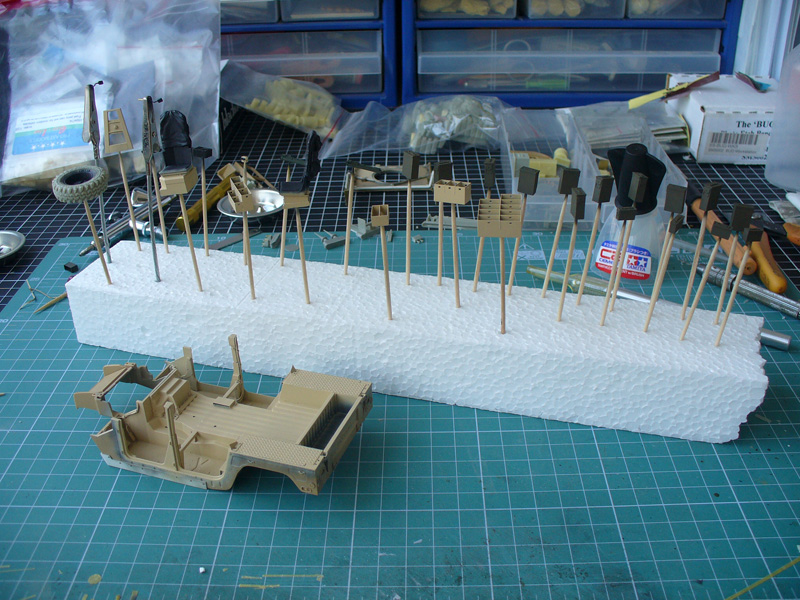
Just some quick photos to show you how the new setup looks. Most of these are still subassemblies, not glued to the model, added just for the photoshoot.
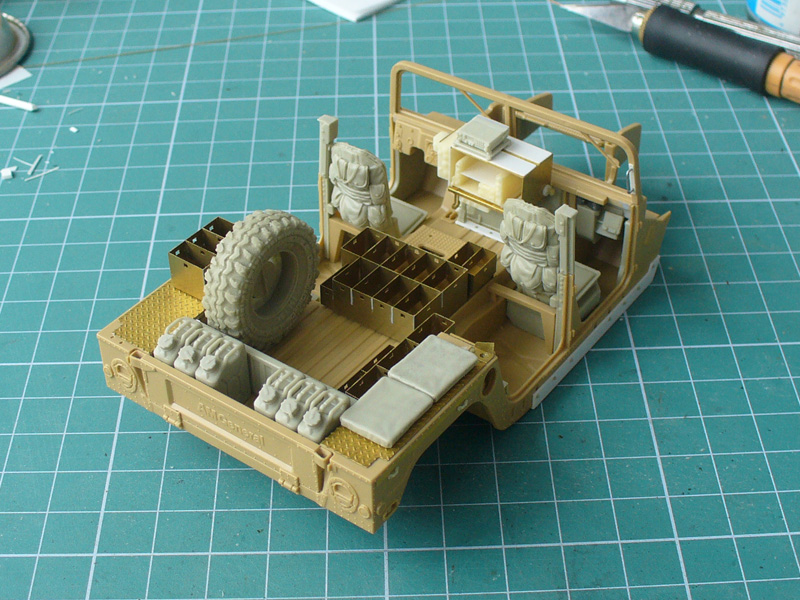
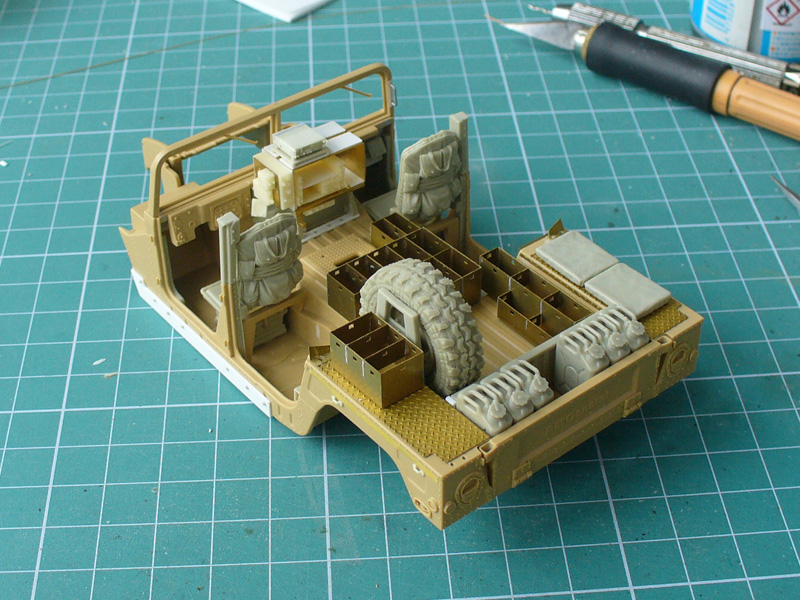
Spare tire, many ammo can racks, etc. I started building the radio setup by combining different sets from Pro Art. Most of these are molded in cream resin and the details are lost when photographed, but I can assure you these radios are absolutely great. I added some extra details as well. This area will be much busy when all the comms is placed, along with wiring.
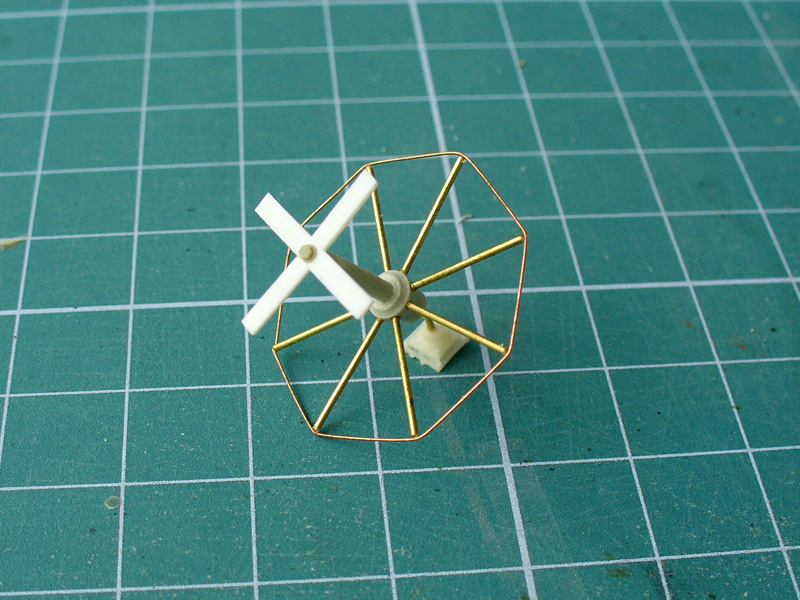
And I built satellite antenna for AN/PCS-5.
Cheers,
Mario
Spare tire, many ammo can racks, etc. I started building the radio setup by combining different sets from Pro Art. Most of these are molded in cream resin and the details are lost when photographed, but I can assure you these radios are absolutely great. I added some extra details as well. This area will be much busy when all the comms is placed, along with wiring.
And I built satellite antenna for AN/PCS-5.
Cheers,
Mario

Trisaw
Joined: December 24, 2002
KitMaker: 4,105 posts
Armorama: 2,492 posts
Posted: Saturday, January 24, 2015 - 11:43 PM UTC
Looks good, Mario. The added resin details really makes the kit "pop" to the eye.
JGphins
Joined: July 19, 2014
KitMaker: 249 posts
Armorama: 249 posts
Posted: Saturday, January 24, 2015 - 11:48 PM UTC
Awesome work thus far, great detail with all the added items. Love this web site for all it has to offer and the great community. Thanks for sharing your work, will continue to follow.
JGphins
JGphins
BobSolo
Joined: August 30, 2014
KitMaker: 331 posts
Armorama: 112 posts
Posted: Sunday, January 25, 2015 - 03:35 AM UTC
Awesome! Im liking this better than the black dog piece already! Radio looks amazing too, i look forward to your next update.
Cheers Bob
Cheers Bob
Maki
Joined: February 13, 2002
KitMaker: 5,579 posts
Armorama: 2,988 posts
Posted: Sunday, January 25, 2015 - 01:46 PM UTC
Thanks for your kind words guys. Hope to have some updates soon.
Mario
Mario
MakiWawa
Joined: December 17, 2014
KitMaker: 448 posts
Armorama: 448 posts
Posted: Monday, January 26, 2015 - 05:50 PM UTC
Mario- very nice work. This is my dumvee... I see, there your's will be much better .
Now I build next taking advantage conversion Black Dog.

Now I build next taking advantage conversion Black Dog.

Maki
Joined: February 13, 2002
KitMaker: 5,579 posts
Armorama: 2,988 posts
Posted: Tuesday, January 27, 2015 - 12:41 PM UTC
Nice GMV, Piotr. And good luck with Black Dog conversion. 
Mario
Mario
Maki
Joined: February 13, 2002
KitMaker: 5,579 posts
Armorama: 2,988 posts
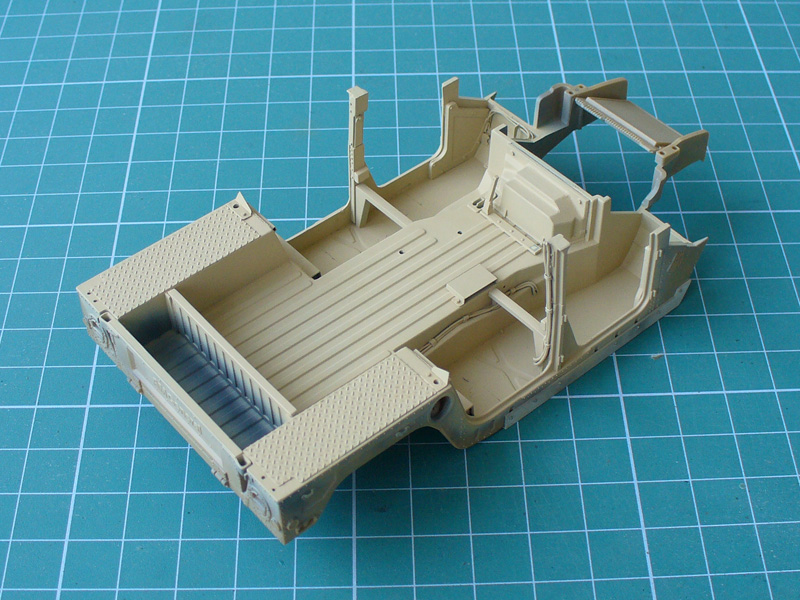
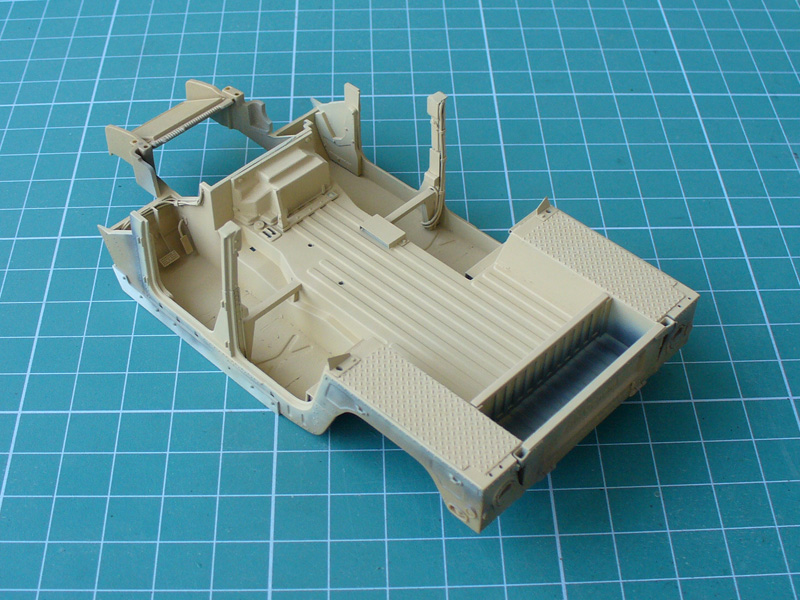
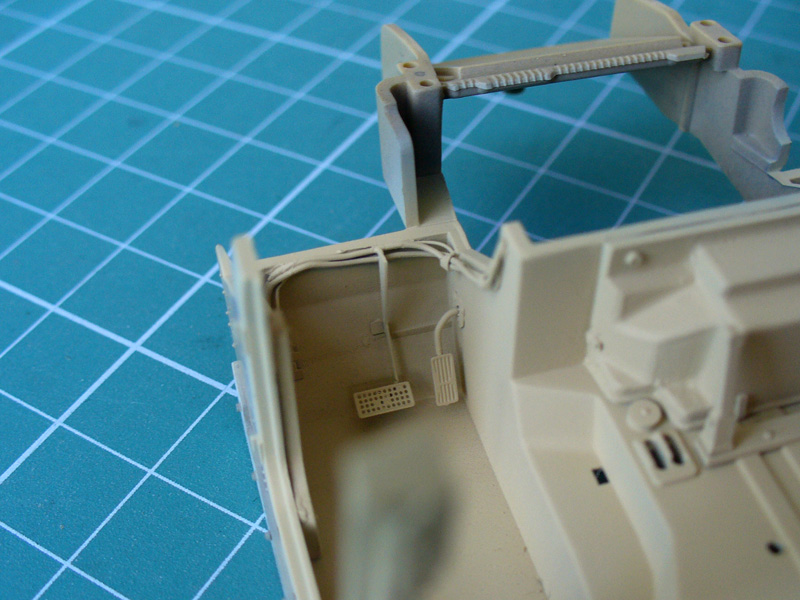
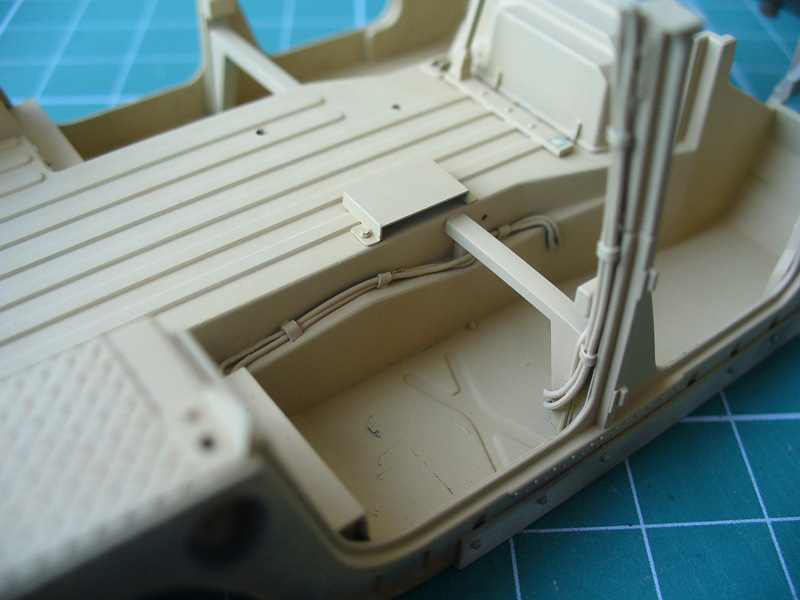
Posted: Saturday, March 07, 2015 - 12:45 PM UTC
Here is a small update... After black primer, the base coat is on:
Some details of the wiring:
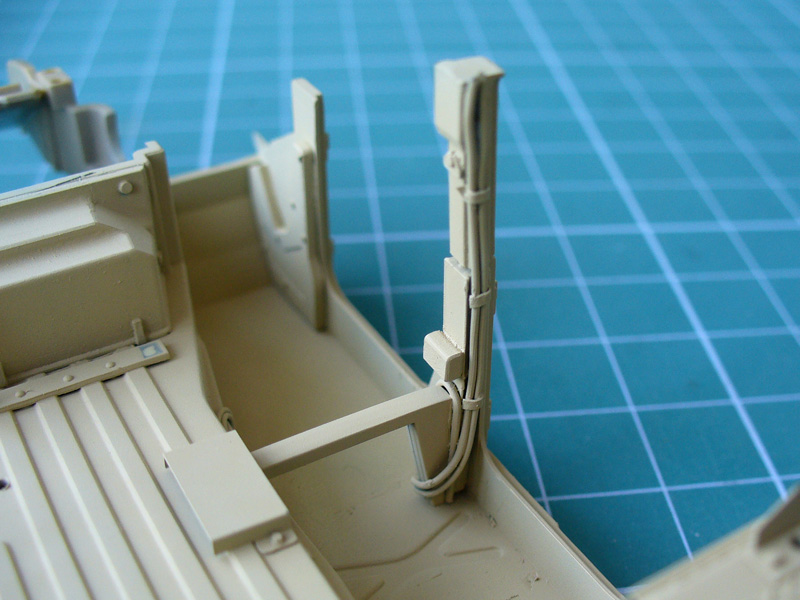
And a lot of details painted separately:
Mario
Some details of the wiring:
And a lot of details painted separately:
Mario
Graywolf
Joined: December 01, 2001
KitMaker: 6,405 posts
Armorama: 1,850 posts
Posted: Saturday, March 07, 2015 - 01:37 PM UTC
Good progress Brother. Wiring looks superb.
BobSolo
Joined: August 30, 2014
KitMaker: 331 posts
Armorama: 112 posts
Posted: Friday, March 20, 2015 - 01:45 AM UTC
Looking good with paint on, wiring looks great too!
 |

WEB HOSTING BY


Copyright ©2021 Armorama and Kitmaker Network, a subsidiary of Silver Star Enterprises
All Rights Reserved. Please read our Conditions of Use and Privacy Policy.
All Rights Reserved. Please read our Conditions of Use and Privacy Policy.