_GOTOBOTTOM
Figures
Military figures of all shapes and sizes.
Online Painting Tutorial
Kinggeorges
Visit this Community
Barcelona, Spain / España
Joined: August 31, 2005
KitMaker: 1,380 posts
Armorama: 845 posts
Posted: Friday, February 28, 2014 - 10:57 PM UTC
Ola companeros !

Following Jeremy's suggestion, I'm about to start a painting tutorial. I'll take advatange of the fact that I have some week ends ahead where I'll be alone to share my work in progress with you. I'll try to post as many pictures as I could and to give you meaningfull tips on how to paint 1/35 figures. I'll try to use my best english here..

First let me introduce this tuto by reassuring everybody: there is no one single way of painting. There are common tips that work for all of us, but each of us has its own "trucs". And there is only one way to find your style: practice. I hope this tuto will give the intent to practice a lot

I do paint with enamels and oils, because when I started painting figures, they were the queen of the paint. I've tested acrylics, but you know I love the smell of the enamel in the early morning . This is my Proust sponge finger cake.

All right gents, so for this tuto I chose an Alpine figure, because they are damn good and not over complicated to paint. We gonna paint a russian scoot. Camo is simple, which will give us the opportunity to play with highlights and shades.


Kinggeorges
Visit this Community
Barcelona, Spain / España
Joined: August 31, 2005
KitMaker: 1,380 posts
Armorama: 845 posts
Posted: Friday, February 28, 2014 - 11:14 PM UTC
I love the body expression of this figure. Relaxed, baggy, his look is even similar to modern rapper clothes, but in the same time he's on the watch. I dislike the other figure of the set, which looks like a potatoe bag...

So let see what's inside


First job is to clean the figure of seamlines, which is pretty easy because there are basically none with Alpine figure
I don't know mister Tan receipee, but it's good.

Now the needed tools. You can also use very thin sand paper (from Tamiya, the gery rectangle on the left side of the picture). Personnaly I prefer to use my Xacto to get ride of the seamlines. One very important thing: always use a new sharp blade for your Xacto.


I found only one seamline on the left foot, but it was so subtle the camera didn't get it


The difficult part with those resin figures is the weapon. This is the only weaknesss of the resin figures. Many time I open the box and realised the gun was curved, or when cutting the piece from the support, with this long resin rod, I broke the piece in some strategical place (of course). The thing is that many time at least one of the hand is sculpted on the weapon. That give s a good grip and makes the whole very natural. But the downside is that if you want to have another weapon, you need to sculpt a new hand... When you can I would advise to replace the resin weapon by a plastic one, like a Dragon Gen 2 or a trumpeter weapon. They are more detailled and more resistant.


Here we need to clean the trigger area. Very delicate process. Take your time. Breath regularly
Kinggeorges
Visit this Community
Barcelona, Spain / España
Joined: August 31, 2005
KitMaker: 1,380 posts
Armorama: 845 posts
Posted: Friday, February 28, 2014 - 11:34 PM UTC
It's like we are ready for some action. Prepare you figure for some undercoat layer of paint. You need to find a way to manipulate your figures without touching them (unless you want to make dirty fingers marks on your lovely figure). At that stage, my trick is clothes pins. I have big and small ones. Of course there will be one part of the figure that will be uncovered, but at that stage it's not problematic


As far as the undercoat is concerned, you can use either a black, a white or a beige one. At least this is what I read from authorised and qualified source . But I think that if you make a pink undercoat it wouldn't change that much the result. Until recently I wasn't using any undercoat. But I realised that it helps you to track the sneaky seamlines that would have escaped your Xacto. And the following layers of paint got a better tone. I use black prime because in some circontances with the folloing layers of paints, by not covering some part of the figure, it spares me the underlining work (for example here the helmet interior).

RULE/FACT. What matters when priming : use a VERY diluted paint here. I mean VERY. You can even paint two layers if needed. But if the paint is to thick, you lose many details. And this rule will be true for the rest of the tuto : you're better off with less paint than too much. Diluted paint will allow you to paint multiple layers of different tones without your figure looking crap/Frankensteinised.


To be continued
easyco69
Visit this Community
Ontario, Canada
Joined: November 03, 2012
KitMaker: 2,275 posts
Armorama: 2,233 posts
Posted: Saturday, March 01, 2014 - 12:05 AM UTC
Awwsome!
Kinggeorges
Visit this Community
Barcelona, Spain / España
Joined: August 31, 2005
KitMaker: 1,380 posts
Armorama: 845 posts
Posted: Saturday, March 01, 2014 - 03:07 AM UTC
I forgot to mention something which will be a basic rule for this tuto.
Don't ask me which precise colors/references I use/mix etc. First I never list my paint before or during any painting session. And most of all, as I said in the beginning, you must find your own way. And this implies finding yourself the good color match. Picasso never asked Dali which Beige he used in his painting

So once your figure is primed, you can start the real painting job. I generally start my figure by the head, but you can start by the feet, the elbow or the butt, it won't change anything. I start with the head because that's the most enjoyable part for me. And it gives my figure some personality that encourages me to go on.

I've decided to paint both heads included in the set, eventhough I have a preference for one. That way I'll try to show you that you can obtain very different outcomes depending upon how you work.

So let's say we have Vladimir P.with the forage cap, and Dimitri M. with the Helmet (any likeness with Russian statesmen is compeltely intended).

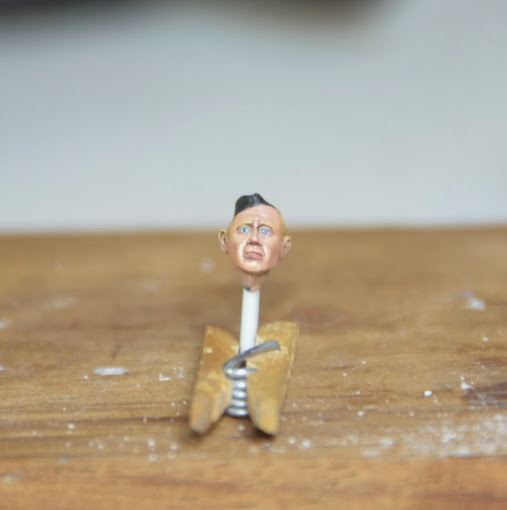
Let me present you Vladi. Vladi is a good guy, eventhough he has some sort of Jumbo hears and a forehead a little bit backgrounded. But he's still quite good looking.


I started to apply a very diluted layer of flesh tone. First thing first : the eye. They are the mirror of the soul. So a nice pair of eyes is 65% of the figure success. Start by paint the eyes in black. You can overtake a little, we are in the very early stage, don't worry !
Then fill in with white, but you should let a black stripe in the upper part of the eyes (not needed in the bottom part)


Sorry for the sharpness of the pictures. You'll see that during the tuto, as you will, I'll make progress too with my camera. It'll get better and better

Then put a drop of paint for the iris. If you are a die hard (which I was with Dimitri but not with Vladi), you can put a drop of black paint, and then make the iris. You can make your drop blue, black, brown, green, like in real life. Be sure that you chose a bright/flashy color if you go green or blue, otherwise nobody will notice the color of the iris. I usually use oil colour for that because their are brighter.


Ok, now you can be proud of your 0.02% completion rate for the figure. But as i said, it's an important part. At such stage you don't need to sweat much more for the eye, because you'll refine them by working around them (eyebrow, eyelid etc).

So next on the plate is shadowing that face. I'm sure you already have seen hundreds of drawings explaining that phase. I'm gonna describe it though. For that I generally use Raw sienna or burnt umber oil paints, without any mix for the darkest parts, mixed to some flesh paint for the less shadowy parts. It give something like this.


As you can see, there is not so much paint on Vladi (he doesn't seem to appreciate that). You'll have the occasion to apply many more layers afterward, so don't worry. As you know scale modeling is an art of patience.

Ok for the next steps, I must apologize but I was fed up to interrupt my painting session every 2 minutes to take a pictures. I've been more disciplined with Dimitri and I've got a lot of in progress pics (I told you I had a preference). I'm gonna describe it though, eventhough as a french magazin motto says: "the weight of the words, the shock of the pictures".

Let the oil dry a little and once you shadow is done, you apply a layer of diluted flesh paint on the less shadowy parts. Then your next move is to mix some violet with flesh tone, to be applied between your brown shadowing and the normal flesh part (and will use this mix mostly on the lower cheek aznd other lower parts. The idea is to progressively link the tones between them. The violet helps in this respect.

Once you've done that you apply another diluted (I'm gonna stop to use this word because in fact everytime you'll take your brush in your hand, it will be with some diluted paint) layer of flesh paint to join the different tones. You should restart this process until you are happy with the result. That's why you need diluted paint.

You'll probably come up with somehting like this


as far as the refinement of the eyes ais concerned, you can paint the upper eyelid with flesh paint, between the blackline we've talked about earlier and the deapest shadowing of the figure which is under the eyebrow. You can also paint the bottom eyelid with a mix of grey, violet and flesh. Those two additions will make a convincing pair of eyes.

For the lips, I use a mix of burnt sierra, violet, red and some flesh to tone it down. It's up to you if want to make him look like a girl or a zombie. You should paint only the bottom lip, whereas the upper lip just need a very thin line of that mix. In between, if you are precise enough, you could paint a black line to separate both lips.

As you can see Vladi is a bit shinny. That's due to the oil painting, and to another reason I discovered very recently while discussing at my hobbyshop (yes it still exists !).

RULE/FACT. If you use White Spirit like I did for several years, as it is a "fat" oil you have more chance to have a satiné or even worst a bright finnish rather than a matt one. I recently turned to enamel thinner instead and for the moment I haven't been desappointed once. It just costs an arm compared to a white spirit bottle, but I guess we are all used to pay an arm and a leg for what we like the most...

I can hear some of you saying "yes, ok for the thinner stuff, but you always have the matt varnish, you fool". I never use something more unstable than the matt varnish (TNT is cat pee in comparison). I often ended up with a bright finish when using those .*@## matt varnishes. And when mister varnish makes you the great honour to concede a matt finish, most of the time you lost most of the subtle nuances you made on the varnished surface.
RULE/FACT. The dilution rule you've started to understand also apply to varnish

Pictures are coming in a separate post
Kinggeorges
Visit this Community
Barcelona, Spain / España
Joined: August 31, 2005
KitMaker: 1,380 posts
Armorama: 845 posts
Posted: Saturday, March 01, 2014 - 03:40 AM UTC
Some pictures of Vladi's finished (or mostly finished) face.


Biggles2
Visit this Community
Quebec, Canada
Joined: January 01, 2004
KitMaker: 7,600 posts
Armorama: 6,110 posts
Posted: Saturday, March 01, 2014 - 04:36 AM UTC
For mounting my figures I drill a hole as large as possible through the bottom of the foot usually near the heel so that I can drill further up into the ankle, then glue in dress maker's pins with the heads cut off (because they're cheap, long, and pointy!). You could also use lengths of stiff wire, or even fine finishing nails. You can handle them by this or stick them into a temporary base for painting, and afterwards use the same pin/nail for permanent mounting on base or dio.
Kinggeorges
Visit this Community
Barcelona, Spain / España
Joined: August 31, 2005
KitMaker: 1,380 posts
Armorama: 845 posts
Posted: Saturday, March 01, 2014 - 05:11 AM UTC
Hello Biggles2,

Yes I know this technique I use since recently. It's quite efficient. It's very funny because in between those two posts this is exactely what I've done. But when I looked at the figure I realised that the ankle is so thin that drilling anything in it would destroy the whole feet.
I usually use the technique which you describe when I paint 54mm or 75 mm metal figure.

Best,
Julien
Biggles2
Visit this Community
Quebec, Canada
Joined: January 01, 2004
KitMaker: 7,600 posts
Armorama: 6,110 posts
Posted: Saturday, March 01, 2014 - 05:45 AM UTC
Yeah, you have to be pretty careful and start with a #80 bit for a pilot hole, and gradually up-size from there. But once the pin/wire/nail is CA'ed in place it actually makes the ankle stronger.
Kinggeorges
Visit this Community
Barcelona, Spain / España
Joined: August 31, 2005
KitMaker: 1,380 posts
Armorama: 845 posts
Posted: Monday, March 03, 2014 - 09:33 AM UTC
Thank you Biggles, I didn't think of the progressive drilling !

Ok it's time to pursue the tuto.
As far as Vladi is concerned, I still need matify his face and paint the forage cap.

On the pics below you can see how I use the black primer on the forage cap. You can easily leave unpainted a very thin portion to let the black prime appearing. The Matt varnish when applied will tone down the colors.


The idea is not to let the shadow part in black only, because the contrast would be too high, but to play in between the black and with some green dark color.

Once you have applied a first coat of green paint, you could play with the folds of the forage cap with some dark green and some light one. To make the red star more visible, you could contour it with some black, and paint a halo of dark green, as you'll see on the picture. Use the oil paint for the red star as the paint will be more visible.


to be continued with Dimitri this time.

J
retiredyank
Visit this Community
Arkansas, United States
Joined: June 29, 2009
KitMaker: 11,610 posts
Armorama: 7,843 posts
Posted: Monday, March 03, 2014 - 11:30 AM UTC
I have been painting miniatures for quite some time(10 years) and would never have thought to paint the pupils/irises prior to the whites of the eye. Normally, I get a very small amount of black paint on the end of a needle and touch it to the center of they eye. I found this almost impossible with 1:35 figures. I will definitely try it on my next set.
milvehfan
Visit this Community
North Carolina, United States
Joined: June 26, 2007
KitMaker: 2,116 posts
Armorama: 1,080 posts
Posted: Monday, March 03, 2014 - 02:17 PM UTC
Very Cool.
This will be a big help with me painting my figs.

mil
Kinggeorges
Visit this Community
Barcelona, Spain / España
Joined: August 31, 2005
KitMaker: 1,380 posts
Armorama: 845 posts
Posted: Saturday, March 08, 2014 - 02:54 AM UTC
Hello guys,
Thanks for your posts. I hope I can be of any help, as this is the purpose of this thread. With the week end starting, I can find some time to go on with the other dude, Dimitri.

You'll see, at least I hope, to the extent my camera allow it, that I've painted him quite differently. in the outcome, there are way less contrasts, but in nmy opinion the overall looks like more lifelike.

Let's start by the begining. LIke Vladi, I start by the eyes. Same technique applied. First paint in black, then white (leaving a black stripe in the upper part, then paint a black dot (half the size of the white surface), beware not to make your figure squint, then a colored dot, a little bit smaller than the black one, then a final black tiny dot in the middle. If you want to be a perfectionnist, you could even paint a white dot on one of the side of the pupil, simulating light reflection. I did that with my Bravo6 french para and it works well.

Let's the pictures talk by themselves


Once the eye are set, like with Vladi, we put some shadows on the main lines of the face


Then we apply some flesh paint to sharpen and define more precisely the shadow lines we just must made


one close up of such preliminary work. On the bottom eyelid I've applied some flesh paint mixed with some violet.


Another very diluted layer of flesh paint in order to soften the contrast between the flesh paint and the shadow


Now I started to add some red and a very little point of violet on the cheecks and the bottom parts of the face. You can see how the whole face turned to a white dominant colour to something more pink/warmer. I also repainted the bottom eyelid with some darker violet to better contour the eye.


Now the different tones are harmonized. you can still see the shadow part, but there is a graduation in between.


Now we are entering into the details. First, the bottom and rear part of the cheecks received some more red, very diluted, oil colour. Then the lips have been painted. They might be a little too much redish on this picture. And finally the beard has been painted. I usaully take some light grey enamel I dilute to the max, and use it belo the nose and on the bottom part of the cheeks. Beware: if you use too much thinner on your brush, you will ruin the previous layer you've made. This part is quite risky and it still gets me mad some times.

A close up pic where you can see the three additions


the same with some distance


at this stage we are pretty close from completion. It lacks only the highlight. one Dimitri, unlike Vladi, I chose to make the highlights much more subtil to make the whole face more natural. In this respect I started my first highlight where usually other painters are at their 3rd layers of highlight. It's a personnal choice; I prefer less contrast, but closer to a realistic face. You can see where I highlighted : the end of the nose, the nostrils, on each side of the mouth and above the superior lip. I didn't insist on the cheeckbone, since his helmet will cast some shadow on that part


now some comparison between Vladi and Dimitri. As you can see Vladi is much more contrasted than Dimitri. It gives a better rendering on pictures, but a less realistic finish. I would be happy to hear which one you prefer and for which reasons.


best,
Julien
Kinggeorges
Visit this Community
Barcelona, Spain / España
Joined: August 31, 2005
KitMaker: 1,380 posts
Armorama: 845 posts
Posted: Monday, March 10, 2014 - 07:38 PM UTC
Next step is painting Dimitri helmet. I decided to make hit worn and torn, but not that much.

First I tried to replicate the russian green, in his flashy version, by applying a green base coat. This one has to be thick as it will be the only one layer of green (see last photo in the previous post).

Something I invented with this figure. I tell you, follow your own path, fiond new ways ! So I wanted to modulate the green colour without going through 1001 washes. I took the green of the first coat and added some more white (a little bit). Paint has to be thick and not liquid. Then a took my brush and tapped the helmet with it gently in order to create small stains/dots of a lighter green. In the end I couldn't distinguish the small dots and my light green dots transformed the green helmet.


Then you need to figure the small impacts/scratchs on the helmet. Paint some fairly tiny light green (close to white in fact) dots, in which you will paint tinyer black dots. Try also to replicate scrap by making a very rapid line of paint in dark color. This one is really hard because eveything lies in the movement of your brush.
Once the dots and lines are made, you can play with oils through filters to replicate grease or rust stains.

One part of the helmet that is usually very torn is the hedge of the helmet. All aroung you can play with a dark green paint to replicate scraps. You should finish by applying a thin line of silver paint on the hedge.

You can also play with pigment and pastels if wish. I didn't

Last job is too apply a coat of satiny varnish as many helmets have this shiny effect.

That should give something like this. the streaks and dots are very subtile. I hope you'll be able to view them on the pics. Myself I only can see them with daylight.


And now Valid and Dim together


Have fun. Next step: the camo overall

Julien
Venko555
Visit this Community
Bulgaria
Joined: December 07, 2013
KitMaker: 908 posts
Armorama: 698 posts
Posted: Monday, March 10, 2014 - 09:23 PM UTC
Nice work, faces are superb. I'm also about to paint my first Alpine figures and your tutorial is great. Can't wait for the rest!

Cheers!
ubisuck
Visit this Community
Quebec, Canada
Joined: December 20, 2012
KitMaker: 461 posts
Armorama: 255 posts
Posted: Tuesday, March 11, 2014 - 01:17 AM UTC
Julien, one question:

Basically, in 100% of the figures you painted, you never glue them before painting? You paint then you glue the parts together? Is that it always?

I'm close to 59 and I do not remember (since I was 8yo) the last time I painted a figure.

But, thx to "Parrot" (member here) I now have 4 WWII Germans to paint and some Afghanistan's Canadians in a Trump Husky (not sure), so I am watching you closely buddy, very closely

Marc/ubi
easyco69
Visit this Community
Ontario, Canada
Joined: November 03, 2012
KitMaker: 2,275 posts
Armorama: 2,233 posts
Posted: Tuesday, March 11, 2014 - 02:12 AM UTC
amazing work. Very helpful! Now , come on over to my house & paint my guys lol jk'n. I'm inspired!
But...you should include the colors your using, mix ratio's, brush techniques, wash techniques etc... or this tutorial will be meaningless....it become's a "look what I can do" sort of post. But your topic title says "tutorial"..so..make it one.People want to follow along with you, to the exact color , mix ratio etc. If your going to teach, then "teach". You will be leaving a lot of people in the dark.
You have amazing skill's & it's understandable that it is a "big" job to try to explain yourself (teach) but with all respect, your only doing half a job on this.
My 2 cents.
Kinggeorges
Visit this Community
Barcelona, Spain / España
Joined: August 31, 2005
KitMaker: 1,380 posts
Armorama: 845 posts
Posted: Tuesday, March 11, 2014 - 05:23 AM UTC
Hello guys,

Venelin and milvehfan, I'm glad to read your posts ! This tutorial is quite time consuming for me, and my intent is to motivate people to achieve nice results by themshelves. Alpine figures are great because they are not overly complicated and provide sufficient details to guide your brush through each part.

Marc, thanks for your post. The idea is to avoid to handle the figure with your fingers. Because when doing so you leave stains and potentially remove the paint. For this figure, I found very useful those ejector pin, which I didn't remove because it allows me to hold the heads with clothes peg without touching them. I also do that for pieces that are not accessible to my brush once glued. For example with this figure I painted the arms separately in order to easily paint the bottom parts of the arms, which I couldn't do if I had glued them before. So yes, most of the time I paint them separately, then I glue the different parts together, and eventually paint the join if needed (most of the time it's not because Alpine or Bravo 6 figures fit quite well).

David, that's a kind of rough and tough reply you made, but quite honest. English speaking people would reply to you I guess "I appreciate that". Kidding aside, I understand what you are saying. But I'm limited by time, my english skills, camera limitation and by the fact I'm not a technician but more an artist (with all the good and bad things that go with it). I'll try to give the more info I can, but as I warn in the beggining of the tuto, I'm not the guy who gives exact ratio/mix of paint. Usually when I buy books or magazines on scaled figures, I don't read at all this part on which brush, which paint bla bla bla.

But I heard what you said and I'll try to take that into consideration (except the colours mix ) and be more didactic.

Best,
Julien
Kinggeorges
Visit this Community
Barcelona, Spain / España
Joined: August 31, 2005
KitMaker: 1,380 posts
Armorama: 845 posts
Posted: Tuesday, March 11, 2014 - 05:25 AM UTC
I can come to your house to paint, but You'll have to pay flare tickets, food, drinks and my commission )
J
Kinggeorges
Visit this Community
Barcelona, Spain / España
Joined: August 31, 2005
KitMaker: 1,380 posts
Armorama: 845 posts
Posted: Tuesday, March 11, 2014 - 06:57 AM UTC
OK, in order to please David, I'll share with you two "technical" observations I made recently.

the first one concerns dilution. Please forgive me if I already shared that tips in the previous posts. I've been using white spirit for quite a long time now. And I must admit many times I ended up with some shiny colours on some parts of the figures. I discussed recently with my hobbyshop owner who indicated me that the shining effect was due to the white spirit, and if I would use Thinner (from Tamiya for example) instead, my paint would be matt. I initially thought it was only seller arguments. I was dead wrong. By using thinner, you will 99% of the time have a matt result. The consistency of the paint diluted with thinner is different. It's less liquid and tend to dry more quickly than with white spirit. But the grain of the paint is thinner (better diluted let's say). So don't be gready and pay you some thinner, you'll make a good investment.
BUT I did try such thinner with my matt varnish. And guess what : I finished with a shiny effect..... whereas when using white spirit, the enamel matt varnish works perfectly. As I said, there is only one way : test and learn !

Second observation: brushes. You need to take care of those precious things when you are a figure painter. If you take care of you brushes, they could last for ages. I remember when I started to paint my brushes was tortured by me, I never washed them, it was like painting with boxing gloves... And then I saw my mother (who is an artist painter) washing her brushes with Marseille soap. I still use that technique every time I finish a session. So to preserve your brushes, first plunge them in the white spirit, dry tehm on a piece of tissue, put some Marseille soap in your hand (or any similar soap, not a "fat" soap, but it also exists some kind of professional soap for brush cleaning) and intensively wash them with such soap. put them under water for 2 minutes so that no soap remains.
I personnaly just recently (I'm painting figures since nearly 15 years now) found my favorite brush brand. It's Manet Hobby series, round peak, synthetic (nylon). I use number 8. The hairs are quite long, but the peak is very thin and stays the same figure after figure. Another wrong belief for me I quitted few years ago. I thought initially that you must have had a triple 0 brush to paint the small details. WRONG. The intermediary category works much better, as long as you have a thin peak. And usually I found the artistic brand better than the hobby brand. I had some difficulties to find my Manet though. I don't know if they are easily available outside France. I also heard about Windsor and Newton series 7, but I didn't try them yet. I'll let you know if I have the opportunity to try them.

Best,
Julien
JPTRR
Staff MemberManaging Editor
RAILROAD MODELING
#051
Visit this Community
Tennessee, United States
Joined: December 21, 2002
KitMaker: 7,772 posts
Armorama: 2,447 posts
Posted: Saturday, March 15, 2014 - 09:32 AM UTC
julien,

Wonderful tutorial! I have used a tried and true technique for ages yet I will try a few of your methods as I think they can improve my style. Thank you for the effort in writing this. I'll be back!
Kinggeorges
Visit this Community
Barcelona, Spain / España
Joined: August 31, 2005
KitMaker: 1,380 posts
Armorama: 845 posts
Posted: Sunday, March 16, 2014 - 05:36 AM UTC
Hello Frederic,

Thanks for your comments, I'm happy to see it could be useful.
I've seen that there is a lot of figure related subjects popping on the forums, which is a very good thing.

I've interrupted this thread because real life came back in force. Please forgive me but I must say I've been very lazy and selfish as I took much less photo of the camo work than for the face process. But still you'll have some . I must sya that interrupting oneself during a painting session every 3 minutes is quite disruptive and disturbing.

Anyway I finished to paint Dimitri, and I decided to paint 2 other figures, one from Tank, and another one in Plastic I'll transform, so that tuto could include some scratch too. Ans of course there will a base for that, so that the tuto is the most advantageous for anyone interested in the marvelous world of figure painting.

So we stopped at the face process. After that I paint his shirt. Very little work on that. I paint the shirt in 3 tones : a basic one, an exerated dark in the bottom parts and a light pretty close to the white. As usual I underline with black paint the seams.
For the button, I start to paint a black dot, larger than the button itself, then paint a yellow dot the size of the button, and lastly a tiny white dot on the top of the button (simulating light reflection).


Then it's time to attack the big chunk: the overall. I start by applying a base coat green. At such stage I try to chose only one color, and not to mix several colors for the base color (unless I'm forced to, but usually enamel range is sufficient to find the right color), because it's always hasardous to find back the same mix afterward. And if the color is not 100% the right one, you can always modulate during the lightning/shadowing process.
The base coat:


If the color is not uniform, don't worry. I might have already said that before, but during the initial stages of the painting, nothing is perfect, and you can allow yourself that imperfection. Because there will be MANY other layers to improve the effects.

So first task is the replication of the balck lines on the seewing seams and at each separation between the overall parts. This work has to be done first because : 1) thos sculpted lines are usually delicate and thin on the figure. They are not visible anymore after several layers. and 2) when painting a camo, a stain will never cross such lines. So each line gives you the limit of your camo for each part.


Now you start the shadowing, first with the deepest shadows. Don't exagerate as the color you'll use will be the darkest you'll use on your figure. You can either use the basecoat plus black, or use a darker green tone, or all of the three together. As i said, for the colour it's your choice, no miracle receipt (sorry David).


As you can see, it's very subtle.

Next steps in a new post

J
Kinggeorges
Visit this Community
Barcelona, Spain / España
Joined: August 31, 2005
KitMaker: 1,380 posts
Armorama: 845 posts
Posted: Sunday, March 16, 2014 - 06:34 AM UTC
And it goes on, on and on..

We continue with the shadowing process. Same task than the previous one, but this time with a lesser dark green, and with more surface painted, to replicate "mid shadow"


the same process continue, with each time a lighter shadow, until you come close to the basic color


Now you need to refine the shadow parts with the base color in order to sharpen them and link them with the basic color. This work is very important because it will make the overall result natural.


You can see how all the different tone appears more clearly whitout any disruption.Once the shadowing is finished, you can start the lightning. Here is the contrary of the shadowing. You start on the bigger suface with a color pretty close to the base coat, but lighter. You can use white for that, or a lighter enamel reference, or the two of them with the base coat. Beware if you already use a different green tone for the darkest part, don't use another different green tone for the light parts, or your figure will really look odd.

Here you go


ONce you have duplicate the same process than for the dark parts, you need to finish with details, such as strings and seams. For the streams, you need to paint with a much lighter color (you can even use other colors here, I generally use a beige tone in oils) either between the two black lines, like in Dimitri's back, or next to the black line for the pant's seams. The latter will give volume to the seam. With the same very light mix you can add the final layer of light color on the most prominent folds on the figure. As you can see you have enhance a lot the volumes on you figure.

You'll see that a big part of this long work will be covered by the brown stains of the camo. But it's the same principle than for the arms that I paint separately : 50% of them won't be visible in the end, but it gives a certain coherence to the whole.

Here is the result of what I explained just above


pictures taken with a different mode on my camera so that you can better appreciate the different tones applied during the process.


Kinggeorges
Visit this Community
Barcelona, Spain / España
Joined: August 31, 2005
KitMaker: 1,380 posts
Armorama: 845 posts
Posted: Sunday, March 16, 2014 - 07:50 AM UTC
Finally I made some test fitting with the arm and the two heads to see if the fitting is correct.


next step : the brown part of the camo

Best,
Julien
Kinggeorges
Visit this Community
Barcelona, Spain / España
Joined: August 31, 2005
KitMaker: 1,380 posts
Armorama: 845 posts
Posted: Sunday, March 23, 2014 - 06:15 AM UTC
hello,

It's time to close this post with the last pictures of Dimitri.
Please find below the camo nearly completed.
Best,
Julien


 _GOTOTOP