

Jason, if you look closely at the Ampersand book on the DW and check out the soft top version, the boxes seem to be similar.
Dan
Hosted by Darren Baker
A Dragon Wagon odyssey

panamadan

Joined: July 20, 2004
KitMaker: 1,513 posts
Armorama: 1,449 posts
Posted: Sunday, February 16, 2014 - 05:26 PM UTC

JLModels

Joined: February 15, 2014
KitMaker: 117 posts
Armorama: 117 posts
Posted: Monday, February 17, 2014 - 10:29 AM UTC
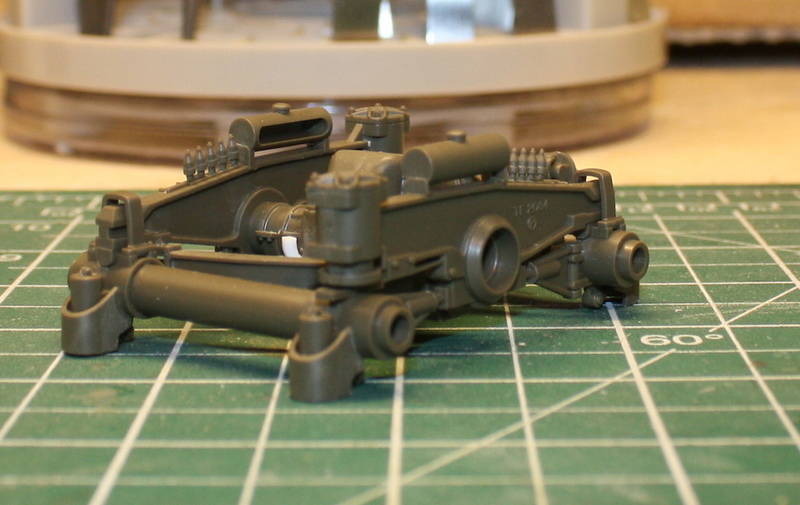

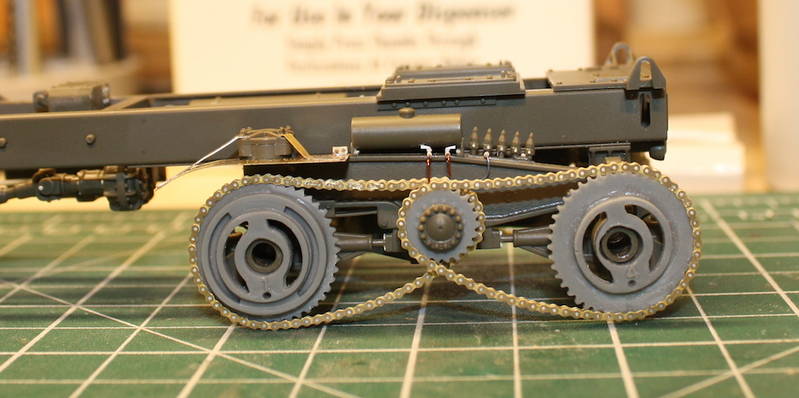
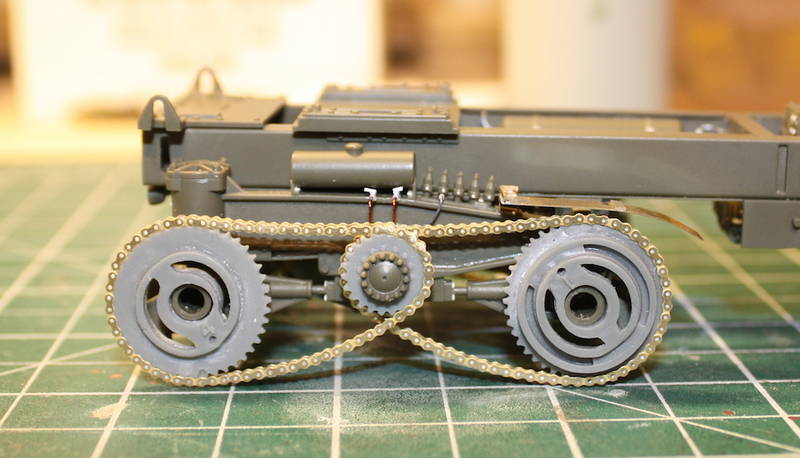
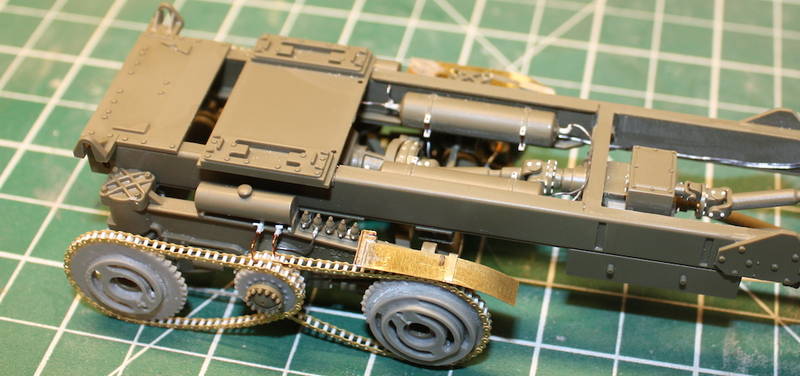
Heres the start of the tandem rear axel truck. Some irritating mold ejector pin marks were removed as usual, and the molded in tube was replaced with styrene rod. I think its either as fill or vent tube, but I couldnt find confirmation on that, just that its there.
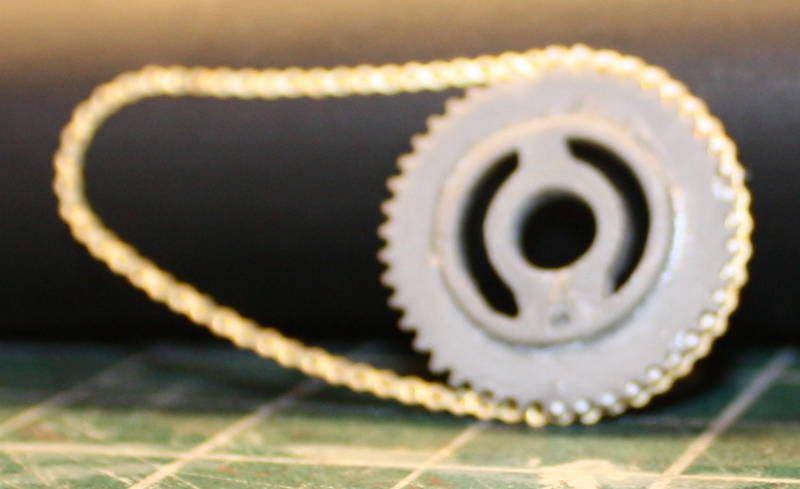
And heres where the fun begins. Each wheel is driven by a chain, which is molded solid in the Tamiya kit. These chains are highly visible in the finished model and look 100% better if replaced with the Royal models resin and etched chains set.
The only problem is that this set is one of the biggest pains I have ever successfully assembled in my life!
The set provides resin rod, which was warped and a resin cutting guide to help you trim it to shape. Neither worked for me. The rod was replaced with 0.020 styrene rod and in place of the non-functional cutting guide I used a Chopper.
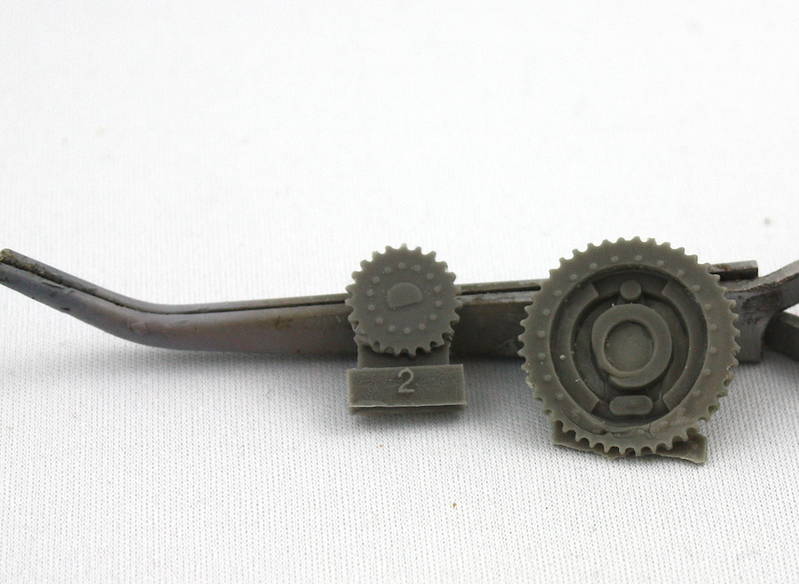
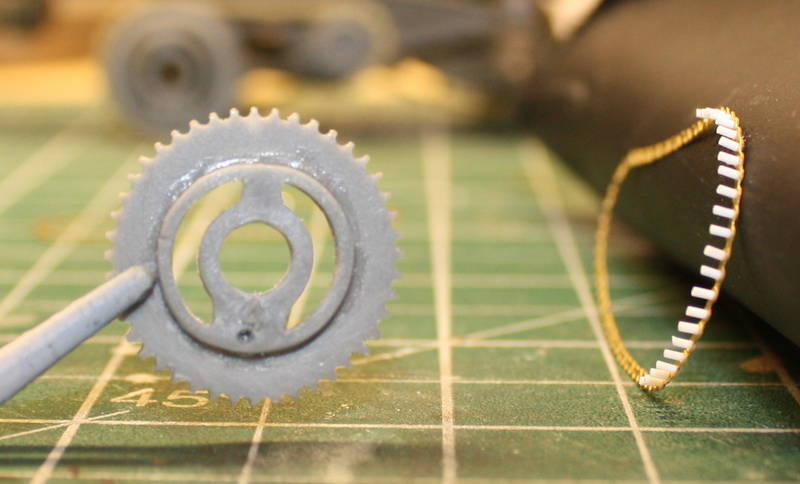
There are two big issues with the chain replacement set. The first is the quality of the resin sprockets. One of mine arrived with a couple of massive bubbles in the teeth area, and the other arrived warped into an oval shape. In fact most of them werent perfectly spherical, but this one sprocket in particular was warped to uselessness.
I also realized the Tamiya kit is missing the chain which drives the front winch, so to kill two birds with one stone I ordered a second Royal Models chain set, which gave me enough unwarped and correctly molded sprockets to build the kit, as well as leftover chain photoetch to build the front winch chain drive. Should I have had to order two sets just to make one good one? Obviously not, but its what it took to do so. At the time I built these the click2detail 3d printed chains weren't available. Now that they are, I'd use those instead. Unfortunately click2detail doesn't yet make the chains for the dual winches, so I'd still need to use the Royal Models set anyway.
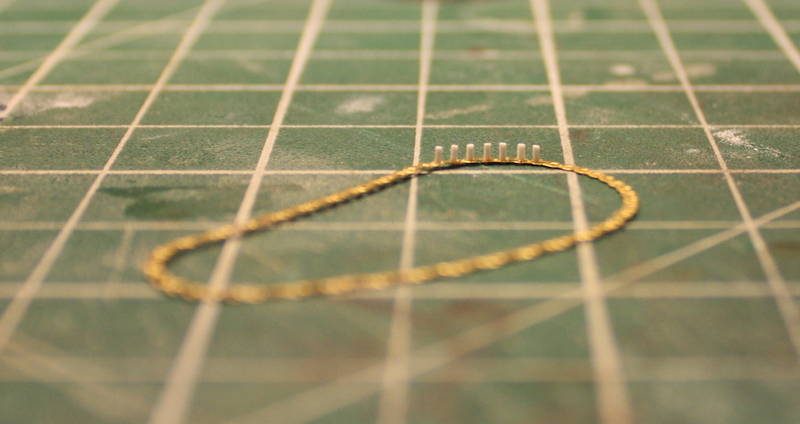
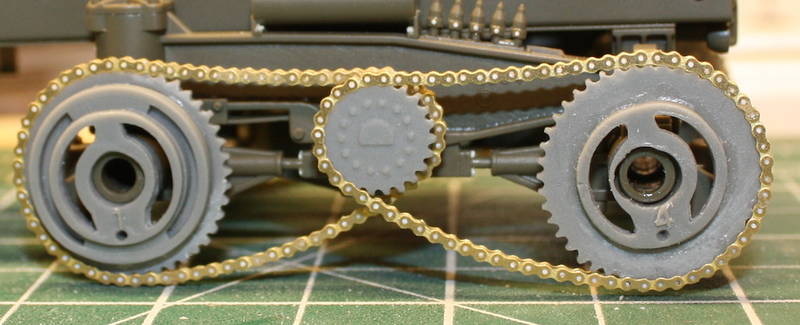
The second issue is the tolerances needed to make the chain. Because there are about 100 small pieces of rod that all need to line up, the styrene rod needs to be cut to 0.75mm +/- 0.03mm of the ideal size. Any more variation then that and the chain halves wont align properly and your chain will look wavy and terrible (Ask me how I know, or what happened to the first chain I tried to assemble! At least with a second copy of the chain set I had a backup.)
Every single little styrene rod had to be measured with digital calipers to confirm it was the right size. And there are about 100 per chain. And four chains. You can see where this is going
MANY hours later I managed to get it done.
panamadan
Joined: July 20, 2004
KitMaker: 1,513 posts
Armorama: 1,449 posts
Posted: Monday, February 17, 2014 - 02:42 PM UTC
Wow.
Dan
Dan

The_musings_of_NBNoG
Joined: January 08, 2012
KitMaker: 520 posts
Armorama: 516 posts
Posted: Monday, February 17, 2014 - 05:00 PM UTC
I had always thought that slat armor would be a great challange....but thats working with 2X4's compared to this!


((2X4..is lage piece of wood ))
))
((2X4..is lage piece of wood
))JLModels
Joined: February 15, 2014
KitMaker: 117 posts
Armorama: 117 posts
Posted: Tuesday, February 18, 2014 - 08:40 AM UTC
It might be a great challenge, but in the end it was worth it. The completed assemblies, once mounted to the axles, are actually surprisingly strong. Thankfully!
The best part is that I get to do it all over again come time for the winch to be built!
The best part is that I get to do it all over again come time for the winch to be built!
JLModels
Joined: February 15, 2014
KitMaker: 117 posts
Armorama: 117 posts
Posted: Wednesday, February 19, 2014 - 11:50 AM UTC
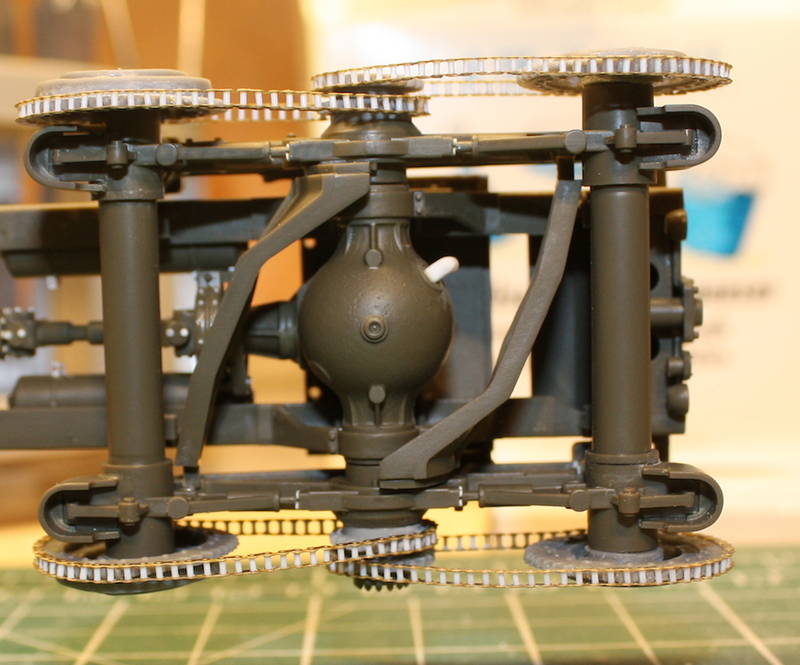
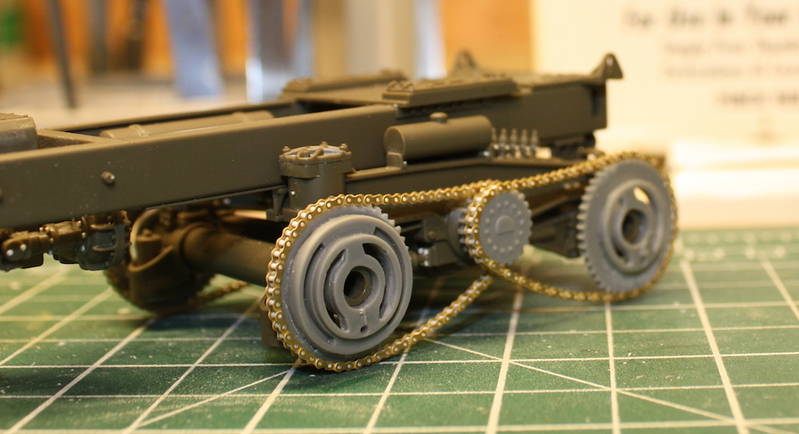
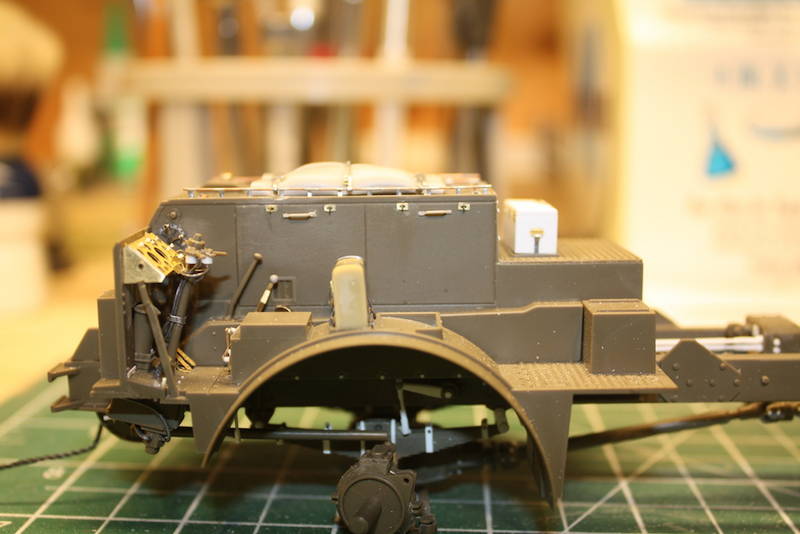
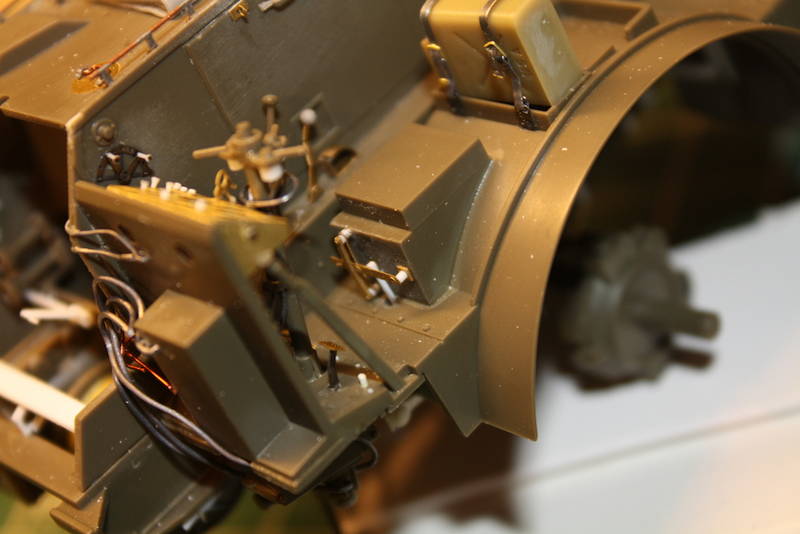
Ive begun detailing the rear half of the undercarriage, including the oil drip tubes for the chains, as well as miscellaneous bolts I noticed in the images that were missing in the kit.
Also added are the mud guards from the Royal Models photoetch set, which are better detailed and more accurate than the ones which come with the Eduard set.
The front and rear brake lines have been added from 0.030 lead wire. The springs at the end of the wire, as well as the dangling ones hanging from the frame to hold up those lines were made from 0.013 inch copper wire and wrapped around 0.050 copper wire to form the spring, then removed, sliced off and glued on. When I realized how many different sized wires and such I would need for this kit I actually went out and bought the entire range of Plus models lead and copper wire, from size 0.013 up to 0.1 inch. While it was expensive, it actually paid for itself in terms of not having to tear my hair out finding the right wire sizes I needed.
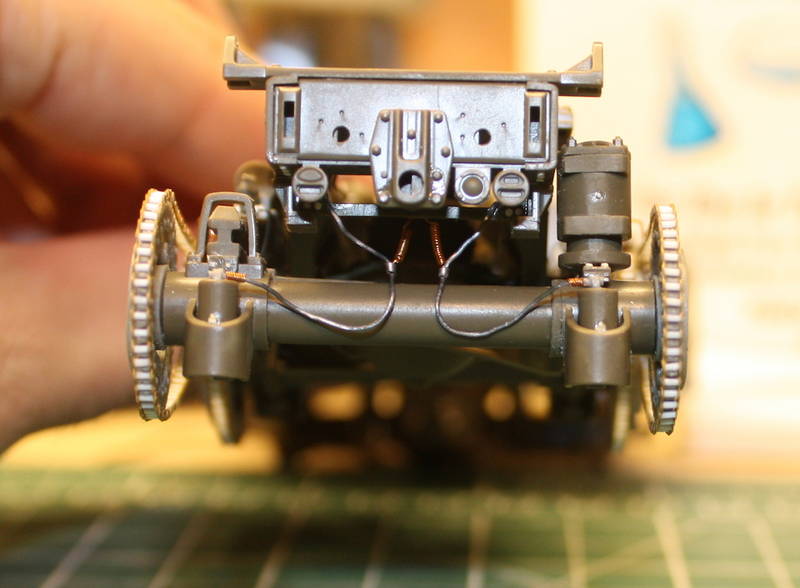
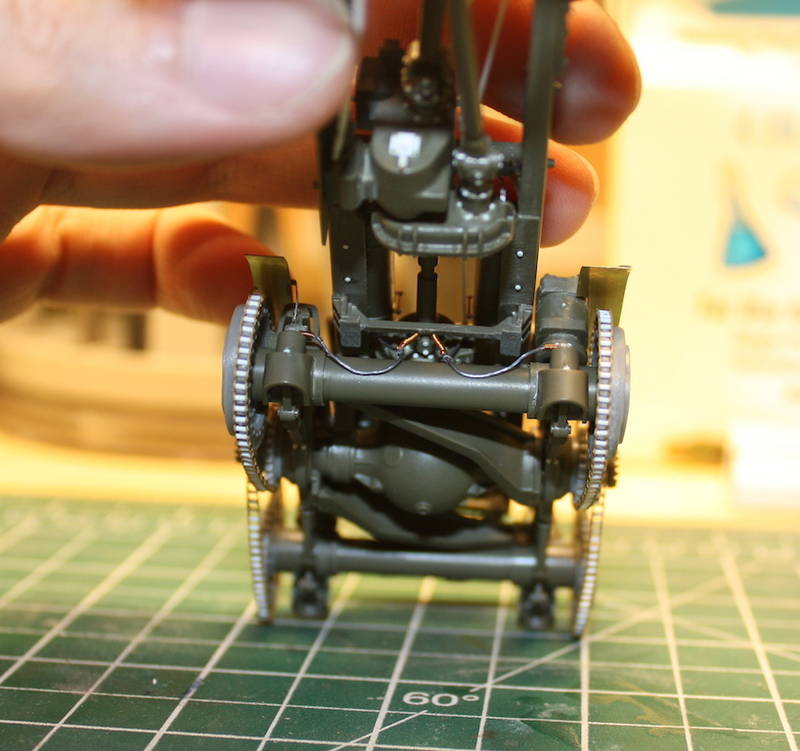
The airtanks and their associated hoses were taken on next. Each one has a coupling that needs to be attached either end, and theyre different for each tank. The right side tank hose connects to the left one in the front, and exits at the back towards the brakes along with a check valve. The left side tank front connects both to the right side and goes forward under the cross member and along the frame to the engine compartment, while the other side exits back toward the brakes.
I debated replacing the straps entirely but as the tanks are molded into the frame, I would have had to cut them away, reshape them and then add the straps. Instead I only cut away the simplified middle section and replaced it with styrene strip and brass rod to simulate the strap connectors.
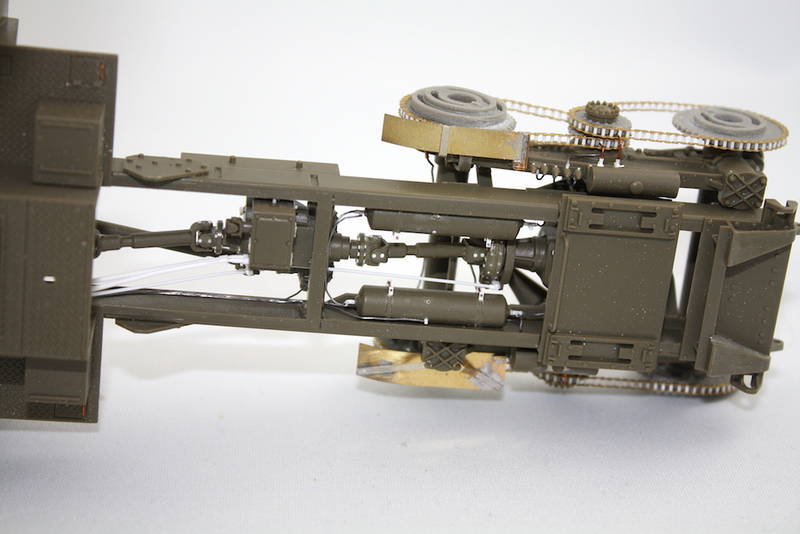
I also added the linkage rods which connect from the secondary transfer case to the engine compartment, as well as a linkage which goes from the winch transfer case/secondary transmission back to the top of the rear drive transfer case. Im not sure how much it will be seen in the end, but at least I know its there, right?
Also added are the mud guards from the Royal Models photoetch set, which are better detailed and more accurate than the ones which come with the Eduard set.
The front and rear brake lines have been added from 0.030 lead wire. The springs at the end of the wire, as well as the dangling ones hanging from the frame to hold up those lines were made from 0.013 inch copper wire and wrapped around 0.050 copper wire to form the spring, then removed, sliced off and glued on. When I realized how many different sized wires and such I would need for this kit I actually went out and bought the entire range of Plus models lead and copper wire, from size 0.013 up to 0.1 inch. While it was expensive, it actually paid for itself in terms of not having to tear my hair out finding the right wire sizes I needed.
The airtanks and their associated hoses were taken on next. Each one has a coupling that needs to be attached either end, and theyre different for each tank. The right side tank hose connects to the left one in the front, and exits at the back towards the brakes along with a check valve. The left side tank front connects both to the right side and goes forward under the cross member and along the frame to the engine compartment, while the other side exits back toward the brakes.
I debated replacing the straps entirely but as the tanks are molded into the frame, I would have had to cut them away, reshape them and then add the straps. Instead I only cut away the simplified middle section and replaced it with styrene strip and brass rod to simulate the strap connectors.
I also added the linkage rods which connect from the secondary transfer case to the engine compartment, as well as a linkage which goes from the winch transfer case/secondary transmission back to the top of the rear drive transfer case. Im not sure how much it will be seen in the end, but at least I know its there, right?
Dangeroo

#023

Joined: March 13, 2009
KitMaker: 2,058 posts
Armorama: 1,656 posts

Posted: Wednesday, February 19, 2014 - 09:35 PM UTC
Wow, that is amazing detail, Jason. I'll be watching with interest!
berwickj

Joined: April 16, 2007
KitMaker: 352 posts
Armorama: 342 posts

Posted: Wednesday, February 19, 2014 - 11:28 PM UTC
Hi Jason,
your work is looking first class! I'm amazed at the level of detail you're putting into this.
Be careful when starting the trailer, if you're planning on using the Tankograd book as a guide. They show an M15A1 trailer that has been backdated to look like an M15, but this is not mentioned. You're better off using the manual, there are some great details in there.
John

165thspc

#521
Joined: April 13, 2011
KitMaker: 9,465 posts
Armorama: 8,695 posts
Posted: Thursday, February 20, 2014 - 01:44 AM UTC
WOW you are really showing me details I never even thought to add! As in the bolt heads on the universal joints. Now I will have to rework both my Dragon Wagon and my Mack NO.
Thanks for sharing!
Thanks for sharing!


thebear
Joined: November 15, 2002
KitMaker: 3,960 posts
Armorama: 3,579 posts
Posted: Thursday, February 20, 2014 - 04:45 AM UTC
Wow..You have patience ...Great work .. puts my work on mine to shame. I'll be watching .. 
Rick
Rick

JLModels
Joined: February 15, 2014
KitMaker: 117 posts
Armorama: 117 posts
Posted: Thursday, February 20, 2014 - 06:41 AM UTC
Stephan, Richard,
Thanks! I know a lot of it likely might not be seen in the end, but I'm still surprised Tamiya skipped over so many bolts and linkages.
Michael,
That's actually why I'm making these blog posts. I figured that given the amount of time I spent researching this thing, if I can document and post it then others will have an easier time building theirs!
John,
Thanks! I was aware of it because the Tankograd one still has a lot of added reinforcements around the bed and the bed crossbar layout is very different. Still, it is a good reference for the front raised part of the trailer (minus the second added roller), the trailer legs and the wheel braking system. I've found a dozen M15A1 walkarounds but almost no M15 walkarounds.
JLModels
Joined: February 15, 2014
KitMaker: 117 posts
Armorama: 117 posts
Posted: Friday, February 21, 2014 - 05:22 AM UTC
Topside to begin detailing the crew compartment. The Tamiya kit includes a decent amount of detail here, but theres still a lot to be improved.
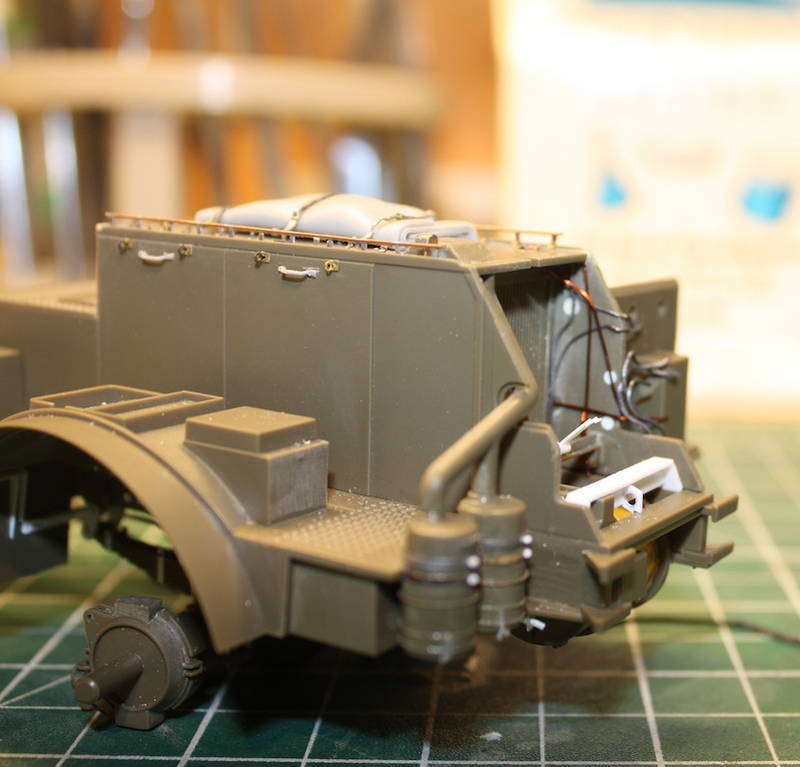
The molded on rails on top of the engine compartment are decent, but the Royal models set includes the parts to replace these with some brass rod and photoetch. I did so, and really think it improves the look, but a word of caution here. If you do this, make sure you have a good soldering iron and some pretty decent soldering skills. The entire assembly is delicate even soldered, and simply would not hold up well if it were only superglued.
The resin blankets are included with the Royal Models set and added tie downs made of lead foil with Aber photoetched buckles.
The drivers steering column and dash got a big makeover, including the Royal Models photoetched dash, lots of wiring around the steering column (refer to reference images for a lot of this, the wiring layout is odd. One of the steering-column mounted valve wiring makes a loop around the other two).
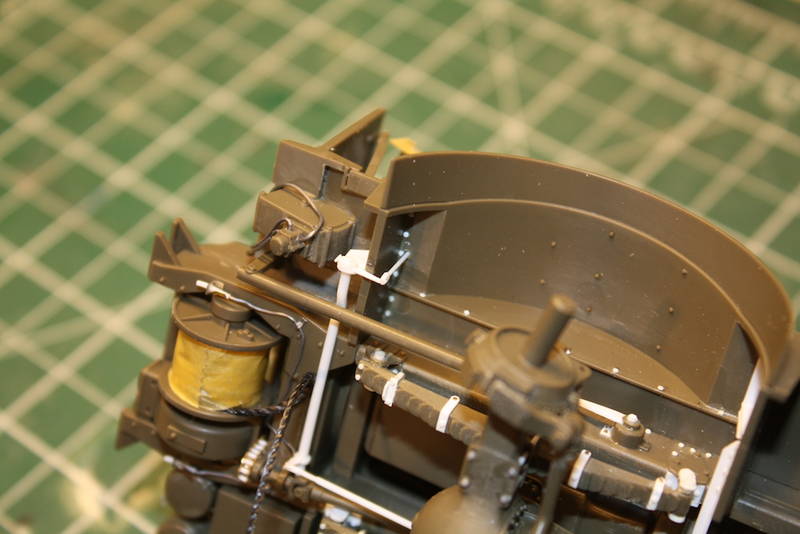
You can also see the lever mechanism below the drivers seat which actuates the secondary transmission takeoff I mentioned in post 2.
Ill put a bit of a note on the photoetch detail sets Ive bought here. As you may have noticed, Im using the Royal Models stuff rather extensively, but have barely mentioned the Eduard sets I bought. Theres a reason for that. Frankly, almost universally, the Royal Models stuff is simply better, or more accurate than the Eduard set. For example, Eduard would have you sand down the flat plates on the sides of the engine compartment, and then replace them with take a guess
Photoetched flat plates.
No detail difference whatsoever, less accurate (the real plates dont stand out from the compartment like adding the photoetch ones would), and make work for no benefit. Maybe if you were showing them open and put in a complete engine it might make sense, but for 99% of us its just a useless set of parts they include. The same goes for replacing the molded on engine compartment vent with a photoetched one, same for replacing the two small access hatches at the back of the cab interior, etc etc. There are really precious few Eduard parts in their interior set which are of much value. Id really only recommend them if for some reason you cant get the Royal Models stuff, and thats even with Royal Models resin casting issues.
That being said, their shifting plate replacement on the engine compartment near the drivers seat was a little nicer done than the Royal Models one, so at least that was used, with some 0.010 styrene rod handles.
The driver pedals were also replaced with royal models ones, which are more accurate than the Eduard ones (although Ive seen both foot plate textures in images, so I can only assume there were manufacturing differences over time).
The molded on rails on top of the engine compartment are decent, but the Royal models set includes the parts to replace these with some brass rod and photoetch. I did so, and really think it improves the look, but a word of caution here. If you do this, make sure you have a good soldering iron and some pretty decent soldering skills. The entire assembly is delicate even soldered, and simply would not hold up well if it were only superglued.
The resin blankets are included with the Royal Models set and added tie downs made of lead foil with Aber photoetched buckles.
The drivers steering column and dash got a big makeover, including the Royal Models photoetched dash, lots of wiring around the steering column (refer to reference images for a lot of this, the wiring layout is odd. One of the steering-column mounted valve wiring makes a loop around the other two).
You can also see the lever mechanism below the drivers seat which actuates the secondary transmission takeoff I mentioned in post 2.
Ill put a bit of a note on the photoetch detail sets Ive bought here. As you may have noticed, Im using the Royal Models stuff rather extensively, but have barely mentioned the Eduard sets I bought. Theres a reason for that. Frankly, almost universally, the Royal Models stuff is simply better, or more accurate than the Eduard set. For example, Eduard would have you sand down the flat plates on the sides of the engine compartment, and then replace them with take a guess
Photoetched flat plates.
No detail difference whatsoever, less accurate (the real plates dont stand out from the compartment like adding the photoetch ones would), and make work for no benefit. Maybe if you were showing them open and put in a complete engine it might make sense, but for 99% of us its just a useless set of parts they include. The same goes for replacing the molded on engine compartment vent with a photoetched one, same for replacing the two small access hatches at the back of the cab interior, etc etc. There are really precious few Eduard parts in their interior set which are of much value. Id really only recommend them if for some reason you cant get the Royal Models stuff, and thats even with Royal Models resin casting issues.
That being said, their shifting plate replacement on the engine compartment near the drivers seat was a little nicer done than the Royal Models one, so at least that was used, with some 0.010 styrene rod handles.
The driver pedals were also replaced with royal models ones, which are more accurate than the Eduard ones (although Ive seen both foot plate textures in images, so I can only assume there were manufacturing differences over time).
panamadan
Joined: July 20, 2004
KitMaker: 1,513 posts
Armorama: 1,449 posts
Posted: Friday, February 21, 2014 - 11:53 AM UTC
Jason, have you seen this: http://www.archertransfers.com/AR35274.html
Dan
Dan
Stickframe

#362
Joined: December 01, 2013
KitMaker: 1,661 posts
Armorama: 1,202 posts

Posted: Friday, February 21, 2014 - 12:36 PM UTC
Hi Jason - sorry to be late to the party - late or not, I have to say, the work you did on those chain drives is really something else! I am sure it was no picnic, and must make the following (excellent) wiring details seem downright easy! (And I know it's not all that easy)
Cheers
Nick
Cheers
Nick

Plasticbattle
#003

Joined: May 14, 2002
KitMaker: 9,763 posts
Armorama: 7,444 posts

Posted: Friday, February 21, 2014 - 04:04 PM UTC
Fantastic build so far Jason. Kudos for the chains ... they look great. 

JLModels
Joined: February 15, 2014
KitMaker: 117 posts
Armorama: 117 posts
Posted: Saturday, February 22, 2014 - 09:29 AM UTC
Yup, and I have it! Just wait until you see what I had to do to get the instruments right on this thing!
JLModels
Joined: February 15, 2014
KitMaker: 117 posts
Armorama: 117 posts
Posted: Saturday, February 22, 2014 - 09:31 AM UTC
Quoted Text
Hi Jason - sorry to be late to the party - late or not, I have to say, the work you did on those chain drives is really something else! I am sure it was no picnic, and must make the following (excellent) wiring details seem downright easy! (And I know it's not all that easy)
Cheers
Nick
Thanks!
While it was easier to build, the wiring was a pain to figure out exactly how many wires there are and what goes where. A lot of the images I found were of restored Dragon Wagons that had their wiring replaced with more modern stuff, so making sense of it all wasn't as easy as you'd expect!
JLModels
Joined: February 15, 2014
KitMaker: 117 posts
Armorama: 117 posts
Posted: Saturday, February 22, 2014 - 09:35 AM UTC
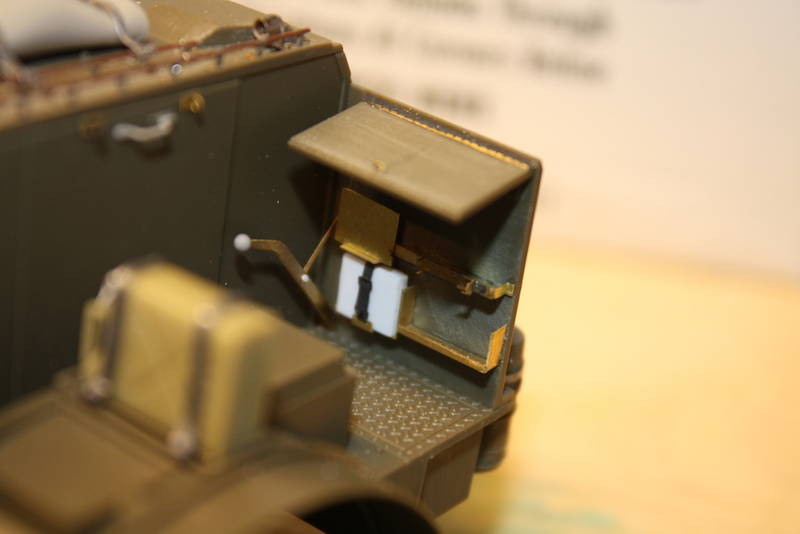
The commanders seating are took a lot of work to get done. Once again Eduard provides an incorrectly shaped replacement for the commanders map desk, so I stuck with the Tamiya one, which is the correct shape. I added a little lock-down hoop from my spares bin (sadly out of focus in this shot) and the Eduard hinge, as the real map desk is openable, presumably for map storage.
Below the map desk is an area neither photoetch sets, nor Tamiya got right. Yes, there is a first aid kit, and both sets include a nice holder and straps for the first aid kit. But next to that, and above that are two shelving assemblies. The shelf above the first aid kit has a plate on the left side with a small outcrop at the bottom which holds the commanders binoculars, and next to that is a flashlight holder mounted on the outside of the shelf. The lower one next to the first aid kit is there in some images and not in others, so I assume there are production differences for that one.
Sadly neither of the shelves is included in the photoetch sets, so I scratchbuilt both using leftover brass sheet soldered together, and the Royal Models flashlight holder. The Flashlight itself, as well as the binoculars case, will be added after painting.
JLModels
Joined: February 15, 2014
KitMaker: 117 posts
Armorama: 117 posts
Posted: Monday, February 24, 2014 - 12:26 PM UTC


I began the cab itself by doing something I almost thought treasonous at the time: obliterating almost all of the molded in detail on the cab both inside and out. I filled all of the light locator holes, the tool locator holes, and removed the tripod mount from the top of the cab. Inside I removed all of the seams, the locator marks for the ammo racks and the locator areas for the front windscreen. I also filled in the two holes in the roof but only partially, so the inside is smooth but there is still a depression from the outside for the roof-mounted light and 50cal ring mount.

The interior of the roof is an area where I question Tamiyas sanity. The upper roof ribs are molded as a single piece with the fire extinguisher mounts, main cab light, and the rear light power cable winder thing (I dont really know what else to call it) all molded as one piece. The problem is two-fold. First, it has injector pin marks all over the visible side, and second, its got this unusual extra plastic sheet between some of the ribs. None of my pictures show any sort of internal roof armor added, so why this is there I have no idea. Its not like without it the piece would be difficult to mold, Tamiya has many more complicated pieces in this kit. So why they molded it like this I havent a clue.

So of course I cut away all of this mythical filler plate, and added the ribs as they should be to the top and side of the cab. I cut away the rear light power cable winder thing and added the proper mounting tabs, and glued it to the interior of the cab roof directly, as its supposed to be.
Next up: Weld seams! So many tiny, interspaced weld seams! In the images of the actual vehicle theyre all large enough to be seen clearly, but small enough that they were a pain to add. I cut up 0.010 styrene rod to about 2mm in size, then laid them out in the pattern from the reference photos and glued them down with Tamiya extra-thin cement. When they were softened I came back and textured them with my sharp pair of tweezers. The results, as tedious as they were to do, look pretty good I think.
Thankfully the ones around the edge of the cab front and roof were solid and went faster.


JLModels
Joined: February 15, 2014
KitMaker: 117 posts
Armorama: 117 posts
Posted: Wednesday, February 26, 2014 - 05:15 AM UTC
I got myself a small collapsible lighting tent so hopefully the images will come out clearer now.
The cab windows all needed reinforcing strips added to the inside, as was shown in the Royal Models instruction sheet. I added them using 0.010 x 0.030 styrene strip, cut at 45 angles, as they were on the original vehicle. For no other reason than because I can, I added the tiny weldseams in the corners using archer transfers resin weld beads. Im not sure theyll be at all visible, but I got their sample pack with a dry transfer set I ordered a while back and this was an excuse to test them.


You can also see some of the lead wiring I put in leading to the ceiling cab light, and to the external roof spotlight, as well as the hold-downs for the heavy duty cutters which mount to the ceiling. The cutters themselves arent included in the Tamiya kit and are a rather unique shape. Strangely enough I found a pair in a Dragon German figure kit as a spare accessory! The funny thing is that minus the very ends of the handles, which I had to file down, the Dragon german heavy cutters match absolutely perfectly with the actual tool in the references.
Next came the rear of the cab as well as the accessories to be mounted in the cab during or after painting. The cab rear is another one of those areas where Tamiya just gave all modelers a big ol middle finger and dumped a ton of injection pin marks all over the inside, in corners and areas where theyre hard to fill.

Unusually this is one area where the Eduard stuff actually matched up well with my references and fit fairly nicely. The hinges and tie-down straps for the resin jerry can are mounted pretty nicely (also the Royal Models rear wall jerry can mount is incorrectly shaped). I also added the styrene frames to the inside of the rear windows. The Royal Models set actually comes with photoetched versions of these, but I found it easier to get the right thickness using styrene strip instead. As usual, a ton of interspersed weld beads were added as they were to the cab roof.

The fold-down rear seat is a fairly basic Tamiya part, and while the Royal Models set does include a photoetched part for it, it doesnt really match up well with any photos I have. Furthermore, the handle is molded into the rear wall in the down position, indicating the seat should be laying flat against the wall, as opposed to in seat conformation. So I carved off the handle, made a new one from some brass strip, added the little spring works as part of the latch mechanism. Next came a few small brass holddowns for the wire that runs along the top edge, and the wiring itself, which goes down the right side reinforcing rib, and voila, the inner rear panel is done.
The cab windows all needed reinforcing strips added to the inside, as was shown in the Royal Models instruction sheet. I added them using 0.010 x 0.030 styrene strip, cut at 45 angles, as they were on the original vehicle. For no other reason than because I can, I added the tiny weldseams in the corners using archer transfers resin weld beads. Im not sure theyll be at all visible, but I got their sample pack with a dry transfer set I ordered a while back and this was an excuse to test them.
You can also see some of the lead wiring I put in leading to the ceiling cab light, and to the external roof spotlight, as well as the hold-downs for the heavy duty cutters which mount to the ceiling. The cutters themselves arent included in the Tamiya kit and are a rather unique shape. Strangely enough I found a pair in a Dragon German figure kit as a spare accessory! The funny thing is that minus the very ends of the handles, which I had to file down, the Dragon german heavy cutters match absolutely perfectly with the actual tool in the references.
Next came the rear of the cab as well as the accessories to be mounted in the cab during or after painting. The cab rear is another one of those areas where Tamiya just gave all modelers a big ol middle finger and dumped a ton of injection pin marks all over the inside, in corners and areas where theyre hard to fill.
Unusually this is one area where the Eduard stuff actually matched up well with my references and fit fairly nicely. The hinges and tie-down straps for the resin jerry can are mounted pretty nicely (also the Royal Models rear wall jerry can mount is incorrectly shaped). I also added the styrene frames to the inside of the rear windows. The Royal Models set actually comes with photoetched versions of these, but I found it easier to get the right thickness using styrene strip instead. As usual, a ton of interspersed weld beads were added as they were to the cab roof.
The fold-down rear seat is a fairly basic Tamiya part, and while the Royal Models set does include a photoetched part for it, it doesnt really match up well with any photos I have. Furthermore, the handle is molded into the rear wall in the down position, indicating the seat should be laying flat against the wall, as opposed to in seat conformation. So I carved off the handle, made a new one from some brass strip, added the little spring works as part of the latch mechanism. Next came a few small brass holddowns for the wire that runs along the top edge, and the wiring itself, which goes down the right side reinforcing rib, and voila, the inner rear panel is done.
JLModels
Joined: February 15, 2014
KitMaker: 117 posts
Armorama: 117 posts
Posted: Thursday, February 27, 2014 - 02:31 PM UTC
The interior accessories came next, including the 50cal and Thompson ammo storage bins, the fire extinguishers, seats, etc.
While the seats seem simplified, they are actually pretty accurate to all of the images I saw. The only questionable areas were the two front seats. Most restored or in-progress restoration images show them with sheetmetal backs, which would require thinning of the kit parts. But the ww2-era and technical manual images show a pleated fabric cover placed over the back. I simulated this by thinning down the sides, then using Apoxie epoxy sculpting putty to model the fabric and pleats.

The ammo storage bins were some of the most frustrating pieces in the entire model, and blame for this falls entirely on Eduard. The Tamiya pieces are simplified and missing the side frames, Thompson machine gun shelf at the bottom, and the straps that prevent the ammo containers from sliding out. The side frames on these parts are particularly critical, because they can be VERY clearly seen through both the windows and especially if any of the doors are opened. The Royal Models set actually come with some really nice resin ammo bins with side frames, and I was torn about using those, but decided I wanted to have some of the ammo boxes removed to make the Dragon Wagon look more lived in and dynamic.
In hindsight I should probably have just used the Royal Models ones or scratchbuilt them out of 0.010 strip styrene, but in my sometimes near-infinite stupidity, I decided to try to use the ones from the Eduard Dragon Wagon storage boxes set. I had to get this set on Ebay as its out of production and frankly, IMO, for good reason. It comes with replacement photoetched ammo racks, with separate shelves, but the sides are etched as solid plates rather than the proper frame shape (pretty much mirror images of the like the undetailed Tamiya ones.) The Eduard interior set comes with the proper etched frames to add to the Tamiya parts, so I thought to myself Hey, lets just cut the sides off of the Eduard Storage bin set ammo rack parts and solder on the correctly shaped Eduard Interior set side frames, and all will look awesome, right?
So why is it the two parts were somehow different heights and different widths!? No, Im not kidding. Two parts from the same manufacturer; both meant to detail or replace the same Tamiya ammo bins were completely different sizes!
Also, to add insult to injury, the photoetched ammo boxes the storage bin set includes not only look terrible and have no lids, but even better, they dont fit with the Eduard Interior set side panels, nor match up with the Royal Models resin pieces.
So I sanded back all of the Eduard ammo set shelves and frame, matched it as close as I could to the Eduard side frames, and soldered it all together. This took a LOT of solder to fill the gaps, and frankly was a massive pain in the rear. But combined with the Royal Models Thompson submachine gun shelves at the bottom, and the Eduard straps (that were heated over a flame to soften them) and it looks pretty damned good in the end.

Even so, if I had to do it again, Id just scratchbuild the ammo bins from strip styrene and burn the Eduard Dragon Wagon storage and ammo bin set in the furnace of my unending fury. Or just save the 15 bucks and never buy it, or for that matter save myself even more and never buy the entire Eduard Interior set too, and save myself the grief.
The fire extinguishers were next, and they were fairly important to detail well as there are four identical ones scattered throughout the cab. The Tamiya parts are actually pretty decent minus the undetailed strap, but the worst offender is the base plate. The base of the real ones is a complicated shape with six groves along the edges, three of which have raised holes, and one large center hole through which you can see the bottom of the extinguisher.
The Eduard interior kit proves its uselessness again here, having replacement frames that dont even attempt to replicate these features at the bottom (You may ask, why care about the bottoms, but remember two of those extinguishers are mounted sideways to the interior of the cab roof, so the bottoms are plainly visible). Royal Models provides a really nice replacement strap, which I used, but the base plate with only the center hole and a strange shape to that as well. Ive seen the shape of the Royal Models base in one image, so its likely a production variant, but its rarer than the one I chose to model.
So I redid the base myself, carefully drilling, filing and sanding away until I had the size groves and center hole. I then added the straps, and finally a small base plate for the fire extinguisher nozzle that was carved off the Eduard set.

Next up I'm going to work on either the dual winches, or maybe paint up the interior.
While the seats seem simplified, they are actually pretty accurate to all of the images I saw. The only questionable areas were the two front seats. Most restored or in-progress restoration images show them with sheetmetal backs, which would require thinning of the kit parts. But the ww2-era and technical manual images show a pleated fabric cover placed over the back. I simulated this by thinning down the sides, then using Apoxie epoxy sculpting putty to model the fabric and pleats.
The ammo storage bins were some of the most frustrating pieces in the entire model, and blame for this falls entirely on Eduard. The Tamiya pieces are simplified and missing the side frames, Thompson machine gun shelf at the bottom, and the straps that prevent the ammo containers from sliding out. The side frames on these parts are particularly critical, because they can be VERY clearly seen through both the windows and especially if any of the doors are opened. The Royal Models set actually come with some really nice resin ammo bins with side frames, and I was torn about using those, but decided I wanted to have some of the ammo boxes removed to make the Dragon Wagon look more lived in and dynamic.
In hindsight I should probably have just used the Royal Models ones or scratchbuilt them out of 0.010 strip styrene, but in my sometimes near-infinite stupidity, I decided to try to use the ones from the Eduard Dragon Wagon storage boxes set. I had to get this set on Ebay as its out of production and frankly, IMO, for good reason. It comes with replacement photoetched ammo racks, with separate shelves, but the sides are etched as solid plates rather than the proper frame shape (pretty much mirror images of the like the undetailed Tamiya ones.) The Eduard interior set comes with the proper etched frames to add to the Tamiya parts, so I thought to myself Hey, lets just cut the sides off of the Eduard Storage bin set ammo rack parts and solder on the correctly shaped Eduard Interior set side frames, and all will look awesome, right?
So why is it the two parts were somehow different heights and different widths!? No, Im not kidding. Two parts from the same manufacturer; both meant to detail or replace the same Tamiya ammo bins were completely different sizes!
Also, to add insult to injury, the photoetched ammo boxes the storage bin set includes not only look terrible and have no lids, but even better, they dont fit with the Eduard Interior set side panels, nor match up with the Royal Models resin pieces.
So I sanded back all of the Eduard ammo set shelves and frame, matched it as close as I could to the Eduard side frames, and soldered it all together. This took a LOT of solder to fill the gaps, and frankly was a massive pain in the rear. But combined with the Royal Models Thompson submachine gun shelves at the bottom, and the Eduard straps (that were heated over a flame to soften them) and it looks pretty damned good in the end.
Even so, if I had to do it again, Id just scratchbuild the ammo bins from strip styrene and burn the Eduard Dragon Wagon storage and ammo bin set in the furnace of my unending fury. Or just save the 15 bucks and never buy it, or for that matter save myself even more and never buy the entire Eduard Interior set too, and save myself the grief.
The fire extinguishers were next, and they were fairly important to detail well as there are four identical ones scattered throughout the cab. The Tamiya parts are actually pretty decent minus the undetailed strap, but the worst offender is the base plate. The base of the real ones is a complicated shape with six groves along the edges, three of which have raised holes, and one large center hole through which you can see the bottom of the extinguisher.
The Eduard interior kit proves its uselessness again here, having replacement frames that dont even attempt to replicate these features at the bottom (You may ask, why care about the bottoms, but remember two of those extinguishers are mounted sideways to the interior of the cab roof, so the bottoms are plainly visible). Royal Models provides a really nice replacement strap, which I used, but the base plate with only the center hole and a strange shape to that as well. Ive seen the shape of the Royal Models base in one image, so its likely a production variant, but its rarer than the one I chose to model.
So I redid the base myself, carefully drilling, filing and sanding away until I had the size groves and center hole. I then added the straps, and finally a small base plate for the fire extinguisher nozzle that was carved off the Eduard set.
Next up I'm going to work on either the dual winches, or maybe paint up the interior.

didgeboy
Joined: September 21, 2010
KitMaker: 1,846 posts
Armorama: 1,509 posts
Posted: Thursday, February 27, 2014 - 04:35 PM UTC
Please please please, never take these photos away. This build is awesome.

stufer

Joined: May 25, 2003
KitMaker: 416 posts
Armorama: 342 posts

Posted: Thursday, February 27, 2014 - 11:37 PM UTC
this is insane,I'm looking at the Tamiya M26 tractor unit in my stash and shuddering internally at the thought of the benchmark being set by this buildlog Good Work Fella!!

trahe
Joined: April 03, 2006
KitMaker: 1,158 posts
Armorama: 950 posts
Posted: Friday, February 28, 2014 - 12:12 AM UTC
Incredible build. Those drive chains are insane!
JLModels
Joined: February 15, 2014
KitMaker: 117 posts
Armorama: 117 posts
Posted: Friday, February 28, 2014 - 04:58 PM UTC
Damon,
I shall endeavour not to!
I shall endeavour not to!
 |

WEB HOSTING BY


Copyright ©2021 Armorama and Kitmaker Network, a subsidiary of Silver Star Enterprises
All Rights Reserved. Please read our Conditions of Use and Privacy Policy.
All Rights Reserved. Please read our Conditions of Use and Privacy Policy.