

Hey Matt - - wow! your shop is building some serious turbines and neat (big) looking stuff in general! - no lightweight projects in that building!....yes, i'll copy an image or two for the files - thanks
Hi Victor - i really appreciate your encouragement for joining Armorama - your work, among all the other great projects being built here, really caught my attention - this is clearly a place for those of us who enjoy building models and checking out and talking with others who do to - thanks for taking a look at the build too -
Claude - yes i get it - thanks for checking in again - no worries -
If all goes as I'm hoping, I'll post a few more progress pictures tomorrow, or over the weekend -
cheers
NIck
Hosted by Darren Baker
1/35 Truck Fabrication shop

Stickframe

#362

Joined: December 01, 2013
KitMaker: 1,661 posts
Armorama: 1,202 posts

Posted: Thursday, December 12, 2013 - 09:25 AM UTC
repynot

Joined: July 19, 2012
KitMaker: 194 posts
Armorama: 188 posts

Posted: Thursday, December 12, 2013 - 11:26 AM UTC
WAUW!!
Where did you find all those workshop tools?
I can see that the workshop I have planned to build some time in 2014 is not near any thing like this monster...
Where did you find all those workshop tools?
I can see that the workshop I have planned to build some time in 2014 is not near any thing like this monster...
Stickframe
#362
Joined: December 01, 2013
KitMaker: 1,661 posts
Armorama: 1,202 posts
Posted: Friday, December 13, 2013 - 02:58 PM UTC
Hello -
Hi Repynot, thanks for taking a look. Most of the shop tools are from Verlinden, but also from CMK, and any other source i could find. It would be nice if someone made small kits with just shop basics! - a few bench vices, grinders, etc, without the need to buy all the other stuff too. Because of this, I'm always on the lookout for nice tools!
Anyway, for this post, i have some progress pics of some new details along the "back" of the shop. Funny thing, I did at least something new almost every night after work - and I dont have too much to show for it!
OK -please take a look:


The two above are along the rear, curved wall. Just adding another layer of details, clutter etc. The workbench itself, was built and installed a few weeks ago. It has a thin aluminum top with styrene and thin brass rod framing. The challenge was to get it stiff enough to install, but to not warp it in the process - the aluminum seems to do the trick.
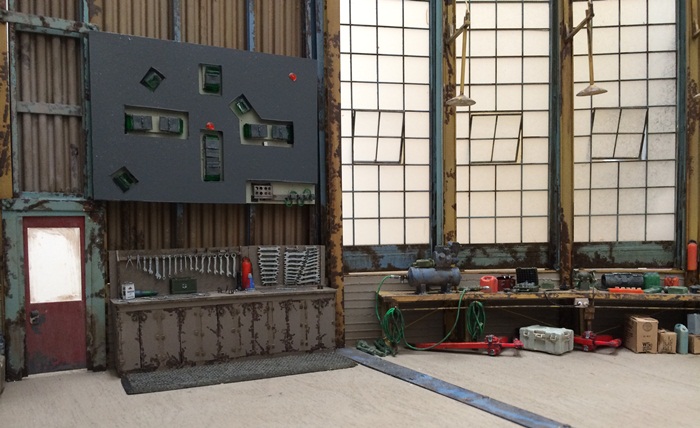
The little bench above is made of a mix of thin plywood, styrene and HO scale locomotive "long hood" doors. The tools are from vector cut.
The odd looking device above it is based on memory - something i saw a long time ago, used to calibrate digital optics (surveying instruments). As i liked the "look" i rationalized that something like this might be used to calibrate the optics used on CROWS too...maybe not - i really don't know...
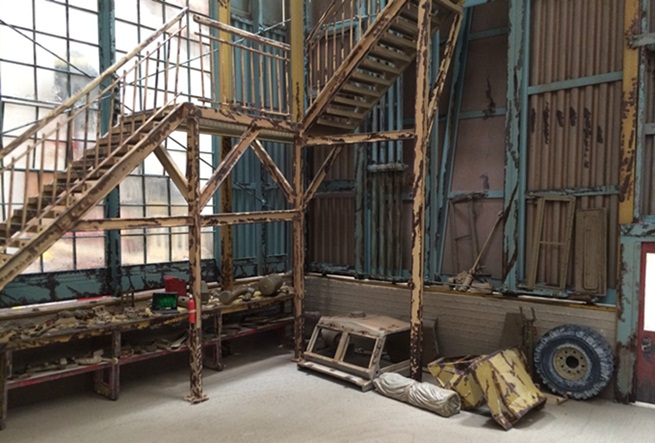
The area shown above is hard to work in - in brief, the stairs were built as one complete unit, then dropped into place. Unfortunately, this was well before i wanted to get into detailing - so, there's just a simple workbench with some clutter - I clearly need to add more to "ground" it better....in the future...
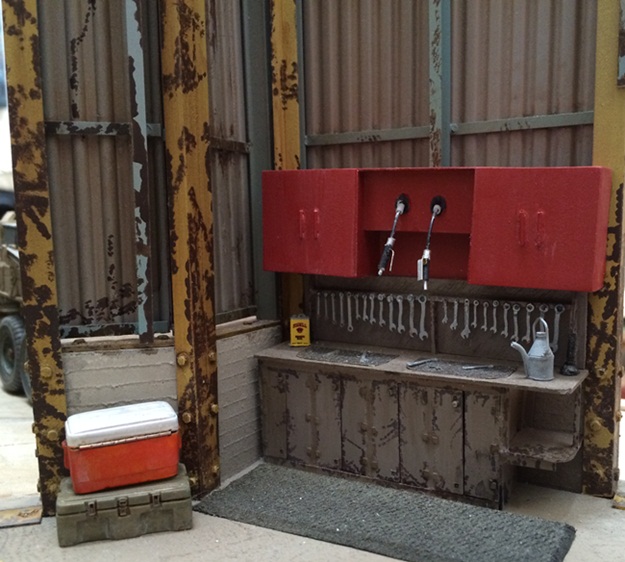
I recently saw one of these combo, cabinet/air hose units - cool - so, I thought this shop could use one too!
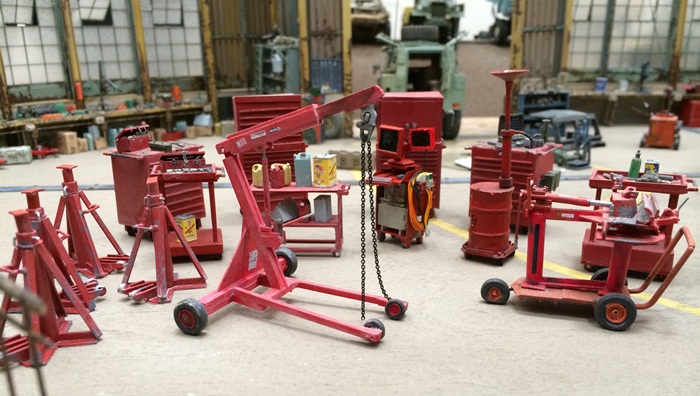
Most of the "shop stuff" is scratchbuilt - roller cabinets, engine puller, heavy duty jack stands, heavy tubing bender (on little trolley) etc. mostly from styrene, but with bits of brass,aluminum tubing etc. The tires/wheels are resin, from smaller scale aircraft kits.
I tend to dig around in hobby shop junk sale boxes and look for accessory kits (photo etch stuff etc) that are on sale for really low prices and then, reuse the parts to suit my needs. Also, i keep the "alternate" parts to photo etched parts from kits - and, as a result, a good box of useful vehicle realted odds and ends at hand.

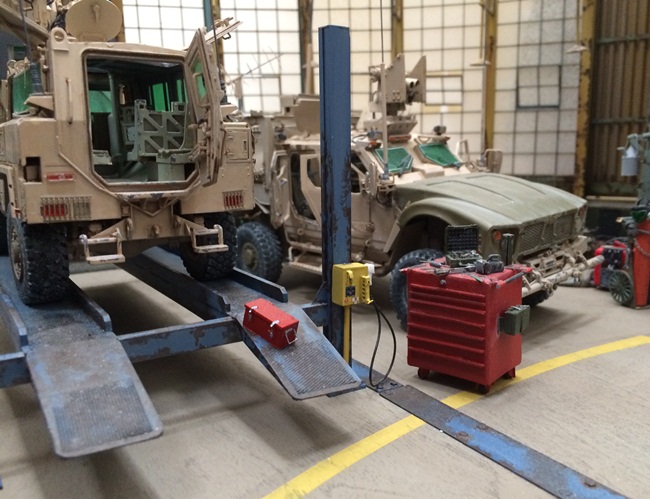
The heavy lifts are scratch built from styrene. These arent glued down yet - neither are the floor tools -
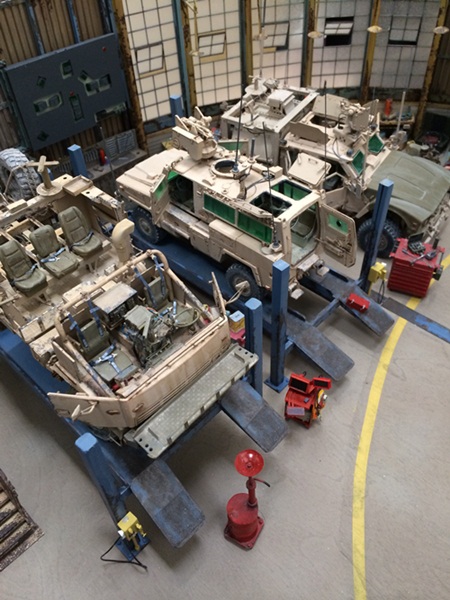
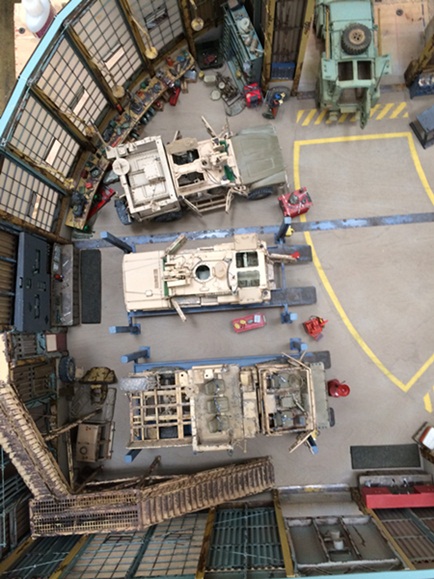
The two above give a pretty good view of progress on the back of the shop as it stands today. I think i need to go through one last time with details (and still all of the "front" of the shop!!!) - pictures are pretty good at showing the gaps i dont seem to notice while the rpoject is on the bench - I need to add paper! notes, books, manuals etc etc plus, still more junk.
You can see the/my(?) optics "calibration device" in front of the RG-31, mounted on the wall. The RG has been modified too - from the Kinetic kit - My version is loosely based on the Rg31A1/A2 - you'll note the opening front doors. It is not a precice representation, but fairly close and a real challenge to build!
Eventually I'll give the shop floor a wash with Lifecolor dust (heavily diluted), and when that sets up, I'll add oil stains etc. That won't be happening for a while though!
Next project - another MATV - i like the Panda kit. While they're not a picnic to build, i think I've resolved many of the problems, via trial and error and some GREAT posts here on Armorama! For this version of the truck i want it to be mostly torn down - and on the shop jacks shown above, hopefully good fun to build!
Ok - thanks for taking a look!
Cheers,
Nick
cheers
Nick
Hi Repynot, thanks for taking a look. Most of the shop tools are from Verlinden, but also from CMK, and any other source i could find. It would be nice if someone made small kits with just shop basics! - a few bench vices, grinders, etc, without the need to buy all the other stuff too. Because of this, I'm always on the lookout for nice tools!
Anyway, for this post, i have some progress pics of some new details along the "back" of the shop. Funny thing, I did at least something new almost every night after work - and I dont have too much to show for it!
OK -please take a look:
The two above are along the rear, curved wall. Just adding another layer of details, clutter etc. The workbench itself, was built and installed a few weeks ago. It has a thin aluminum top with styrene and thin brass rod framing. The challenge was to get it stiff enough to install, but to not warp it in the process - the aluminum seems to do the trick.
The little bench above is made of a mix of thin plywood, styrene and HO scale locomotive "long hood" doors. The tools are from vector cut.
The odd looking device above it is based on memory - something i saw a long time ago, used to calibrate digital optics (surveying instruments). As i liked the "look" i rationalized that something like this might be used to calibrate the optics used on CROWS too...maybe not - i really don't know...
The area shown above is hard to work in - in brief, the stairs were built as one complete unit, then dropped into place. Unfortunately, this was well before i wanted to get into detailing - so, there's just a simple workbench with some clutter - I clearly need to add more to "ground" it better....in the future...
I recently saw one of these combo, cabinet/air hose units - cool - so, I thought this shop could use one too!
Most of the "shop stuff" is scratchbuilt - roller cabinets, engine puller, heavy duty jack stands, heavy tubing bender (on little trolley) etc. mostly from styrene, but with bits of brass,aluminum tubing etc. The tires/wheels are resin, from smaller scale aircraft kits.
I tend to dig around in hobby shop junk sale boxes and look for accessory kits (photo etch stuff etc) that are on sale for really low prices and then, reuse the parts to suit my needs. Also, i keep the "alternate" parts to photo etched parts from kits - and, as a result, a good box of useful vehicle realted odds and ends at hand.
The heavy lifts are scratch built from styrene. These arent glued down yet - neither are the floor tools -
The two above give a pretty good view of progress on the back of the shop as it stands today. I think i need to go through one last time with details (and still all of the "front" of the shop!!!) - pictures are pretty good at showing the gaps i dont seem to notice while the rpoject is on the bench - I need to add paper! notes, books, manuals etc etc plus, still more junk.
You can see the/my(?) optics "calibration device" in front of the RG-31, mounted on the wall. The RG has been modified too - from the Kinetic kit - My version is loosely based on the Rg31A1/A2 - you'll note the opening front doors. It is not a precice representation, but fairly close and a real challenge to build!
Eventually I'll give the shop floor a wash with Lifecolor dust (heavily diluted), and when that sets up, I'll add oil stains etc. That won't be happening for a while though!
Next project - another MATV - i like the Panda kit. While they're not a picnic to build, i think I've resolved many of the problems, via trial and error and some GREAT posts here on Armorama! For this version of the truck i want it to be mostly torn down - and on the shop jacks shown above, hopefully good fun to build!
Ok - thanks for taking a look!
Cheers,
Nick
cheers
Nick
1stjaeger

Joined: May 20, 2011
KitMaker: 1,744 posts
Armorama: 1,727 posts

Posted: Friday, December 13, 2013 - 08:17 PM UTC
I'm either dreaming...and I'll soon wake up and all this will have disappeared (logically as such perfection does not exist down here)....and I will ba allowed to believe once again that I can build (halfway) decent dios........
....or else this whole thing is a cheat (as I guessed before) and the photos are taken in a real workshop!!
If neither of this is true......I go nuts!!

You are a master of observation and rendering. If both are on the highest level...something awesome like this is the result!!
A deep bow from an old dio builder!!
Romain
roudeleiw

Joined: January 19, 2004
KitMaker: 2,406 posts
Armorama: 2,224 posts

Posted: Friday, December 13, 2013 - 11:37 PM UTC
Very impressive!
A dio to keep in mind when doing something similar and look for motivation
Claude
A dio to keep in mind when doing something similar and look for motivation
Claude

jrutman
Joined: April 10, 2011
KitMaker: 7,941 posts
Armorama: 7,934 posts
Posted: Saturday, December 14, 2013 - 03:38 AM UTC
Ok ,this takes things to a whole different level.Astounding work!
J
J

165thspc

#521
Joined: April 13, 2011
KitMaker: 9,465 posts
Armorama: 8,695 posts
Posted: Saturday, December 14, 2013 - 03:38 AM UTC
Unless the shop crew just put down a brand new coating of "Grey Coat Epoxy" there's no way that floor is that clean. We need some oil stains in there my friend.
Please know that I am truly amazed with this massive project of yours. I have been collecting tools and window castings for some time in order to build a small WWII European shop to house a crew working on my super detailed M4 High Speed Tractor.
Seeing your shop I now have no more excuses!
Please know that I am truly amazed with this massive project of yours. I have been collecting tools and window castings for some time in order to build a small WWII European shop to house a crew working on my super detailed M4 High Speed Tractor.
Seeing your shop I now have no more excuses!


amoz02t
#192
Joined: November 25, 2009
KitMaker: 1,383 posts
Armorama: 1,281 posts

Posted: Saturday, December 14, 2013 - 04:11 AM UTC
Clearly many are following this for good reason as your work is wonderful. Want to visit this shop just to see the tools! Wow! please keeping sending more photos!

matt
Joined: February 28, 2002
KitMaker: 5,957 posts
Armorama: 2,956 posts
Posted: Sunday, December 15, 2013 - 12:54 AM UTC
Quoted Text
Hey Matt - - wow! your shop is building some serious turbines and neat (big) looking stuff in general! - no lightweight projects in that building!....yes, i'll copy an image or two for the files - thanks
The smallest Compressors have impellers with a 9.75" diameter... the large ones.......66" in diameter. We have a couple possible orders that are going to have to be shipped in pieces..... the outer casing is over 10 feet wide......
I added a few more pics..... some I snapped this morning with my phone. I'll try to get a few from of plant 1 from the "older" end.
EDIT: I added 4 more from the other end of Plant 1. I didn't have a chance when I got home yesterday to upload them.
Stickframe
#362
Joined: December 01, 2013
KitMaker: 1,661 posts
Armorama: 1,202 posts
Posted: Monday, December 16, 2013 - 09:17 AM UTC
PLEASE SEE PICTURES BELOW - I didn't post them right the first time - sorry -
Romain, thanks for such generous word, i certainly appreciate it! now, we just need to hope the rest of the build look ok when its done!, again, i really appreciate the positive words -
Hi Claude, Thanks! to your point of motivation, i was really inspired when i saw the work of a fellow called Dallas, on a different forum, who was superdailing a few 1/35 buildings -and wow, it really caught my eye, and as a result here we are!
Thanks Jerry! -
Michael - hahaha! you can eat off the floor of this shop! acutally, im not going to weather and abuse the floor until im almost done with work on the ground floor - the weathering does a pretty good job of covering accidental glue blobs, paint overspray - and mistakes in general - so, the dirty floow will come -
amoz02t thanks for following and the comments -
Matt - thanks - as i mentioned, if there were an "industrial-arama" i'd think about giving that show a go - would be fun to try anyway -
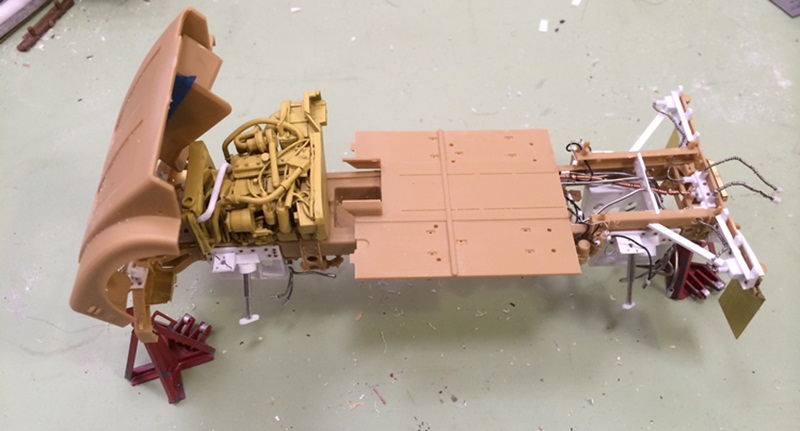
I spent the weekend working on an MATV for the shop - The idea here is that this truck is being torn down for a big overhaul -
It became a bit more compicated than that when i decided that I want to use the Panda MATV suspension for another truck so, decided that I'd separate those parts, and scratch build a representative suspension on the truck being worked on, shown as WIP below.
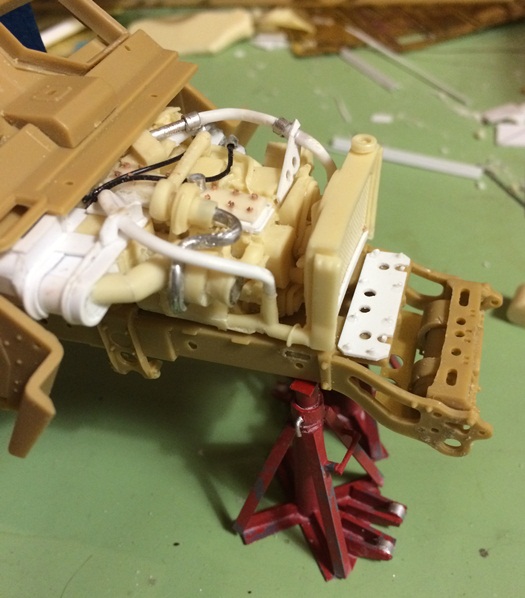
Also, decided that a few trucks in this shop need there hoods up! But, as of today, i dont know of anyone making an AM MATV engine (Real Model to release one in 2014). So, i did some heavy duty bashing on a modern era CMK diesel engine.
I could only find two on-line pics of the MATV CAT C7 engine (luckily one of each side)in the truck, so, i checked the CAT website too for the C7 and found more - but, none with hoses/wires etc attached to the brand new engine; however, I did see there's a small turbo charger on the passenger side, and a general view of where "big hoses" run.
OK - here we go.
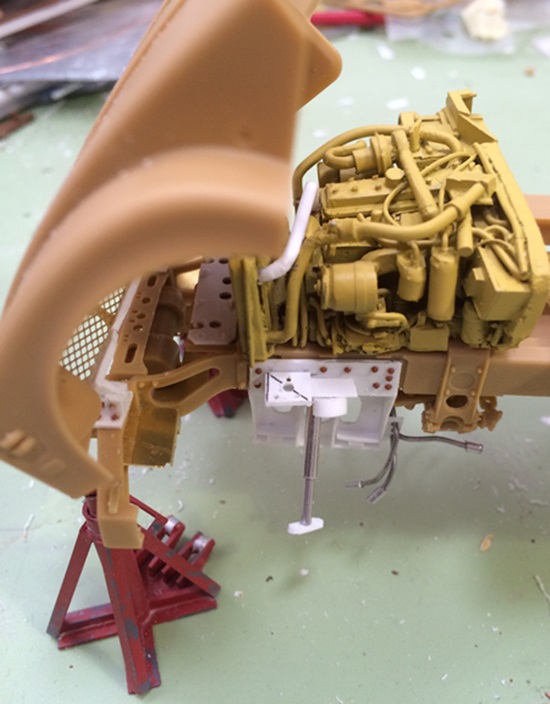
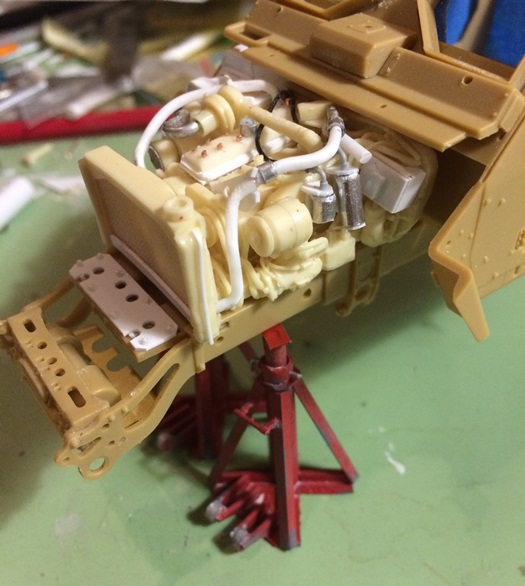
These two are left and right front views of the engine being built - the turbo and add-ons to the block are bits of exrta resin chunks, styrene, aluminum tubing and the valve cover bolts are short peiece of wire cut off, once they were glued into holes.
The air intake is styrene - an odd shape - in realife, its outside edge has a curve - from the curve, an intake runs to the engine.
There are a couple of filters on the drivers side and that long, large diameter hose -
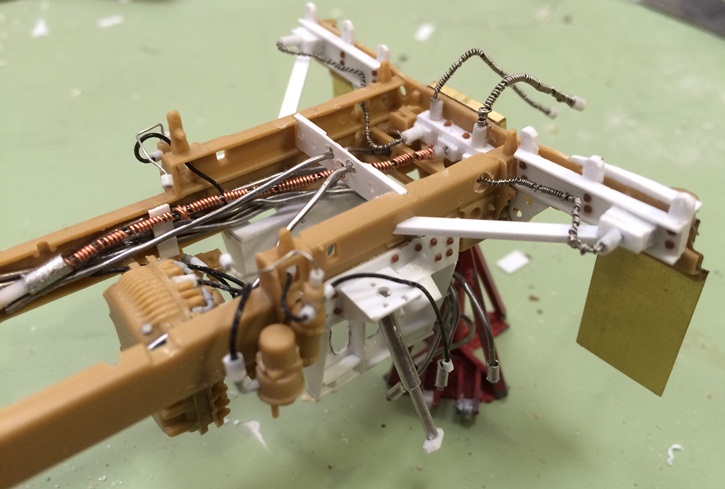
Now - onto the suspension:
The photos above shows progress up to last night - The idea for this truck is that it will be up on heavy jack stands, and in the midst of a heavy overhaul - so, no tires/wheels etc (I'm planning on using the kits actual suspension parts for a different truck)
The complicated part of this was scratchbuilding the suspension in a credible way - lots of styrene....etc. I have the AK Interactive MATV book, which is generally helpful for the hose, wire routing, but at this point, the parts to be painted are done - I'll add other wires to remain black or colored later. This part of the build included a fair amount of guess work.
OK - thats all - thanks for taking a look!
Nick
Sorry - please see pictures below -
Romain, thanks for such generous word, i certainly appreciate it! now, we just need to hope the rest of the build look ok when its done!, again, i really appreciate the positive words -
Hi Claude, Thanks! to your point of motivation, i was really inspired when i saw the work of a fellow called Dallas, on a different forum, who was superdailing a few 1/35 buildings -and wow, it really caught my eye, and as a result here we are!
Thanks Jerry! -
Michael - hahaha! you can eat off the floor of this shop! acutally, im not going to weather and abuse the floor until im almost done with work on the ground floor - the weathering does a pretty good job of covering accidental glue blobs, paint overspray - and mistakes in general - so, the dirty floow will come -
amoz02t thanks for following and the comments -
Matt - thanks - as i mentioned, if there were an "industrial-arama" i'd think about giving that show a go - would be fun to try anyway -
I spent the weekend working on an MATV for the shop - The idea here is that this truck is being torn down for a big overhaul -
It became a bit more compicated than that when i decided that I want to use the Panda MATV suspension for another truck so, decided that I'd separate those parts, and scratch build a representative suspension on the truck being worked on, shown as WIP below.
Also, decided that a few trucks in this shop need there hoods up! But, as of today, i dont know of anyone making an AM MATV engine (Real Model to release one in 2014). So, i did some heavy duty bashing on a modern era CMK diesel engine.
I could only find two on-line pics of the MATV CAT C7 engine (luckily one of each side)in the truck, so, i checked the CAT website too for the C7 and found more - but, none with hoses/wires etc attached to the brand new engine; however, I did see there's a small turbo charger on the passenger side, and a general view of where "big hoses" run.
OK - here we go.
These two are left and right front views of the engine being built - the turbo and add-ons to the block are bits of exrta resin chunks, styrene, aluminum tubing and the valve cover bolts are short peiece of wire cut off, once they were glued into holes.
The air intake is styrene - an odd shape - in realife, its outside edge has a curve - from the curve, an intake runs to the engine.
There are a couple of filters on the drivers side and that long, large diameter hose -
Now - onto the suspension:
The photos above shows progress up to last night - The idea for this truck is that it will be up on heavy jack stands, and in the midst of a heavy overhaul - so, no tires/wheels etc (I'm planning on using the kits actual suspension parts for a different truck)
The complicated part of this was scratchbuilding the suspension in a credible way - lots of styrene....etc. I have the AK Interactive MATV book, which is generally helpful for the hose, wire routing, but at this point, the parts to be painted are done - I'll add other wires to remain black or colored later. This part of the build included a fair amount of guess work.
OK - thats all - thanks for taking a look!
Nick
Sorry - please see pictures below -
Stickframe
#362
Joined: December 01, 2013
KitMaker: 1,661 posts
Armorama: 1,202 posts
Posted: Monday, December 16, 2013 - 09:25 AM UTC
Ok - try again! - not all
Ok - hope this works!!
Thanks, and sorry!
Ok - hope this works!!
Thanks, and sorry!
repynot
Joined: July 19, 2012
KitMaker: 194 posts
Armorama: 188 posts
Posted: Monday, December 16, 2013 - 09:33 AM UTC
Again WAUW...
Those workshop benches are just breathtaking!!
You really have an eye for detail.
I will take some pictures of my workshop tomorrow in 1/1 scale
Those workshop benches are just breathtaking!!
You really have an eye for detail.
I will take some pictures of my workshop tomorrow in 1/1 scale

KoSprueOne

Joined: March 05, 2004
KitMaker: 4,011 posts
Armorama: 1,498 posts
Posted: Monday, December 16, 2013 - 02:32 PM UTC
Out-Freeking-Standing !
You draw well too. Thanks for sharing your technique and in progress pictures with us

You draw well too. Thanks for sharing your technique and in progress pictures with us
repynot
Joined: July 19, 2012
KitMaker: 194 posts
Armorama: 188 posts
Posted: Monday, December 16, 2013 - 09:31 PM UTC
My workshop in 1/1


helkaissy


Joined: October 06, 2013
KitMaker: 244 posts
Armorama: 180 posts
Posted: Monday, December 16, 2013 - 09:52 PM UTC
Honestly speaking...I have never seen anything like that...you my friend defy reality and I can no longer tell which is model and which is real from your photos anymore.
I am amazed by this huge and impressive project and the attention given to details is out of this world.
This work belongs in a museum.
May I ask where you found all the tools in the workshop?
Cheers
Hussein
I am amazed by this huge and impressive project and the attention given to details is out of this world.
This work belongs in a museum.
May I ask where you found all the tools in the workshop?
Cheers
Hussein

matt
Joined: February 28, 2002
KitMaker: 5,957 posts
Armorama: 2,956 posts
Posted: Monday, December 16, 2013 - 10:54 PM UTC
Hopefully I can find some time during the holiday break (from work) to get going on some machines for my idea. I've been busy downloading spec sheets /drawings & Pics of various machine tools.
jrutman
Joined: April 10, 2011
KitMaker: 7,941 posts
Armorama: 7,934 posts
Posted: Tuesday, December 17, 2013 - 02:51 AM UTC
Quoted Text
Ok - try again! - not all
Ok - hope this works!!
Thanks, and sorry!
Ok,after seeing this,I think I need to just sit back,drink coffee and look at my Christmas tree.
Nice!
J
Stickframe
#362
Joined: December 01, 2013
KitMaker: 1,661 posts
Armorama: 1,202 posts
Posted: Tuesday, December 17, 2013 - 01:07 PM UTC
Hello - thanks for having a look -
Repynot - wow!! thanks for posting those pictures - yes, I've copied them - lots of interesting elements in your shop - including the vehicles! the crane is interesting too - it seems to clear a pretty wide span...hmmmm that is interesting. The storage/packages are interestng too - pallets with boxes....and a the pallet jack...dont be surprised if you see some of these in this, or the next build
KoSprueOne, thanks for checking it out - glad you find the various steps useful too - as for the sketches, I'm a bit low tech....so pen and paper it is!
Hi Hussein, thanks for taking a look - and glad you like the build so far. The tools are Verlinden and CMK machine tools, and Eduard, Aber, and Vectorcut for the hand tools - it turns out, there are tools avail, but not always easy to get - and not at all easy to get twice - so, in addition to those noted, I'll scratchbuild unique items as i see fit, and always have an eye out for cool parts!
Hey Matt - thanks - i copied a few of your images too - that is quite a shop - what tools/parts are you planning to build? - I'll certainly check it out when you get going. thanks for following up
Hi Jerry - hahah! glad you enjoyed taking a look! lets hope im not still at it next christmas too -
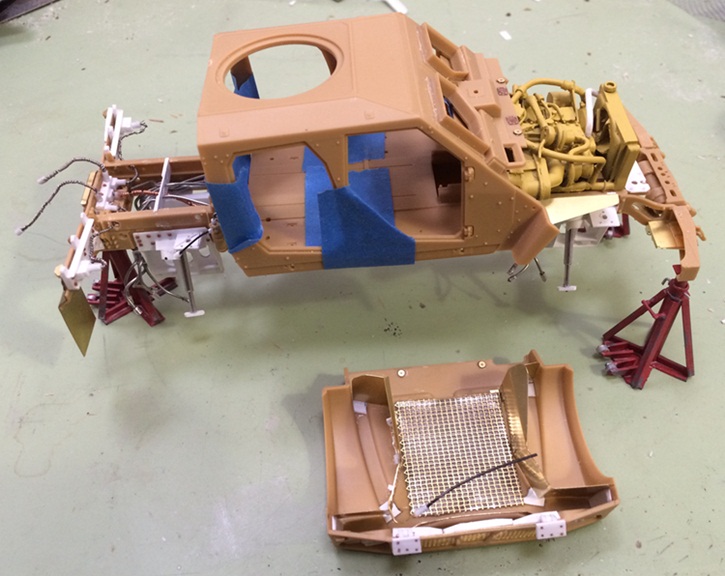
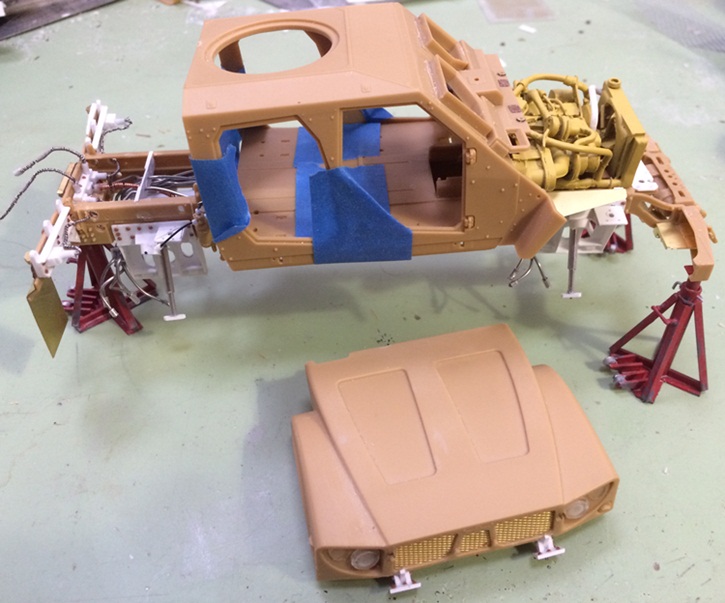
Ok - a small post today - More on the MATV - as my version is supposed to look like its being worked on - and the hood tilted open, I worked on the hood and related parts.
Please take a look:
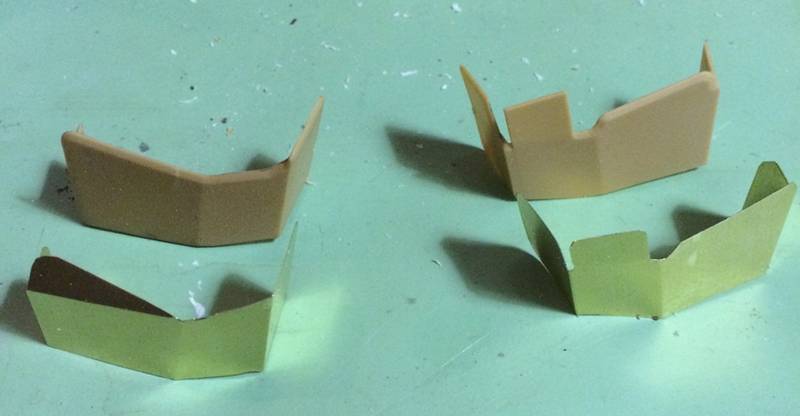
I haven't had much luck finding good pictures of what's going on inside the hood of this truck - from the 3 or 4 that I've found, it appears the parts shown above (which go under the hood) are essentially splash guards, and not necessarily structural. The Panda parts are thick, and would look really thick with the hood open, so i made these thin brass sheet alternatives.
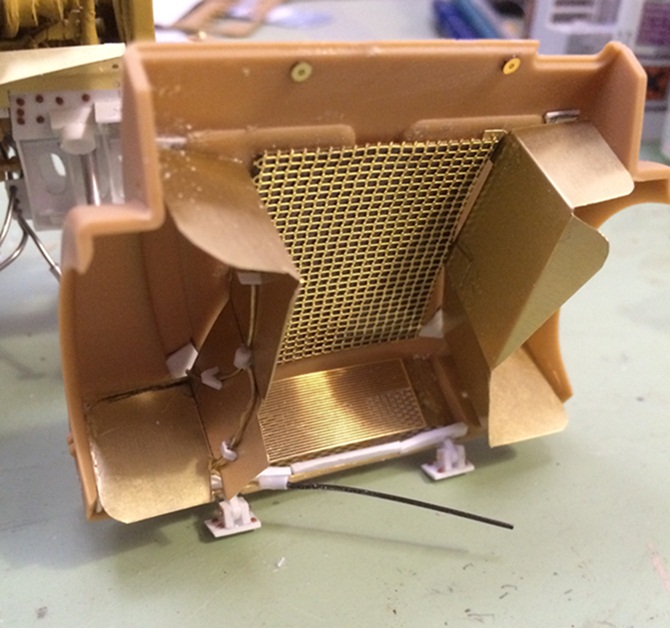
Above, you can see the splash guards installed, plus other stuff I'm specualting about being "under the hood". The mesh, when painted, is intended to look like the layer of insulation/mesh fabric that I'm guessing is between the engine and hood.
Above, you can compare the hood top and bottom sides -
Next steps, on to the MATV cab - in and out. After seeing Repynot's shop, i want to get back into mine !
thanks for taking a look!
cheers
Nick
Repynot - wow!! thanks for posting those pictures - yes, I've copied them
- lots of interesting elements in your shop - including the vehicles! the crane is interesting too - it seems to clear a pretty wide span...hmmmm that is interesting. The storage/packages are interestng too - pallets with boxes....and a the pallet jack...dont be surprised if you see some of these in this, or the next build KoSprueOne, thanks for checking it out - glad you find the various steps useful too - as for the sketches, I'm a bit low tech....so pen and paper it is!
Hi Hussein, thanks for taking a look - and glad you like the build so far. The tools are Verlinden and CMK machine tools, and Eduard, Aber, and Vectorcut for the hand tools - it turns out, there are tools avail, but not always easy to get - and not at all easy to get twice - so, in addition to those noted, I'll scratchbuild unique items as i see fit, and always have an eye out for cool parts!
Hey Matt - thanks - i copied a few of your images too - that is quite a shop - what tools/parts are you planning to build? - I'll certainly check it out when you get going. thanks for following up
Hi Jerry - hahah! glad you enjoyed taking a look! lets hope im not still at it next christmas too -
Ok - a small post today - More on the MATV - as my version is supposed to look like its being worked on - and the hood tilted open, I worked on the hood and related parts.
Please take a look:
I haven't had much luck finding good pictures of what's going on inside the hood of this truck - from the 3 or 4 that I've found, it appears the parts shown above (which go under the hood) are essentially splash guards, and not necessarily structural. The Panda parts are thick, and would look really thick with the hood open, so i made these thin brass sheet alternatives.
Above, you can see the splash guards installed, plus other stuff I'm specualting about being "under the hood". The mesh, when painted, is intended to look like the layer of insulation/mesh fabric that I'm guessing is between the engine and hood.
Above, you can compare the hood top and bottom sides -
Next steps, on to the MATV cab - in and out. After seeing Repynot's shop, i want to get back into mine !
thanks for taking a look!
cheers
Nick
cassshay
Joined: September 17, 2013
KitMaker: 55 posts
Armorama: 52 posts
Posted: Tuesday, December 17, 2013 - 01:43 PM UTC
Hey Nick, great to see you working on this project. I bet these guys would like to see the completed building accrossed the alley. Gents he built a simular building housing a off road racing shop, with all the tools and trucks. Keep up your great work.
Mark
BBlmber
Railroad Line Forums
Mark
BBlmber
Railroad Line Forums

HeavyArty
Joined: May 16, 2002
KitMaker: 17,694 posts
Armorama: 13,742 posts
Posted: Tuesday, December 17, 2013 - 01:47 PM UTC
Very cool. Is the engine scratch or modified from something else? I have been thinking about modifying the CMK M939 engine for mine.


Stickframe
#362
Joined: December 01, 2013
KitMaker: 1,661 posts
Armorama: 1,202 posts
Posted: Tuesday, December 17, 2013 - 02:22 PM UTC
Hi Mark - thanks for checking in - yes, still building!
Hi Gino - the engine above started with the M939 by CMK you showed. It's not really that close to the Cat C7, but, with enough work, it can be made to look convincing (I think). A problem I had was finding good pictures of the engine in the truck (MATV) - I only found 2 or 3, then went to the CAT website for info on the C7....so, you see plenty of guesswork in my version!
Go for it - and post the results. I'm going to get further into the model before I add more color and wires/tubes to the engine.
Thanks for the comments
Cheers
Nick
HeavyArty
Joined: May 16, 2002
KitMaker: 17,694 posts
Armorama: 13,742 posts
Posted: Tuesday, December 17, 2013 - 02:43 PM UTC
Quoted Text
Hi Gino - the engine above started with the M939 by CMK ...A problem I had was finding good pictures of the engine in the truck (MATV) - I only found 2 or 3, then went to the CAT website for info on the C7....
Great minds think alike! I too have found only a few pics of the engine in the truck. I will most likely give it a go...eventually.
Stickframe
#362
Joined: December 01, 2013
KitMaker: 1,661 posts
Armorama: 1,202 posts
Posted: Tuesday, December 17, 2013 - 03:18 PM UTC
Yeah! Or spend too much time on stuff like this! (Haha) -
I found one picture of each side of the engine in a truck, but they are each shot from a low viewpoint, and you can't see as much as I'd like to. That said, you can see the air filter/intake housing, and some key tubes on the passenger side, and a few filters, reservoir etc on the drivers. The CAT web site shows a stripped down C7 - no hoses, but a clear view of the turbo charger -
Mix all of the above with the CMK kit - and go for it! Scroll up this page and you'll see what I did to the kit - cutting + a fair amount of add on scratch stuff
Cheers
Nick
repynot
Joined: July 19, 2012
KitMaker: 194 posts
Armorama: 188 posts
Posted: Tuesday, December 17, 2013 - 07:12 PM UTC
Quoted Text
Hello - thanks for having a look -
Repynot - wow!! thanks for posting those pictures - yes, I've copied them
@ Stickframe.
If you want more pictures please let me know.
The vehicles are CV9035DK, just landed from Afghanistan for refurbishment.
I can assist in measurements for the crane if it would helpfull, it is just small a 8 T.
Here is a picture of how a workbench should not look like!!

If you want large scale pictures, don't hesitate to contact me.
Best Regards Per
Stickframe
#362
Joined: December 01, 2013
KitMaker: 1,661 posts
Armorama: 1,202 posts
Posted: Tuesday, December 17, 2013 - 09:24 PM UTC
Hi Per - thanks for another great picture (ha! who would think Id be so pleased to see shop pictures!), I might follow up with you about more info. This build is mostly about light and medium duty vehicles (although, with all the armor, those MRAPs are pretty heavy)
The big plan (my big plan that is), should I stick with this subject, is to next build a heavy duty shop (HET M1070's maybe a Buffalo, D9rs etc) so, would include service pits and a gantry crane - much like your shop! My thought is to do a newer, less beaten up building than the current shop dio to house this facility. At the rate I'm going now that won't happen until at least next summer!
Thanks again -
Nick
 |

WEB HOSTING BY


Copyright ©2021 Armorama and Kitmaker Network, a subsidiary of Silver Star Enterprises
All Rights Reserved. Please read our Conditions of Use and Privacy Policy.
All Rights Reserved. Please read our Conditions of Use and Privacy Policy.