

Яusso-Soviэt Forum: Cold War Soviet Armor
For discussions related to cold war era Russo-Soviet armor.
For discussions related to cold war era Russo-Soviet armor.
Hosted by Jacques Duquette
Xact Scale T-80U BLOG

Jacques

Joined: March 04, 2003
KitMaker: 4,630 posts
Armorama: 4,498 posts

Posted: Wednesday, July 24, 2013 - 06:27 AM UTC
I am starting the Xact Scale T-80U kit to explain issues, problems, details, and possible solutions. I will also post a link to my review once it is up.


arpikaszabo

Joined: February 13, 2006
KitMaker: 674 posts
Armorama: 637 posts

Posted: Wednesday, July 24, 2013 - 07:11 AM UTC
Good luck with Your build. I already started mine. I consider it a good kit with many quirks, a lot of correcting is to be made.
Jacques
Joined: March 04, 2003
KitMaker: 4,630 posts
Armorama: 4,498 posts
Posted: Wednesday, July 24, 2013 - 12:22 PM UTC
Agreed. I put in about 20 hours of research and writing on the kit and I know I did not get all the little quirks. Quite the marathon, but for the T-80, worth it! 
I will start posting pictures and notes.
I will start posting pictures and notes.
Jacques
Joined: March 04, 2003
KitMaker: 4,630 posts
Armorama: 4,498 posts
Posted: Wednesday, July 24, 2013 - 12:35 PM UTC
Resources:
Prime Portal: http://www.primeportal.net/tanks/yuri_pasholok/t-80u/
Terry Ashley's Review at PMMS: http://www.perthmilitarymodelling.com/reviews/vehicles/xact/xs35001.html
Cookie Sewell's review at Missing-Lynx: http://www.missing-lynx.com/reviews/russia/xactxs35001reviewcs_1.html
Interesting read on how and why K5 ERA works like it does (I love the science stuff too): http://fofanov.armor.kiev.ua/Tanks/EQP/era.html
I also used:
M-Hobby April 2007 with drawings for the T-80B.
Drawings online for the T-80UD
Polygon book on the T-80 (actual book, not electronic)
New vanguard T-80 book by Zaloga
Russian Armor T-80 book by Baryatinskiy
Concord Book on T-80U by Zaloga
Concord Book T-64 and T-80 by Zaloga
T-80 operator's manual (Russian) - (online download)
I did a LOT of research on this and I still feel very ill informed about reviewing this model vs. some of our Russian compatriots.
For example, I was unable to confirm this, but I have been told that the kit has a T-80B lower hull and not a correct T-80U lower hull. I do not have enough information to confirm that, nor was I able to find any where near enough to make that claim. I need to decompress now.

KurtLaughlin
Joined: January 18, 2003
KitMaker: 2,402 posts
Armorama: 2,377 posts
Posted: Wednesday, July 24, 2013 - 04:19 PM UTC
Hey- You can't start this - You didn't finish the BMP blog! 
KL
KL
Jacques
Joined: March 04, 2003
KitMaker: 4,630 posts
Armorama: 4,498 posts
Posted: Thursday, July 25, 2013 - 02:48 AM UTC
The BMP BLOG is in the works...I am stuck on fixing the turret. It is coming. But that is fun.
This is work...
This is work...

DerGeist
Joined: January 21, 2008
KitMaker: 735 posts
Armorama: 707 posts

Posted: Thursday, July 25, 2013 - 10:28 AM UTC
Jacques, have you come across any info on the South Korean's T-80U's while researching your Blog? I've found a hand full of pics online but no info on any local mods etc.
Erik
Erik
Jacques
Joined: March 04, 2003
KitMaker: 4,630 posts
Armorama: 4,498 posts
Posted: Monday, July 29, 2013 - 10:05 AM UTC
I was going to wait for the review of this kit to be up before starting this, but they are busier than I thought on the editorial side. I don't want to keep you all waiting, so lets dig into this kit.
Steps 1-5 deal with getting the hull ready for the suspension. All parts should be dry fit in case there are small fit issues. The parts are mainly flash free, but there are sprue attachment points that need to be thoroughly cleaned up, and some small instances of flash.
As mentioned in the review, Parts PE 6 go on the BOTTOM of A13/14. Also, make sure to align A13/14 correctly.

In step 2, parts A9/10 need filler in the ejection mark as it faces OUT. Also, on my kit, there are little holes to be filled in on the lower hull side. These are short shots (?) from the cut outs on the upper hull.
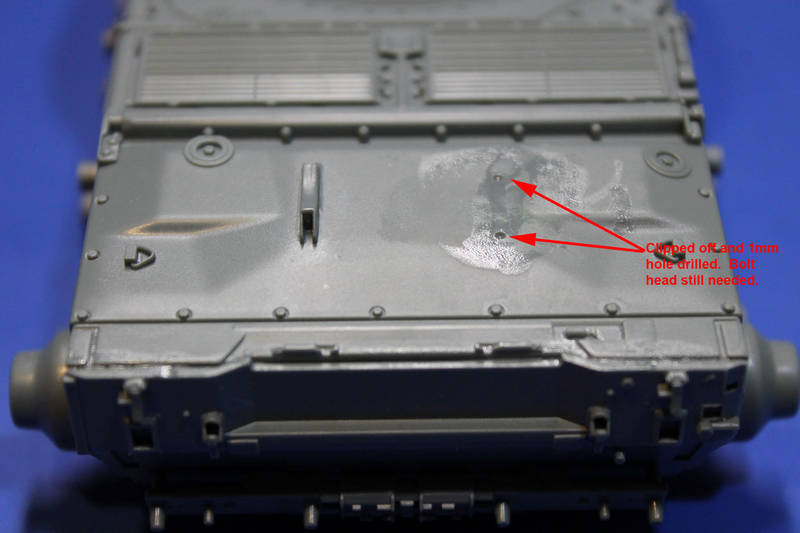
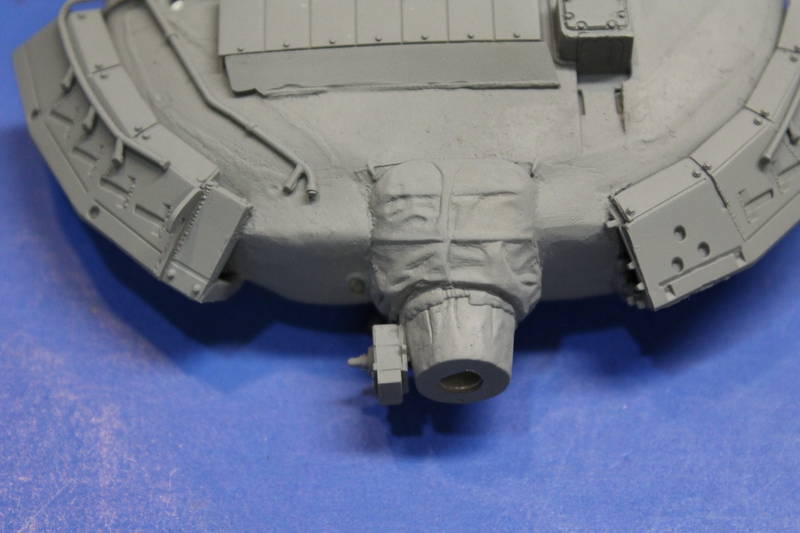
Many people have asked about the fuel drum mountings on the rear engine deck. Yes, they could/should be there. See Prime Portals walk-around to see them in use. BUT...they are not the norm. So I removed them by snipping them off with flush sided cutters, cleaning up the attachment area, filling in a goof up, and drilling 1mm holes where the bolts would go. I need to add the bolt heads yet...the tops of the bolt heads should be FLUSH with the engine deck...no snagging.
Skipped part 3 for now, but all the pieces look good and measure out nearly perfectly. (I could not measure out the sprocket though...sorry)
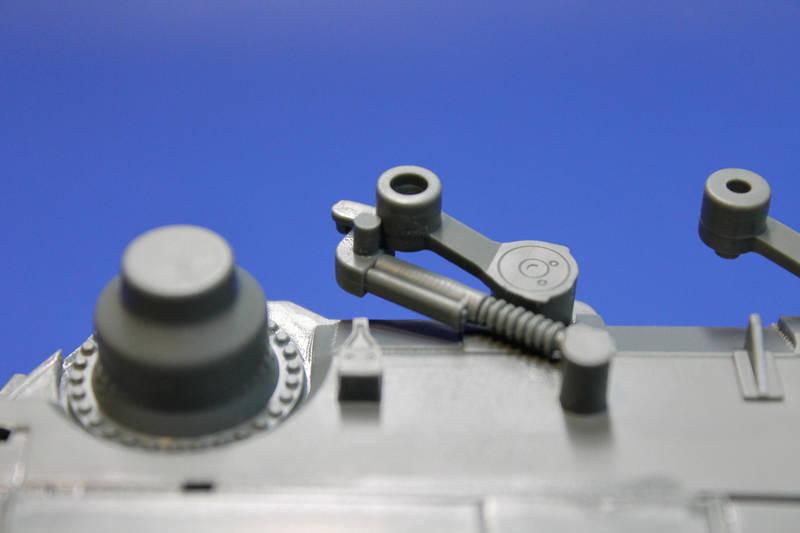
Part 4-5. Make sure, when you add parts E28/29 (the shocks) that you are ready to add parts E30 (road wheel arms) soon after. This allows you to get the positioning correct since there is no positive attachment between these parts. While there absolutely is a attachment between them on the real thing, I can see how hard it would be to see it and get it correct, so for this one I will give the kit a pass. Here are a few shots to give you a good idea how this should go:

Jumping to step 8, make sure to put the fuel cell side pieces on as best you can to reduce the need to fill these areas. Part D12 will need something to fill the hole in the bottom of the piece. I plan to use paper as it is thin enough not to mess up how the piece sits.
Step 11. Take your time adding part B1. It may require a few tweaks to get it to fit on really good. I did a little clamping and took my time. It worked out for me. Part K1 is a perfect fit when put on correctly! Make sure part B9 is parallel to the rear hull. While mine is a bit off, I dropped the model (oops), is should be parallel.

Step 21. The turret. I drilled all the holes, (44!) with my 1mm drill bit, and then just enlarged (carefully!) the 1.5mm holes (just 4 of them). Some of the holes take a bit of work and make sure you pay attention to the orientation of how you need to drill.
The turret has two issues that really bother me.
1. the upper front "cheek" fill covers. These are represented as "proud" to the turret surface, with weld beads. They should be level or recessed. With smoother weld beads (remember, I have AMS). The way these areas are filled in can really fool the eye though. Here is a example, from Prime Portal, from above:

and here is a profile shot of the same tank. As you can see, it is a flush patch with raised welds.

The goal of the people on the production line was to make the "plugs" flush. Not proud or recessed. I am sure there is some variability in how this was applied, humans are human after all. BUT...in the end, they need to be reduced to represent a average production turret. Sorry modellers, it has to be done to appease the AMS Gods.
2. The turret shape...the front, by the mantlet, is angled too far out...the turret front should be more vertical...by 1mm or 2mm tucked "in" towards the turret and the turret sides should "peak" out about 2 mm more, in more of a rounded point, at a point about 1/3 from the front. The side issue will be covered by the ERA, so it is not a issue here. The front...yeah, it is noticeable. It is hard to show with the ERA on the real tanks, but take a look at these, also from Prime Portal, and judge for yourself:


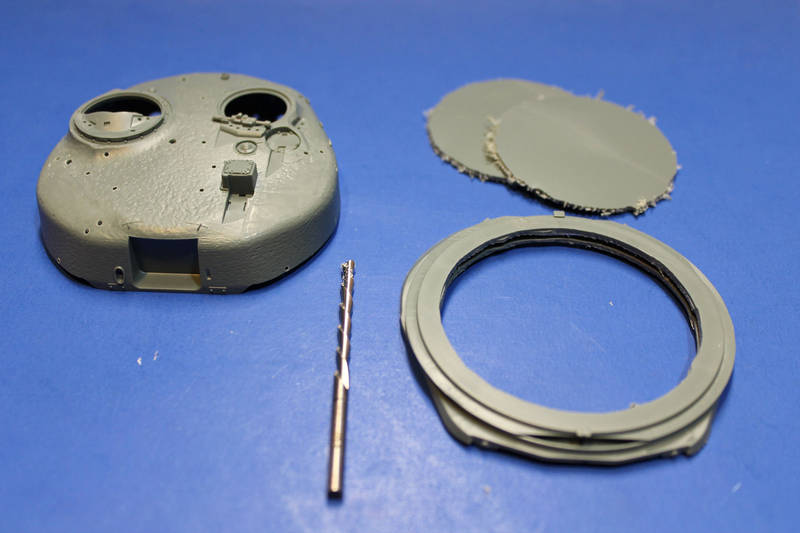
I am not sure why the turret bottom and race are solid pieces, maybe production or engineering issues, but a solid turret bottom bothers me. This is AMS here, pure and simple. I took a drywall cutting bit, put it in my drill press, glued together part N1 and N2, let them dry, and then SLOWLY cut out the pre-scribed lines. Worked like a charm. I will probably use putty to fill in between the parts.
I also took my #11 knife, put in a fresh sharp blade, and slowly cut off and removed the incorrect fill areas of the turret. I smoothed them out as best I could. I now have to texture the turret equally.
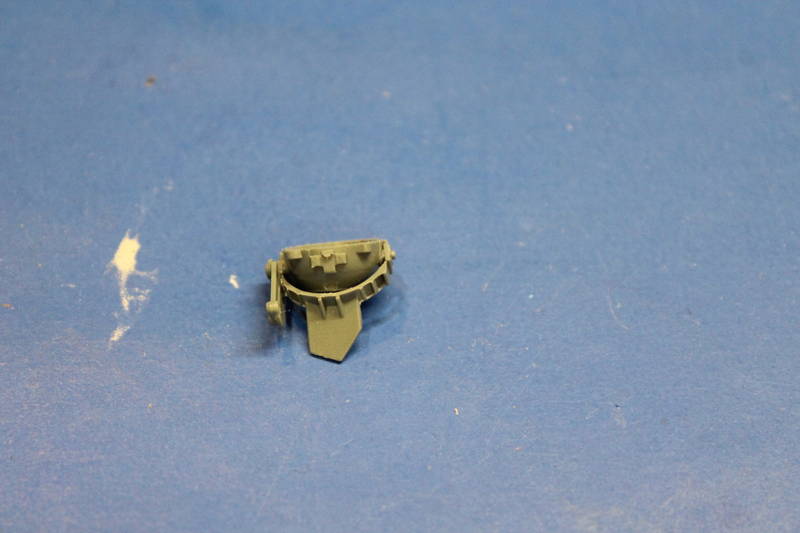
Finally, the interior bits. I think they are a bit anemic, possibly under scale, and thin. They could use a bit of putty or styrene to thicken them up a bit...this again is a AMS problem. Here they are next to their counterparts offered by SP Designs in their T-80U sets:

Phew.
Steps 1-5 deal with getting the hull ready for the suspension. All parts should be dry fit in case there are small fit issues. The parts are mainly flash free, but there are sprue attachment points that need to be thoroughly cleaned up, and some small instances of flash.
As mentioned in the review, Parts PE 6 go on the BOTTOM of A13/14. Also, make sure to align A13/14 correctly.
In step 2, parts A9/10 need filler in the ejection mark as it faces OUT. Also, on my kit, there are little holes to be filled in on the lower hull side. These are short shots (?) from the cut outs on the upper hull.
Many people have asked about the fuel drum mountings on the rear engine deck. Yes, they could/should be there. See Prime Portals walk-around to see them in use. BUT...they are not the norm. So I removed them by snipping them off with flush sided cutters, cleaning up the attachment area, filling in a goof up, and drilling 1mm holes where the bolts would go. I need to add the bolt heads yet...the tops of the bolt heads should be FLUSH with the engine deck...no snagging.
Skipped part 3 for now, but all the pieces look good and measure out nearly perfectly. (I could not measure out the sprocket though...sorry)
Part 4-5. Make sure, when you add parts E28/29 (the shocks) that you are ready to add parts E30 (road wheel arms) soon after. This allows you to get the positioning correct since there is no positive attachment between these parts. While there absolutely is a attachment between them on the real thing, I can see how hard it would be to see it and get it correct, so for this one I will give the kit a pass. Here are a few shots to give you a good idea how this should go:
Jumping to step 8, make sure to put the fuel cell side pieces on as best you can to reduce the need to fill these areas. Part D12 will need something to fill the hole in the bottom of the piece. I plan to use paper as it is thin enough not to mess up how the piece sits.
Step 11. Take your time adding part B1. It may require a few tweaks to get it to fit on really good. I did a little clamping and took my time. It worked out for me. Part K1 is a perfect fit when put on correctly!
Make sure part B9 is parallel to the rear hull. While mine is a bit off, I dropped the model (oops), is should be parallel. Step 21. The turret. I drilled all the holes, (44!) with my 1mm drill bit, and then just enlarged (carefully!) the 1.5mm holes (just 4 of them). Some of the holes take a bit of work and make sure you pay attention to the orientation of how you need to drill.
The turret has two issues that really bother me.
1. the upper front "cheek" fill covers. These are represented as "proud" to the turret surface, with weld beads. They should be level or recessed. With smoother weld beads (remember, I have AMS). The way these areas are filled in can really fool the eye though. Here is a example, from Prime Portal, from above:
and here is a profile shot of the same tank. As you can see, it is a flush patch with raised welds.
The goal of the people on the production line was to make the "plugs" flush. Not proud or recessed. I am sure there is some variability in how this was applied, humans are human after all. BUT...in the end, they need to be reduced to represent a average production turret. Sorry modellers, it has to be done to appease the AMS Gods.
2. The turret shape...the front, by the mantlet, is angled too far out...the turret front should be more vertical...by 1mm or 2mm tucked "in" towards the turret and the turret sides should "peak" out about 2 mm more, in more of a rounded point, at a point about 1/3 from the front. The side issue will be covered by the ERA, so it is not a issue here. The front...yeah, it is noticeable. It is hard to show with the ERA on the real tanks, but take a look at these, also from Prime Portal, and judge for yourself:
I am not sure why the turret bottom and race are solid pieces, maybe production or engineering issues, but a solid turret bottom bothers me. This is AMS here, pure and simple. I took a drywall cutting bit, put it in my drill press, glued together part N1 and N2, let them dry, and then SLOWLY cut out the pre-scribed lines. Worked like a charm. I will probably use putty to fill in between the parts.
I also took my #11 knife, put in a fresh sharp blade, and slowly cut off and removed the incorrect fill areas of the turret. I smoothed them out as best I could. I now have to texture the turret equally.
Finally, the interior bits. I think they are a bit anemic, possibly under scale, and thin. They could use a bit of putty or styrene to thicken them up a bit...this again is a AMS problem. Here they are next to their counterparts offered by SP Designs in their T-80U sets:
Phew.

Maki


Joined: February 13, 2002
KitMaker: 5,579 posts
Armorama: 2,988 posts
Posted: Monday, July 29, 2013 - 07:17 PM UTC
This one will be fun to watch. I'm not so much into Russian stuff, but it seems you will be going all-in with the Xact model and I will be checking your progress.
Keep us updated.
Mario
Keep us updated.
Mario


koalorka

Joined: June 16, 2010
KitMaker: 48 posts
Armorama: 46 posts
Posted: Tuesday, July 30, 2013 - 12:31 AM UTC
Interesting observations, especially about the turret shape. Will you show it corrected?
Jacques
Joined: March 04, 2003
KitMaker: 4,630 posts
Armorama: 4,498 posts
Posted: Tuesday, July 30, 2013 - 04:28 AM UTC
I am working on the turret. I am not sure what needs to be done at this point, and what will be hidden. Working on the K-5 Arrays so I can test fit and look over the issues.
Also, the front slope issue may be harder to correct than it is worth...
Also, the front slope issue may be harder to correct than it is worth...
arpikaszabo
Joined: February 13, 2006
KitMaker: 674 posts
Armorama: 637 posts
Posted: Tuesday, July 30, 2013 - 04:39 AM UTC
Nice one, You noticed a few things I slipped over. Anyway, on the last reference pic You posted from Primeportal, the Xcact turret is missing the notch just under the K5 ERA blocks. Why did You have to post it, I have to start over 

SEDimmick
Joined: March 15, 2002
KitMaker: 1,745 posts
Armorama: 1,483 posts

Posted: Tuesday, July 30, 2013 - 06:31 AM UTC
Quoted Text
Jacques, have you come across any info on the South Korean's T-80U's while researching your Blog? I've found a hand full of pics online but no info on any local mods etc.
Erik
Erik, if your on Facebook, I put some photos I've found of the ROK T-80U on the T-80 group...the biggest change I can tell is that it looks like the turret storage might have changed slightly (towards the rear) and rubber block track are fitted since the repainting with the MERC like camo that the ROK uses on its vehicles.
I haven't been able to find a decent walk-around of these vehicles even using Korean terms via google translate either.
Jacques
Joined: March 04, 2003
KitMaker: 4,630 posts
Armorama: 4,498 posts
Posted: Tuesday, July 30, 2013 - 06:50 AM UTC
Link to T-80 group on Facebook: https://www.facebook.com/groups/133632516823724/
As for the ROK tanks. Rumor, and that is all I have, is that while they are not EXACTLY a secret tank in service, they are not EXACTLY wide open for public viewing. Taking photos is not as easy as for other tanks. Seems weird with all the other photos of T-80U's, and walk-arounds, but they are not really making it easy for the modeler.
As for the ROK tanks. Rumor, and that is all I have, is that while they are not EXACTLY a secret tank in service, they are not EXACTLY wide open for public viewing. Taking photos is not as easy as for other tanks. Seems weird with all the other photos of T-80U's, and walk-arounds, but they are not really making it easy for the modeler.
Jacques
Joined: March 04, 2003
KitMaker: 4,630 posts
Armorama: 4,498 posts
Posted: Wednesday, July 31, 2013 - 04:59 AM UTC
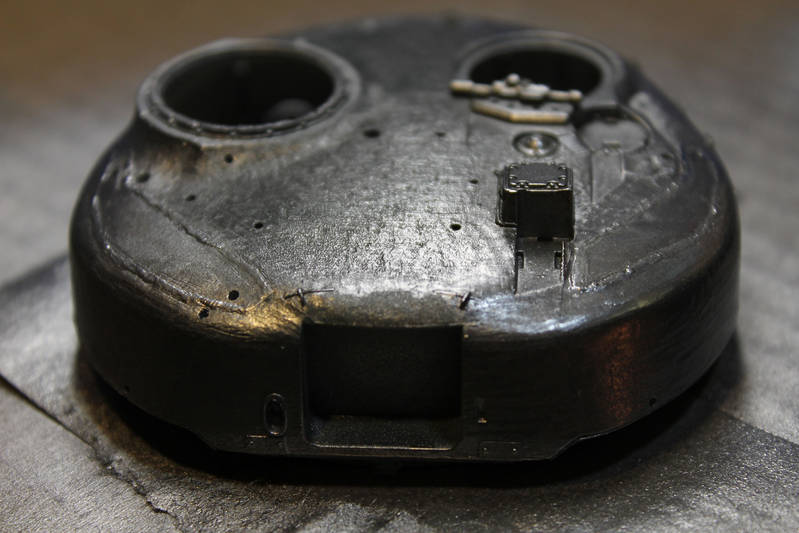
Broke out the A+B putty.
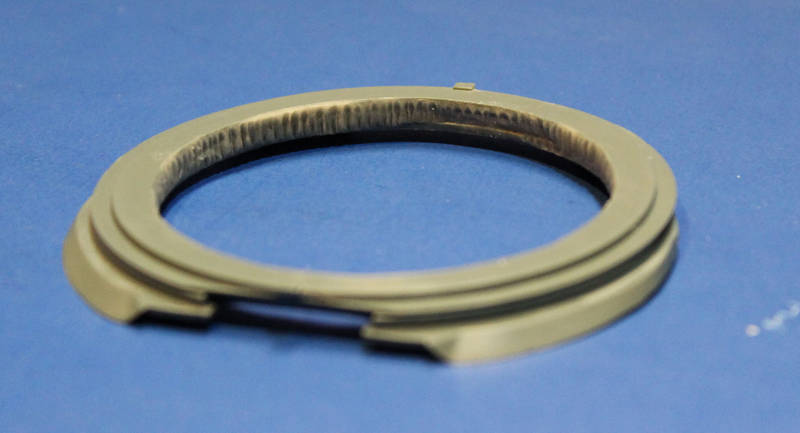
I filled in the gap around the inside rim of the turret ring. I then took a nail and added some "tooth" detail to give it a bit of texture. Nothing accurate, but enough to fool the eye of someone peeking in through the turret hatches.
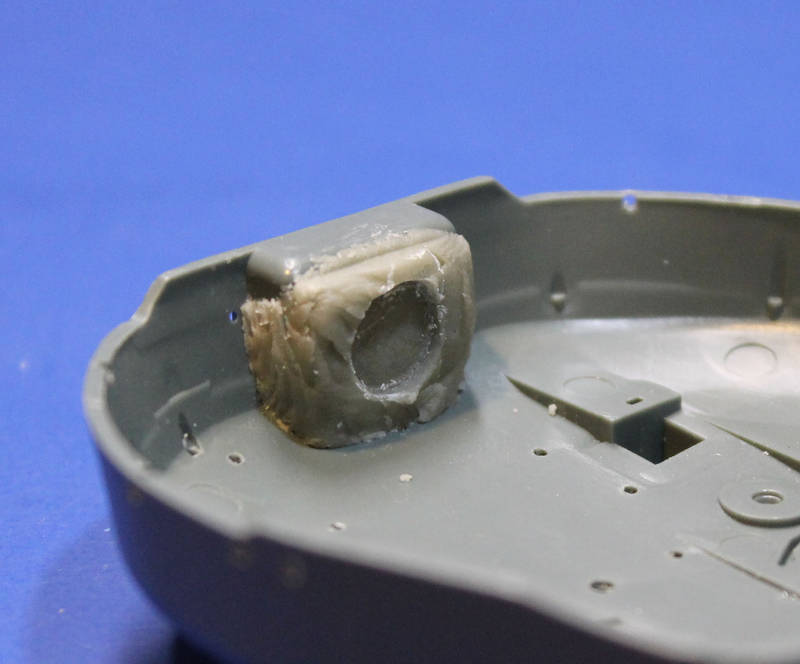
To get the SP Designs breech to work, I cut about 5mm off of it and then I added some putty to the inside of the Xact turret top, using the end of the breech to make a impression for a solid base. I made sure to fit the lower turret part on as there is a lip that needs to be taken into account.
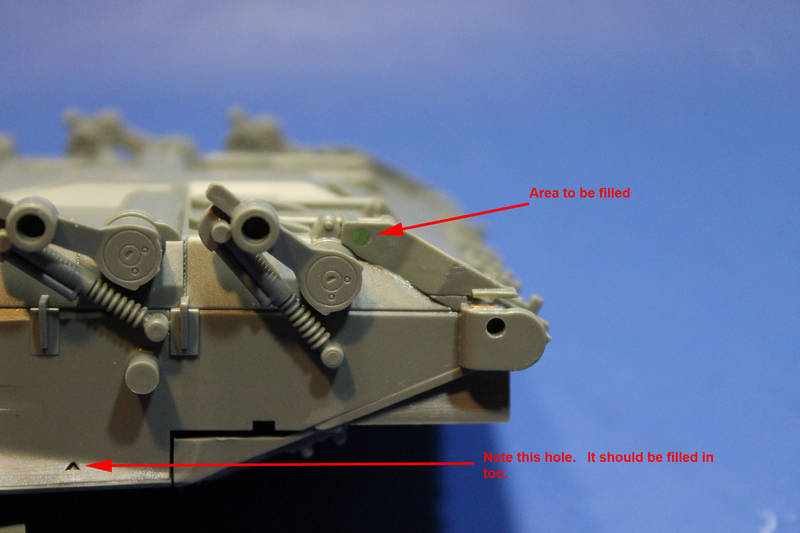
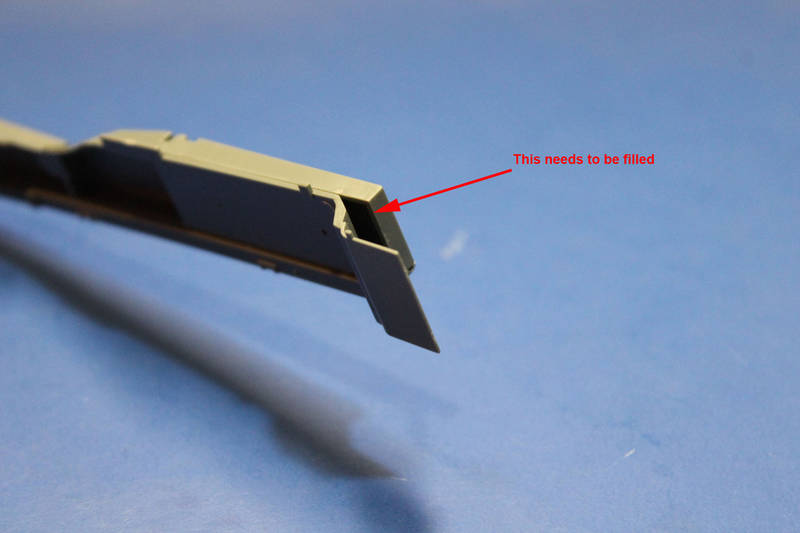
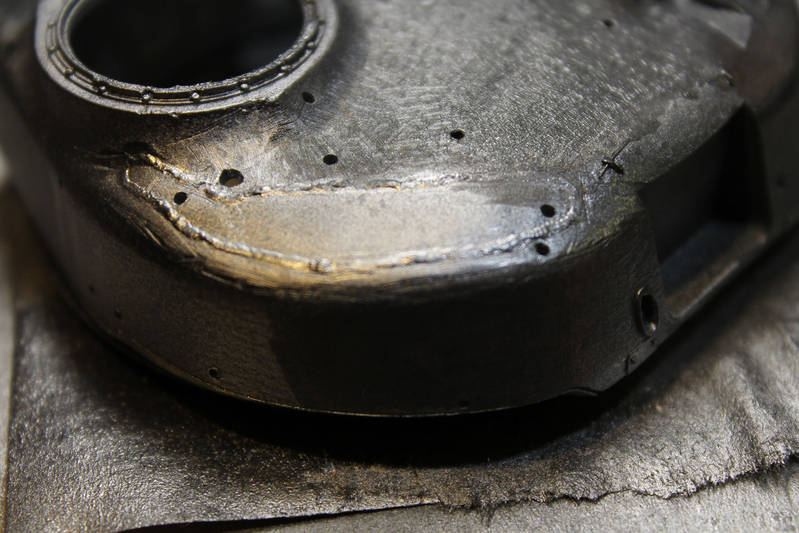
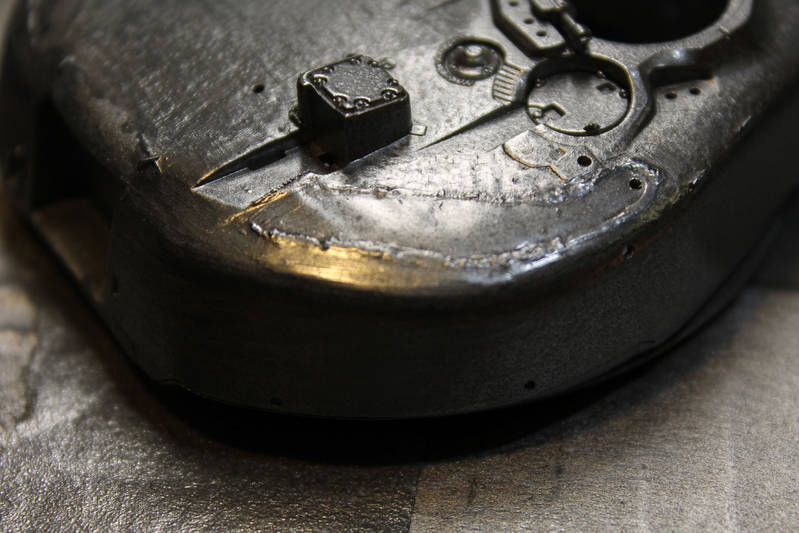
The MOST important thing to do was fill in the "valley" where the upper hull meets the upper front glacis without destroying the "step-up" lip that belongs there. Really thinly rolled putty, a toothpick for a tool, and some water helped me to work it out really nice. I am VERY happy with this.
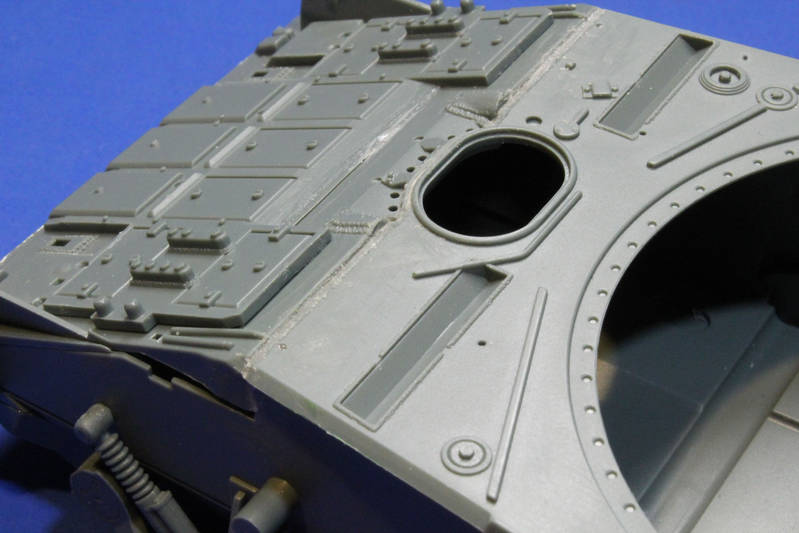
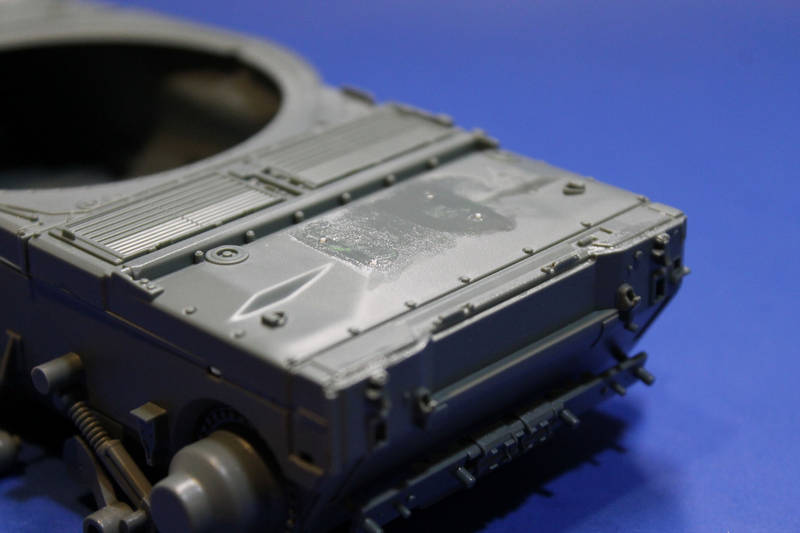
A side shot of the same area showing where I filled in the side gaps too. And the little triangle hole in line with the back of the drivers opening (green spot).
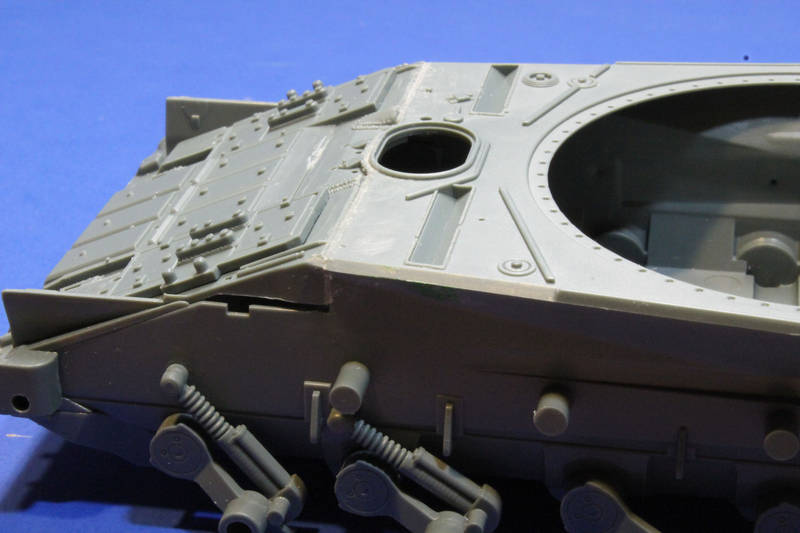
Engine deck without the fuel racks and holes drilled. Just need to add bolt heads.
Finally, primed the interior and pieces white to get the interior done so I can "close the can" and get to work on the outer detail.

I filled in the gap around the inside rim of the turret ring. I then took a nail and added some "tooth" detail to give it a bit of texture. Nothing accurate, but enough to fool the eye of someone peeking in through the turret hatches.
To get the SP Designs breech to work, I cut about 5mm off of it and then I added some putty to the inside of the Xact turret top, using the end of the breech to make a impression for a solid base. I made sure to fit the lower turret part on as there is a lip that needs to be taken into account.
The MOST important thing to do was fill in the "valley" where the upper hull meets the upper front glacis without destroying the "step-up" lip that belongs there. Really thinly rolled putty, a toothpick for a tool, and some water helped me to work it out really nice. I am VERY happy with this.
A side shot of the same area showing where I filled in the side gaps too. And the little triangle hole in line with the back of the drivers opening (green spot).
Engine deck without the fuel racks and holes drilled. Just need to add bolt heads.
Finally, primed the interior and pieces white to get the interior done so I can "close the can" and get to work on the outer detail.
Jacques
Joined: March 04, 2003
KitMaker: 4,630 posts
Armorama: 4,498 posts
Posted: Tuesday, August 06, 2013 - 08:41 AM UTC
The Review: https://armorama.kitmaker.net/review/9283
Jacques
Joined: March 04, 2003
KitMaker: 4,630 posts
Armorama: 4,498 posts
Posted: Thursday, August 08, 2013 - 07:03 AM UTC
So I have been working on the turret some more. Getting the weld beads back on for the fill areas, and better than the kit, presented some interesting challenges. What I finally came up with has 2(!) good answers. The first thing I tried was white correction fluid. This is used on paper to correct inked on markings. It did not too that great BUT then I thought, what about Mr. Surfacer 500? Well, that worked out GREAT! BUT...Bill Goodrich, over on Track-Links, clued me into a technique he used for weld beads: Bill Goodrich's E-25 BLOG on T-L Tool: Model Master squeeze bottle liquid cement. That worked REALLY well too. Overall results:
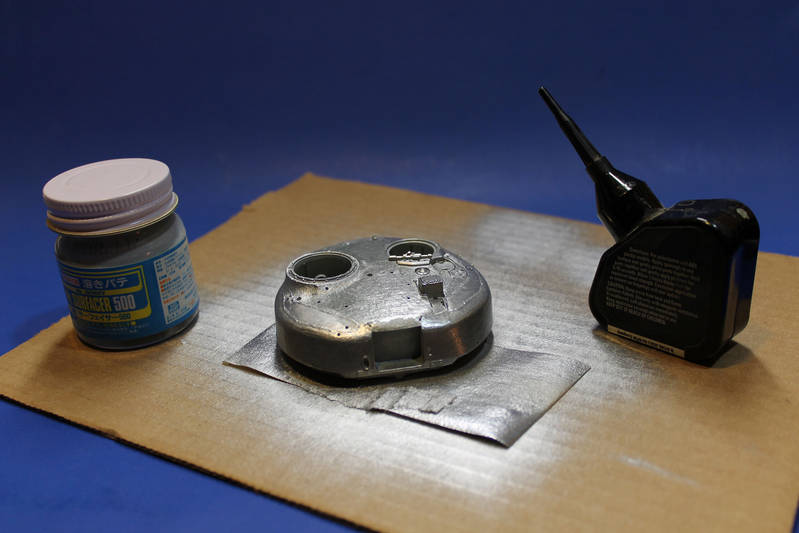
Mr. Surfacer 500 on the left, MM squeeze glue on the right.
Closer view of them both
Close up of the Mr. Surfacer weld beads...
...and the MM squeeze glue weld beads.
I painted the turret with silver to show off the detail STARKLY. However, the pictures make it look more pewter...it is not. It is a bright, shiny silver.
To use the Mr. Surfacer 500, I applied it directly from the bottle using a unbent paper clip, taking care to keep the putty line THIN. I put at least 2 coats on, and some got 3 to make the beads a bit uneven, as per the prototype.
To use the MM Squeeze glue, I simply applied the glue trying to keep the glue in a thin line and allowing it to dry. No other manipulation. And I only did 1 layer of the glue.
I also tried to change the texturing of the turret with a round knife blade, but it did not work out the way I expected, so I will report more on that later.
Jacques
Joined: March 04, 2003
KitMaker: 4,630 posts
Armorama: 4,498 posts
Posted: Saturday, August 24, 2013 - 11:50 AM UTC
Thought I was dead, right? Well, work has been trying (it is harvest time, so things are a special kind of crazy) but...
I will be posting progress on here either tonight or tomorrow. (I may also show WHY I have so little time to work on this right now...)
The Facebook T-80 page is also a great place to find out information about building this kit and some mods other people are doing.
Finally, my friend Kyle is doing a BLOG on Track-Link It is kind of a head to head BLOG with mine! May the best modeler win.

Luty

Joined: August 23, 2005
KitMaker: 310 posts
Armorama: 299 posts

Posted: Sunday, August 25, 2013 - 01:09 AM UTC
I do weld by diluted filler through a medical syringe needle. 
Jacques
Joined: March 04, 2003
KitMaker: 4,630 posts
Armorama: 4,498 posts
Posted: Tuesday, August 27, 2013 - 01:48 AM UTC
No, I am not being a jerk, nor forgetting my work on here. I cannot take pictures for the next few days, the "studio" is being used for model building purposes. Remember what has been keeping me from posting more on the T-80U...???
I can verbally report a bit. The turret is a bit...odd. Once together, under the mantlet and at the rear of the turret ring, there are gaps. They should NOT be there, so filling is needed.
In step 14, make sure to attach parts B12/13 to B19 before adding K2 so you get the correct angle. I messed this up initially, but corrected it.
The APU in step 13 is nicer than I initially thought. There are some very fine weld bead lines around some of the pieces that need it. This shows attention to detail that I had not expected. Nice.
Another surprise is dealing with the front headlights. It seems, at first, that the usual mistake of the attaching the headlights to the glacis is done here. In fact, the headlights are molded with a "stem" and have a indent to be put in. Standard and incorrect. BUT...if you fill the hole in the glacis AND cut off the lower stub, there is a CORRECT feature of the headlights...part E11. This should be used to glue the headlight to the headlight guard, so it hangs. This means deviating from the instructions, but it is MUCH more accurate and, I think, a detail added by the manufacturer to use if you figured it out. Sly...
Currently working on a fix for the front turret profile fix, on either side of the mantlet.

jwest21
Joined: October 16, 2006
KitMaker: 3,374 posts
Armorama: 3,126 posts
Posted: Friday, August 30, 2013 - 03:32 AM UTC
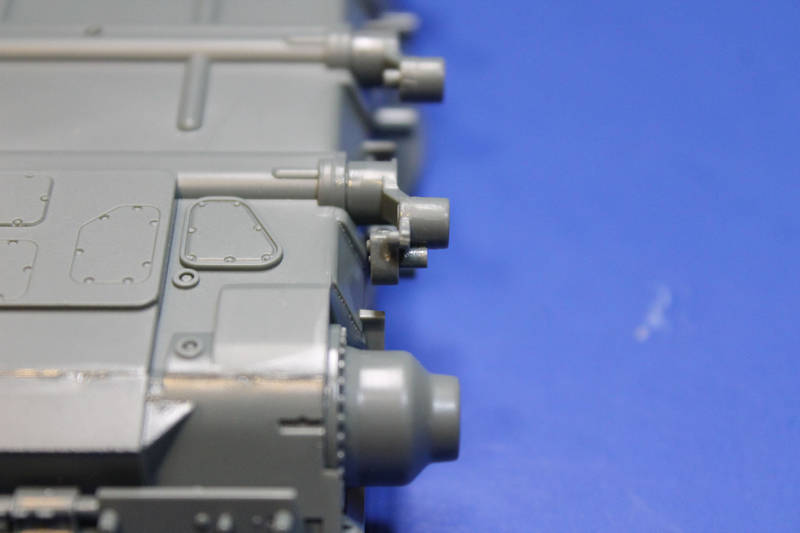
I may have missed it, but did you alter parts D2 and D3 in step 12? In the pictures, they have what appears to be piping or tubing coming out but the kit parts lack this. I wasn't sure which was correct
Jacques
Joined: March 04, 2003
KitMaker: 4,630 posts
Armorama: 4,498 posts
Posted: Friday, November 08, 2013 - 05:33 AM UTC
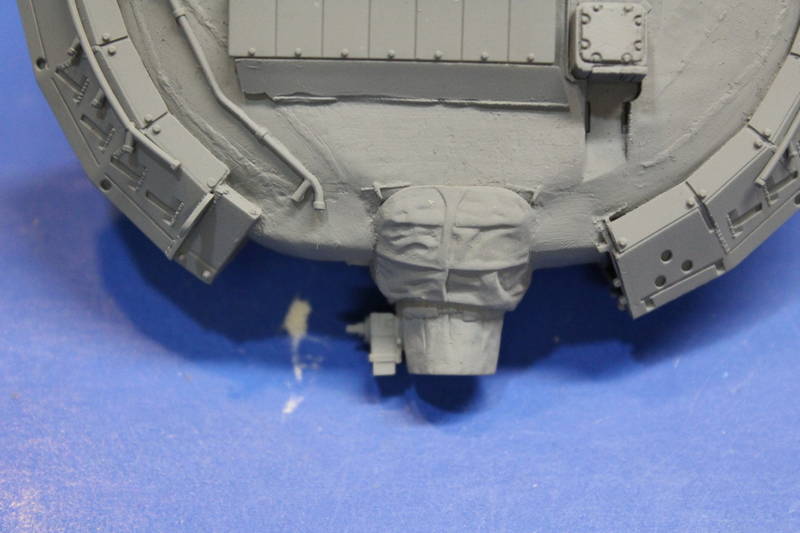
Jason, Parts D2 and D3 are basically piping to continue the fuel system on either fender. They have caps...see these pics:


I think the kit parts are good enough for what they need to be; about the only improvement I can think of is to give them actual caps...

I think the kit parts are good enough for what they need to be; about the only improvement I can think of is to give them actual caps...
Jacques
Joined: March 04, 2003
KitMaker: 4,630 posts
Armorama: 4,498 posts
Posted: Friday, November 08, 2013 - 05:46 AM UTC
Dealing with the turret details...
front face. Well, here is the final result, with A+B putty added, some sculpting, and a new MG ring (still not correct, but ok):
and a pair of profile shots. I think I did pretty good for what i was trying to accomplish. I would rather see X-act fix this area in future releases so that it can be a last time effort, but it is not as bad as I thought.
I also fixed the weld between the radio antenna mount plate and the side sight...just in front of the gunners hatch. It is no longer the "stairway to heaven" it looked like before. Sorry, no red circle to highlight it!
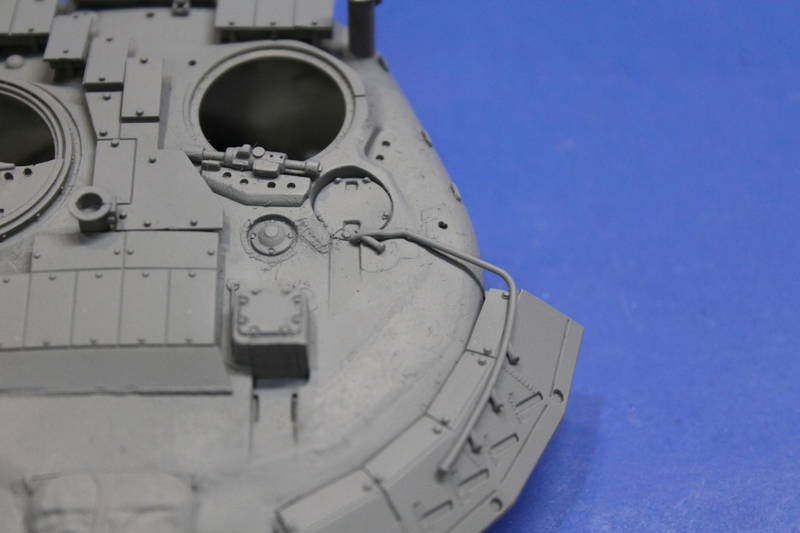
Notice the turret texturing after I put on some primer...I had messed with this in the past, scraping it with a hobby knife and then applying liquid cement to soften it up. I even sanded a few spots. I think it looks better than the standard kit texturing of the turret.
The front cheek weld seams look a bit subdued...will keep an eye on this (I may check them out with a quick pin wash) I do not want them to be too subtle after all the work to figure them out.
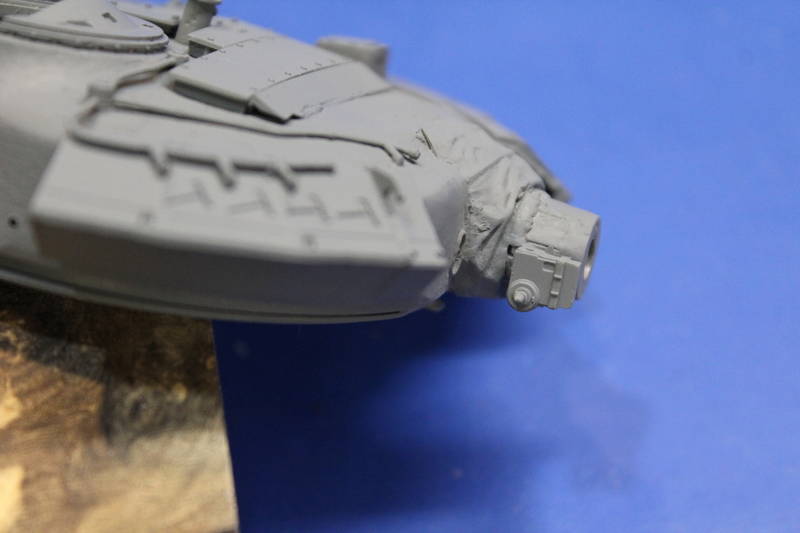
And the main searchlight. Since I reworked the front face of the turret, where the searchlight attaches, I had to cut the locating pin off as there was no corresponding hole to put it in. It is a bit of a complicated build, so took a specific photo of it so you can see how it goes together.
Questions?
front face. Well, here is the final result, with A+B putty added, some sculpting, and a new MG ring (still not correct, but ok):
and a pair of profile shots. I think I did pretty good for what i was trying to accomplish. I would rather see X-act fix this area in future releases so that it can be a last time effort, but it is not as bad as I thought.
I also fixed the weld between the radio antenna mount plate and the side sight...just in front of the gunners hatch. It is no longer the "stairway to heaven" it looked like before. Sorry, no red circle to highlight it!
Notice the turret texturing after I put on some primer...I had messed with this in the past, scraping it with a hobby knife and then applying liquid cement to soften it up. I even sanded a few spots. I think it looks better than the standard kit texturing of the turret.
The front cheek weld seams look a bit subdued...will keep an eye on this (I may check them out with a quick pin wash) I do not want them to be too subtle after all the work to figure them out.
And the main searchlight. Since I reworked the front face of the turret, where the searchlight attaches, I had to cut the locating pin off as there was no corresponding hole to put it in. It is a bit of a complicated build, so took a specific photo of it so you can see how it goes together.
Questions?
Jacques
Joined: March 04, 2003
KitMaker: 4,630 posts
Armorama: 4,498 posts
Posted: Tuesday, November 19, 2013 - 10:57 AM UTC
Adding bits and details to the turret to get it done. Debating if I should detail out the stowage basket better, or not. Seems a bit AMS-ish to me, but I admit it is bugging me. I may just slap myself in the head and move past it.

Blucop
Joined: January 03, 2005
KitMaker: 279 posts
Armorama: 262 posts

Posted: Friday, November 29, 2013 - 03:11 AM UTC
Hi Jacques, it looks to be coming together nicely.
Could you tell me however how the T-80U extra fuel tanks connect with the fuel system? The hoses on a T-72 are very evident, how does the T80 accomplish this connection? Are there no visible hoses?
Thanks
Could you tell me however how the T-80U extra fuel tanks connect with the fuel system? The hoses on a T-72 are very evident, how does the T80 accomplish this connection? Are there no visible hoses?
Thanks
 |

WEB HOSTING BY


Copyright ©2021 Armorama and Kitmaker Network, a subsidiary of Silver Star Enterprises
All Rights Reserved. Please read our Conditions of Use and Privacy Policy.
All Rights Reserved. Please read our Conditions of Use and Privacy Policy.