#226
British Columbia, Canada
Joined: February 20, 2012
KitMaker: 1,909 posts
Armorama: 1,066 posts
Posted: Friday, August 02, 2013 - 11:34 AM UTC
Olivier,
I used a Mission Models multi tool.

Cheers Rob.
Anything without guns is a target!
27 completed campaigns and counting :)
Alberta, Canada
Joined: July 20, 2006
KitMaker: 706 posts
Armorama: 665 posts
Posted: Friday, August 02, 2013 - 01:58 PM UTC
Alex
Great looking build so far. The bush hats that you have on the Techs, were not issued till 2000 and they were US boonie type. The Canadian bush hat is the same that RED GREEN wears.
Anthony

AMPS # 2734 , IPMS EDMONTON
Win The Firefight, Protect Your Brothers, Leave No One Behind.
Survivor of 7 rotations, last 3 in the sandbox.
"Gone toe to toe with the Taliban, and won."
Correze, France
Joined: June 10, 2004
KitMaker: 5,329 posts
Armorama: 5,204 posts
Posted: Friday, August 02, 2013 - 08:53 PM UTC
Quoted Text
Olivier,
I used a Mission Models multi tool.
Cheers Rob.
Thanks Rob. I finally decided to glue the basket frame onto the turret side then glue the lower section of mesh around the basket.
I have the both side baskets glued on and complete. I still have to glue the bottom and lower mesh parts to the bustle basket. The bottom part is oversized and will need some serious trimming.
Olivier
Visit my site Click the banner
"La reine des batailles, j'ai nommé l'infanterie"
Napoléon
Switzerland
Joined: January 27, 2013
KitMaker: 75 posts
Armorama: 75 posts
Posted: Saturday, August 03, 2013 - 02:25 AM UTC
@ Alex, looks good with the color, really like your towing scene. Would you use all the figures in the background on the dio?
Correze, France
Joined: June 10, 2004
KitMaker: 5,329 posts
Armorama: 5,204 posts
Posted: Saturday, August 03, 2013 - 03:11 AM UTC
Now I have the turret baskets completed.

It was not an easy game as most of the parts are ill-shaped and a number are oversized.


I have some small bits to add and it will be ready for the painting session. But this won't be before the end of August as I don't have my painting tools with me.
Olivier
Visit my site Click the banner
"La reine des batailles, j'ai nommé l'infanterie"
Napoléon
Switzerland
Joined: January 27, 2013
KitMaker: 75 posts
Armorama: 75 posts
Posted: Saturday, August 03, 2013 - 04:25 AM UTC
Looks pretty nice Olivier. Do not make me scared, i have this one in my stash too. Cant see anything of the problems, looks really clean.
Cheers Christioh
Correze, France
Joined: June 10, 2004
KitMaker: 5,329 posts
Armorama: 5,204 posts
Posted: Saturday, August 03, 2013 - 04:59 AM UTC
I hope you're not scared but at least you're warned

If I've had some Aber mesh, I definitely would have used it instead of the Trumpeter parts.
Olivier
Visit my site Click the banner
"La reine des batailles, j'ai nommé l'infanterie"
Napoléon
New York, United States
Joined: March 08, 2010
KitMaker: 3,662 posts
Armorama: 3,078 posts
Posted: Saturday, August 03, 2013 - 06:43 AM UTC
@ Oliver nice work on that mesh

@ Alex your build is moving right along looking forward to seeing more

I have made some progress on my build and hitting up the spare parts box for extras


more soon
Active Campaigns on the bench:
Operation Fall Gelb - Pz.Kpfw. IV Ausf. C
Engineering the Future - M-26 Recovery Vehicle
115 Campaigns completed
Correze, France
Joined: June 10, 2004
KitMaker: 5,329 posts
Armorama: 5,204 posts
Posted: Monday, August 05, 2013 - 02:02 AM UTC
Here are my latest progress with the LAV.
The headlight guards are a bit thick to say the least. I kept them as I want to build the kit from the box without any exterior addition.


Olivier
Visit my site Click the banner
"La reine des batailles, j'ai nommé l'infanterie"
Napoléon
Ontario, Canada
Joined: November 10, 2010
KitMaker: 587 posts
Armorama: 550 posts
Posted: Monday, August 05, 2013 - 04:02 AM UTC
Oliver-looking real nice. I enjoyed the LAV when I built it a few years ago. perfect amount of photoetch included in the kit. What were you thinking about
Anthony- I realize that the hats aren't exact but I'm taking a few artistic liberties, the key component for me is two vehicles and the tow set up.
Christoph- No, only the 2 veh techs, and the two "tankers" will be featured in the diorama.
Everyone else, builds are looking good. lets see so more work out of everyone. I'm on vacation in montreal for the next two weeks so I won't be getting any work done.

Ontario, Canada
Joined: November 10, 2010
KitMaker: 587 posts
Armorama: 550 posts
Posted: Monday, August 05, 2013 - 04:08 AM UTC
Quoted Text
I am really liking your work here, Alex. Although your toes in photo 5 are in shadow, they indicate that your figures have very realistic skin tone.
Just wondering about your excellent freehand camo job. What pressure would you be at to avoid the over splatter that I so often experience with freehand work?
Ben
Ben, I'm using a Pasche H air brush with the medium tip, I'm running about 10-12 PSI. There is a bit of overspray in areas but it is very minor, and could easily be blended with weathering. I mostly experiment on an old Abrams turret before spraying, this way I can dial in different settings depending on the paint mixture etc. So my advice would simply be to have a test model on hand to adjust your brush to where you feel comfortable. But 10-17 is in the range I work.
Alberta, Canada
Joined: April 07, 2010
KitMaker: 1,028 posts
Armorama: 45 posts
Posted: Friday, August 09, 2013 - 09:59 AM UTC
I'm starting to make some headway in the campaign, and my entry is beginning to look like an airplane:


Just seam filling for now, while I wait for the canopy mask to arrive. When that gets here, its time for the really enjoyable part; painting, markings, and weathering.
To prevent being called an 'expert', screw something up good every now and again.
Correze, France
Joined: June 10, 2004
KitMaker: 5,329 posts
Armorama: 5,204 posts
Posted: Saturday, August 10, 2013 - 12:25 AM UTC
Visit my site Click the banner
"La reine des batailles, j'ai nommé l'infanterie"
Napoléon
New York, United States
Joined: March 08, 2010
KitMaker: 3,662 posts
Armorama: 3,078 posts
Posted: Friday, August 23, 2013 - 09:39 AM UTC
Active Campaigns on the bench:
Operation Fall Gelb - Pz.Kpfw. IV Ausf. C
Engineering the Future - M-26 Recovery Vehicle
115 Campaigns completed
SgtRam
 Contributing Writer
#197
Ontario, Canada
Joined: March 06, 2011
KitMaker: 3,971 posts
Armorama: 2,859 posts
Posted: Friday, August 23, 2013 - 02:46 PM UTC
Alright, with my name in the hat, thought I had better get something going, so here is my entry. I will be building the latest Kinetic S-2A Tracker, with Canadian markings of course.


Now to get the glue out and start some building.
SgtRam
Contributing Writer #197
Ontario, Canada
Joined: March 06, 2011
KitMaker: 3,971 posts
Armorama: 2,859 posts
Posted: Tuesday, August 27, 2013 - 08:01 AM UTC
Cockpit done with a little creative placement of weight. I used a product call Liquid Gravity from Deluxe. Easy to use, I am hoping there is enough room to put it in to help keep the front wheel on the ground.


The panel detail is the Eduard set.
Ontario, Canada
Joined: August 05, 2003
KitMaker: 1,698 posts
Armorama: 1,563 posts
Posted: Tuesday, August 27, 2013 - 09:15 AM UTC
Hope to get it weathered this weekend or next. I really want to pair it with a Trumpeter Husky (from the Trumpeter Campaign), but I honestly don't recall seeing any Husky's in UN white?

Why plan when you can react?
Ontario, Canada
Joined: November 10, 2010
KitMaker: 587 posts
Armorama: 550 posts
Posted: Tuesday, August 27, 2013 - 04:04 PM UTC
Kevin and Grant, both are looking really nice.
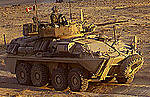
Grant, I think by the time the Husky was deployed in UN white Somalia I think, we were using the Bison based vehicle. I posted a picture of the Cougar and bison a few pages back in somalia. But here it is again

I've added another Canadian cat to the shed, and purchased Trackjam's C1 Late kit and have been working on that while on vaction at the cottage
Ontario, Canada
Joined: August 05, 2003
KitMaker: 1,698 posts
Armorama: 1,563 posts
Posted: Wednesday, August 28, 2013 - 07:33 AM UTC
Why plan when you can react?
Ontario, Canada
Joined: November 10, 2010
KitMaker: 587 posts
Armorama: 550 posts
Posted: Wednesday, August 28, 2013 - 07:38 AM UTC
Jason Bobrowich, did say early when I asked that the Husky served in Bosnia. It would be safe to assume that if it was there it was white. Maybe, just guessing.
Alberta, Canada
Joined: February 18, 2003
KitMaker: 1,728 posts
Armorama: 1,629 posts
Posted: Tuesday, September 17, 2013 - 02:54 PM UTC
I think I've settled on this:

It's the most up to date version of the Coyote (unless there's more stuff added since then - Anthony?). Will be using the Real Models update set and hope to sculpt full stowage. Was also considering a LAV III LORIT or OPFOR Leopard C2, but this won out.

Cheers,
Jim
"Fire all weapons and open a hailing frequency for my victory yodel" - Zapp Brannigan
Ontario, Canada
Joined: August 05, 2003
KitMaker: 1,698 posts
Armorama: 1,563 posts
Posted: Tuesday, September 17, 2013 - 03:22 PM UTC
Oh boy oh boy... looking forward to this one JC.
Why plan when you can react?
British Columbia, Canada
Joined: September 03, 2009
KitMaker: 6,965 posts
Armorama: 47 posts
Posted: Friday, September 20, 2013 - 05:07 AM UTC
Having recently finished the
1/32 kit I'm feeling like being on a bit of a Hawk kick so for this campaign, my chosen victim is the Airfix 1/48 kit.

I bought it at a swap meet, complete with the NeOmega cockpit set and a little paint already on some of the parts.
Fuselage and wings were off their sprues

The resin cockpit parts with their paint started

The rest of the parts on their sprues

And the decals for one Canadian and three Australian Hawks

I've read reviews which mention that the decals can be out of register. If that's the case I'm not too worried given that CanMilAir does an excellent set.
When once you have tasted flight you will walk the Earth with your eyes turned skyward.
For there you have been, and there you will always long to return.
-Leonardo Da Vinci
British Columbia, Canada
Joined: September 03, 2009
KitMaker: 6,965 posts
Armorama: 47 posts
Posted: Friday, September 20, 2013 - 12:05 PM UTC
Assembly went quickly after I coerced the resin cockpit into the fuselage.

My camera decided to focus on the jumble behind the model instead of the wingtip. I was trying to show how bad the fit of the wingtips is. Airfix in their infinite wisdom decided to produce a universal wing for their 1/48 Hawks. If you want to do a Hawk 100, you need to chop off the T.1 wingtip and replace it. The replacement is barely better than nothing at all.

The model is really an Australian Hawk 127 rather than the Canadian Hawk 115. Those wingtip fences are for the Australian formation lights, and aren't fitted to Canadian Hawks. Off they go. This is a good thing because I'm going to have to cover the entire wingtip with filler, and they'd have been ruined at that point.
When once you have tasted flight you will walk the Earth with your eyes turned skyward.
For there you have been, and there you will always long to return.
-Leonardo Da Vinci
Saskatchewan, Canada
Joined: November 14, 2012
KitMaker: 142 posts
Armorama: 113 posts
Posted: Tuesday, September 24, 2013 - 11:27 AM UTC

Sorry just got back online and catching up on a few campaigns.
Some men aren't looking for anything logical, like money. They can't be bought, bullied, reasoned, or negotiated with. Some men just want to watch the world burn.