


Hosted by Darren Baker
Sherman Skink

Pave-Hawk

Joined: May 05, 2006
KitMaker: 900 posts
Armorama: 510 posts

Posted: Friday, September 21, 2012 - 03:16 AM UTC
Some temporary curvature and hatches, and separating the gun bulge are into discrete segments.
tankmodeler

#417

Joined: March 01, 2004
KitMaker: 3,123 posts
Armorama: 2,539 posts

Posted: Friday, September 21, 2012 - 07:58 AM UTC
Iain,
The problem you have with the bulges is that you are modelling the top as tangent to the inclined roof plate and this is not how the cssting is laid out. Look at teh photo below:
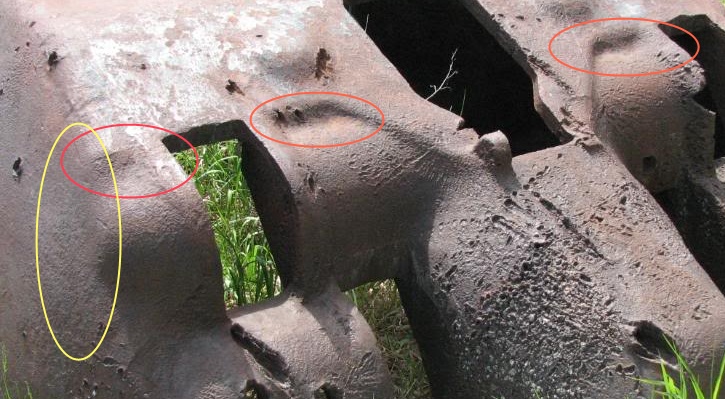
The red ovals show that the roof plate is intersected by a "flat" surface and then the rotor bulge is added to that. The rotor bulge can be modelled with the hemisphere shape on the end and buried into the flat surface up to the "equator" of the bulge.
This is what I'm talking about:
Here is the turret without radii on any of the corners.

See that the bulges sit on top of another flat surface.
Here is the same model with the radii added.

My shapes aren't exactly there, I only threw this together in 20 minutes and without looking at the drawings, so it only resembles a Skink turet. But it's close enough to see that the real shape is arrived at after adding radii to my initial version withuot radii.
The problem you have with the bulges is that you are modelling the top as tangent to the inclined roof plate and this is not how the cssting is laid out. Look at teh photo below:
The red ovals show that the roof plate is intersected by a "flat" surface and then the rotor bulge is added to that. The rotor bulge can be modelled with the hemisphere shape on the end and buried into the flat surface up to the "equator" of the bulge.
This is what I'm talking about:
Here is the turret without radii on any of the corners.
See that the bulges sit on top of another flat surface.
Here is the same model with the radii added.
My shapes aren't exactly there, I only threw this together in 20 minutes and without looking at the drawings, so it only resembles a Skink turet. But it's close enough to see that the real shape is arrived at after adding radii to my initial version withuot radii.

Pave-Hawk
Joined: May 05, 2006
KitMaker: 900 posts
Armorama: 510 posts
Posted: Friday, October 05, 2012 - 10:30 PM UTC
Here is where the 3D model is at now.
Too much curvature where the roof meets the sides I think, plus a few adjustments to some of the detail locations is needed, i.e. aimers hatch is too far up I believe, nose piece shape is not quite there..
And the only way I can see me getting the gun bulges right is on a physical model, but it's pretty close to something I can work with.
tankmodeler
#417
Joined: March 01, 2004
KitMaker: 3,123 posts
Armorama: 2,539 posts
Posted: Saturday, October 06, 2012 - 05:09 AM UTC
That's looking really good!
The gunner's door might be a little narrow, but it seems to be in the right place. The nose looks pretty close. I'd say that the radii from walls to roof might actually be too small. The curvature is pretty gentle in the photos.
This is definitely going down the right road now.
Paul
The gunner's door might be a little narrow, but it seems to be in the right place. The nose looks pretty close. I'd say that the radii from walls to roof might actually be too small. The curvature is pretty gentle in the photos.
This is definitely going down the right road now.
Paul
Pave-Hawk
Joined: May 05, 2006
KitMaker: 900 posts
Armorama: 510 posts
Posted: Saturday, October 06, 2012 - 10:37 AM UTC
Thanks. 
I also finally took your advice regarding using a solid model and shelling it rather than trying to use surfaces. It finally clicked in my head how to get it in the ballpark of looking right.
Though I suspect of a professional 3D designer were to look at the model feature tree they would have a heart attack at seeing all the stuff that doesn't adfd to the design anymore, but has been used to reference too much other stuff to be deleted without a lot of painful rework.
tankmodeler
#417
Joined: March 01, 2004
KitMaker: 3,123 posts
Armorama: 2,539 posts
Posted: Saturday, October 06, 2012 - 03:17 PM UTC
Quoted Text
Though I suspect of a professional 3D designer were to look at the model feature tree they would have a heart attack at seeing all the stuff that doesn't adfd to the design anymore, but has been used to reference too much other stuff to be deleted without a lot of painful rework.
Yeah, I hear ya. I'm a mechanical engiener by trade, but I don't do CAD every day for a living and when I do create a model to work through a design, the feature tree looks like a bloody disaster.
Still, I have learned the hard way that things like radii, casting features, shells drafts are best left until last, once the basic shapes are good. Of course some times the external drafts are key to the shape, but you leave to the end those things that you can and it doesn't clutter up your design or feature tree with things that you can do at the end to "pretty" it up.
Remember it's all a learning process.
Paul

jon_a_its

Joined: April 29, 2004
KitMaker: 1,336 posts
Armorama: 1,137 posts

Posted: Monday, October 08, 2012 - 03:02 AM UTC
Iain, let me know when you are ready for 'pre-production' & we can discuss file formats & what would work
Pave-Hawk
Joined: May 05, 2006
KitMaker: 900 posts
Armorama: 510 posts
Posted: Monday, October 08, 2012 - 07:28 PM UTC
Will do Jon.
It might take me a few weeks at the moment, as currently I only really have part of weekends to dedicate the time it needs to work on, and there's still a fair bit left to do/tweak before I am satisfied that it's 'close enough for government work'.
It might take me a few weeks at the moment, as currently I only really have part of weekends to dedicate the time it needs to work on, and there's still a fair bit left to do/tweak before I am satisfied that it's 'close enough for government work'
.Pave-Hawk
Joined: May 05, 2006
KitMaker: 900 posts
Armorama: 510 posts
Posted: Wednesday, October 17, 2012 - 10:16 AM UTC
Quick update,: Haven't felt up to working on this for a bit, but hoping to get it finished off this weekend, in between sorting my stuff out for an interstate move in a couple of months.
Pave-Hawk
Joined: May 05, 2006
KitMaker: 900 posts
Armorama: 510 posts
Posted: Friday, October 19, 2012 - 08:51 PM UTC
Ok here is where it's at. Pretty sure I have reached the limit on my current 3D modelling talents so I think the next step will be get a physical model made and refine that, unless there are any major things that any sees that I have missed and can add in.
Main turret body.

Turret Floor. Hopefully it's modelled correctly so should fit quite nicely into the turret body. Designed with the Dragon M4A1 in mind, I have that and the El Alamein Sherman in my stash so took direct measurements for the turret ring.

And here is a quick and dirty hatch I started work on. No idea if the hatch should be hollow or solid so it' has been started as a hollow item.

Main turret body.
Turret Floor. Hopefully it's modelled correctly so should fit quite nicely into the turret body. Designed with the Dragon M4A1 in mind, I have that and the El Alamein Sherman in my stash so took direct measurements for the turret ring.
And here is a quick and dirty hatch I started work on. No idea if the hatch should be hollow or solid so it' has been started as a hollow item.
tankmodeler
#417
Joined: March 01, 2004
KitMaker: 3,123 posts
Armorama: 2,539 posts
Posted: Saturday, October 20, 2012 - 08:45 AM UTC
Iain,
I'm sorry to say it doesn't look like you've captured the hatch shape at all.
First of all the hinge detail is on the wider side and not narrow end. Then the ends are round in plan without a flat and the overall shape is more evenly curved with no flat areas at all.
The hinge area isn't a monolithic block, but has two "ears: neither of which has any undercut or hollowing.
Take a look at these images for a better appreciatiuon of the rounded nature of these hatches.
Paul
Pave-Hawk
Joined: May 05, 2006
KitMaker: 900 posts
Armorama: 510 posts
Posted: Saturday, October 20, 2012 - 01:14 PM UTC
Unhollowing the hatch is just a matter of getting rid of the shell, so that problems solved.
What is the actual shape of the hinge points on the hatch, I cant really tell from the drawings, is it just a rounded shape?
What is the actual shape of the hinge points on the hatch, I cant really tell from the drawings, is it just a rounded shape?
barkingdigger

#013

Joined: June 20, 2008
KitMaker: 3,981 posts
Armorama: 3,403 posts
Posted: Sunday, October 21, 2012 - 02:02 AM UTC
Hi Iain,
Been keeping my eye on this lovely bit of CAD work! (While doing a bit of CAD solids work meself...) I'm kinda hoping you get this into production, because I'd certainly want one.
As for those hatches, they look a lot like the standard round ones from the later Sherman TC hatch, but with the edge opposite the hinge "flattened" for some reason. I'd start with one from a kit for measurements, but trim that edge. Not sure why they wanted to add yet another part to the inventory rather than just use the standard round hatch...
Tom
Pave-Hawk
Joined: May 05, 2006
KitMaker: 900 posts
Armorama: 510 posts
Posted: Sunday, October 21, 2012 - 11:06 AM UTC
Only Shermans I have are the Dragon El Alamein and M4A1 DV versions, both of which have large round hatches, so not much help as a basis.
And I am guessing the drivers hatch is probably not right either. Finish work early this week so might see if I can use a bit of that time to come oup with something more appropriate, but I may just take the shape from the drawings and see if I can whip something up in sheet styrene and putty.
And I am guessing the drivers hatch is probably not right either. Finish work early this week so might see if I can use a bit of that time to come oup with something more appropriate, but I may just take the shape from the drawings and see if I can whip something up in sheet styrene and putty.
tankmodeler
#417
Joined: March 01, 2004
KitMaker: 3,123 posts
Armorama: 2,539 posts
Posted: Monday, October 22, 2012 - 05:34 AM UTC
Quoted Text
As for those hatches, they look a lot like the standard round ones from the later Sherman TC hatch, but with the edge opposite the hinge "flattened" for some reason.
No, I'm afraid they are nothing like the Sherman commander's hatches from teh late cupola. The shapes are entirely different.
The basic shape is a flat sided oval (not an elipse) that is uniformly convex added to the side are two ears for the hinge pick-up points. In the turret csting is a hump which sits between the two ears and holds the hinge pin(s) (and, I think a torque relief spring). There is a rectangular cutout in the roof of the turtet top the side of the hatch holes that would appear to take a tab on the side of the hatch similar to what you have created, but a closer look at the drawings and available photos seems to indicate that there is a cylindrical object between the hinge ears on the hatch and this is what I think is a torque relief spring assembly.
The hatch has a hole somewhat forward of the centreline through which pokes the periscope (which looks like a pretty standard Vickers unit as seen on Churchills, Valentines and other Commonwwealth AFVs) and it's armoured guard. Near the forward hinge ear on each hatch is another short arm which holds the catch mechanism that engages the catch spring that is on the turret roof.
HTH
Paul
barkingdigger
#013
Joined: June 20, 2008
KitMaker: 3,981 posts
Armorama: 3,403 posts
Posted: Monday, October 22, 2012 - 07:06 AM UTC
I stand corrected! I only had the earlier posting of a tech manual drawing to go on...
Definitely want to see this get into production!
Tom
Definitely want to see this get into production!
Tom
Pave-Hawk
Joined: May 05, 2006
KitMaker: 900 posts
Armorama: 510 posts
Posted: Monday, October 22, 2012 - 02:18 PM UTC
Had a play around in solidworks last night trying to find a way to create the curvature and I think I now have something that will work but need to create the actual initial shape now.
Looking at the drawings there appears to be a lip of some kind around the edges of the hatch and I cant tell if it's simply a flat portion, or sits slightly raised from the overahll hatch bulge.
I am really wishing now that there were more decent photos of a complete skink particularly the top. I always wonder how close to the real thing drawings actually are.
tankmodeler
#417
Joined: March 01, 2004
KitMaker: 3,123 posts
Armorama: 2,539 posts
Posted: Tuesday, October 23, 2012 - 06:08 AM UTC
Quoted Text
Had a play around in solidworks last night trying to find a way to create the curvature and I think I now have something that will work but need to create the actual initial shape now.
Create the oval

Create the curvature as a spline in the longitudinal plane, add a centreline as an axis and then "revolve cut" 90 deg to each side of the planeit.

Miror it to the other side

Use the "convert entities" to map the curvature onto one of the flat faces of the remaining material & then "cut" it.

Mirror that

Shell it out

Add the interior seal lip using convert entities & offset to create a boss

In earlier images there is a small discontinuity that looks like a lip around the hatch, but is only where there is a hard edge between two surfaces. I blended that out in this image using a 2" fillet.

And here the hatch is again from a different angle.

This still appears a little flat for my eye, so you can play with the shape of the curve and the height of the hatch until you get something you like.
Quoted Text
Looking at the drawings there appears to be a lip of some kind around the edges of the hatch and I cant tell if it's simply a flat portion, or sits slightly raised from the overahll hatch bulge.
I think it's where the artist has shown the intersection of the curvature and a slight flat on the side of the hatch. Depicting changes in curvature on sketches of castings is always a tricky business. Whether you'd actually see it unknown. You can see from my images above that the hard corner will show as a line, but a real casting is unlikely to have such a hard line and would most likely have a generous radius between the two surfaces, obliterating any visible line. Your call. They only made a few of these parts, so what they _really_ looked like is anyone's guess.
Quoted Text
I am really wishing now that there were more decent photos of a complete skink particularly the top. I always wonder how close to the real thing drawings actually are.
I've been wishing for more Skink photos for 25 years! They probably _were_ taken and just a probably thrown away at the end of the program or war.
HTH
barkingdigger
#013
Joined: June 20, 2008
KitMaker: 3,981 posts
Armorama: 3,403 posts
Posted: Tuesday, October 23, 2012 - 07:15 AM UTC
Impressive work, Paul.
I think one problem with tech drawings of an aborted development like this is that the parts may have "evolved" after the pen hit paper. Still, if there aren't any good pics, nobody can call you out on it!
Tom
I think one problem with tech drawings of an aborted development like this is that the parts may have "evolved" after the pen hit paper. Still, if there aren't any good pics, nobody can call you out on it!
Tom
Pave-Hawk
Joined: May 05, 2006
KitMaker: 900 posts
Armorama: 510 posts
Posted: Tuesday, October 23, 2012 - 11:16 AM UTC
Well that has certainly given me a quick 3D modelling lesson that should prove very useful in future.
The method I was using to generate the shape was to create the oval, extrude slightly, then use the dome feature and adjust to get it looking about right.
I also found that by applying/varying a chamfer to the edge of the extrude I could adjust the starting angle of the dome. That was done purely as experimentation however, so whether I utilise that will depend on how the final product eventually looks.
tankmodeler
#417
Joined: March 01, 2004
KitMaker: 3,123 posts
Armorama: 2,539 posts
Posted: Tuesday, October 23, 2012 - 01:29 PM UTC
Many ways to end up with a skinless cat!
Pave-Hawk
Joined: May 05, 2006
KitMaker: 900 posts
Armorama: 510 posts
Posted: Tuesday, October 23, 2012 - 01:35 PM UTC
Indeed there is
I may try calling upon your 3D modelling expertise for my next project: "How to model a vehicle engine with only 2 crappy reference drawings" lol.
I may try calling upon your 3D modelling expertise for my next project: "How to model a vehicle engine with only 2 crappy reference drawings" lol.
Pave-Hawk
Joined: May 05, 2006
KitMaker: 900 posts
Armorama: 510 posts
Posted: Saturday, October 27, 2012 - 02:59 PM UTC
Well I spent a bit of time trying to get the commanders hatch looking good enough, only to realise I had some how screwed up the shape and size and it would never fit properly into the hatch cutout on the turret. 
Ended up starting from scratch and this is about what I have so far.

Ended up starting from scratch and this is about what I have so far.
tankmodeler
#417
Joined: March 01, 2004
KitMaker: 3,123 posts
Armorama: 2,539 posts
Posted: Saturday, October 27, 2012 - 03:46 PM UTC
I hate to say it, but the shape still looks off. The intersection of the curve of the external hatch surface and the edge oval contour seems to be tangent to the vertical. This isn't correct, looking at the images. The top surface should be evenly convex and tangent to the horizontal only at the centreline of the hatch. The intersection of the curved outside surface with the edge of the hatch should be at a relativly shallow angle and not at a right angle as it seems here.
Pave-Hawk
Joined: May 05, 2006
KitMaker: 900 posts
Armorama: 510 posts
Posted: Saturday, October 27, 2012 - 05:22 PM UTC

Played with the curvature somewhat.

 |

WEB HOSTING BY


Copyright ©2021 Armorama and Kitmaker Network, a subsidiary of Silver Star Enterprises
All Rights Reserved. Please read our Conditions of Use and Privacy Policy.
All Rights Reserved. Please read our Conditions of Use and Privacy Policy.