_GOTOBOTTOM
Armor/AFV: Allied - WWII
Armor and ground forces of the Allied forces during World War II.
Hosted by Darren Baker
LRDG Breda Gun Truck WIP...
Brigandine
Visit this Community
Dunedin, New Zealand
Joined: July 12, 2006
KitMaker: 553 posts
Armorama: 312 posts
Posted: Wednesday, November 03, 2010 - 11:37 PM UTC
Nearly a YEAR after my last set of photos and it is still a WIP; priority

General view...

Detail of scratch-built greedy boards, spare wheel and mount, tool box, Bagnold sun compass; altered rifle racks and oil cans. In real life the cans were filled with water as part of the "bail-out" kits used on each truck. The Tamiya kitset is also missing a third transfer lever for the two speed differential used on the Chevrolet 30 cwt 1533X2


Left side with scratch-built spare wheel mount and sand channels and racks. Spare wheels were rarely mounted in the back tray of LRDG gun trucks and many were fitted with similar spare wheel mounts on the running board. The rear mud flaps were never used on gun trucks. Didn't realise my SMLE EY had slipped behind the wheel until now...


Sand channels and racks (need to straighten the top of the rear rack...)


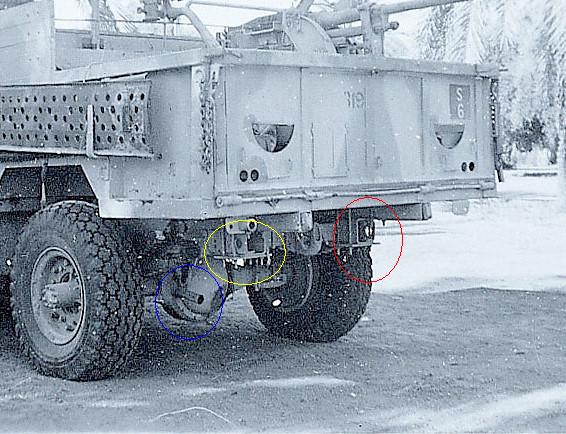
S1 Patrol (Rhodesian) gun truck - good detail of rear axle and brake lines, exhaust and suspension showing how the Tamiya exhaust needs to be altered. Also note the lack of mudflaps, the brackets for the Breda mountings and the spare wheel rack made out of angle-iron. S1 Patrol's greedy boards had slightly different mountings with the top board being made out of two pieces: each Patrol unit in the LRDG carried out its own modifications in the LRDG's workshops. The cargo barrier can also be seen. My thanks to Brendan O'Carroll for the photo and permission to use it.


Underneath my gun truck...


T1 Patrol gun truck: slightly different configuration to that of S1 Patrol, with the "greedy boards" extended further foward: note, again, spare wheel and lack of mudflaps. The Breda was mounted using long U-bolts and the cargo bed which was reinforced with sheet steel.


Good view of R1 Patrol W/T truck: note configuration of upward sliding hatch with two handles, nothing like the kitset. The LRDG used Rod Aerials, not whips for short and intermediate range communications. Look carefully at the aerial and the leads can be seen angling towards the top.


My old "Te Aroha III" of T1 Patrol, modified with new compartment for the civilian Phillips Type 635 receiver and modified hatches for both receiver and No. 11 W/T


Nearly four years old...currently redoing a few bits and pieces including sand mats.
Te Aroha III

exer
Visit this Community
Dublin, Ireland
Joined: November 27, 2004
KitMaker: 6,048 posts
Armorama: 4,619 posts
Posted: Thursday, November 04, 2010 - 01:26 AM UTC
Very good work here- I really like the finish you got on the leather seats.
Brigandine
Visit this Community
Dunedin, New Zealand
Joined: July 12, 2006
KitMaker: 553 posts
Armorama: 312 posts
Posted: Thursday, November 04, 2010 - 09:51 AM UTC
Thanks Pat, there's still some work needed to finalise the stowage layout, etc. Clear photos have a habit of showing up where detail can be improved...
ltb073
Visit this Community
New York, United States
Joined: March 08, 2010
KitMaker: 3,662 posts
Armorama: 3,078 posts
Posted: Thursday, November 04, 2010 - 10:32 AM UTC
Nice work Jeff, I like where you mounted the spare tires, mine just got thrown in the back with the rest of the gear
gremlinz
Visit this Community
Hamilton, New Zealand
Joined: February 07, 2009
KitMaker: 795 posts
Armorama: 743 posts
Posted: Thursday, November 04, 2010 - 03:48 PM UTC
Looks good. I've got a stack of the Tamiya LRDG trucks in the stash that I just can't seem to find the motivation to build. This gives a little inspiration to at least give one a go.
mopnglo
Visit this Community
United States
Joined: January 07, 2006
KitMaker: 452 posts
Armorama: 271 posts
Posted: Thursday, November 04, 2010 - 05:05 PM UTC
Jeff, terrific job so far! The details are spectacular! Looking forward to the finished product.
AlanL
Visit this Community
England - East Anglia, United Kingdom
Joined: August 12, 2005
KitMaker: 14,499 posts
Armorama: 11,675 posts
Posted: Friday, November 05, 2010 - 11:53 PM UTC
Hi Jeff,

This is looking terrific. Do you have any reference pics of how the Breda was fixed to the truck bed?

Excellent stuff.

Al
Brigandine
Visit this Community
Dunedin, New Zealand
Joined: July 12, 2006
KitMaker: 553 posts
Armorama: 312 posts
Posted: Saturday, November 06, 2010 - 11:11 AM UTC
Hi Alan,
the best photos I have found so far are the ones I have included in the first posting: I have tweaked the photo of the S1 Patrol vehicle...


The red and yellow circles highlight the extra brackets with four struts bolting the cargo bed to the chassis rails (part C46 in the Tamiya kitset): these were only used on the Breda trucks. The blue circle highlights the sit of the exhaust pipe over the rear axle; it is way too long in the kitset (C49) but fortunately the plastic is flexible enough to be cut down and reshaped or it can be replaced with tubing. Other details worth noting are the holes in the outer walls of the rear box section of the chassis (C46) and the hollow-section tow hook.


Not the clearest of photos but the red circles show that the tripod legs were secured to the bed and chassis of the truck with long U or J shaped bolts. The yellow rectangle shows that the cargo bed was reinforced with (presumably) light gauge sheet steel.
AlanL
Visit this Community
England - East Anglia, United Kingdom
Joined: August 12, 2005
KitMaker: 14,499 posts
Armorama: 11,675 posts
Posted: Saturday, November 06, 2010 - 11:29 AM UTC
Hi Jeff,

Many thanks, I'll bookmark the thread for reference. I'm in Tilly mode at the moment but have made a start on my LRDG figs.

Excellent, thanks

Al
Brigandine
Visit this Community
Dunedin, New Zealand
Joined: July 12, 2006
KitMaker: 553 posts
Armorama: 312 posts
Posted: Saturday, November 06, 2010 - 09:21 PM UTC
Ahhh Tilly! Looking forward to getting stuck into one or several over the next couple of weeks (one more Uni exam tomorrow and I have finished for the year...)

AlanL
Visit this Community
England - East Anglia, United Kingdom
Joined: August 12, 2005
KitMaker: 14,499 posts
Armorama: 11,675 posts
Posted: Saturday, November 06, 2010 - 10:04 PM UTC
Hi Jeff,

The Tilly is a great little kit, Tamiya produuced a gem there. Must do some more work on my LRGD figs too. The NWM offerings are pretty cool, best 'special' troops I've seen for the desert so far.

Al
slodder
Visit this Community
North Carolina, United States
Joined: February 22, 2002
KitMaker: 11,718 posts
Armorama: 7,138 posts
Posted: Saturday, November 06, 2010 - 11:05 PM UTC
Great job. Attention to detail is fantastic. Not just on the build side but the detail of research is really outstanding.
NebLWeffah
Visit this Community
Alberta, Canada
Joined: October 13, 2004
KitMaker: 1,683 posts
Armorama: 1,248 posts
Posted: Sunday, November 07, 2010 - 05:25 PM UTC
This is a very nice model you have there. I have the Tamiya kit in the stash and hopefully will get to it someday. Well done!

cheers;

Bob

Brigandine
Visit this Community
Dunedin, New Zealand
Joined: July 12, 2006
KitMaker: 553 posts
Armorama: 312 posts
Posted: Sunday, November 07, 2010 - 08:38 PM UTC
Thanks for all your comments; now that university studies are over for the year ( )I will have some spare time to finish the project properly and sort out some of the small details that the photos have shown up.
Brigandine
Visit this Community
Dunedin, New Zealand
Joined: July 12, 2006
KitMaker: 553 posts
Armorama: 312 posts
Posted: Monday, November 08, 2010 - 08:41 AM UTC
In a wild whydidn'tithinkofthat moment I wondered why I didn't lower the tailgate to show how I secured the Breda to the truck's bed and chassis - I will get around to it: in the meantime, a brief explanation.


I made three J bolts out of stiff wire, and secured the base of the Breda to the bed using the trunnions (parts D6-D11) as anchor points - the red and blue circles highlight these.
I'm pretty sure that a sheet of light-gauge steel was either welded or riveted to the cargo bay bed by the LRDG to provide extra strength, and I have used 10 thou plasticard for this.


Underneath the purple circles highlight where the J bolts sit neatly against the chassis rail - these have now been secured in place with plastic tubing cut in half and welded to the chassis. I have also welded an extra cross beam to the chassis to secure the rear leg of the tripod.
Red and blue circle highlight the brake lines, shock absorber mounts and lever action shock absorbers added to the rear axle and the correct position of the modified exhaust pipe.
AlanL
Visit this Community
England - East Anglia, United Kingdom
Joined: August 12, 2005
KitMaker: 14,499 posts
Armorama: 11,675 posts
Posted: Monday, November 08, 2010 - 09:58 AM UTC
Excellent Jeff. Thanks for the info,

Al
 _GOTOTOP