


But the thinners is knock out material..

I like the pre-shading, should show through very nicely. Looking forward to the 'Dunkelgelb'..


 It does flow well and has a long window between AB tip cleaning though, so positives and negatives probably outweigh each other... The children smiled for most of the day! Must be looking forward to the 'Atmosphere' over the holiday weekend...


 Especially for dio pieces, where the light needs to hit the vehicle and figures from a presumed direction, 'Adam Wilders' article in AFV Modeller is usually to be found in my vicinity at the moment, the combination of all the past,present and future painting techniques and hypothesise inspire me... After all it is how I approach painting or illustration in the 2D form. So to me we are all part of a never ending jigsaw, that has it's entry and exit points for the individual modeller, right the way through from 'dry-brushing' to 'colour modulation' and beyond... I'm waffling again aren't I
  I will really have to open the windows today!


 cheers from Mark
 Got some good weather around here today... So I thought about getting some daylight chromatic reference done on the Mr Hobby Panzer Colour H403. As it looks very different under various lighting conditions
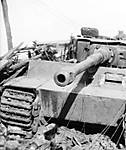
  Which leads into the colour under the zimmerit... Hi Mike! Now this has been the subject of many intense discussions on many sites. Some of the most informative coming from members on Missing-Lynx, there are many threads on this issue. If the zimmerit has been torched then we appear to have a very pale ash colouration with the primer obviously darkening somewhat... Now if the paste has been dislodged by small arms, winging shots or elemental flaking (this can be seen more on the eastern front) the primer shows through... Thought to be in most cases 'Rot Oxid'.


 As you can see from the 'pre-toasted' image posted of '112' on the previous update it varies somewhat from the kits instructions scheme. Sorry for the lack of activity of late O ne thing and another you know! The main thing being moisture in the mix!!! My always excellent compressor suddenly stopped filtering moisture from the feeds, so I have had to overhaul the regulator assembly, moisture trap, o-rings and gaskets. I will have to get another pre-AB moisture trap, as I am now paranoid over the dreaded water splatter !
  I have taken the photographs under a tru-light bulb from my light box, upon a white background... You will have to bear with me on the photography skills, I tend to take a few 'hundred' at each stage then cull (more like massacre) them down to the usable few. Anyway for your consideration #6383 OOB in it's Gunze Sangyo Mr Hobby Panzer Colors H403. hull and turret have been primered with Mr Base White 100 and pre-shaded, the running gear primered and sheet exhaust shrouds with GamesWorkshop Chaos Black Primer and the Turret Stowage Bin and the underbelly in Games Workshop 'Medichite Red' Foundation paint thinned with Vallejo thinner in equal parts! It does give a nice hull red oxide tone.


 Hi everybody! Some good points there Karl,I myself think that the Gunze Sangyo Panzer Colors H403 is probably one of the darkest 'Dunkelgelbs' that I have ever used... And thats on a white primer coat! The weathering should tone it down quite a bit though, I think I have achieved what I intended though with modulating the fixed items such as the exhaust shrouds and turret stowage bin, giving them different primer coats or pre-shading tones. The 'Dunkelgelb' chestnut rumbles on and on doesn't it? But as this is a OOB trying to stick to the instructions including colour chart, I'll let this one off the hook in respect to nailing the RAL7028 with the other manufacturers takes on Dark Yellow. David Byrden over on a thread on Missing-Lynx , that in his opinion preferred a Humbrol shade, as it was closest to some relics he had. Interestingly enough there are some images of some artifacts from the late western front on a few recent topics on ML at the moment, and the tones and shade vary considerably depending on the item coated and or it's sub primer coat. Though nothing major, thankfully... And the weathering and filters should take care of the imperfections as they are surface level. Another thing that I need to look closer at with the GS paints is the thinning as the normal 5/6-1 cut for soft edge camo is a bit to heavy, ant separates quicker than Tamiya or Vallejo, not played with the Lifecolor set yet. Right not a lot other than the camo job photo-shoot then! I tried to closely follow the scheme from M. Kenny's pre inferno photograph by Lt. Bill Cotton on the glacis and right-hand turret side, then followed OKW procedure And tried to match the other planes to the style of the pattern, it works when you turn the turret through 360 degrees in 90 degree quadrants... I know I'm losing the plot again. Here are the images.


 Once agian thanks for the input Karl, it really does keep the grey matter ticking.
  I think in the future I would really cut the GS H403 down with a lot lighter tone. The actual yellow pigment is really strong in this stuff, knocking it down with the thinners just seems to nullify any of the white that is in there, I think your views on the 'scale effect' are very valid. When illustrating I tend to work from a very bleached pale initial layer of colour for most subjects as 'scale effect' can darken substantially on 2D work also, so as much light has to be left in the fields as possible. Maybe we could get a collective view on where to go with the mixing of 'scale effect' paints as an option for those of us who want to approach the painting of models from differing schools of thought and disciplines. I am still mulling over putting a AB filter coat over the lighted planes of the Tiger, have any of you guys tried this? I was thinking tree cover on one side of the N175, or shadows from a two story building in the towns centre, shortly before the crossroads of the Rue Pasteur and the junction of the town square where '112' was ambushed and flank shot. Thank you both for adding this very interesting view on this thread, one I need to explore a lot more. I think with the level of modelling out ther and all the many great views on technique, style and schools of thought, the world of armour modelling is less of an unfinished jigsaw now that it has ever been. I suppose that it lies in the fact that with so many forums and arena to display, talk and share, we are all learning a lot more than we would have done in the past... Thanks for the kind words Karl and Marco, I think you are right on this subject... There must be an awful lot of dark and moody panzers in Japan eh?


 That Dunkelgelb has a very warm colour to it, almost looks like Braun RAL 8020 North Africa. I liked the way you lightened the hull front plate turret top and sides, skirts and rear mud guards "Adam modulation Styley" I would go with Karl on this one, shame it wasn't bleached a few shades brighter/ lighter. I love the slightly greenish colour of the Dunkelgelb on the wheels nice contrast. camo looks spot on, very close to 112 the big patch of plain DG around the hull MG looks good. A very chocolate(plain to dairy) on the Braun and I like the green. All the colours are slightly Dark so they all match. So I dont see a problem. Maybe a much lighter wash or AB dusting and the whole tiger will lighten or the slighter overall darker colour is caused by early morning dew(just thinking aloud) for the Dio you are going for at a much later date. Looking good, like I've said the overall camo looks spot on mate One observation, when tow cables were sprayed when the camo was applied at unit level in the field. once they had been used and moved, then there would be a line of Dunkelgelb, sort of shadow were the cable had been in the 1st place. That sounds like quite a nice touch, only thought about this when looking at your cables on the back of the Tiger. Anyway looking forward to the Bocarge weathering LOL Geraint
 Hi Geraint! Sorry for the delay in replying, first day back at school for the tribe, tactical and logistical planning starts the day before, a quick mini invasion by the squad then a lengthy de-briefing for all!
  Also the modern 'standard' black primer, and also have a go with Jon Haywards 'red oxide' primer start, I am really happy about the way the turret stowage bin has turned out with it's 'rot oxid' preshade, the dents and dings really work visually. Though I fancy completing the hull prior to factory applied 'Dunkelgelb' basecoat, with the zimmerit primered in it's 'ochre' natural state prior to painting, just another method of pre-shading I reckon! Thanks for the heads up on the Vimoutiers Tiger, always like a good wander around a walk a round! It will be interesting in the next few years to see what scheme it will be re-painted to, I wouldn't mind having a go at the re-zimmeriting of it! Lisa isn't keen on the idea of me building a 1/2 scale water firing Tiger Turret in the back garden... Good evening to all! Just a quick drop in with the progress on the painting of #6383 '112' OOB. I have AB'd a light mix of the GS/PC H403 with a little more Mr Basecoat white 1000, into the centre of the larger remaining patches of 'Dunkelgelb', to give the oil wash a better chance of working it's magic. This has been biased more to the front left hand side and roof areas of the Tiger, due to the time of day that it travelled along the N175 in a south westerly route towards Villers Bocage from hill/point 213, with it being early afternoon as the 1st Kompanies Tigers approached the town. The test piece of turret came out well with this procedure so the Tiger will get the same 'treatment' to lighten up the DY basecoat, before it receives it's obligatory 'hardcoat' either Future/Klear or Games Workshops 'Purity Seal' (don't tell Oliver! ) then it will be decal time and some serious weathering... Along with finishing '121' #6383 'modded' ready for painting, those vision slits are getting their comeuppance later... As the drill is out! This can be done whilst the washes and weathering layers on '112' #6383 dry and settle down. Right I'll shut up and post the images!
 Phil.
Phil. 


 I have gone for the Games Workshop 'Purity Seal' for the hard-coat prior to the decals and weathering (Hey Geraint, this stuff is great, very fine hi-satin finish, goes on great, crystal clear and free if you have a teenage son into 40K, I nearly dropped dead though last time I had to replace some 'Chaos Black surreptitiously... It's eight quid a can now, though it does go far. ) Thanks for the kind words, I'm glad you like this Tiger, I must say it has grown on me, and I am starting to see the point of it... ish! Though an un-zimmed mid would have been better! But a great kit if zimmerit was a put off for those wanting to build a late Tiger.
 Hey Geraint! How you doin'? Right it's official then... I quite like this kit! I would like it even more without an un-zimmed turret included! It's has got all the other plain un-pasted armour panel parts included after all... And it did have some room left in the box! Though I still prefer the other DML Tigers still, though the Dragon never sleeps for long under the Lonely Mountain eh? As promised the chromatic 'yellow' oil filters have been applied with Games Workshop 'purity seal' lightly spray coated from the rattle can.


 As you can see from the following images, because of the overall surface area that the decal has had to cover taking into account the vertical 'pleating' needed to embed the transfer into the pattern, this seriously affects the vertical dimensions of the cross. I think on the 'modded' #6383 we will be going with stencils!
  I think what would be needed in future decal options for such heavy zimmerit patterns (though the Panther G and Elefant zimmerit depictions look excellent ) A Balkenkreuz with elongated vertical proportions to accommodate the shortening effect of the zimmerits ridges. It was one of the features that I noted upon first inspection of the kits zimmerit moulding as opposed to other zimmerit solutions whether they be DIY or After-Market. Ah well it's all a learning curve eh?
 I will see if an extension from 'donor' to the Balkenkreuz where needed will remedy it's stunted appearance!
  |


