Armor/AFV: Axis - WWII
Armor and ground forces of the Axis forces during World War II.
Hosted by Darren Baker
DML#6383 Tiger 1 Turret Zimmerit Mod
barkmann424
Visit this Community
England - North West, United Kingdom
Joined: November 23, 2008
KitMaker: 357 posts
Armorama: 353 posts
Posted: Thursday, February 26, 2009 - 10:06 PM UTC
Thanks David! Time to break out wood tones! Another case of the 'red oxide' frenzy breaking out again I'm afraid! I have seen similar images through the grating but didn't know if they were 'over restored' or re-painted! Not a difficult one to rectify as I had to airbrush the PE sides of the vents in primer anyway along with the actual vent part)
I was looking at various images yesterday of track wear on the cleated/track face of late combat tracks, and noticed that the inside pattern is often worn whilst the outside tread moulding is less. Is this due to camber on the running gear or purely an uneven load distribution? Interesting I feel an worthy of depiction on a well used Tiger maybe?


Just thought it was a interesting feature and worthy of a ponder

Right back to the OOB! Thanks Phil.
Jendarith
Visit this Community
Louisiana, United States
Joined: February 22, 2009
KitMaker: 6 posts
Armorama: 5 posts
Posted: Friday, February 27, 2009 - 04:26 AM UTC
Thanks for all of this 'How To' Phil,
this is the best forum or most helpful group I've ever joined. You're good man; I should be able to take these tips and run with it. One other question if you please, do you put your decals over this Zimmeritt, paint numbers on it, what? It just seems like it would be hard to put decals over this stuff. What do you recommend? Thnx, Brent
barkmann424
Visit this Community
England - North West, United Kingdom
Joined: November 23, 2008
KitMaker: 357 posts
Armorama: 353 posts
Posted: Saturday, February 28, 2009 - 09:03 PM UTC
Hi Brent! Hello everybody!
On the question of turret tactical markings/numerals, you can get really good results from the DML/Cartograph decals as long as you use a 'softener' such as 'Microsol' or similar. A lot of modelers prefer Archer dry transfer decals, albeit put onto the supplied 'wet transfer' backing sheet provided with these decals as an option. For a couple of the Tigers, I will use decals, but I will also 'freehand' paint a couple also. Though it is not so much freehand as guided by stencil marks, as the real numerals were often done this way, as signwriting skills were not always equally distributed between the maintenance echeleons, (as can be seen on '231' with it's jaunty numerals and paint drips!) How are you enjoying your build Brent?
Right onto Richard 'The Bear's' question relating to the PE part that bridges the gap between the moulded pattern on the bow plate and bow/glacis apron on #6383. It is a good solution, maybe not the best option (but from the looks of the re-tooling already done to incorporate the bow zimmerit part, a whole new hull front would have had to be reworked in order to make a flush angled butted fit between the parts.

Above you can see it in place, be careful of which way it is fitted, as the pattern on the PE sits better with the moulded pattern one way and not the other! A good case for test fitting.
And here it is 'blended' with the aid of 'Mr Surfacer 1200'.


There it looks OK, I would personaly 'putty paste' the gap an add wear to the leading edge.
Right back later Thanks for dropping in...

Phil
panamadan
Visit this Community
Minnesota, United States
Joined: July 20, 2004
KitMaker: 1,513 posts
Armorama: 1,449 posts
Posted: Sunday, March 01, 2009 - 02:08 AM UTC
Phil, I wonder if the track being worn on one edge more than another is due to improper track tension? I served on tanks and have noticed that a tank will pull slightly to the side if the tension is in need of attention. However, that photo that you have shown is quite worn, so maybe I'm all hot air! I'm pondering it too! Dan
barkmann424
Visit this Community
England - North West, United Kingdom
Joined: November 23, 2008
KitMaker: 357 posts
Armorama: 353 posts
Posted: Sunday, March 01, 2009 - 11:21 AM UTC
Hi Pandaman! Thanks for the loan of your grey matter for that extra 'ponderin' power', it really is a perculiar wear pattern, although some track links will be fresher than some, maybe the wear could occur more under the stress and strain of turning as a stationary or reversing track takes more wear on the contact area? I wouldn't know too much though as I have only ever 'driven' German heavy printing machinery' Honestly you would not let me near a fish tank! Let alone a Gun Tank I hope this quandry can be answered soon, as this will keep me ponderin' for a while! Still it would add the 'extra' little something to a build, possibly a Tiger on a road-march perhaps?
Right back too the topic proper. #6383 OOB, a liitle work has been done primarily on the rear hull plate. The zimmerit pattern has been removed from the area where the armoured exhaust covers and steel sheet shrouds cover the muffler stack assembly, as on the #6383 MOD kit. The cut outs for the unit insignia and 1st Kompanie tactical rhombus have been installed also, although this time I cut the plugs to the size of the appertures and pushed them further towards the face of the plate, lessening the filling needed in order to bring the surface depth between the moulded zimmerit and the simulated bared armoured plate. it's just a matter of trimming and sanding a marked piece of styrene, using the apperture as a template, bearing in mind that the cut around the plug should be slightly beyond the marked area.

And with the exhaust covers on.

The test fit of the roadwheels with the drive sprocket and 600mm idler, nice and weighty looking, full tanks and ammo load!


So not an amazing push forward, but on we go. I should be able to get some more fitting and stowage on tomorrow, along with some internal stuff.

Thanks for staying awake Cheers Phil
panamadan
Visit this Community
Minnesota, United States
Joined: July 20, 2004
KitMaker: 1,513 posts
Armorama: 1,449 posts
Posted: Sunday, March 01, 2009 - 11:34 AM UTC
Phil, No matter what the reason is, it seems quite strange that there would be so much wear on the tracks; I imagine that most Tigers did not have many hours on the clock before their demise, so to wear down that hard metal seems strange to me. One thing: sand does wear metal track quicker-I wonder where that photo was taken?
Dan
seabee1526
Visit this Community
Michigan, United States
Joined: September 14, 2007
KitMaker: 185 posts
Armorama: 130 posts
Posted: Monday, March 02, 2009 - 10:56 AM UTC
The PE piece for the bow of 6383 is provided in the kit?
barkmann424
Visit this Community
England - North West, United Kingdom
Joined: November 23, 2008
KitMaker: 357 posts
Armorama: 353 posts
Posted: Monday, March 02, 2009 - 07:13 PM UTC
Hi Steven Yup! The PE zimmerit patch is contained within the kit #6383 on its own fret: MC. It actualy matches up pretty well, and blended in okay with the Mr surfacer. Though it does only match the moulded pattern closely one way! I should be able to get some more on the #6383 OOB posted later... Still no PE for the others yet though I could dig out some old Eduard and Voyager if they do not arrive soon

Cheers Phil.
tomapaul
Visit this Community
Bucuresti, Romania
Joined: September 17, 2007
KitMaker: 425 posts
Armorama: 304 posts
Posted: Monday, March 02, 2009 - 07:58 PM UTC
Really amazing work Phil!
I can't wait to see them painted.
If you were to recommend a late Tiger I kit...what would that be.You must have liked one more than the other.
barkmann424
Visit this Community
England - North West, United Kingdom
Joined: November 23, 2008
KitMaker: 357 posts
Armorama: 353 posts
Posted: Tuesday, March 03, 2009 - 11:09 AM UTC
Hi Paul, Glad to have you along for the ride! I am finding that the 'modded' #6416 is becoming my favourite within this build project, as It has some fine details and differences that set it apart from the other Tigers involved. But back to your question of which one I would recomend, it would have to be #6406 as it gives you the most flexibility on build options. I tend to look upon the kits as 'pallettes' that have all or most of the components included to build multiple options, within the production range of Dragon's Tiger 1 release periods. Which is why I would recomend #6406 as the best Late Tiger.Although #6253 had all the AM type 'bells and whistles' with it's exstensive PE and extras, it's escalating price takes it out of the equation for alot of modelers. Between #6406 and #6416 you can combine the features in both kits to build almost any variant of the Late Tiger 1... I believe?
Imagine the possibilities that open with a new DML Early Tiger 1 and Mid in the mix... Endless options
Pandaman, the image of this track wear, comes from a set of images belonging to the Imperial War Museum. They show Tigers of the s.Pz.-Abt 508 that were knocked out or abandoned near the village of Romola in July of 1944.


Not sure what the road surface was like, probably sandy though! This could be a question for the Missing Lynx axis forum Right I'm off to the OOB #6383's stowage parts and PE.

Cheers for looking. Phil
panamadan
Visit this Community
Minnesota, United States
Joined: July 20, 2004
KitMaker: 1,513 posts
Armorama: 1,449 posts
Posted: Tuesday, March 03, 2009 - 03:02 PM UTC
Phil, Looks sandy-but you would think the whole track would be worn, not the inside. I wonder if the inner roadwheels flexed inwards due to the weight of the tank? Dan
barkmann424
Visit this Community
England - North West, United Kingdom
Joined: November 23, 2008
KitMaker: 357 posts
Armorama: 353 posts
Posted: Wednesday, March 04, 2009 - 02:56 AM UTC
Hey Dan... Panamadan! I am really sorry about calling you 'Pandaman' I'll put it down to sleep deprevation with the new baby and a four year old with no thoughts of sleep! I will post a query around the sites and see if anyone else has an insight! From what I can see of numerous close images of late Tiger 1's with 'shelf life' that it was quite common... It's got me wondering if it was as prevelant on King Tigers and Panthers, in such an uneven wear pattern. Perhaps with the deleting of the rubber tyred interleved roadwheels for the overlapped steel resilient roadwheel, the weight distribution changed... Maybe a look at some mid Tigers with the 'cleated' later track on for comparison? Right I will get back to the build photos for posting.

Thanks for tollerating my borderline dyslexia ...Dan... Phil
panamadan
Visit this Community
Minnesota, United States
Joined: July 20, 2004
KitMaker: 1,513 posts
Armorama: 1,449 posts
Posted: Wednesday, March 04, 2009 - 07:15 AM UTC
Never noticed that! Pandaman! My new alais! Dan
seabee1526
Visit this Community
Michigan, United States
Joined: September 14, 2007
KitMaker: 185 posts
Armorama: 130 posts
Posted: Wednesday, March 04, 2009 - 07:26 AM UTC
Thanks for the reply Phil, this is very fun to watch, thank you
bizzychicken
Visit this Community
Wales, United Kingdom
Joined: September 06, 2008
KitMaker: 967 posts
Armorama: 842 posts
Posted: Wednesday, March 04, 2009 - 11:14 AM UTC
Phil so sorry hav'nt been around. Trying to find info on own prodjects. Got alot to catch up on ! Geraint
barkmann424
Visit this Community
England - North West, United Kingdom
Joined: November 23, 2008
KitMaker: 357 posts
Armorama: 353 posts
Posted: Thursday, March 05, 2009 - 07:48 PM UTC
Hi Geraint, buddy! Hello everybody!
Quoted Text

Phil so sorry hav'nt been around. Trying to find info on own prodjects. Got alot to catch up on ! Geraint

Your not alone... Starting to get there though, with the build schedule though. Sometimes life and Modeling dont congeal very well!
Okay a bit more has been done on the hull stowage and appendages. Just the Kits PE clamps and spare track stowage to do now, and then we will give this Tiger a lick of paint... I think!
Of note as to omissions of detail, is that the first welded bolt on the front hull side that usually resides on the Glacis plates end, for the fixing of the side fenders/mudguards... Has been lost amongst the zimmerit at some point! Tis is easily rectified though by slicing one off one of the spare 'zimmeritless' hull side plates supplied in the kit and putting this tiny detail back in it's location. Then you can cover it up with the fenders! It is on the spare glacis plate that is in the kit?

And 're-attached'.

There looks at home now. The great thing about the side fenders/mudguards on the DML Tigers... Is that you can cut them into separate pieces, because of the forgiving nature of the styrene and the fillet support on the rear of the part. With the aid of a sharp knife or razor saw cut down the moulded gulley/channel between each panel, with care. And you will have seperate fenders! These can then be sanded on the internal ends gently, and for that slight hap-hazard appearance we see on the Tigers mudguards, if you take a sanding board and take away a finely angled smattering of styrene from the rear attachment area of the piece, this creates a less uniform appearance to the run of the fenders along the hull side, giving it a little more visual interest.

And goodbye to that replaced welded nut!

A little 'carving' and sanding has also been applied to the rear mudguards, once again DML styrene really does give us great options in representing battle damage and general wear and tear on their kits.


There still 'Out of the box' but a little different with a few tweaks!

I think I will have to explain with images the damage representation to the fenders and mudguards really! I'll get on that this morning along with some of the kits PE.

Thanks for looking Phil.
bizzychicken
Visit this Community
Wales, United Kingdom
Joined: September 06, 2008
KitMaker: 967 posts
Armorama: 842 posts
Posted: Friday, March 06, 2009 - 01:02 AM UTC
Hi mate. Have you seen the new Tiger crew ,manning up by Mini Art, looks like some of those figures could fit into the Dio you are working on . The Tigers are really looking awesome Great to be back, the photo images that you are posting are fantastic, cheers Geraint.
barkmann424
Visit this Community
England - North West, United Kingdom
Joined: November 23, 2008
KitMaker: 357 posts
Armorama: 353 posts
Posted: Saturday, March 07, 2009 - 04:37 AM UTC
Hey Geraint! Your absolutely spot on with these! I am very excited about these... Oh the possibilities, these look perfect for the alert part of the dio area on a couple of the Tigers harboured alongside the N175. A few Hornet heads and some hot swapping of limbs etc, this will really help the scenes theme of spreading activity from the initial alarm call. I really cannot believe this set has been released at this time! Marvelous... Well happy ! What can I say.


Back later with a bit more on the OOB #6383... Cheers again Phil.
barkmann424
Visit this Community
England - North West, United Kingdom
Joined: November 23, 2008
KitMaker: 357 posts
Armorama: 353 posts
Posted: Wednesday, March 11, 2009 - 10:55 AM UTC
Hello again everybody! Thanks for being patient, here are some more shots of the OOB #6383, the interior is now complete, other than some scratches and chips and a little detail painting. Of note to the interior, a number of the torsion bars gave way, easily retified but puzzling, this has never happened before. I think that I will put it down to a self made wash attacking the cemented area of the parts.

These other images show the progress made towards the finishing of the external stowage. Should be ready for undercoating by weekend!


The towing cables are sitting nicely and behaving, these were annealed over the gas cooker flame then twisted with pliers from one end whilst being held in a mini-vice. This being done in order to tighten the look of the cable, more in keeping with the moulded optional part, and the real thing. They are not to bad really and with a little attention can shape up quite well. And they come with the kits as standard!


The supplied 'Magic Tracks' have been assembled and the first link drilled to show the detail of the trackpin holes. Also being an OOB build a little more gentle damage applied to the fenders/mudguards. Right back tomorrow with a bit more...


Cheers for looking. Phil.
jimz66
Visit this Community
Connecticut, United States
Joined: December 15, 2006
KitMaker: 1,165 posts
Armorama: 1,105 posts
Posted: Wednesday, March 11, 2009 - 02:32 PM UTC
Looking very cool Phil. Very nice build log. Can't wait to see this one with some paint on it. Great start. Very nicely done. Great stuff you got going on here. Thanks for sharing. Got to make this one a feature when your done.
barkmann424
Visit this Community
England - North West, United Kingdom
Joined: November 23, 2008
KitMaker: 357 posts
Armorama: 353 posts
Posted: Saturday, March 21, 2009 - 11:16 AM UTC
Hi Everyone Hello James! I am really sorry for the delay in posting any recent updates on this blog, life 'n' stuff kinda jumped up quick and bit me. Anyway I'm back with a quick update on the #6383 OOB.
James thanks for your kind words of encouragement
Quoted Text

Got to make this one a feature when your done.

Well have to see how they end up looking! I'm going to have a play around with a few painting and weathering, with some products and mediums from various companies. So should be interesting!
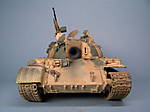
Right first things second! A special thanks to Oliver and Freyja(two of the clan) for helping with build whilst I have been unable to build. Thank you to Oliver for finishingjoff the PE! Don't think he'd swap from his Warhammer 40k for good though! And to Freyja for the careful application of the track hauling cable, no mean feat with the unruly DML cable, even annealed! She followed the layout in Patrick Stansell's 'The Modellers Guide To The Tiger Tank' Ampersand Publishing. As the instructions hazy lead for the hangers PE option are a little bit vague. . Anyway I'll shut up and get on with the photo's...


Right so thats that over with! I have added some items from the other Tigers in the mix, such as extra PE clamp handles for the starter parts. The brackets for the turret spare track links were drilled, and a length of streched sprue (still out of a box ) cut to size and used as the locator pin in the lower bracket plate. The Magic Tracks provided for the spare links were drilled and mounted on these, so they can be moved freely until fixed in their preffered position (these things really swung about a bit whilst manouvering at full tilt) .
So nearly at the priming stage, just a few decisions to be made on the track choice (officially I have a full set of Magic Tracks to play with(still out of a box, well a few boxes really)... As well as a heap of DS tracks... So maybe I'll leave that choice to you all out there. And what paint manufacturer to use?

Thanks once again for your patience, with this modelling madness
Back real soon... Phil
iwatajim
Visit this Community
United Kingdom
Joined: December 15, 2008
KitMaker: 246 posts
Armorama: 171 posts
Posted: Saturday, March 21, 2009 - 12:21 PM UTC
Hey there Phil,

You are doing a fantastic job with this build log and in the process creating a great source of reference for anyone building one of these big kitties! I would like to add my voice to the calls for you to make this into a feature.

As to your next steps, I would like to see you using the DS tracks as I have heard that you need to remove a link and it would be interesting to see how you go about this, if necessary

It would also be interesting to see the lifecolor paint set being used.

Just my two cents Thanks for sharing and happy modelling mate.

Cheers, Jim
bizzychicken
Visit this Community
Wales, United Kingdom
Joined: September 06, 2008
KitMaker: 967 posts
Armorama: 842 posts
Posted: Saturday, March 21, 2009 - 12:45 PM UTC
Phil, I've been thinking about the wear on the tracks. As bearing's and drive shafts, torsion stub ends, wheel bearings,all areas of the Tigers running gear. As everything wore, the weigh of these Beast would bend the complete running system outwards. If you over imagined it , looking direct on from the front on of a Tiger it would look like this I-// sorry scanner not working so i can only use keyboard again imagine looking front on .......I-//.....Straight line hull, horizontail line axile, sloping line wheels. So you would think that the outer edge of the track would wear 1st. But it doesn't work quite like that! With the tracks under tension all of the wear would actually happen on the inner side of the track. All the load of the tiger is dead center(most weight). As the tracks are running forward all the force is created on the inner of the track like this (mirrored) //-I therefore the inner track would wear quicker than the outside. Hope I'm making sense. We lost the rugby and I'm a bit pissed,know what I mean,quite a few but being Welsh the Irish played well It was one hell of a game LOL Geraint What we were talking about in our message this morning .I've never used Mini Art figures, always been a bit of a Dragon man. Has you said you have been buying them by the bucket full, they are that good? I've never liked the look of the faces on them. With Hornet heads are they mostly sharper than Dragons Gen1 figures? Thanks LOL Geraint
thedoog
Visit this Community
New York, United States
Joined: May 14, 2007
KitMaker: 263 posts
Armorama: 260 posts
Posted: Saturday, March 21, 2009 - 12:55 PM UTC
Looking reallly great!
My vote is; don't torture yourself with those damned DS tracks--use a set of Magic Tracks on this beautiful baby!
vanhall
Visit this Community
Groningen, Netherlands
Joined: January 23, 2007
KitMaker: 406 posts
Armorama: 391 posts
Posted: Sunday, March 22, 2009 - 03:20 AM UTC
Looking good Phil.. Best track cable work I've ever seen Freyja

What's the choices of paint manufacturers?
Since it's the OOB build, it would be interesting to see it painted from the instructions paint colour table; GSI Hobby colour or Mr. Colour...
But if your going to paint all the finished Tiger's the same, it's maybe better to stick with what you know and like.

Looking forward to seeing more of the other Tigers.