Armor/AFV: Axis - WWII
Armor and ground forces of the Axis forces during World War II.
Hosted by Darren Baker
DML#6383 Tiger 1 Turret Zimmerit Mod
barkmann424
Visit this Community
England - North West, United Kingdom
Joined: November 23, 2008
KitMaker: 357 posts
Armorama: 353 posts
Posted: Thursday, January 15, 2009 - 10:46 AM UTC
Thanks Jimmy! It really is a gorgeous little device, the doe for waffle pattern they do also is amazing, at representing that style of pattern. I have yet to try AFV or Model Kasten's take on the roller tool, but expect they are every bit as good! Though the 'gear thing' from the venetian blinds is my favourite at the moment, a marvel at replicating that tricky larger turret pattern.

Thanks again for the interest. Phil.
bizzychicken
Visit this Community
Wales, United Kingdom
Joined: September 06, 2008
KitMaker: 967 posts
Armorama: 842 posts
Posted: Friday, January 16, 2009 - 03:57 AM UTC
THE WONDER GEAR love it . Nice to see you are making good progress. really enjoying the thread. keep up the great work, Geraint
barkmann424
Visit this Community
England - North West, United Kingdom
Joined: November 23, 2008
KitMaker: 357 posts
Armorama: 353 posts
Posted: Friday, January 16, 2009 - 11:30 AM UTC
Hi Geraint! The hulls are now firmly underway, and partly photographed, just a bit of jigging and I will post them in the morning. Only noticed today that there is no optional, 'bare patch' of armour on the rear hull of #6383 for the 1./s.SS.Pz.-Abt.101 to depict the scwhere rhombus with the number 1 in it, still if you just follow DML's lead, this should be an easy mod to do by removing a rectangle from the rear and replace it with stock styrene card. Any 2nd kompanie vehicles that display the shield with the crossed skeleton key with oakleaves upon a bared armour patch on the glacis will also take some fettling, to adapt it from the 1st kompanie tactical rhombus on the glacis.


See you all! Phil

barkmann424
Visit this Community
England - North West, United Kingdom
Joined: November 23, 2008
KitMaker: 357 posts
Armorama: 353 posts
Posted: Friday, January 16, 2009 - 09:54 PM UTC
Good Morning All! As promised here we have the part of this epic, where the zimmerit application moves onto the Hulls of the three Tigers, First up to the pasting table are the two naked Tigers #6406 and#6416. We start with the anti-magnetic mine paste simulation upon the nose/bow plate. Once again a 'pea sized' lump is applied to the area with an artists pallette knife.


Then when a depth of around 0.2/0.3mm has been achieved the same need to be done to the smaller lower bow armour plate that joins to the belly plate.


With the putty now covering the area it's time to get rolling!


Carefuly yet firmly the tool is 'rolled' over the surface to create 'roughly spaced' vertical adjoining rows that vary slightly, don't get hung up trying to produce perfect vertical rows of the same width, as it didn't appear this way upon the actual AFV's as can been seen from a multitude of reference images.


Don't forget the lower portion of the bow plate!


Right there we have it, here is also the other hull.


So next it is onto the hull rear plate, these can be fun,!

Thanks once more for following this madness... Regards Phil.
wing_nut
Visit this Community
New Jersey, United States
Joined: June 02, 2006
KitMaker: 1,212 posts
Armorama: 674 posts
Posted: Saturday, January 17, 2009 - 01:24 AM UTC
Wow Phil. Sorry I missed this thread 'til now but this is definitely everything anyone wanted to know about Tiger I zim. I better bookmark this before i forget.
thebear
Visit this Community
Quebec, Canada
Joined: November 15, 2002
KitMaker: 3,960 posts
Armorama: 3,579 posts
Posted: Saturday, January 17, 2009 - 06:41 AM UTC
Hi Phil ...Just want to say that this is probably the best blog on zimmerit I have ever seen ...Your workmanship and your attention to details is first rate ...Glad to see David here as well ..It makes this blog a one stop reference for anyone who is really interested in making a Tiger right ...Good job .

Richard
barkmann424
Visit this Community
England - North West, United Kingdom
Joined: November 23, 2008
KitMaker: 357 posts
Armorama: 353 posts
Posted: Sunday, January 18, 2009 - 12:17 AM UTC
Hi there Marc, and welcome aboard Richard, the more the merrier... just don't crowd the engine deck... cooling reasons, threat of engine fires... that sort of thing. Always glad to have some more parts of the Tiger 'Hive' mind linked.
Anyway enough of the rambling. The first thing we need to do in order to start the 'pasting' process upon the rear hull plates, is to make sure we can find the location
points for the stowing of the external equipment. Thus a small hole is drilled through to the rear side of the part.


With this done, the Tamiya (or whatever putty you prefer) Epoxy can be applied in pinto bean sized lumps (thought pea sized was getting tired!) onto the rear hull part, separated into lentil sized lumps, for ease of spreading.

Then again this is spread to a rough evenish depth of aroun 0.2-0.3mm, with a flat bladed impliment, for some of the harder to reach areas, I used the end of a 'redundant' Tamiya 'zimmerit' tool to get at these tricky areas.


Once you are happy with the coverage of the to be pasted areas, it is once more 'rolling time' this difficult looking area is actually quite easy and 'fun'. Following the profiles of the track tension covers and starter port gives a real sense of authenticity to the zimmerit.

The corresponding pattern type doe is utilised for the areas that the roller can not get to.

With all the smaller and obscure areas done the pattern can then be imprinted over the remaining 'puttied' areas.

Then it's the turn of the other rear hull plate, the first one that we pasted above, is for the fine patterned turret... as David has pointed out, it is an earlier hull with the flat hull side front ends, around January '44' production, unfortunately a real 'transient' phase in Tiger 1 production variants, I also very nearly forgot to remove the welded mounting lugs/nuts for the deleted feifel air scouring system. This hull part is from the 'Kurzmaul' #6416 kit. I will have to ask David if this particular Tiger with this hull configuration would have had a travel lock, or if it would have had a very early fitting of the pre-heater cover and aperture.


There we have it 'zimmerited' rear hull plates!
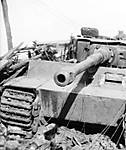
Next job on the cards is to tackle the #6383 sculpted rear hull part, and remove that zimmerit under the exhaust stacks, between the lug nuts that secure the sheet exhaust shrouds, and also in the area where the armoured exhaust covers sit that are fouled!


So see you all next time! Thanks for being interested, you should see how quickly the pub clears when I start talking ZIMMERIT!!!

Cheers Phil
bizzychicken
Visit this Community
Wales, United Kingdom
Joined: September 06, 2008
KitMaker: 967 posts
Armorama: 842 posts
Posted: Sunday, January 18, 2009 - 01:32 AM UTC
Hi Phil, looking at the rear hull plates really shows the deficiencies in the Dragon Zim'ed kit(I'm not trying to talk down the exallant job Dragon has done) Its just the great job you have done on the other rear hulls. It looks like you have to do alot of work removing the unwanted Zim behind the exchaust shrouds. Also it really shows how delicate your Zim is, apposed to the depth of the Dragon Zim. How many Tiger's did 2 kompanie have during the Battle of Normandy? How many are you modelling for your early morning Dio? How many Tigers did 1st ss manage to get across the Saine after Falaise? I got Max Hastings book Overlord for Christmas, have'nt started reading yet. Got Anthony Beevors Berlin to finish 1st. Looking at Overlord, it looks like its going to be quite controversial.Not quite the allied victory we are lead to believe. I love reading books and try and turn some of the pages into a modelling prodject Hopefully this thread will really become handy in the future Got plenty of ref on the Panther, "Quest For, Spielbergers Panther, PanzerTracks " etc. What would you say is a good start to referance to the Tiger? Thanks Geraint
sauceman
Visit this Community
Ontario, Canada
Joined: September 28, 2006
KitMaker: 2,672 posts
Armorama: 2,475 posts
Posted: Sunday, January 18, 2009 - 01:39 AM UTC
Very nice, coming along great!


cheers from the mudpit
barkmann424
Visit this Community
England - North West, United Kingdom
Joined: November 23, 2008
KitMaker: 357 posts
Armorama: 353 posts
Posted: Monday, January 19, 2009 - 10:06 AM UTC
Hello! Good evening and welcome. Hi Geraint, and wotcha Rick! Geraint, I've been compiling a bibliography for this thread, I'll post it in the morning along with a few really useful links to Tiger matters! Not much movement forward on the 'zimmerit removal' even though it is hidden behind the shrouds and armoured covers, I am trying to get the surface once free of the moulded pattern to be a smooth as possible. I am using a dremel and a chisel ended scalpel to 'whittle' away the ridges., when this is done a few thinned applications of Mr Surfacer should get the surface level and texture somewhat like! So here it is... First a barrel ended burr is used 'flat' upon the residue off the pattern after initial removal with the 'mini chisel'.


With the moulded pattern roughly taken away from the areas that it is fouling behind the 'exhaust assembly' test fitting of the covers can be done for seating purposes.


Before we go any further, and to give my aching fingers a rest, the sculpted hull rear is compared with a putty pasted one.

Like Geraint stated yesterday, the #6383 pattern is a pretty good representation of the pattern used on Tiger 1 hulls it does appear a little too oversize. And does go someway into the styrene, probably deeper than it should.

Right back to the job in hand... Phil.
barkmann424
Visit this Community
England - North West, United Kingdom
Joined: November 23, 2008
KitMaker: 357 posts
Armorama: 353 posts
Posted: Wednesday, January 21, 2009 - 07:47 PM UTC
Good morning All! And welcome to the next installment, first up news of a new arrival, to the party!
'Warning' will be happy!
This is to be built OOB for comparison purposes, or as close to OOB as possible, because of work needed to fit parts due to the over moulded zimmerit in areas.
Don't worry Geraint, I will include a brief historical post, to go along with the background reading and basis for the diorama some of these Tigers are destined for. I Did intend to build just six, but due to conflicts in research and reference I have decided that it would be easier to build however many of the 2nd Kompanie can be identified to production variant and markings...
Right onto the rear hull plate once more! After the moulded zimmerit has been removed... even if it a fairly neat job, done with a Dremel (on low speed) with a flat tipped 'barrel' burr and a micro chisel, the surface still needs to be levelled, to do this Mr Surface 1200 is used, flooded onto the surface in layers, enabling the depth of the styrene to be rebuilt to a thicker depth.


When this is done to your satisfaction, you can cover it up quickly with the exhaust muffler assemblies and armoured exhaust covers! The mufflers are given a light stipple with Mr Surfacer 500, to represent some light rusting and flaking to the surface, keeping it subtle for newer vehicles, with this in mind if you do go 'over the top' you can sand back the texture to a smoother though 'pitted' surface. Right dry fit time.


To show the restored thickness to the rear hull plate, a shot of the top edge of the Tigers rump!

Also if you intend to depict a late production Tiger of the 1./s.SS.Pz.-Abt.101 then you will have to remove a little more zimmerit from the rear of #6383, as the area that would display the tactical schwere rhombus sported by all known lates of the kompanie is not depicted on the part, as it is upon the glacis, you could remove the sourface texture again for this or you could do it the dragon way and remove the section of styrene from the rear then plug with a stock styrene sheet plug of your own making. One of the things that I like about the kit, is the 'revisionist' take on the turret Tactical marking numerals for '112' having a green fill rather than the usually depicted black fill! History in the re-making eh! I have shown the area that needs to be wrangled/removed with a black patch!

Also still to do, is the missing section of zimmerit on the angled plate that joins the rear hull part to the belly of the beast! I will use the old 'screwdriver' method for this as the pattern is a lot heavier than any of the roller gear doe's for the smaller pattern, and the Turret ones would be to large!

Right thats it for now... Back latter with another thrilling installement!!!

Cheers again Phil.
bizzychicken
Visit this Community
Wales, United Kingdom
Joined: September 06, 2008
KitMaker: 967 posts
Armorama: 842 posts
Posted: Wednesday, January 21, 2009 - 10:10 PM UTC
This gets better and better, the way you tackelled the rear plate is 1st class with mr s 1200. Also looking forward to the Tiger bibliography. And I would like to give a warm welcome to the AFV applicator, thanks Geraint
barkmann424
Visit this Community
England - North West, United Kingdom
Joined: November 23, 2008
KitMaker: 357 posts
Armorama: 353 posts
Posted: Saturday, January 24, 2009 - 12:36 AM UTC
Hello All! Hello Geraint! The AFV club roller sends its regards it will make it's debut shortly, as I will repaste the earlier late hull .Just putting together a possibles list from the conficting sources of the Tactical numbers that have been muted to been stationed alonside the N175. I have also been 'messing' around with the rear hull plate of #6383, and decided to transfer it to the 1st Kompanie, in order to show off it's unit emblem, optional parts... and a mod on the RHP to include the 'missed' blank option for the 1./s.SS.Pz.-Abt.101's scwhere abteilung tactical rhombus. So firtst up removal of the rectangle of styrene need to take the plug. First holes were drilled around the marked area to plot the corresponding rear area on the part for cutting.


When this has been achieved, with a scalpel or knife, you can manufacture a plug from styrene either stock or sprue scrap! The DML tm tab and location plate on each sprue can provide a good depth plug for the insert, you can also use this for fashioning a DIY 1/35 zimmerit application
spatula!


When you have fitted the plugs (kit and scratch) you can then bring up the surface to a more subtle depth using Mr Surfacer 1200 (or 500 or 1000, whichever you prefer really!) covering the rear of the sanded plug faces in the rear compartment can be done if you wish also.


Tis done! Happy with the look and feel? Right lets move onto the ommitted zimmerit pattern on the lower rear hull smaller angled plate that meets the bellyplate. As hinted above I will simulate the missing pattern with a homemade spatula from sprue scrap. Taking the piece of styrene measure the width of the #6383 hull zimmerit pattern and trim the end to that width measurement. Then sand down both sides of the tools tip flat with a slight angle, you can use a screwdriver, but styrene is a real lot easier to reduce to size!


Once again spread onto the area to be zimmerited, a small portion of putty, spreading it evenly across the surface. Of interest for this method of application, a liitle thicker in depth (say 0.4mm min) helps the patterns simulation, as when the 'spatula tool' is pressed into the putty and the ridges are applied in a 'pushing' downwards motion, a fair amout of the epoxy putty is removed towards the panels bottom. This does not tend to happen with the 'roller' method, but was a feature of the 'comb' method also. (somebody asked if this method could be demonstrated, I will see what I can do! )


So there we have it, we are getting towards the end of the pasting stages, when the hull side sponsons have been visited along with the glacis and bow roof/glacis apron have also been pasted, it will be the actual 'builds' of these Tigers!

Once again thanks for looking, Phil... All comments and addages welcome.
Warning
Joined: August 15, 2008
KitMaker: 107 posts
Armorama: 76 posts
Posted: Saturday, January 24, 2009 - 02:16 AM UTC

Quoted Text


'Warning' will be happy!


Yes, I will.

Dwaynewilly
Visit this Community
New York, United States
Joined: December 15, 2006
KitMaker: 365 posts
Armorama: 18 posts
Posted: Saturday, January 24, 2009 - 01:42 PM UTC
Phil,

Outstanding and most informative blog. I just ordered the Lion Roar tools from my local shop and I'm looking forward to applying your methods. I think your wife is rubbing off on you as your teaching skills are excellent. Looking forward to every update and thanks for sharing.

Cheers, Dwayne
barkmann424
Visit this Community
England - North West, United Kingdom
Joined: November 23, 2008
KitMaker: 357 posts
Armorama: 353 posts
Posted: Sunday, January 25, 2009 - 07:25 PM UTC
Morning All! Glad to be of service to you 'Warning' I get where you are coming from now with the OOB slant. And welcome aboard Dwayne! Glad to have you along for this marathon 'roadmarch'. There is a downside to having an educator for a 'significant other' in that you can develop a 'paranoia' with things like spelling, grammar and other stuff built into the 'minefield' of the English language, apparently there should only ever be three elipeses ever used... like so! And I always thought that you just kept pressing the key until you got bored!
Anyway less of the idle banter, and lets bring the OOB #6383 out from cover, and up to speed. The 'un-meddled' with turret with the kit barrel and no AM or additions is now at the same stage as it's elder siblings. The one thing that has struck me about #6383 is that you can actually fit it back into the box after a rummage! Even though you still get most of the original sprues (minus the bare turret) plus the new zimmerited sprue.

And here for your comparitive pleasure is it nestled up with it's mates.


And the other side...


Right there we go! I think every thing is in place now for a fair comparitive build. Tonight it will be the turn of the AFV club 'roller tool' to come out from the shadows and to step into the light, when it assists us in pasting the hull sponson side panels.

As always thanks for looking, join in if you wish. All comments welcome... and the references will get posted ASAP.

Phil
panzerkampfw
Visit this Community
Busan, Korea / 대한민국
Joined: June 11, 2006
KitMaker: 171 posts
Armorama: 164 posts
Posted: Sunday, January 25, 2009 - 11:12 PM UTC
wow youre a mad man.. great work !
barkmann424
Visit this Community
England - North West, United Kingdom
Joined: November 23, 2008
KitMaker: 357 posts
Armorama: 353 posts
Posted: Monday, January 26, 2009 - 04:08 AM UTC
Hello All! Sorry about the 'bandwidth issue' looks like it is time to go for the 'industrial' strength image hosting eh! Were not even up to the build stage yet let alone the paint/weathering and dio stuff yet! And welcome onboard Patrick, hope you enjoy this insight into my 'Tiger' asylum.

Apologies Phil... Normal service will be resumed shortly!
wbill76
Visit this Community
Texas, United States
Joined: May 02, 2006
KitMaker: 5,425 posts
Armorama: 4,659 posts
Posted: Monday, January 26, 2009 - 07:29 AM UTC
Definitely looking forward to the next installments Phil, I can only imagine the amount of bandwidth you're going to need to support the demand for that!
barkmann424
Visit this Community
England - North West, United Kingdom
Joined: November 23, 2008
KitMaker: 357 posts
Armorama: 353 posts
Posted: Monday, January 26, 2009 - 07:32 PM UTC
Hello Again! 1 PC down and a pro account upgrade, this is becoming a war of attrition! Thanks for the continued interest and support. Cheers for the backing Bill, it fuels the drive for the finish (4 finished Tigers that is ) Right back to the job in hand, to get these hulls pasted,compared and ready for the build proper phase. Then we can put in a bibliography/potted history/ and link references for the 1st and 2nd Kompanie of the s,SS.Pz.-Abt.101, just to 'flesh out' this little blog somewhat!

As the AFV club applicator tool has now arrived on the scene, firstly the late hull of #6406 was 'stripped' of it's zimmerit (this gives us a chance to encounter what extreme damage looks like upon DIY putty zimmerit) simply take a scalpel or craft knife and pick a hole in the putty and then pushing the blade slightly behind the pattern flick it forward and small patches of the applied zimmerit comes away. This is easy to control, to represent a damaged area of your choosing. The 'matrix' of the rollered' pattern has natural weaknesses and flakes of in a very convincing way. if you are clearing the previously applied pattern, you can now slide the blade under the areas you choose to re-do!

With this done, it's now time to re-apply the Tamiya epoxy putty smooth, once again with a flat egded artists pallette knife and apply the pattern with your applicator.

The obsevations I have made upon the AFV club 'applicator' is that the handle is not a comfortable, and the pattern is slightly larger, but not to much bigger than the Lion Roar version. The pattern is a little 'crisper' because of this but I believe that the two apllied patterns will 'sit' well together adding a little variation to the patterns, as it would have naturaly had differences in column width and ridge gauge as the pattern was applied in the factory upon partly cured zimmerit paste by more than one worker. Anyhow here are the steps continued. And the finished bow plate.

Compare this to the Lion Roar pattern on the right depicted upon #6416, and you can see not much difference!

Later on today the hull side sponsons will get the treatment!

Thanks for looking, join in if you wish... Phil
Removed by original poster on 01/29/09 - 07:31:01 (GMT).
barkmann424
Visit this Community
England - North West, United Kingdom
Joined: November 23, 2008
KitMaker: 357 posts
Armorama: 353 posts
Posted: Wednesday, January 28, 2009 - 07:30 PM UTC
Good Morning All!
Right on with the 'pasting'! Now it is the turn of the hull side sponsons, the pattern on these areas will once again be applied with 'roller' applicator tools onto a thin covering of Tamiya Epoxy Putty 'Extra Smooth'. This layer of putty should idealy be around 0.2-0.3mm in depth, they only thing you have to watch out for, is a heavy build up of putty around the hull side fender welded attachment lugs. In order to achieve a 'level' surface to the medium, a little attention with a narrower spreading tool, to remove the excess is needed. I just tend to use another artist's pallette knife with a smaller blade.


You can see on the bottom image, the blob of putty that has been removed after the initial application, in order to gain the required thickness, for the pattern to be impressed. If the putty is to 'deep' then the dreaded 'splurge' occurs, giving you high ridges between the vertical rows.
Now onto the depiction of the zimmerit itself! Now that we have to hand the equally excellent AFV club applicator tool, I shall use this upon the #6406 hull, as this is to have the broader/heavy pattern on the turret, whilst #6416 is to have the finer style zimmerit pattern on the turret, therefore it would not match using the two slightly different tool pattern types upon it.
The 'trick' with the hull sides, is to try and match the way in which the paste was applied to the real vehicle, not only are the rows not always the same width, the also 'clash' especially around the fender attachment lugs, as this must have been awkward in 1/1 scale let alone in 1/35! You can see what I mean in this image if Herr Hofflinger would move over a shade!

As can be seen above the pattern is not wholly 'uniform' and does deviate around the obstacles encountered, on #6383 the sculpted/moulded pattern actually passes right over the welded lugs! If this pattern was applied by hand initially before rendering, then I can only think that the lugs were applied latter... Anyway back to the depiction of the zimmerit patterns on these two hulls. The AFV club roller, gives a slightly bigger an crisper, ridge than the Lion Roar tool, I still think that the Lion Roar is the closer to the actual pattern for the Tigers finer style. Though I do like the 'sharpness' of the AFV club version.


A little variation in the pattern only adds to the realism, so don't get hung up about perfectly neat rows, as this probably very rarely happened!


Right then it's comparison time again.


And just to add further confusion and mayhem, I have included the hull tub from another #6406 kit (the Elsdorf Tiger) which has a Tamiya 0.5mm 'comb' applicator tool pattern applied.


Hull front/bow and rear/stern also for your consideration!


So we are reaching the end of the 'pasting' stage with only the glacis and glacis/bow apron roof part to do (does anybody know the 'definitive' name for this part of the Tiger 1? As the tags it has are quite confusing) , I was thinking about the nubers of roadwheels... Torsion bars etc that will have to be cleaned up an fitted for these kittys!

Anyway thanks for perservering! And for looking, Regards Phil...

Warning
Joined: August 15, 2008
KitMaker: 107 posts
Armorama: 76 posts
Posted: Wednesday, January 28, 2009 - 08:41 PM UTC
Looking good so far. Thanks for breaking out the OOB tiger. Did you have to make any major modifications to get things to fit?

Have you tried the ModelKasten applicator? It's plastic but it looks quite well made.

http://www.hlj.com/product/MDKR-1

barkmann424
Visit this Community
England - North West, United Kingdom
Joined: November 23, 2008
KitMaker: 357 posts
Armorama: 353 posts
Posted: Friday, January 30, 2009 - 12:26 PM UTC
Good Evening Everbody! Hi 'Warning'! You were asking about any major modifications needed to get a good fit for the build on #6383, I think that any issues are mainly related to the areas where the moulded zimmerit pattern covers areas where a part should sit flush upon the models 'styrene' armour surface, turret escape hatch hinge, the area behind the exhaust shrouds and under the armoured exhaust covers... The front end raises a few little fit 'issues', because of the moulded pattern extending across the surfaces of the parts and abrutly ending at the edges, the glacis and the bow/glacis apron need a little attention, in order to make a good clean joint (I will post a few images of this tomorrow hopefully). One other problem I have found is that because the upper/lower bow nose plate being totaly covered in the pattern, the armoured fillet plate that need to be fitted to the inside of the final drive assembly, sits on top of the zimmerit plate rather than flush against the 'true' surface of the bow plates.

As you can see, this leaves a small gap, and the part is slightly proud of the rounded protective shroud covering the lower hull front end sides. This is easily remidied though. My way of getting a flush fit to the 'true armour surface' of the model is to use the parts as a reverse stencil, that will give you a marked area that can then be cleaned of its moulded zimmerit texture. Allowing the bolted fillet plates to sit into the depicted paste. First a light spray of a dark colour upon the bow part is needed, dry fit the part to the hull and PVA 'tag' the cover plates to the inside location of the hull side/bow plate.

With this done you can now spray a 'lighter' colour onto the areas to be stripped of their zimmerit pattern.

When you remove the parts, you should hopfully have two darker areas, where the parts sit, that will enable you to rid the bow part of the moulded texture that fouls these covers.


When this is done and the bow plate and inside final drive plates are attached proper, you should end up with a nice snug fit, with the plates surrounded by the zimmerit, rather than riding on top of the paste!


So there it is! A small problem easily fettled... Another thing I have stumbled across is that for the tacital rhombus on the included plug option for the glacis, the area is a little to wide, this is a minor point, as it only relates to a Tiger 1 decal opition for the !st Kompanie of the s.SS.Pz.-Abt.101 #112, whilst looking at reference images, it appears to me that the small number 1 is actually painted directly onto the zimmerit and not on to where the zimmerit has been removed in a rough horizontal rectangle that carried the scwhere tactical rhombus, this can be seen on '112' 121' '114' and other Tigers of the 1st Kompanie.


Right bed bekons! So back tomorrow... Oh yes on a final note, I think I will try getting hold of a ModelKasten applicator. Phil.
H_Ackermans
Visit this Community
Gelderland, Netherlands
Joined: July 11, 2006
KitMaker: 2,229 posts
Armorama: 2,221 posts
Posted: Friday, January 30, 2009 - 01:00 PM UTC
How's about something else: