introduction
Germany entered World War Two with perhaps the best rail system on the planet. German military planners had been faced with the challenge of fighting on more than one front throughout the country's history, and memories of juggling forces during the Great War were still vivid in the minds of senior staff. Rail transport really came into its own during the First World War when trains were used extensively for moving troops and materiel between fronts, or even along a front. The rise of armored warfare meant that rail transport would be even more crucial, both for getting forces to the right location, as well as resupplying them. And since tanks wear out traveling over roads, rail-heads near the action were required with trains to service them.
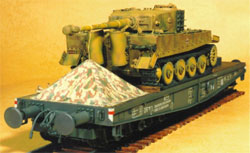
Yet as tanks increased in size, the strain on the rail net grew. Heavy-duty and even super-heavy-duty flatcars capable of carrying behemoths like the Tiger and Tiger II were required. The SSyms flatcar was the only platform that could handle the 63-ton Tiger I or the 76-ton Tiger II, though ironically, tank designers failed to take into account the width of German rail tunnels: they were too narrow for either beast. This meant removing the outer wheels and using narrower "transport tracks" while entrained.
Modelers wishing to place their tank kits on flatcars need the right one for the job. Numerous smaller flatcars have been in circulation, but until recently there was only one readily-available kit in 1/35th scale of the SSyms: the full resin kit by Tank Workshop (the French company Ironside released a kit years ago that's hard to find). Trumpeter stepped into the category in 2011, and according to Tank Workshop, have soaked up whatever interest there is in their kit. While it's still listed on their website, TWS tells me they will be discontinuing it.
Yet I suspect it lives on in many stashes, and so I decided to review it so as to point out the areas where modelers need to beware.
the kit
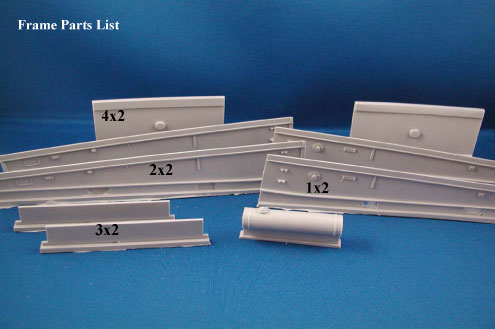
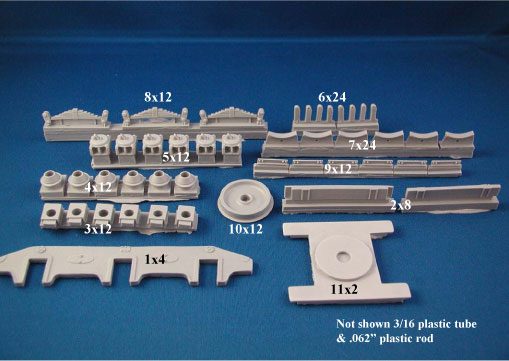
Inside a shoe box-shaped cardboard carton are:
196 pieces of very slick gray resin in plastic bags
a bag containing rivets for attaching the deck
2 lengths of 3/16" plastic tube (for the axles)
2 lengths of 0.062" plastic rod
a length of smaller rod for hinges
a 2-piece real wood deck
9-page color instruction booklet
1 medium-sized sheet of while decals
the review
I never intended to review this kit.
I bought it to act as a display stand for one of the Tigers in my stash, so I didn't photograph the sprues and parts when I opened the box like I would if doing a regular review. I was planning on building it, and just enjoying its esoteric subject matter. So I have had to cop the pictures at right from the Tank Workshop instructions.
Generally I don't like to beat-up on small manufacturers who are supplying the hobby with rare or unusual items like this flatcar. Unless assigned to a particular review, I try to pick and choose among the many fine kits and upgrades finding their way onto the market, so my reviews are normally fairly high. I would just as soon ignore a kit with this many issues, and let it sink into obscurity.
But those of us in the 1/35th railroad fraternity are few enough that I couldn't bite my tongue without warning anyone who has this kit or picks it up second-hand about some serious drawbacks I encountered. TWS says I'm the only one who has ever complained about the kit, so maybe I just got a lemon.
The kit builds up into a very nice rail car, but requires the kind of "iron man triathlon" modeling I generally want to avoid. If you're one of those modelers who thinks pre-cut masks are for sissies, whose ego demands spending hours transforming ugly ducklings into swans, if you can't get out of bed without the challenge of scratch-building parts, manhandling truculent decals or cutting down ill-fitting frames, then you'll be fine.
The problems are significant: several key parts are too big, the slippery resin's surface resists affixing with either epoxy or CA glue (despite multiple degreasing attempts) so that paint flecks off even if primed, and the deck is too short for the assembled frame.
Let's begin with the slippery resin.
It is so slick that it defied bonding with the 5-hour epoxy TWS recommends. Three times I assembled the frame, and three times the epoxy held so poorly, it fell apart. I finally resorted to brass wire pins to steady the bond, reinforced with CA glue. The instructions recommend washing the resin pieces in soapy water, but I would use a strong de-greasing agent like
Bleche Wite. Even then, use a killer base-coat when time comes for painting (automobile primer?). TWS suggested using acetone, but I didn't learn this until after all the support pins were in place.
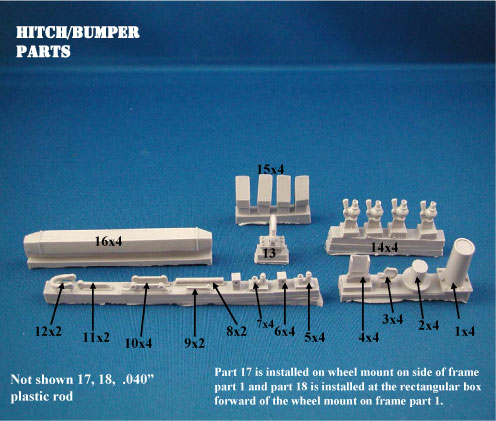
The parts are generally cleanly-cast with a minimum of "hair" or flash, though some of the smaller pieces such as the hand wheels will require clean-up because of dimples and pimples. A few tiny parts had gaps in the casting from air bubbles, and there were some bubble depressions in the base of several spring assemblies. The parts are reasonably easy to detach from their pour plugs/sprues, though the wheels will require a very sharp razor saw.
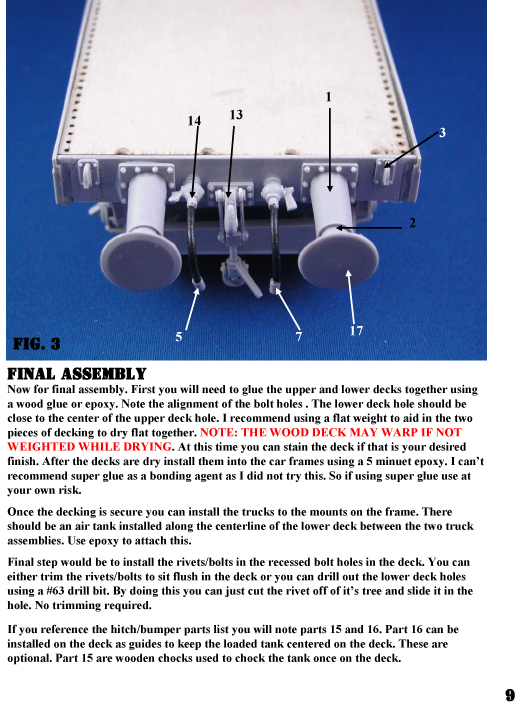
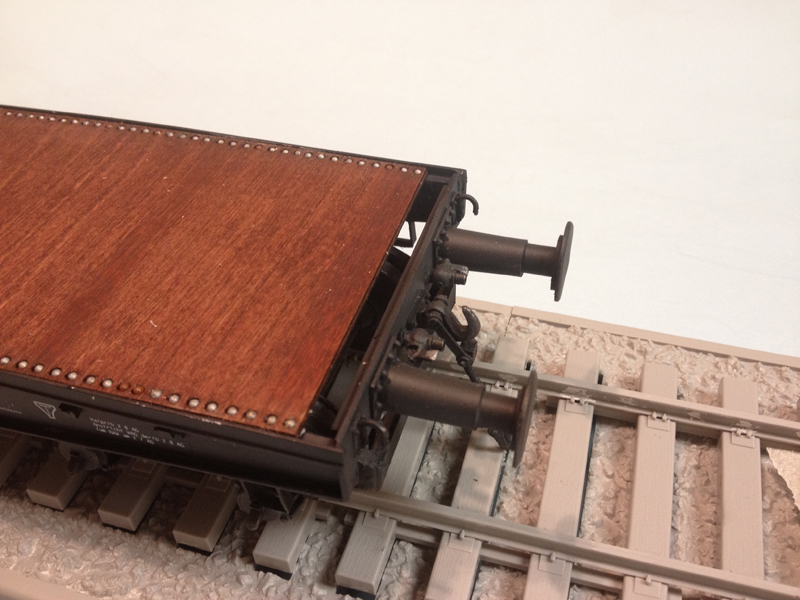
Given what I thought would be a precisely-cut frame, I was quite surprised when I did a dry-fitting of the wooden deck and discovered it was seriously too narrow. Even the instructions say to trim the wheel assembly supports (part #4) so they will "drop in" to the frame, but fail to mention the end pieces are too wide and need to be cut down first. Through trial & error I had to trim away both end pieces until the frame fit the deck. I wasn't prepared for a kit that requires this kind of surgery (as much as a quarter inch), so be warned if you plan of building this kit.
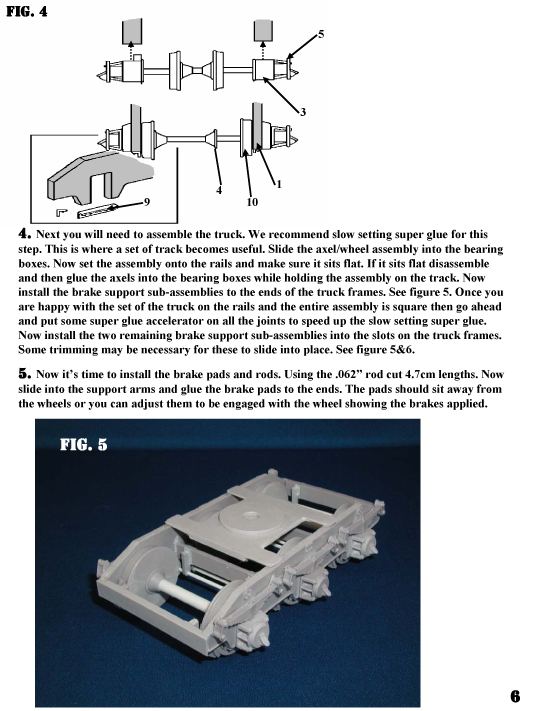
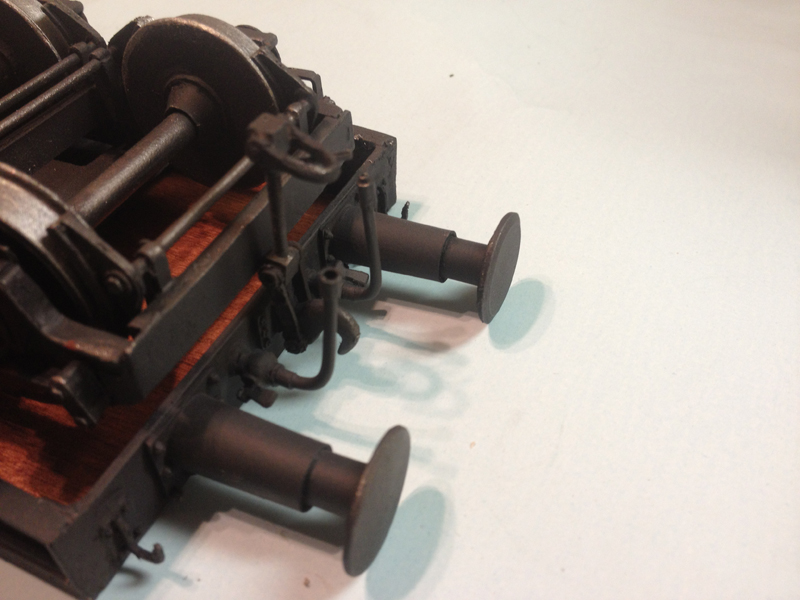
The next sub-assembly is the trucks. As noted above, the pour plugs for the wheels will have to be removed with a razor saw. Be careful or you might cut into the wheel itself! And the subsequent ridges and valleys created by the sawing will need some filler putty. You will need a length of track to set the correct distance between the wheels (I used the Trumpeter track set from their BR52 loco). The brakes are tedious and must be test-fitted as you assemble each truck. The brake shoes often needed to have their attachment holes drilled out or at least cleaned up.
Detail under the platform is nil, so you will either have to scratch-build brake lines, etc. or forgo entering this into any contest where the judges might put a dental mirror underneath to check detailing.
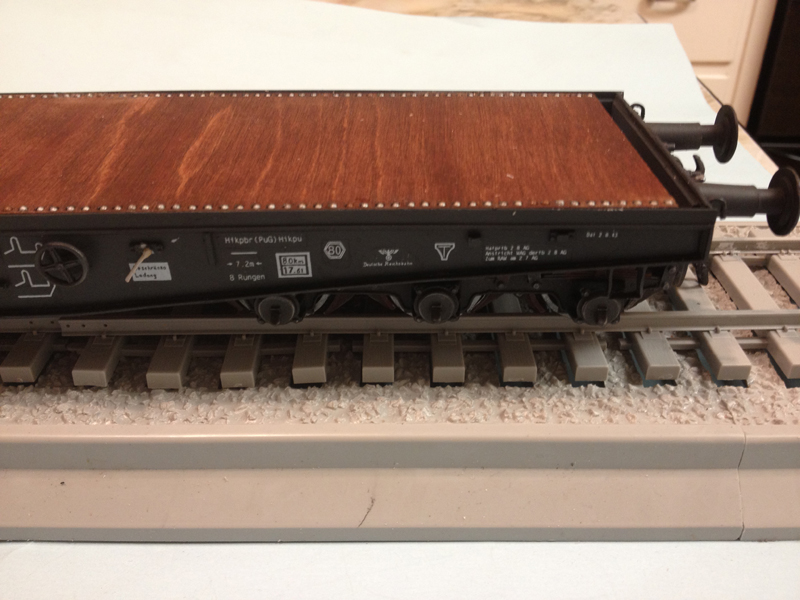
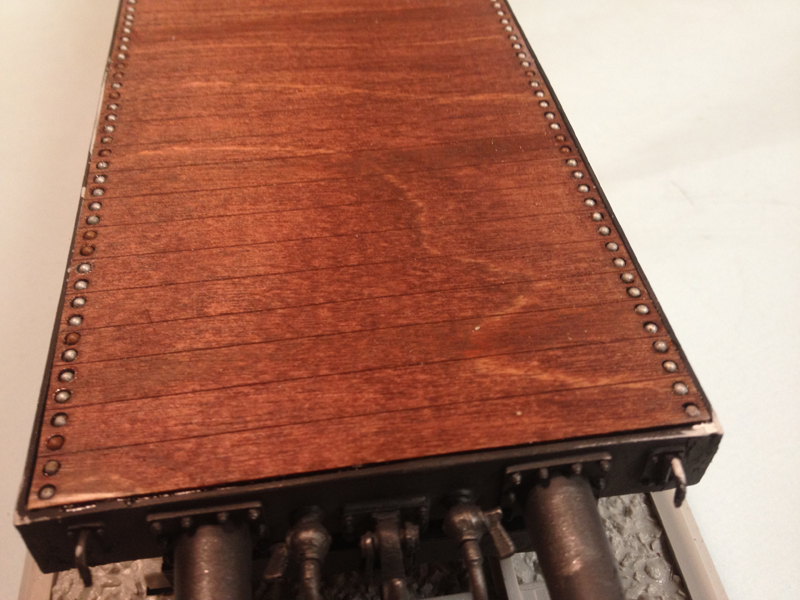
Once the frame and trucks are finished, the remaining steps are the couplers, end bumpers, etc., followed by the wooden deck. It's real wood, in two pieces, which means carefully gluing the top part to the bottom and weighting the composite to prevent warping. Be sure to align the two layers precisely. My decks slipped about 1/32" and it put the bolt holes pre-drilled in the deck out of alignment.
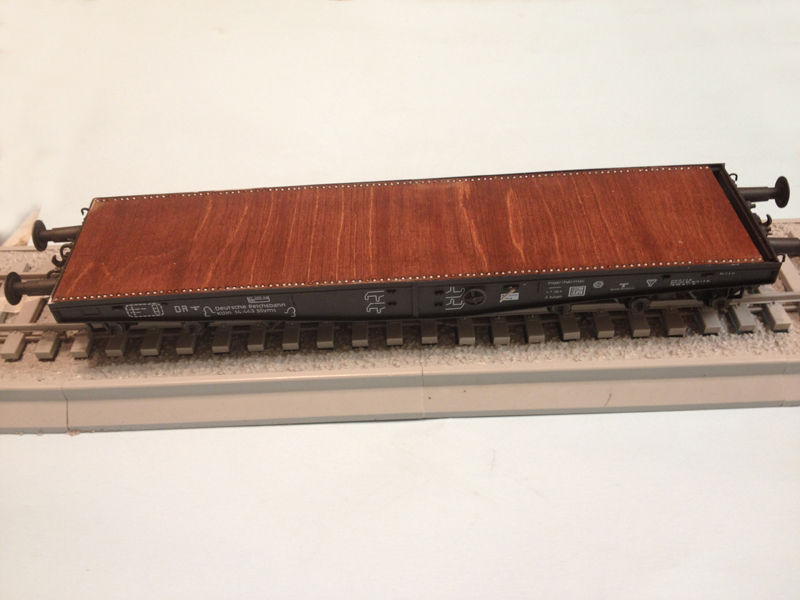
When finished, you can stain the deck, which provides a very realistic finish, one that can be "abused" and retain its "wood-ness." If you get any CA glue on it when affixing to frame, for example, you simply sand or scrape off the shiny coat and the wood below is still darkened from the stain. Try doing that with plastic or resin!
But the deck is too short (see photo at right). Again, TWS says I'm the only one who has ever complained about this problem, but be sure to dry-fit your frame and deck prior to construction. The gap is significant, too: about a plank's worth.
instructions
The instructions have some flaws, including missing parts (the compressed air tank is not shown, though it's included in the kit, and two levers on the side aren't identified, so I ended up placing them where they belong because they were the only parts left). The good news is that color photos are added to line drawings to show how things should look and how they should fit. The order of assembly is generally straight-forward and without issues.
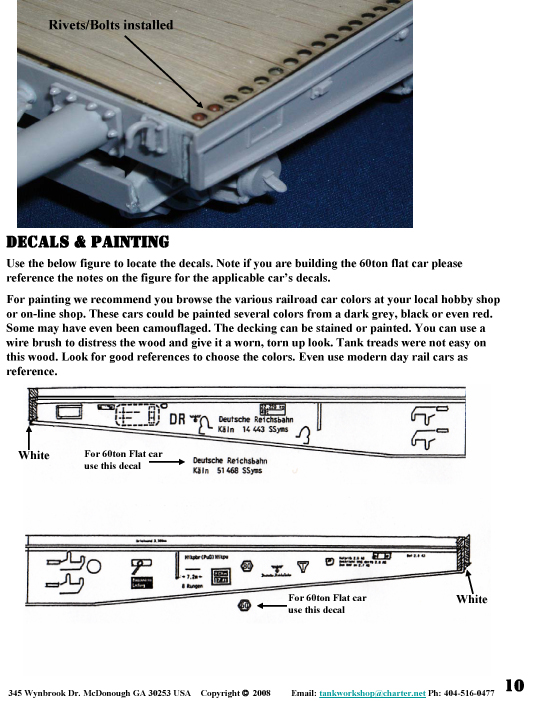
decals & painting
A rather complete set of decals is provided with placement guidelines, though they are white on light blue, so tricky to locate on the sheet. Further, they are printed on a single transfer film, so cut each one out carefully, tightly to avoid too much silvering, but not too close. I found through painful experience that it is better to cut two-line decals like "Deutsche Reichsbahn/Köln SSyms" into two pieces; otherwise there is a tendency for the transfer film to bunch-up and crimp. The quality of the stencils isn't bad, though some of the German looks garbled, like it was transcribed poorly. That's not surprising, since Tank Workshop's web site has several glaring errors in its German names for its other flatcar kits.
The painting instructions are basically "whatever you decide," and maintain these cars were painted black, dark gray or red. There are too few color photos available to answer the question, so I went with black. Post-war SSyms cars I've seen in Germany were usually a reddish brown, but likely were repainted to cover over the "Reichsbahn" insignia.
conclusion
I don't know if the Trumpeter heavy flatcar is any better. Rumor has it Trumpeter copied the Tank Workshop kit, carrying over its simplifications (for example, the wheels have no detailing on their reverse). And with a retail price of $100, the Trumpeter version is no bargain, either.
I'm hoping Libor Zachoval of
LZ Models is reading this, as he has promised us a heavy-duty flatcar in the future.
Finally, I have not given this car a numerical rating. At this point, it's on its way to obscurity, though enough are probably out there that it warrants my pointing out its challenges. But what would be the point in giving it 40 or 50 percent? I'm pleased with the results, but went through a small hell to get there.


Comments