From the early 1980s to the present day the Abrams has evolved with upgrades to the armor, weapons systems, and fire control systems to keep it up to date with changing battlefield threats and new technology. The combat in Iraq moved from the open desert to the narrow city streets and the enemy altered tactics and weapons in order to engage the Abrams in an urban environment.
In order to provide more protection to the Abrams and the crews in Iraq the latest fielded upgrades include both high tech and low tech solutions. Currently both TUSK I (Tank Urban Survivability Kit) and TUSK II are used on Abrams variants in Iraq. TUSK I and TUSK II include a variety of modular components such as commanders and loaders armored gun shields in order to provide protection from any angel to the crew while operating hatches open in urban settings. Explosive Reactive Armour (ERA) packages have been mounted on the hull sides to deal with shaped charge firing weapons. A Counter Sniper/Anti Material Mount (CS/AMM) for a machine gun and white light spot light have been fitted to the top of the mantlet so a variety of targets can be engaged in the close quarters of urban terrain reducing the issue of collateral damage from firing the main gun. Additional belly armor is also attached to add even more protection from mines and IEDs. Thermal imaging systems are provided for both the driver and in conjunction with the commanders .50 Cal (M1A1 only) to further enhance operations during low light. Simple yet very effective a Tank Infantry Phone (TIP) has been mounted at the right hull rear as an invaluable communication device for urban fighting. A rear mounted camera for the driver will be mounted on the left hull rear as part of the TUSK II upgrade. A future TUSK III package will add even more protection for the crew using new systems.
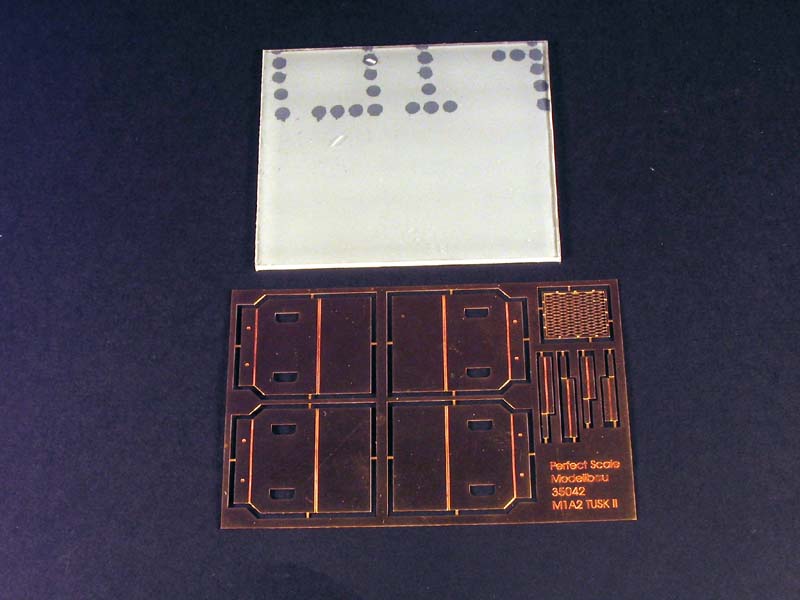
Abrams TUSK kits
The TUSK upgrades certainly change the look of the M1A1 and the M1A2. Several model producers have recently come out with TUSK conversion kits for both the Tamiya and Dragon Abrams kits. Voyager Model produced a conversion kit for the Dragon M1A2 SEP. It represents the ERA tiles seen on the prototype TUSK I system. Legend Productions produces TUSK I conversions for both the Dragon M1A1 AIM/M1A2 SEP and the Tamiya M1A1/A2. These conversions consist of both resin and photo etched parts. Perfect Scale Modellbau entered the TUSK conversion realm first with their M1A1 TUSK conversion kit designed for the Dragon M1A1 AIM kit. Consisting of resin, photo etched, and clear parts it provided the XM19 ERA tiles ARAT I (Abrams Reactive Armor Tiles I), CS/AMM, Loaders Armored Gun Shields (LAGS), and the Tank Infantry Phone (TIP). As a follow up to their first TUSK conversion Perfect Scale Modellbau is now producing their M1A2 TUSK II conversion kit. This is the only TUSK II conversion kit currently on the market and it incorporates components from the TUSK I conversion with new parts exclusive to the M1A2 SEP TUSK II upgrade.
the Perfect Scale Modellbau kit
The Perfect Scale Modellbau M1A2 TUSK II Conversion kit is designed for the Dragon M1A2 SEP kit. Incorporating parts from the TUSK I conversion kit such as the CS/AMM, loaders gun shield, TIP, belly amour, and the side skirt mounted XM19 ERA tiles the new TUSK II conversion adds a new look to the M1A2 SEP with the addition of the uniquely curved XM32 ARAT II (Abrams Reactive Armor Tiles II), turret mounting frames, the additional armored shields for the loader, and the 360 degree armored shields for the commanders cupola.
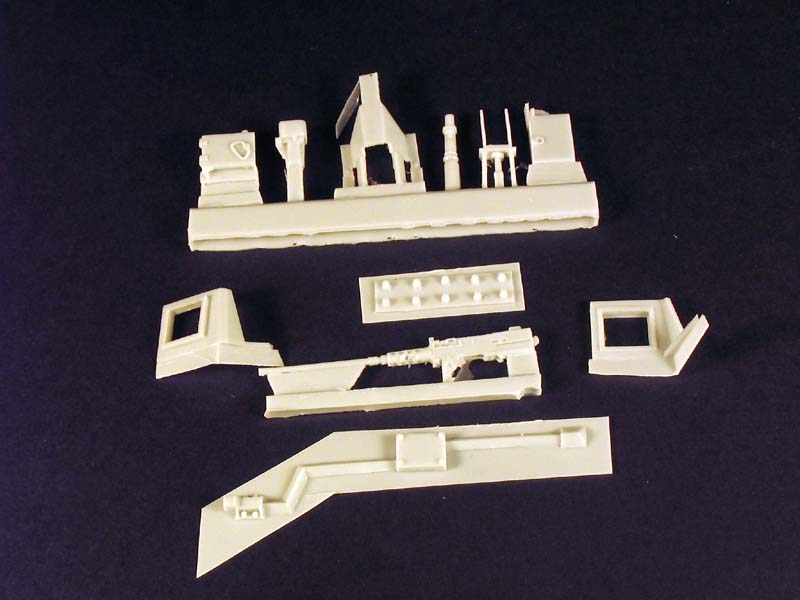
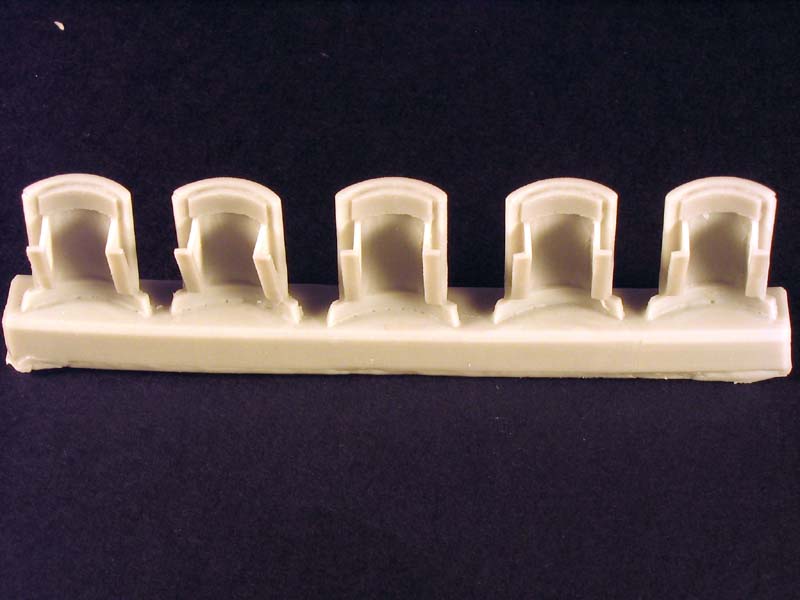
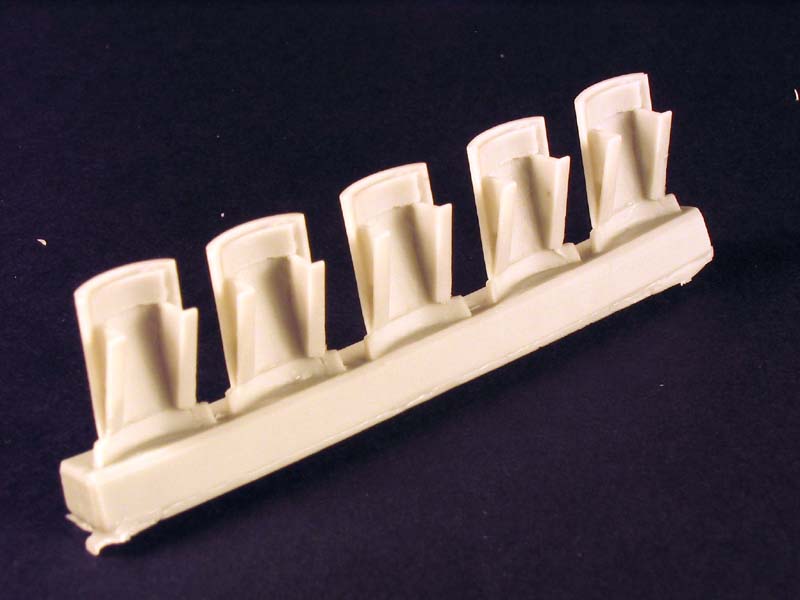
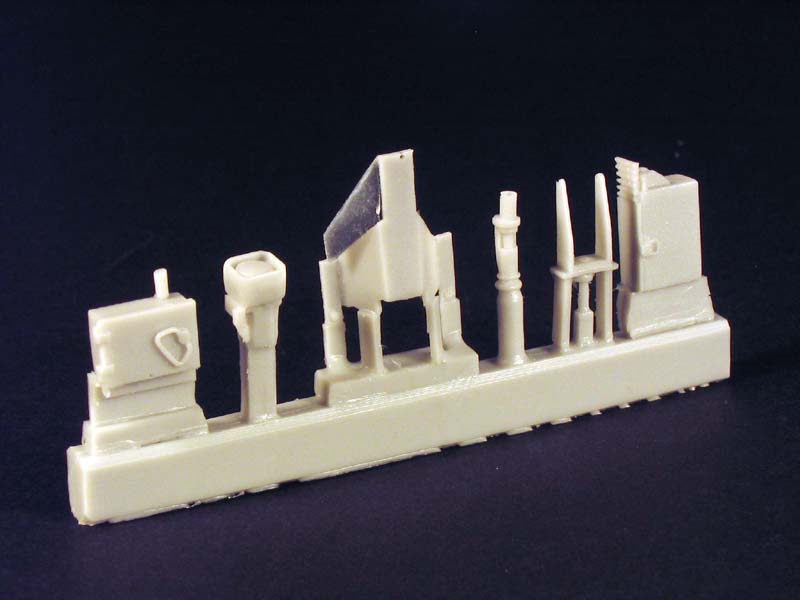
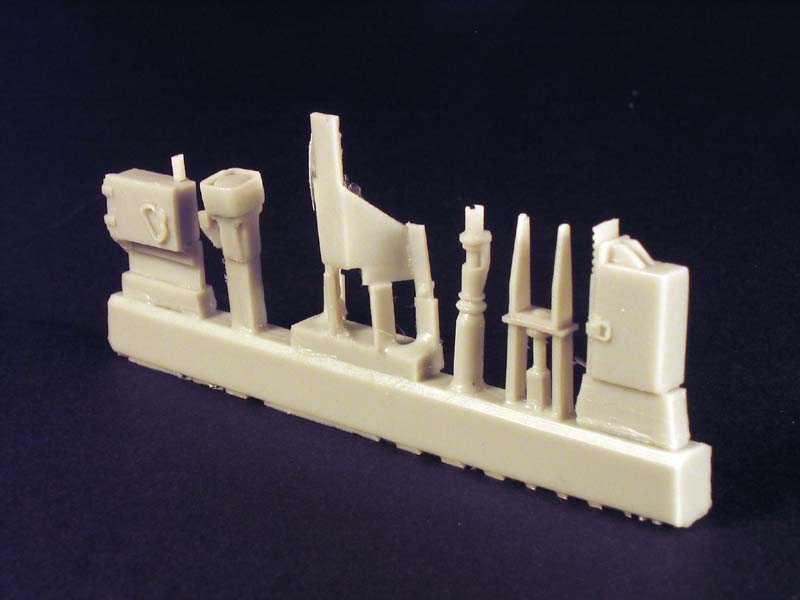
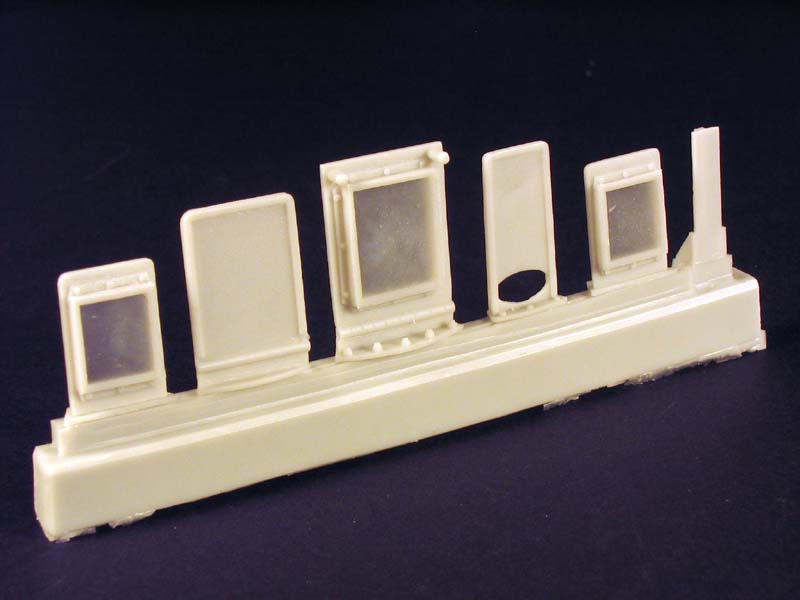
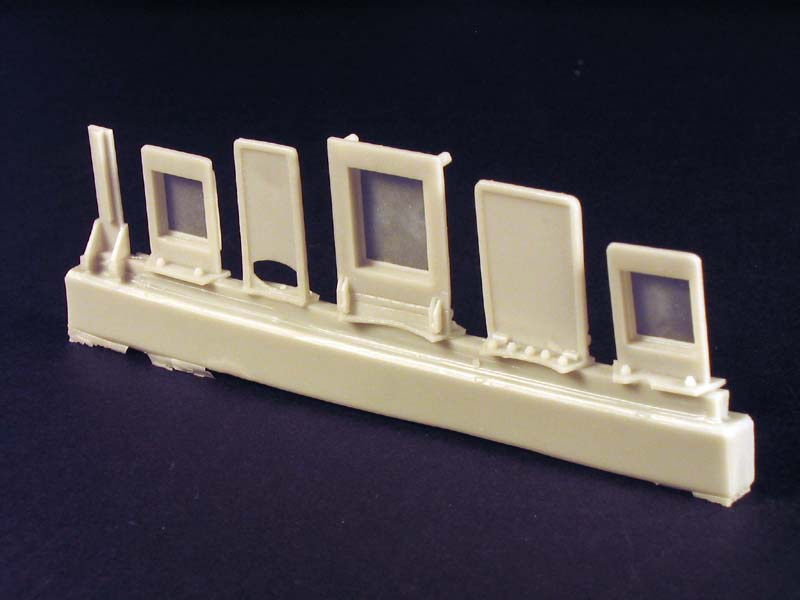
The M1A2 TUSK II Conversion kit contains the following 104 resin parts:
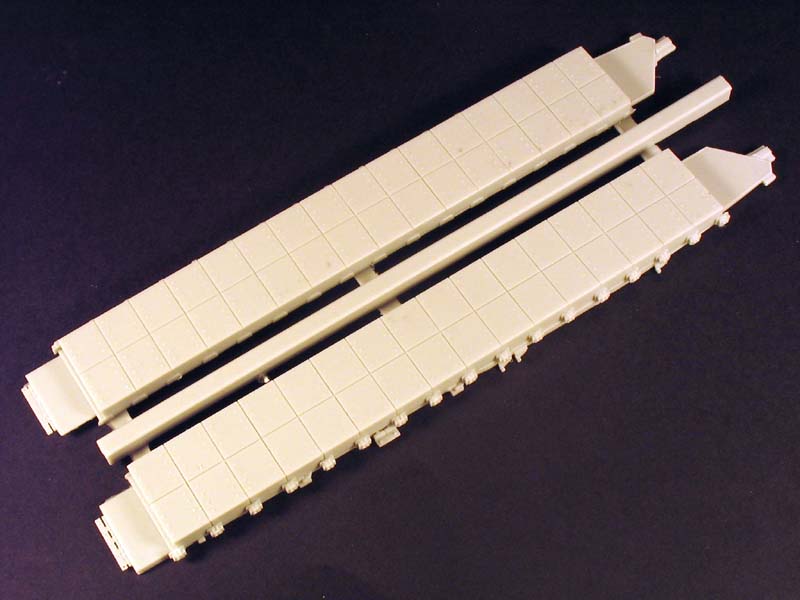
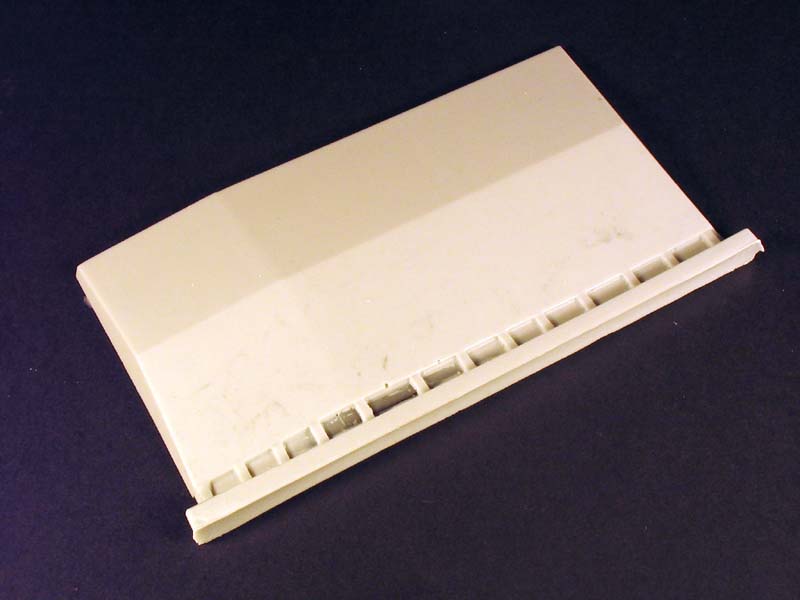
-left and right side skirts with XM19 ERA tiles attached - Tank Infantry Phone -.50 Cal machine gun -left and right rectangular frames for turret mounted XM32 ERA tiles -left and right angled frames for turret mounted XM32 ERA tiles -92 x XM32 ERA tiles -belly armour -Loaders Thermal Weapon Sight for the M240B -Commanders .50 Cal gun shield -CS/AMM Xenon spot light -CS/AMM mount -spot light mount -.50 Cal ammunition container -M240B gun mount -CS/AMM armoured cable cover -Commanders angled shield -8 x bolts for side skirt mounts -3 x Commanders shield segments - Loaders foldable shield -Loaders angled lower shield -left and right Loaders armoured gun shields
The photo etch fret contains the following parts nine parts:
-mesh for Loaders foldable shield -4 x bracket for Commanders .50 Cal gun shield -4 x foot mount brackets for the side skirts
There is also a sheet of clear plastic provided for the gun shield ballistic glass.
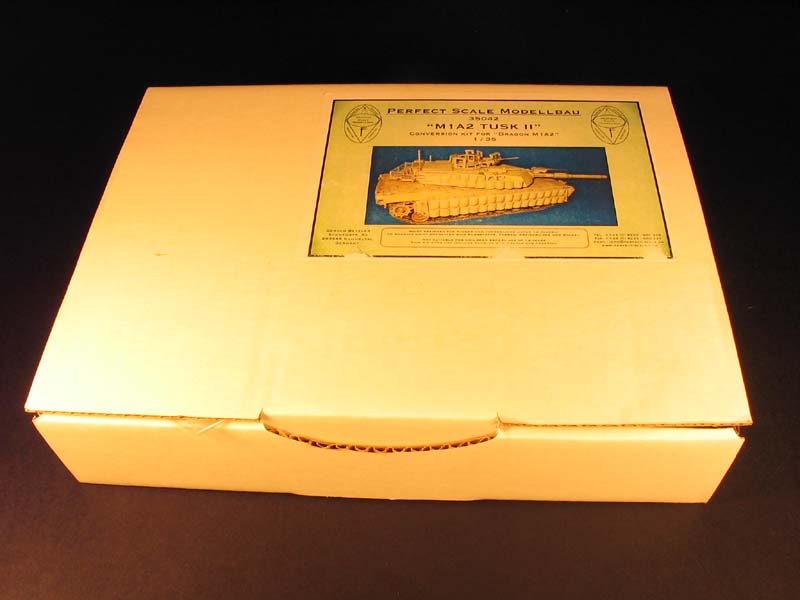
Packaging
The upgrade kit comes packed in a sturdy cardboard box with the resin parts, clear parts, and the photo etched parts in separate zip lock style bags. Styrofoam chips assist in filling out the empty spaces in the box during shipping. Upon inspection of the parts all appeared intact after shipping except for the three windowed commanders shield and it had the thin resin interior edges broken off.
Instructions
The instructions consist of three pages. Two of the pages show the placement of the conversion parts by way of diagrams and B&W photos with German and English text. The third page is the parts diagrams with German text. I found the instructions clear and easy to understand. Although the placement of the hull XM32 tiles is not totally correct in the instructions they do show the correct number of tiles in each position. The correct tile placement is explained further in the review. The instructions also include drawings of the additional second row of XM32 ERA tiles fitted to the turret frames in the event a modeler wants to mount the full ARAT II array. There is no indication as to the electrical cabling layout required for the Loaders Thermal Weapon Sight, spot light, the rate of fire system solenoid on the .50 Cal HMG.
The Conversion Parts
Counter Sniper/Anti Material Mount
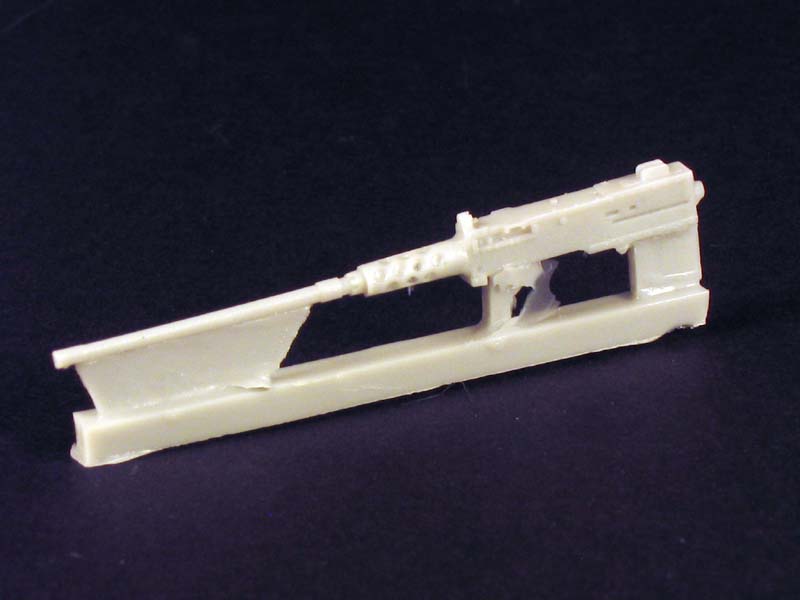
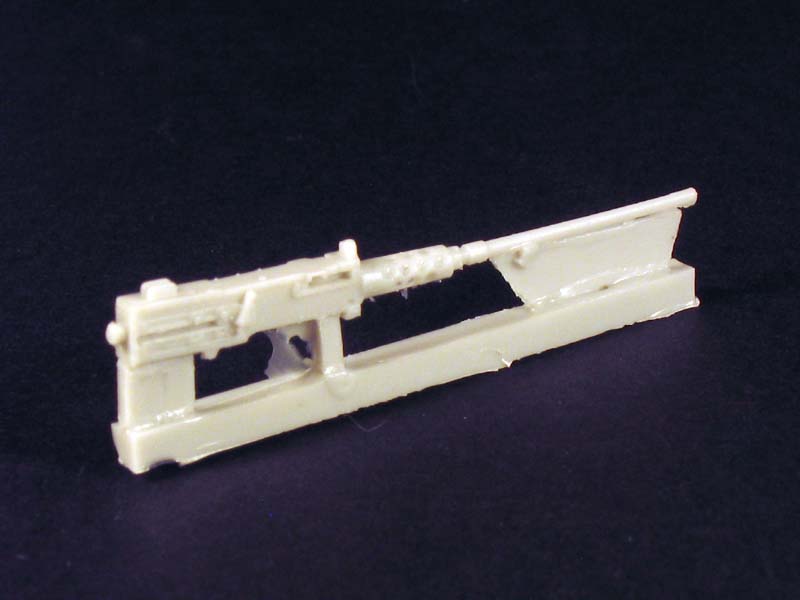
The CS/AMM system consists of six resin parts. The parts have a small amount of resin flash and require removal from the casting blocks. The mount part is nicely formed and forms the base for the remaining parts. Placement of the mount is not totally clear in the instruction images but it is designed to attach on the mantlet projections. The .50 Cal is basic in casting and could use some additional detailing with photo etched parts and perhaps a replacement metal barrel and cooling jacket. The Xenon spot light is nicely reproduced but modelers will have to source reference material for the electrical cabling. A consideration would be to replace the lens with an MV Products lens for additional realism. The ammunition box is well cast and includes a partial .50 ammunition belt. I noted that the latch on the right side appear too close to the middle and it should be slightly forward and there is no top hinge detail on top left side. The armored cable cover is crisply cast bust it appears basic in detail. There are several mounting clamps and bolts that will need to be added. In addition there appears to be a small angled portion of the cable cover that is missing near the mantlet end. There may be variations in the type of cable covers on the real vehicles and this may account for the differences. The electrical rate of fire system solenoid for the left side of the .50 Cal receiver is not included in the kit and must be scratch built.
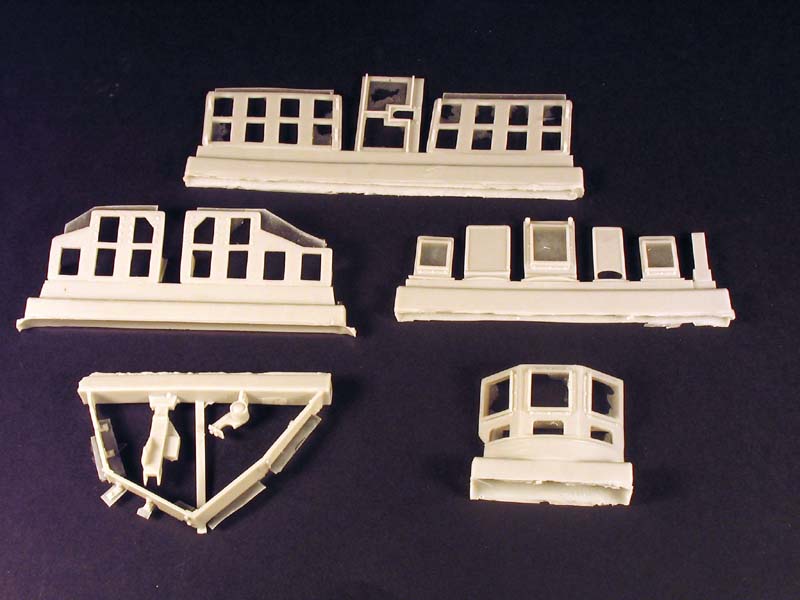
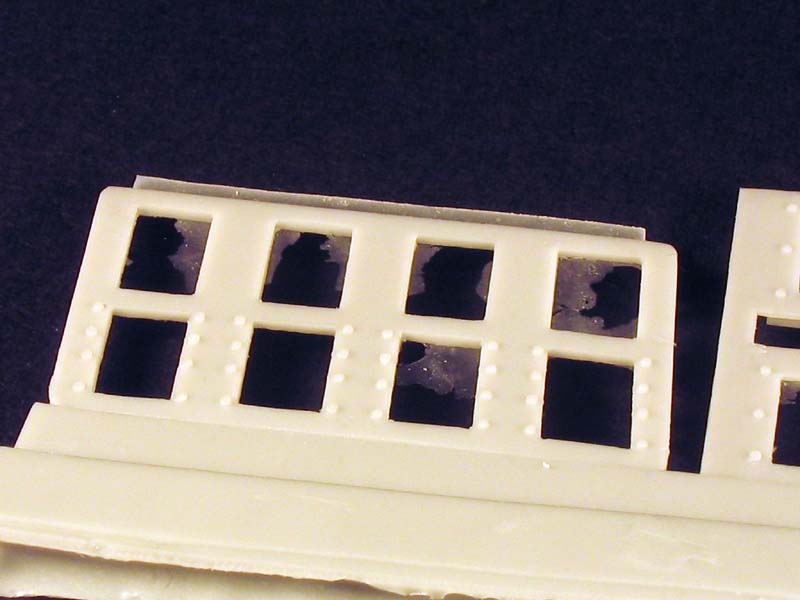
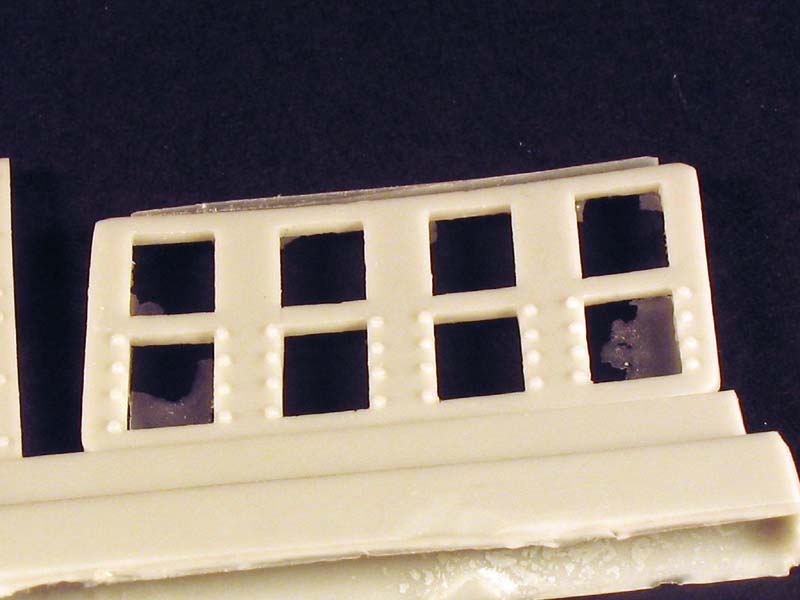
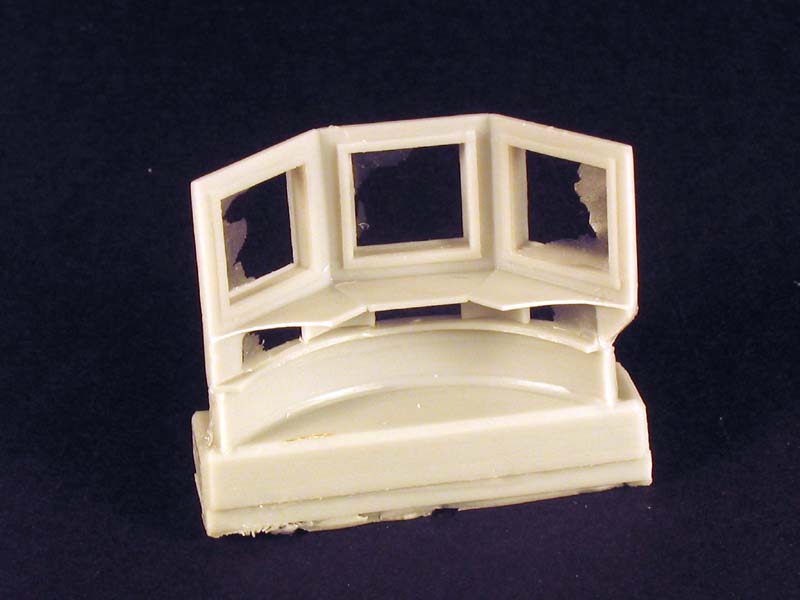
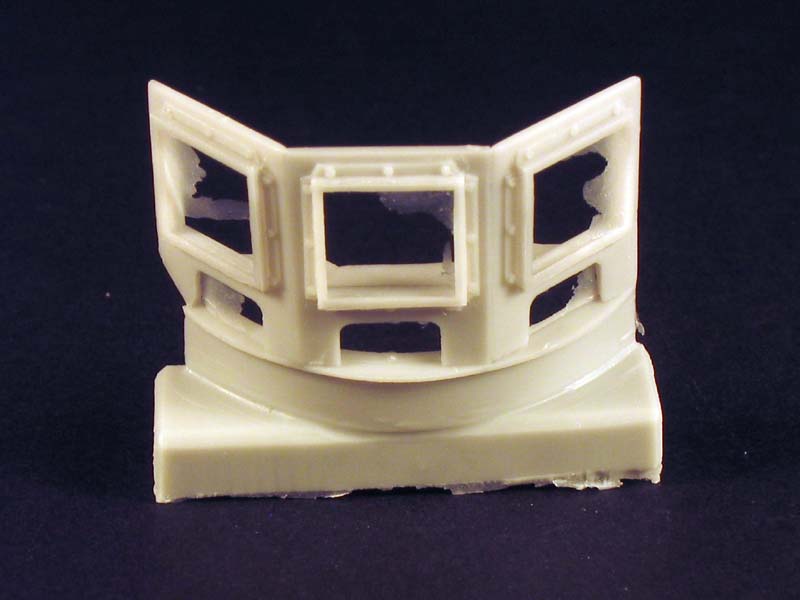
Commanders 360 degree shields
The commanders shields consist of six resin parts, four photo etched parts, and the use of the clear plastic for the ballistic glass. The parts are nicely cast but not completely accurate when compared to reference images. On the three window shield the back side should be flush and not with a protruding frame as depicted in the kit. The inside is also void of multiple bolt details. On the front there should be four brackets that hold the ballistic glass panels in the frame. On the kit the frames are cast as a solid four cornered assembly. This can be corrected by bending thin plastic or metal to the shape of the brackets. An item I noted missing from the three window shield is the commanders hand held spot light and mount. This would have been an excellent detail to have included in the conversion. On the left side of the cupola there are three separate shields mounted. Two of the shields have ballistic glass panels. The inside of these shields is flush as should be but they are missing bolt detail. The outside surface is once again missing the proper brackets. The final shield is a long rectangle with an oval port on the bottom that corresponds with a periscope in the cupola. This part appears to be totally correct. The commanders .50 Cal gun shield looks correct in shape and both inside and outside bolt detail. Strangely enough photo etched brackets are supplied for the ballistic glass panels. I am not sure why Perfect Scale Modellbau chose to include the brackets for the gun shield but not for the other ballistic glass panels.
Loaders Armored Gun Shields
The loaders gun shields consist of seven resin parts and the use of the clear plastic for the ballistic glass. The lower gun shield that wraps around the hatch ring on the turret is nicely cast and detailed. There is both hinge and bolt detail inside and out. In between the turret hatches mounts a hinged armored shield. The shield has both ballistic glass and wire mesh. The wire mesh is provided as a photo etched part. The shield is once again lacking the brackets for the ballistic glass. To the left rear of the loaders hatch is a solid shield. Missing from the inside of the shield on the right side is a vertical grab handle to assist the loader in folding down the shield. The main components of the shields are the gun shields for the M240B. The parts are all nicely cast but missing distinct bolt detail on the outside and inside. The bracket for the ballistic glass on the top outside of the shield is not present. The lower outside angles of both the left and right portions of the gun shields appear to be a little off compared to reference images. A replacement lower pintle mount is provided for the M240B as well as a resin loaders thermal weapon sight to be mounted on the top of the M240B. There is no indication as the wiring required on the thermal weapon sight.
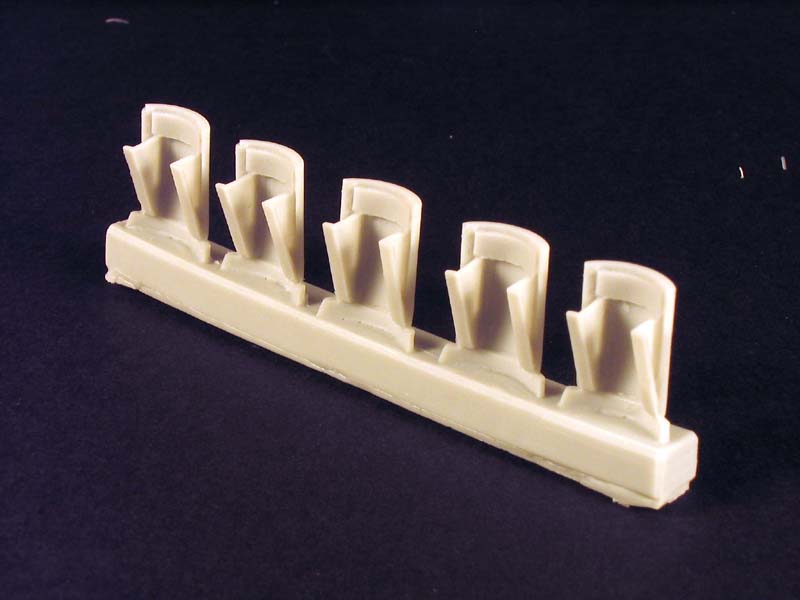
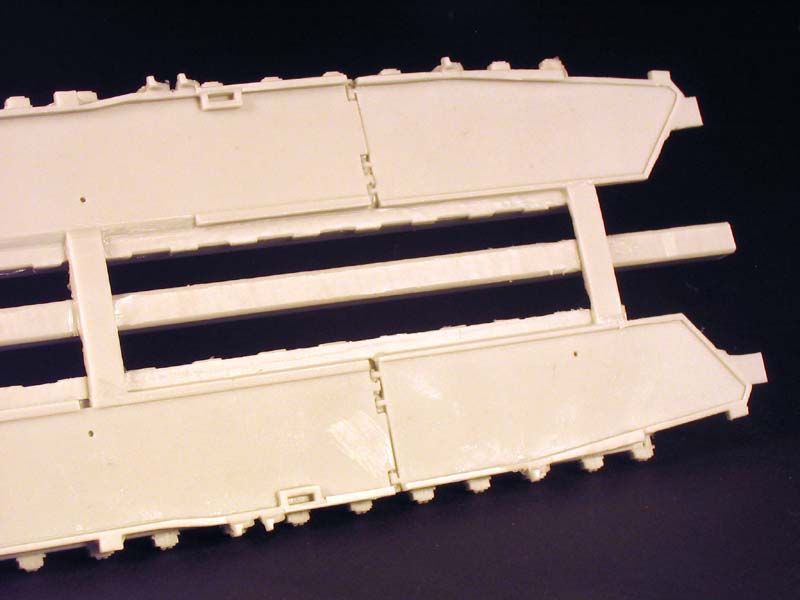
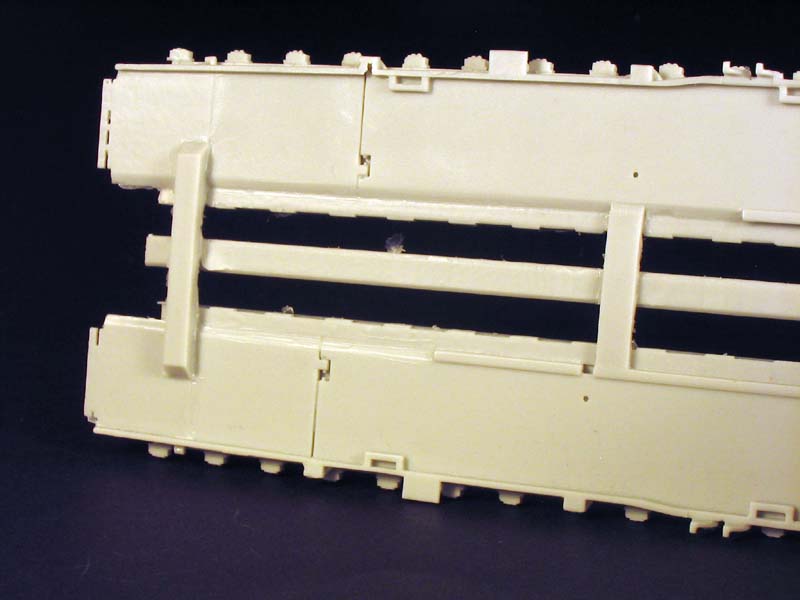
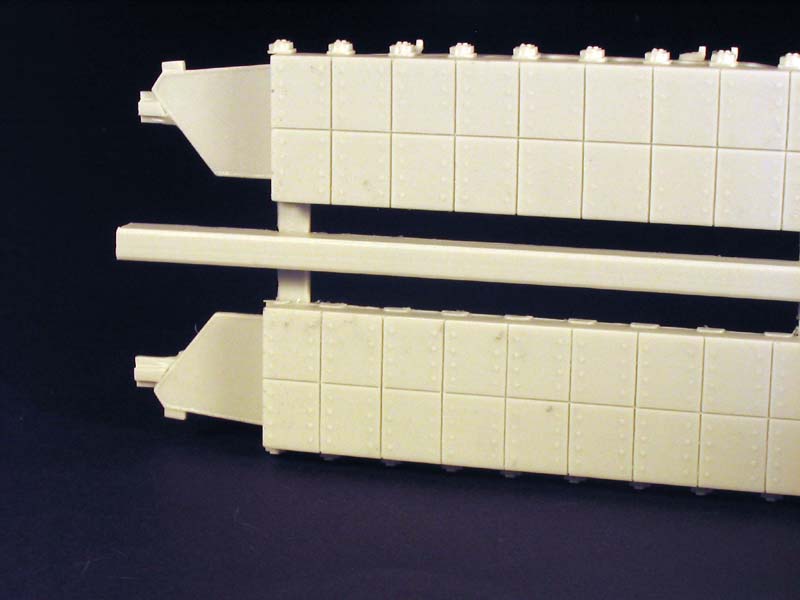
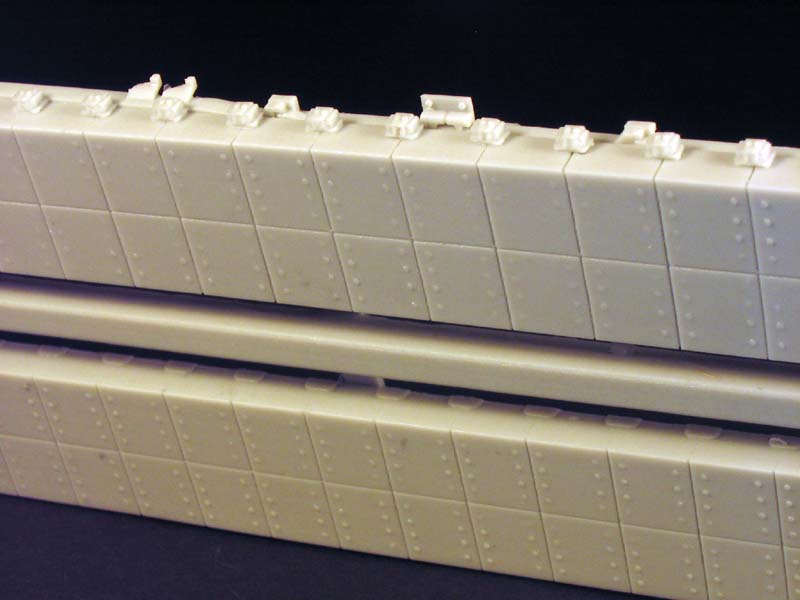
XM19 ERA tiles
The XM19 ERA tiles are provided attached to the left and right side skirts. Overall the level of detail is good with only minor air bubbles along a couple of the end edges. The bolt detail is subtle but visible and when compared to reference images it appears to have a scale effect. There are tiny bolts in the corner of each XM19 tile on the real Abrams but these are not present on the kit tiles. The mounting brackets along the top of the tiles are solid and in fact should be semi-hollow. This is a detail hard to create with resin. I noted that each tile along the top run should have two tie down loops and anti-slip surfacing. Neither feature is present in the kit. That being said I do not think those details are included in the Legend Productions kits either. More noticeable errors in the tiles occur when looking at the forward sections. On the real Abrams the forward most top tile on each side should have a slight angle toward the front of the hull. In the conversion the tile is flush across the top. This leads to the error with the front section of the side skirts. On the real Abrams when the ARAT I tiles were mounted the first section of side skirt on each side was removed and replaced with a thinner metal section with a slightly different shape. A gap was great by the thinner section between the hull fenders and sponsons and a thin frame with a metal or rubberized runner was attached to fill this gap back to the second side skirt section. Unfortunately the conversion kit retains the original side skirt sections making it inaccurate when compared to all images of Abrams fitted with TUSK. It appears that the Legend Productions conversion did get this modification correct so an option may be to adopt some kit bashing to make an accurate TUSK II Abrams. This of course increases the expense of the project. The rear side skirt section has been removed and hinge detail is present. Looking at reference images some of the M1A2 SEPs fitted with TUSK II have and rear side skirt section and some dont.
XM32 ERA tiles
A total of 92 XM32 tiles are provided for the turret and hull as well as four mounted frames for the turret tiles. The tiles appear to be well formed on the front and rear and without any blemishes. The tile and frames are somewhat simplified as there is no small bolt detail on the outside of the tile or on the angled part of the mount that attaches to the XM19 tiles. In addition the tiles should have lifting/carrying straps fitted to the inside of each tile. Two small wire locking cables are used on each tile to secure it to the frame and will have to be added. 32 of the XM32 tiles are used for each side of the hull with a total of 16 in each row. On the turret seven tiles are used for the lower row on the left side and eight tiles are used for the lower row on the right side. The tile counts are correct when compared to reference images. If the top row of tiles is attached on the turret sides then five tiles can be used on each side. Some M1A2 SEP TUSK IIs in Iraq show between 14 and 16 tiles mounted on the hull. Modelers should refer to reference material if not attaching the full run of tiles. It should be noted that the first two upper and lower tiles on the hull sides actually are mounted a bit lower on the real Abrams. This is not indicated in the instructions and the photo in the instructions is incorrect in showing all of the hull mounted tiles even. When the tiles are mounted on the XM19 tiles they should be angled downwards at an angle of 35 degrees. The XM32 tiles in the kit do have an angled frame so each tile should appear very close to the correct angle when attached to the XM19 tiles.
Tank Infantry Phone
A one piece molded TIP with the handle molded in place is provided in the conversion. It would have been nice to have included the handle as a photo etched part. This part is not required as it is already included in the Dragon M1A2 SEP kit. It is likely a left over from the TUSK I conversion common parts.
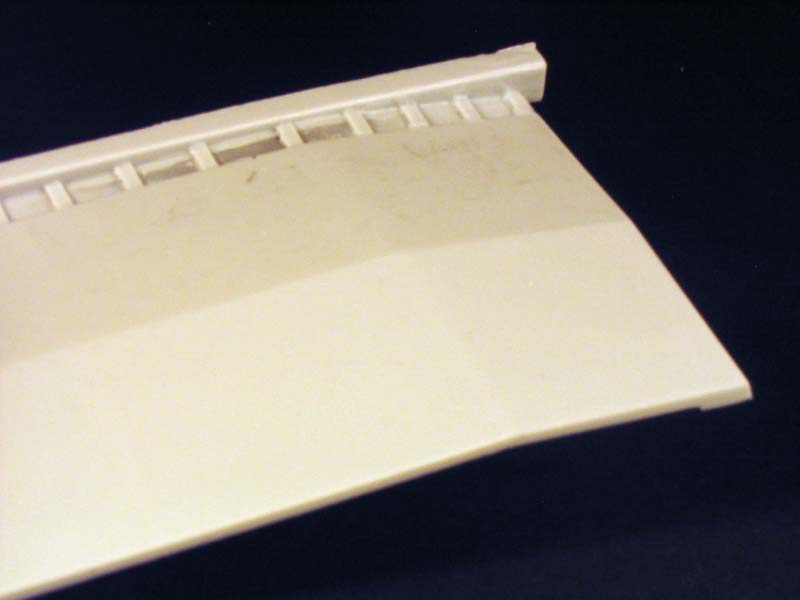
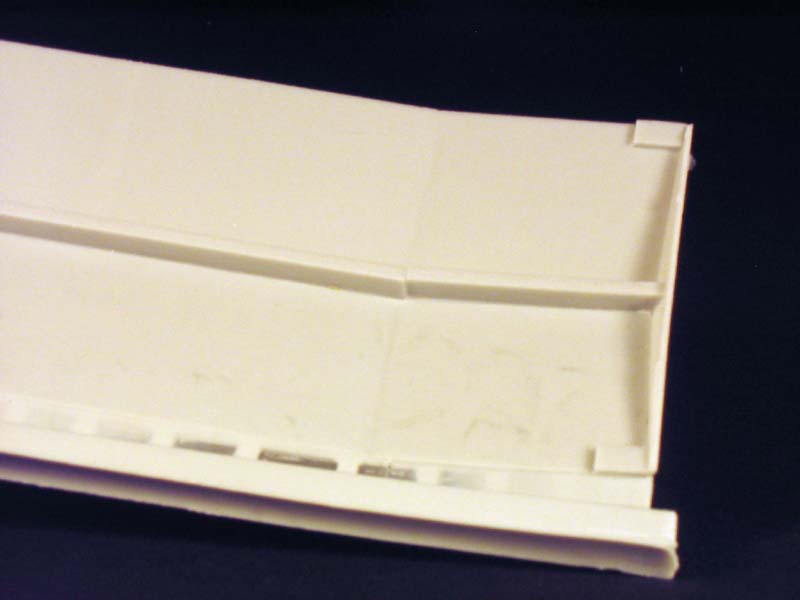
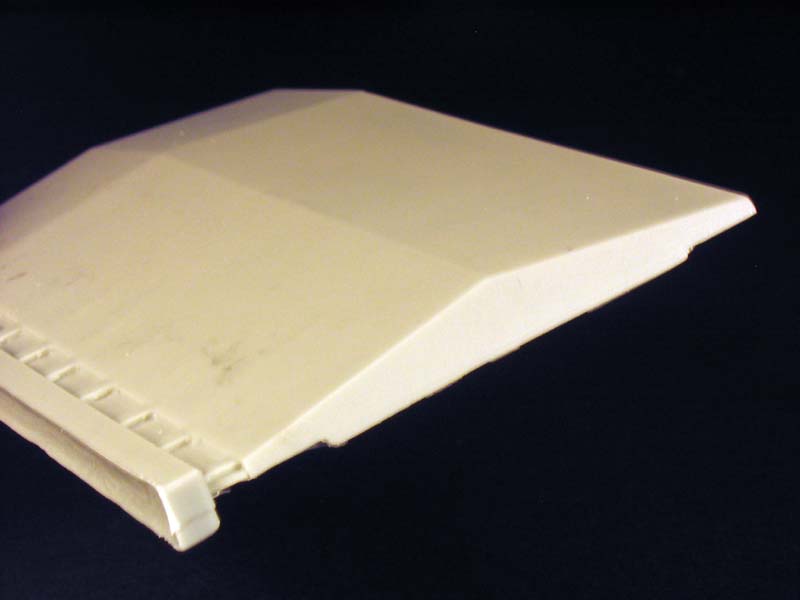
Belly Armor
The belly armor is cast as a one piece hollow part. Cleanup will be minimal with the multiple casting lugs along one side. I noted that the subtle yet visible horizontal weld bead is missing from the front of the armor. The real armor weighs over 1300 kilograms and is bolted to the lower hull. There is visible bolt detail that attaches the armor to the hull behind the idler wheel. The bolt detail is not included on the belly armor part. This is a difficult to view and there is not a lot in the way of public reference material showing the bolt detail clearly. Modelers will have to source good images to get the attachment points and the bolt detail correct.
Upon reviewing the Tankograd No. 3009 M1A1/M1A2 SEP Abrams TUSK book it appears that the M1A2 SEP TUSK IIs in Iraq do have a rectangular bracket possibly for the rear mounted camera on the left rear of the hull above the left rear taillight. No camera is seen mounted in the bracket. The bracket is not included in the conversion kit but should be a simple scratch build addition
.
Conclusion
While this conversion does have several inaccuracies and there is detail missing it is still the only TUSK II conversion currently on the market. Keeping in mind that there is limited reference material available on the TUSK II components Perfect Scale Modellbau has done a good job of producing the conversion. Absolutely there will be extra work needed and some kit bashing or modifications to make it an accurate TUSK II project but I have yet to see a perfect conversion kit. The benefit of this conversion is that the casting is very good and not much has to be done in the way of filling or sanding of imperfections in the resin. The instructions are good and combined with good reference material the modeler should be able to assemble the parts with ease. The conversion is nice, but not perfect. It will provide the modeler with distinct parts for the M1A2 TUSK II version that can be improved upon depending of the degree and scope of effort made by the modeler.
Highs: The conversion provides a unique and up to date version of the Abrams currently in service in Iraq. The quality of the resin casting is very good. The XM32 ERA tiles give the Abrams a very distinct look.Lows: Inaccurate front ERA hull tiles and front side skirt sections. There is a lack of detail on the CS/AMM parts and bolt and bracket detail on the armoured shields.Verdict: The only TUSK II kit out there with nice quality on the turret shields but the level of detail can be further improved. Given the inaccuracies I would suggest combining this kit with the Legends TUSK I kit to make an accurate M1A2 SEP TUSK II.
Great review Jason, very detailed! It seems the best way to get an accurate M1A2 TUSK II is use this kit with the legends conversion.
Its odd as well that PSM included two types of commander 360 shield, as I understood the TUSK II is only fitted to M1A2's, and one of the shields included in this kit can only be used on the A1. That shield would be better included in the original TUSK release. Its a shame I went through a let of head ache to scratch build the commanders shield and now I see it produced in resin......
Thanks Rob,
I have heard from Gerold at Perfect Scale Modellbau and he has stated that for the next production batch of the conversion that the issue with the side skirts will be corrected.
If modellers can hold off and wait then the corrected Perfect Scale Modellbau M1A2 TUSK II conversion should be better.
Im with Rob, great review!
Did those minor corrections myself, no big deal fixing the skirts, same thing with the TUSK 1 upgrade.
Since I build quite some resin kits, I still am impressed of the crisp and flawless quality of the kit parts. Amazing how resin production can be so precise nowadays, that goes for every PSM kit I have laid my hands on so far.
Cheers
Christopher


Comments