history
The Bergepanzer 2 was the first special variant developed using the Leopard 1 chassis. Work on this variant started back in 1962 with a production version rolling out in 1966. Also known as the Leopard 1 ARV (Armoured Recovery Vehicle) it was specifically designed to operate in support of the Leopard 1 Main Battle Tank. The Bergepanzer 2 shares 75 % commonality of parts with the Leopard 1 and the large hull superstructure gives it a distinct look. The vehicle has a hydraulically operated crane capable of rotating 270 degrees is used for lifting power packs. The crane can even lift one end of a Leopard off the ground or pull a turret for maintenance if need be. A main tow winch with 90 metres of cable at the front of the vehicle can provide a straight pull of 34.5 tonnes or up to 69 tonnes with a pulley system. A dozer blade can be used for limited clearing operations and importantly as a support on the ground while lifting heavy loads or as an anchor while winching to recover another vehicle. The Bergepanzer 2 can carry an entire spare Leopard 1 power pack on the back deck using a special mounting bracket. A variety of specialized tools are carried on the vehicle for recovery and fixing damaged tanks.
A unique feature of the ARV is enlarged fuel tanks and a pump to allow the vehicle to provide fuel to another tank or likewise to siphon it and de-fuel another tank. For protection the Bergepanzer 2 is armed with a ball mounted machine gun at the front of the hull, another machine gun fitted to the commanders cupola, and six 76 mm Wegmann grenade dischargers. The ARV is equipped with an NBC system and can deep water ford with a conning tower fitted. The Bergepanzer 2 is fitted with seats to carry four crew; the commander, driver, and two mechanics.
A later version called the Bergepanzer 2A2 was developed to lift the heavier Gepard turret and includes a hydraulic stabilizer leg at the right rear of the hull, safety braces for the dozer blade and some minor changes in external stowage.
The Bergepanzer 2 and the upgraded Bergepanzer 2A2 have continued to serve around the world with Leopard 1 user nations. Over 500 Bergepanzer 2s and 2A2s has been used by Germany, Australia, Belgium, Brazil, Canada, Denmark, Greece, Italy, Netherlands, Norway, and Turkey.
kit overview
This kit is one of two versions of the Bergepanzer 2 produced by Gerold Betzler of Perfect Scale Modellbau. Kit #35027 is the Bergepanzer 2 without interior and kit #35026 is the Bergepanzer 2 with interior. The kits are the same with the exception of #35026 having an additional 49 resin parts for the interior. While the focus of this review is on kit #35026 with the additional interior parts modelers considering kit #35027 will also benefit from the review.
packaging
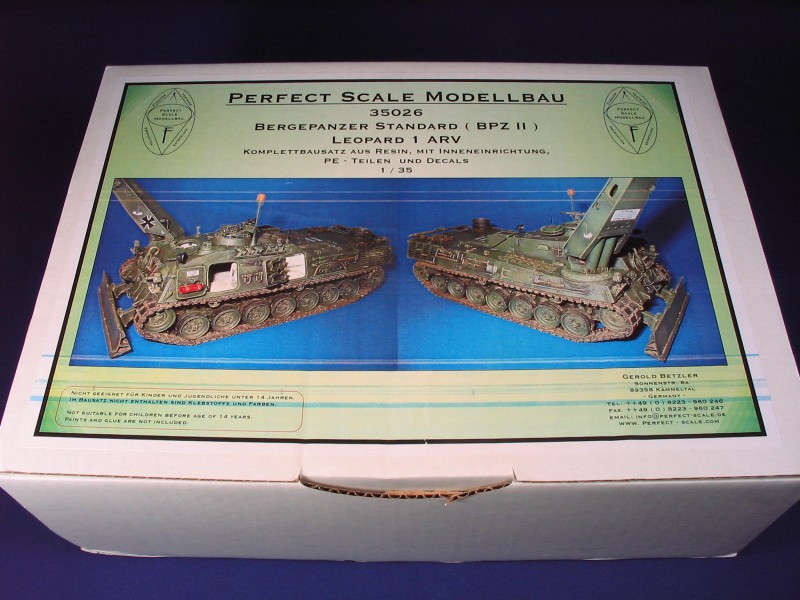
The kit was shipped in a sturdy cardboard shipping box measuring 31 x 21.5 x 10 centimeters. Five plastic zip lock type bags hold the parts. The tracks are wrapped separately in plastic. Styrofoam chips fill the remainder of the space in the box. The box top has two side angle colour images of a built and finished Bergepanzer 2 kit.
the kit
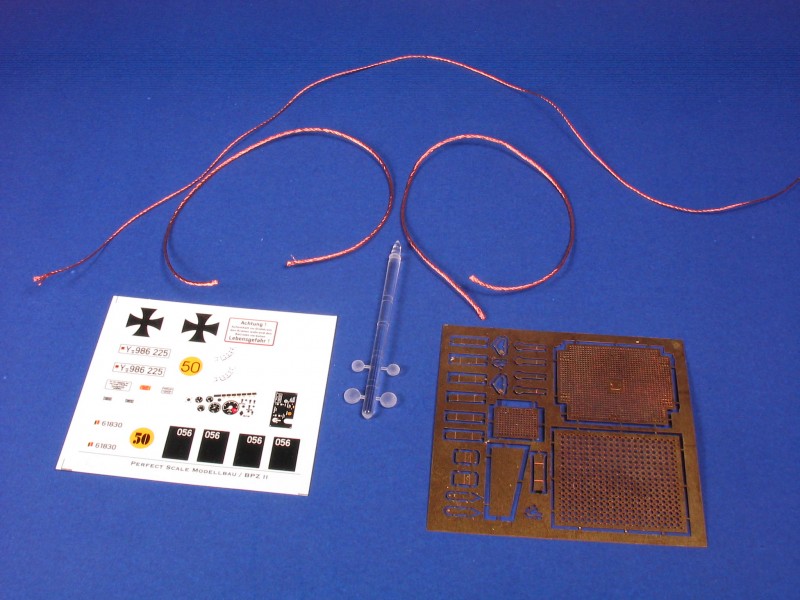
This is a multimedia kit and includes 258 resin parts, a full set of Hong Kong Creation Workshop (HKCW) Leopard 1 injection moulded individual link tracks, a decal sheet, a single brass photo etch fret, clear plastic headlight lenses, and three lengths of braided copper cables.
Just about everything you need to build a Bergepanzer 2 is included in the box.
THE INSTRUCTIONS
The instruction documents come as five A4 sized sheets, four of which are double side printed. The cover page gives both German and English explanations as to what is included in the kit, warnings in respect to working with resin and glues, and a note for the modeler to inspect the parts in comparison to the parts list and to get in touch with Perfect Scale Modellbau if there are broken or missing parts so that replacements can be sent to the modeler. To me this is excellent up front customer service.
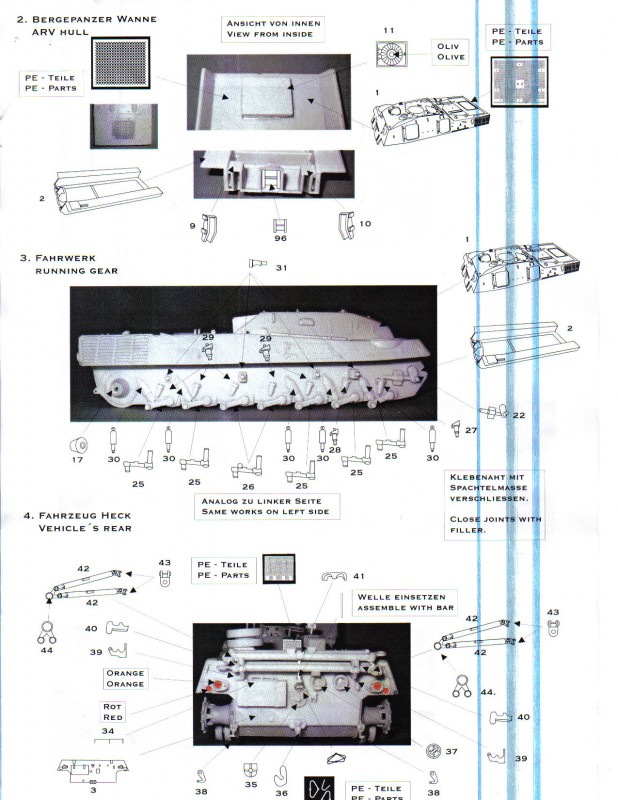
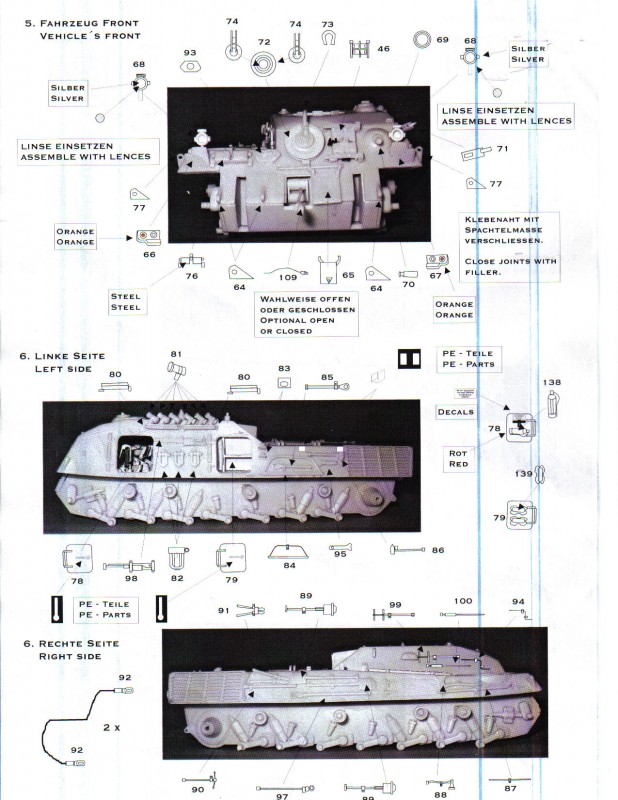
The assembly instructions include five pages of diagrams combined with images to guide the modeler through the assembly process. All of the text included in the assembly process is provided in both German and English. Many of the assembly steps are combined with the use of diagrams, images, and arrows pointing to placement locations. The arrow indicators may be confusing for modelers not totally familiar with the Bergepanzer 2 and therefore I would recommend modelers have reference material readily available at hand to ensure the proper placement of all the parts. The instructions show the placement of the photo etch parts but the angle of some of the images does not always make it clear. This is another time when good reference material is a must. The location of some of the decals such as warning placards and the drivers instrument panel are provided in the instructions. However, there are other decals that only by the modeler having previous knowledge of the vehicle or looking at reference material looking at the box top or a completed Bergepanzer 2 will the modeler be able to accurately place the decals. However, that being said it is excellent that small detailed decals are included as they will add to a finished project.
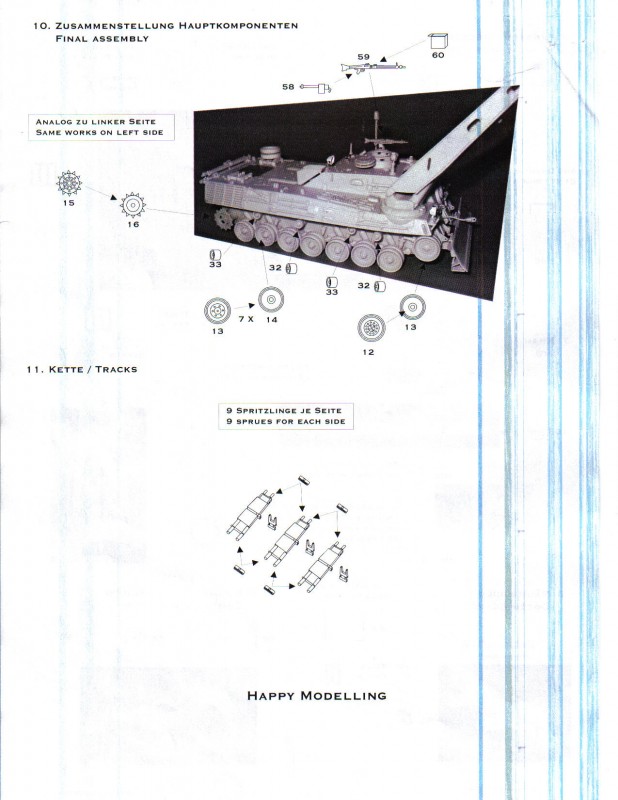
There is a diagram in the instructions showing the assembly process for the HKCW track links. Nine sprues of the track links are used for each side. The instruction diagram provided in the instructions is not totally correct. It shows the assembly of the track link together with the center guides and the end connectors. The way the diagram is situated is has the modeler putting the end connectors on upside down. The bolts on the end connectors should always be to the outside of the track run and not on the inside as depicted in the diagram.
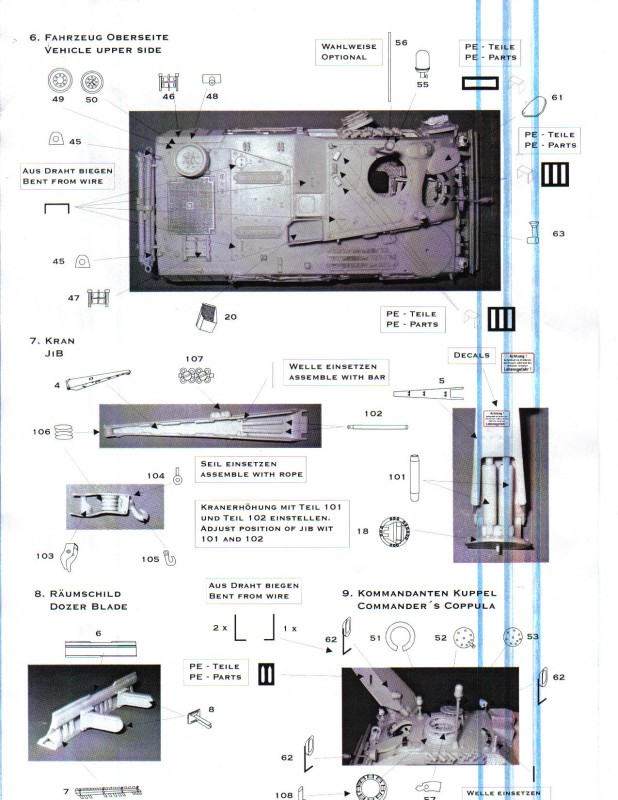
The instructions indicate that wire should be used to form the handles for the armoured covers for the fuel and air cleaner hatches on the back deck. There is no wire included in the kit. This is an easy fix for modelers with basic scratch building skills.
The instructions also indicate that the modeler will have to use wire to make the three mirror mounts.
The instructions do not give any indication as to how the copper cable is to be fitted to the pulley on the crane arm. This is a three loop system that attaches to the hook assembly and may give modelers a bit of trouble if they do not have proper reference material.
There is no painting guide or painting diagram included in the instructions for vehicle itself. This would have been good to have as the placement of the remaining external decals would have been masked off and it would have provided the modeler with the knowledge that the Bergepanzer 2 in German service can be painted in either the single colour Gelboliv or the three colour NATO green, black, and brown pattern.
The box cover image and the images on the Perfect Scale Modellbau site show a finished Bergepanzer 2 in the single colour Gelboliv. There are paint instructions included for some of the interior details, the front clearance markers, the fire extinguisher, air intake fan housing, spare track links, the inside of the headlights, and the taillights. Modelers wishing to finish the Bergepanzer 2 in the service of any other nation will have to do research as far as paint and markings.
Finally, the instructions provide three pages of the parts denoted by a diagram, associated number, the number included, and a description in German. Although the parts in the instructions are numbered there are no corresponding numbers on the part casting blocks or casting sprues. In keeping with the rest of the instructions it would have been nice to have English translations for those modelers not Leopard part savvy. This is not necessary but it would have been a nice to have.
the decals
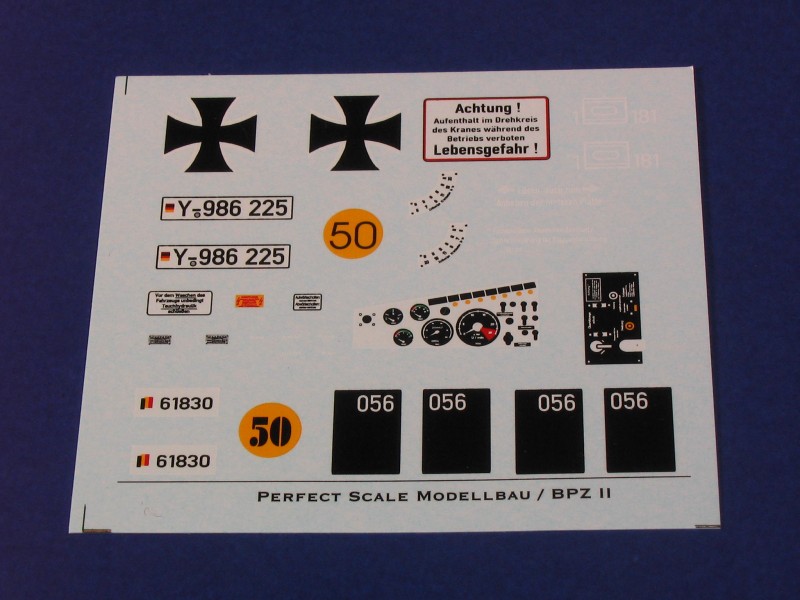
The decals provided have nice colour, good detail, and are in register. The decals offer the modeler warning placards and stencils for the interior and exterior as well as vehicle markings for a Bundeswehr and Belgium Bergepanzer 2.
The decals include the following:
2 x Bundeswehr iron crosses
Vehicle registration number for the crane and hull rear
Drivers instrument panel
Crane operation danger warning placard
2 x 50 Ton bridge classifications (one for a German ARV and one for a Belgium ARV)
Left and right crane tilt/lift load indicator scales
Crew heater warning and operation placard
4 x interior warning placards
Back deck lifting warning stencil
Back deck hydraulic coupling disconnect warning stencil
2 x Bundeswehr tactical vehicle markings
5 x white stencil markings for the fuel filler access covers, the coolant access cover, and the engine and transmission oil access cover on the back deck area
2 x Belgium Bergepanzer 2 vehicle registration numbers (61830)
4 x Belgium Bergepanzer 2 identification numbers (056)
It should be noted that two images of the Belgium Bergepanzer 2 as denoted by the decals can be found in Michael Shackletons Leopard 1 Trilogy, Volume 3, Foreign Usage, page 450. The Belgium Bergepanzer 2 is not exactly as built in the kit and has a ladder-like rack mounted on top of the crane.
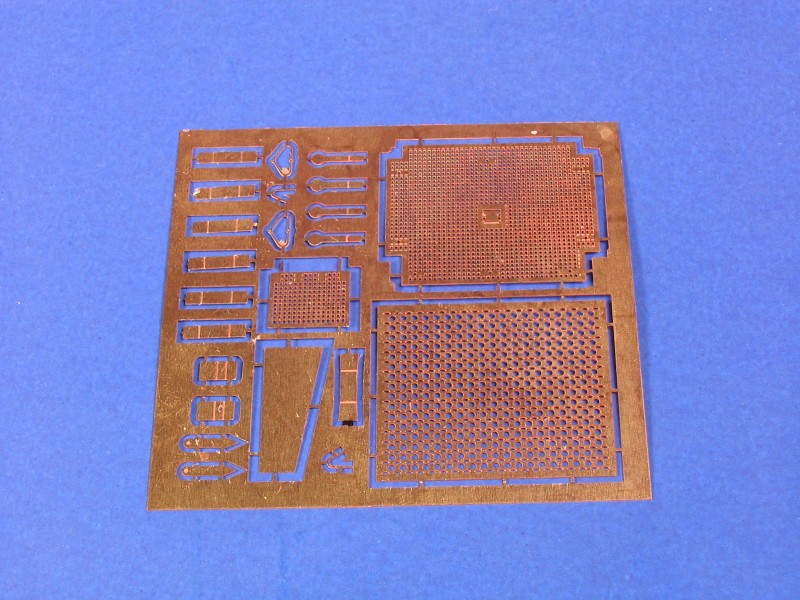
THE PHOTO ETCH FRET
Included in the kit is a photo etch fret that provides a number of details that will add to the project during the build. It is excellent to see that two pieces are provided for the engine air intake grills. On Leopards there are two levels of debris filtering grills on the engine deck and they have been accurately reproduced in photo etch. The periscope covers are included as photo etched parts with scribed fold lines. Hull side hatch handles, tow cable brackets, tilt/lift load indicator needles, A-frame turn loop device, and an additional grill for an air inlet on the superstructure are included. There is one angled rectangular photo etched part that is not used in the assembly of the kit. The quality of the photo etched parts is very high and the level of detail on the grills is excellent.
THE CLEAR PARTS
Four injection moulded clear plastic lens are included for the headlights. The Bergepanzer 2 can mount a total of three headlights. Two on the front of the hull and another on the tilting and rotating mount on the hull roof. Only two headlights are included in the kit, however, the instructions show the third headlight fitted to the roof top mount. Of the four lenses included there are two different pairs of sizes. The correct lenses to use for the headlights are the smaller pair.
THE COPPER BRAIDED CABLE
Three lengths of copper braided cable are included. Two cables measuring 19.5 centimeters each are for making the tow cables and a slightly thinner cable measuring 33 centimeters is for the crane cables. The copper braided cables are very pliable and should fit well when attached to the resin parts.
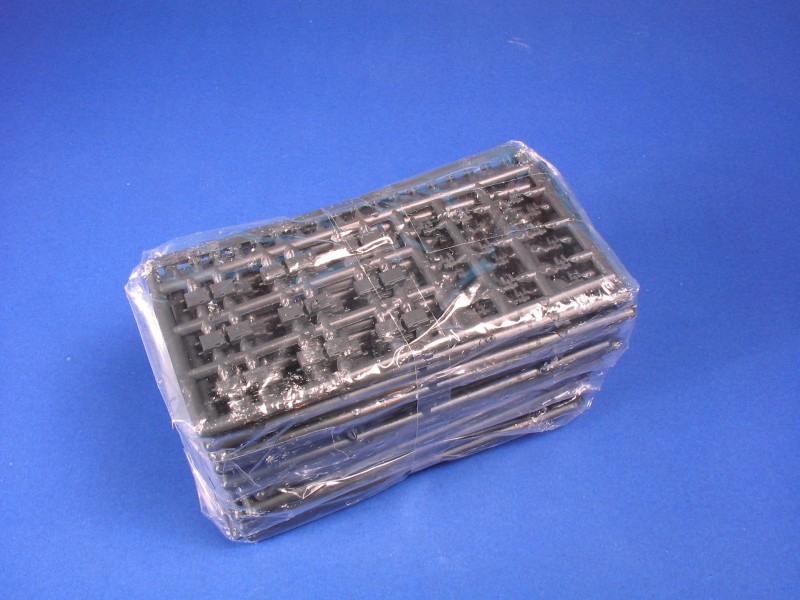
THE TRACKS
The tracks included are the very well detailed Hong Kong Creation Workshop Leopard 1 individual link track set. These tracks mimic the assembly of the actual Leopard 1 tracks and include the track link with rubber track pad, the center guide, and end connectors making a four part process in the assembly and connection of each link. Modelers should make note of my previous comments about the instructions regarding the proper assembly of the tracks. I have used the HKCW tracks previously and care should be taken during the parts removal from the sprues and during assembly to ensure the delicate parts do not break. The tracks look great once assembled and will really make the Bergepanzer 2 project stand out that much more due to the entire track run being visible on the completed model.
THE RESIN PARTS
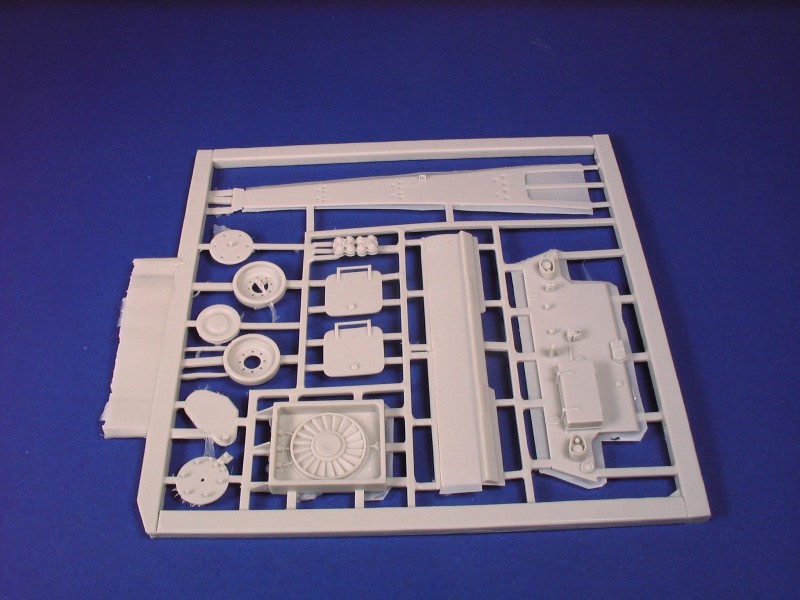
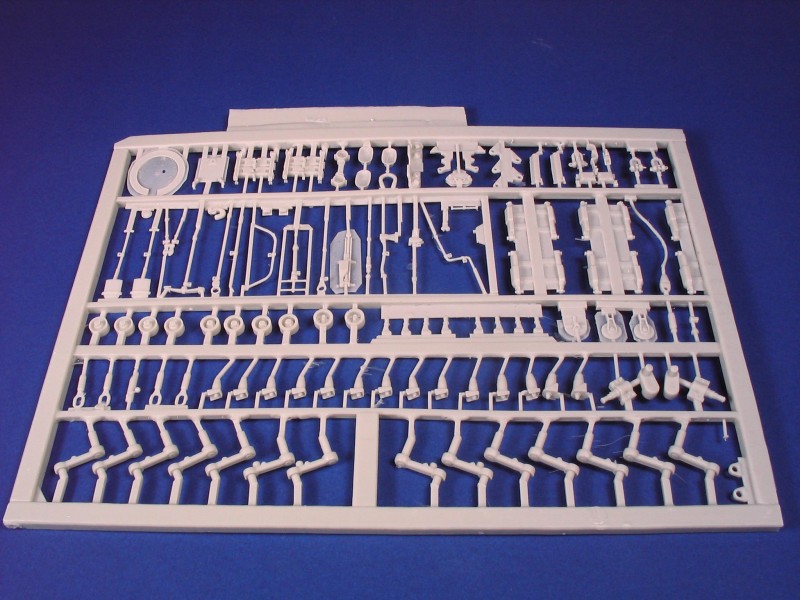
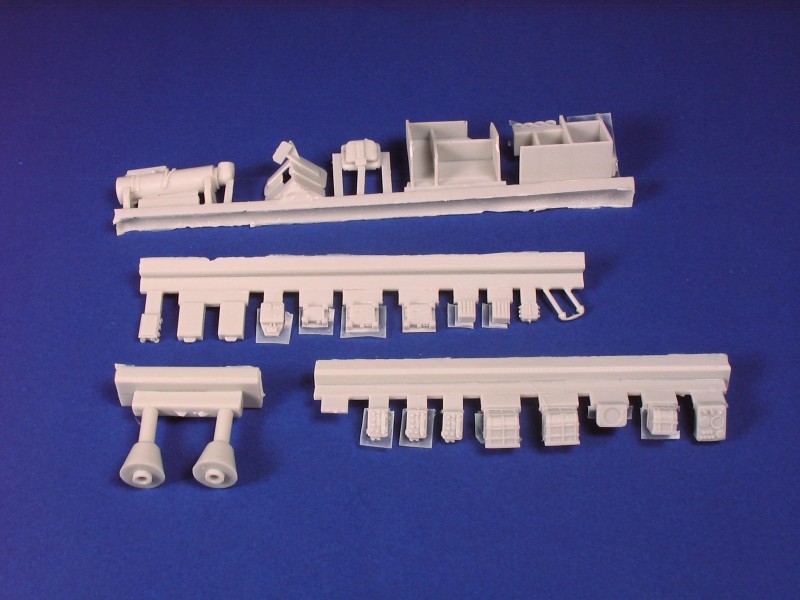
With 258 resin parts there is a lot to talk about in this chapter of the review. The parts are provided on both traditional casting blocks and on complete resin cast sprues. This is a very unique approach and provides both stability and strength to the shipping of the smaller parts. The resin sprues also allow the modeler to remove and clean up resin parts much like their styrene counterparts.
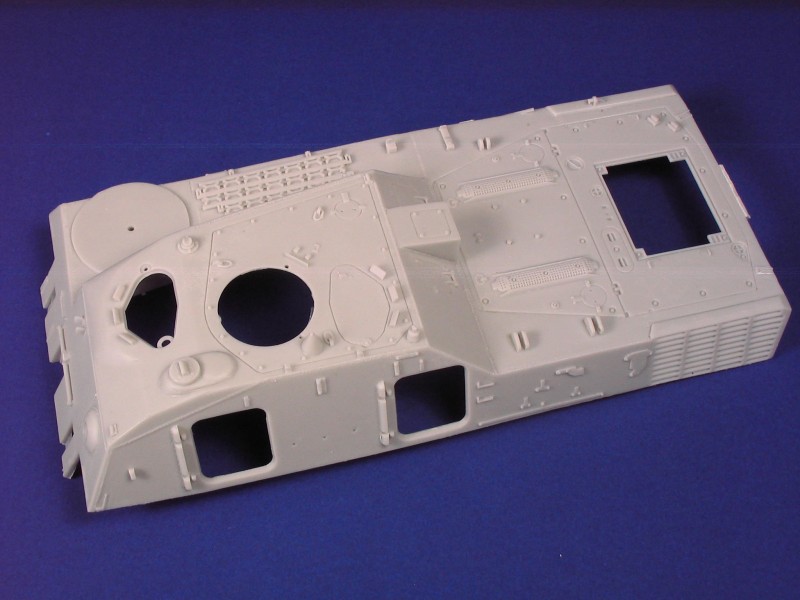
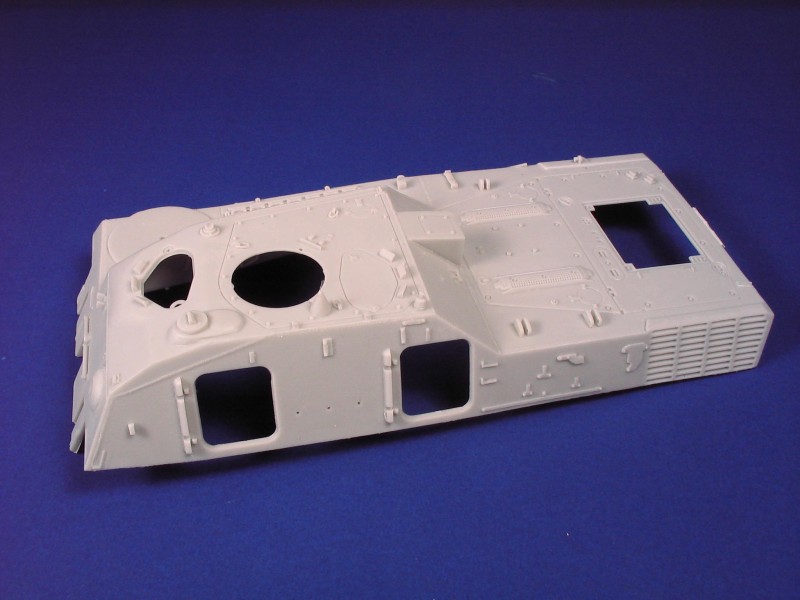
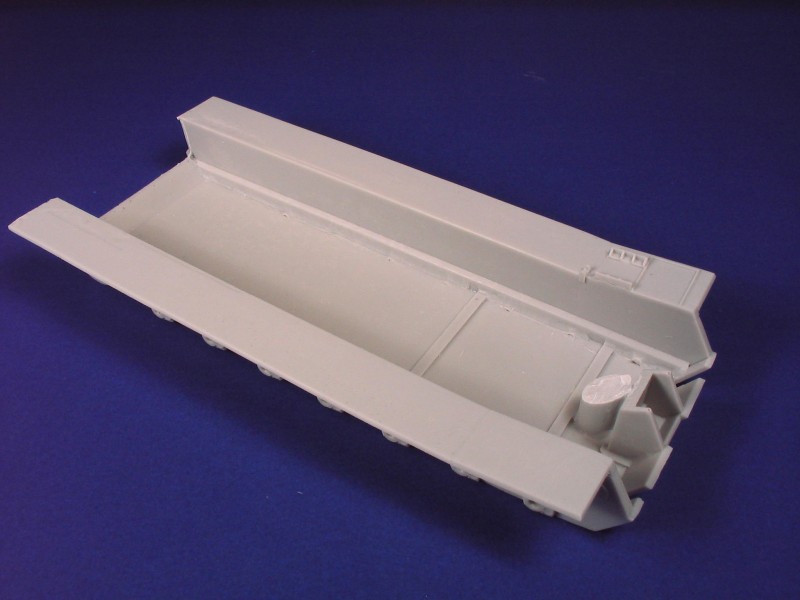
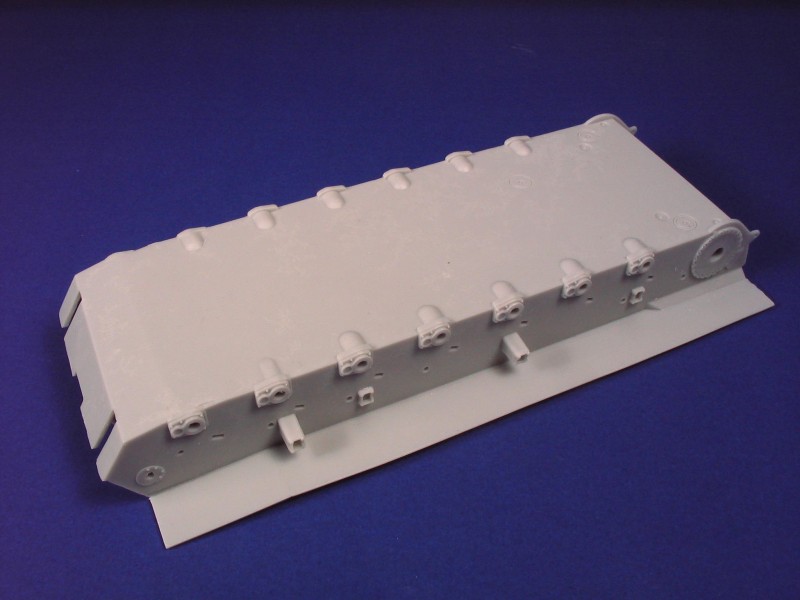
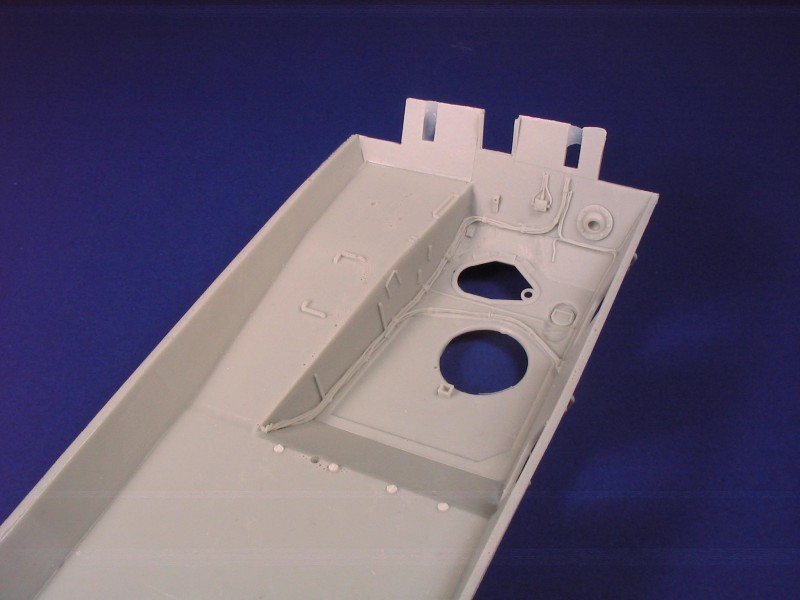
The biggest resin parts are the upper and lower hull. The details included on these parts are extremely well done from raised and recessed bolts, to weld seams, tool fittings, and the periscopes. The upper hull includes open hatches for the commander, driver, and the two left side hull access doors. I found it odd that the third top hatch on the upper hull is cast closed. On the inside of the upper hull in the crew compartment area interior cabling and wiring is cast in place. Details for the machine gun ball mount, and periscope mounts are also included inside the upper hull. I measured the upper hull and compared it to the 1/35 drawings of the Bergepanzer 2 in Michael Shackletons Leopard 1 Trilogy, Volume 2, Special Purpose Variants and they appear to be the same to me. The lower hull includes the front winch housing and nicely detailed suspension mounting points. On the bottom of the hull access covers are well cast but there is no hull floor escape hatch. This may have been an oversight since the Bergepanzer 2 does in fact have an escape hatch but access through the interior is done by lifting a portion of the raised tread plate floor and therefore not immediately visible inside the vehicle.
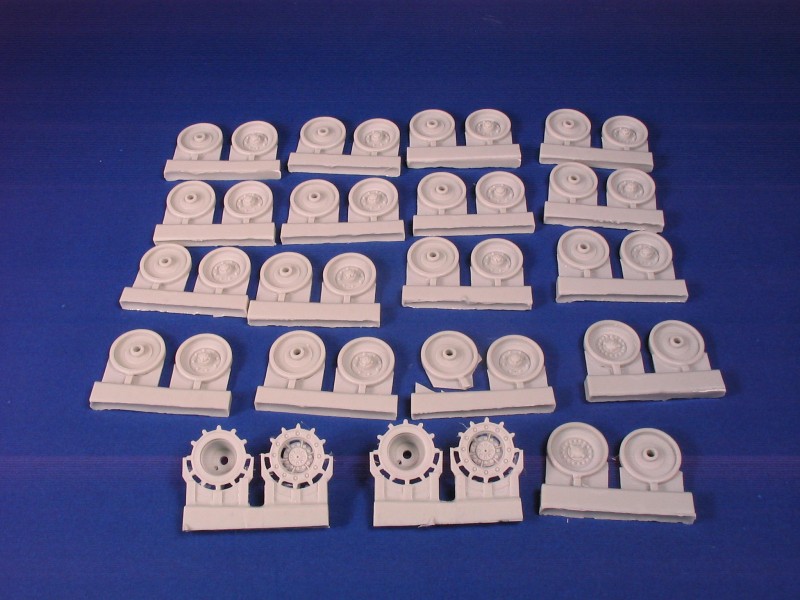
The suspension components are nicely cast and as well detailed as injection moulded rivals. The road wheels, idlers, and drive sprockets are attached to the common form of resin casting blocks. The remaining suspension components are attached to a resin sprue that should facilitate quick removal and clean up with the use of appropriate tools.
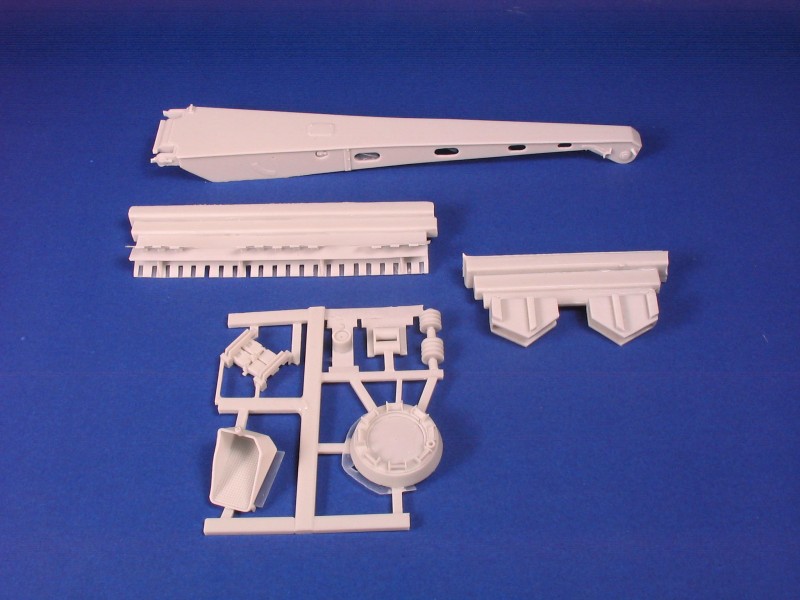
Moving up the hull the crane is a substantial sub-assembly. The crane is comprised of 18 pieces including the decals, photo etched parts, and the copper braided cable. The crane jib scales nearly exactly with the 1/35 drawings of the Bergepanzer 2 in Michael Shackletons Leopard 1 Trilogy, Volume 2, Special Purpose Variants. The casting is very nice and I could detect only minor warping of the large crane jib parts. This is an easy fix with a dip into hot water. During the assembly process modelers should have an idea as to how they want to pose the crane, whether it is in the stowed position on the hull or articulated in a raised and pivoted position. In posing the crane in use modelers should refer to reference material as the lift/load indicator needles should correspond with the appropriate lift/load indicator scale number based on the angle of the crane jib. As mentioned there is no instruction provided as to how to fit the braided copper cable to the tow pulleys. The important thing to remember is that it should look like three tight cables running from the pulley on the end of the crane jib to the pulley on the hook assembly.
At the front of the Bergepanzer a dozer blade is mounted. The dozer blade is provided in four parts including the blade, the rear blade reinforcements, and two support arms. The blade once assembled can be positioned raised or at any lowered angle desired. It should be noted that the blade is not hinged but simply slides into the brackets attached to the lower hull.
The remaining of the upper hull parts are cast with many very nice details requiring an average amount of cleanup. For the most part there is only a small little indication of air bubbles and the parts look properly formed. All of the pioneer tools are provided separately with clamps cast on. Placement of the tools is made easier as the tool mounting brackets are cast on the upper hull with bolt detail visible. The parts on the back deck include the A frame tow bar, spare road wheels, spare tracks links, spare return rollers, and a cast chain bin. The tow cables mounted on the left side are assembled using the copper braided cable and resin tow cable eyelets. There is no indication as to how long the cables should be so modelers will have to look at Bergepanzer 2 reference material to determine the length and how they mount on the back deck. According to my measurements the cables should be approximately 9.5 to 10 centimeters in length including the tow cable eyelets.
The commanders cupola is very nicely produced with the ability to build it with the hatch open or closed. Full periscopes are cast inside and really added to showing off the interior. A very nicely detailed MG3 and mount are also provided to top off the hatch ring. The six grenade dischargers are well detailed but lacking photo etch cap retaining chains. Care must be taken when mounting them to the rails in order to get the proper angles.
The hull front the winch hatch can be built open or closed with the winch box, rollers, and a resin towing cable available for fitting if the winch door is mounted in the open position. The remaining front hull parts including the headlights, clearance lights, towing shackles, spare track links, ball machine gun mount cover, and large pulley are all nicely cast and detailed.
I noted that two distinct vehicle parts were not included in the kit. The first being the large Y shaped cradle for carrying a spare Leopard powerpack on the back deck and the second being the powerpack lifting frame used for removing and replacing an entire powerpack from a Leopard. These are standard pieces of equipment on the Bergepanzer 2 and it would have been great to have them included.
The 49 resin interior parts have been for the most part well thought out will make the kit really stand out. The interior parts include floor plate, storage racks, seats, drivers controls, four fire suppression system bottles, crew heater, periscopes, and communications equipment. The interior will quickly fill up as the parts are added. The assembly of the interior takes place in both the upper and lower hull allowing for the modeler to paint the interior parts and apply the decals before sealing them in the hull. The two large doors are provided separate to allow the modeler to pose them open or closed. A fire extinguisher mounts on the inside of the crew compartment door and stowage guides for electrical cables mount on the inside of the rearward door. This door can be positioned open to show the storage compartment used for tools and other equipment. Photo etched door handles are provided for both doors. One item not included for the interior is the ball mounted MG3. This will have to be sourced by the modeler and adapted to the ball mount is desired. The interior parts that are supplied do appear to be accurate when compared to reference images. There is room for additional detailing and the addition of more fire extinguishers and cables but hats off to Perfect Scale Modellbau for making the effort to produce a very well designed interior.
comparison
The only other 1/35 kit of the Bergepanzer 2 is produced by Elite. Elite produces a resin Bergepanzer 2A2. They also produce a 1/35 Pionierpanzer 2 Dachs Armoured Engineer Vehicle. In a completely unscientific approach I compared the level of detail and quality of casting of the Perfect Scale Modellbau Bergepanzer 2 with the Elite Pionierpanzer 2 kit. The Bergepanzer 2 is far above the Elite kit in terms of visible clear details and crisp casting. Perfect Scale Modellbau has done an excellent job with their casting process and easily compare with larger producers such as Accurate Armour and Legend Productions.
references
While this is a review of the kit I felt it was important to start modelers off in the right direction if they want to build this kit and add further details. So often does a reviewer mention reference material but it is not provided.
In print for reference material for the Bergepanzer 2 is:
The Leopard 1 Trilogy, Volume 2, Special Purpose Variants by Michael Shackleton.
Tankograd Militarfahrzeug Special No 5004, Die Bergepanzer der Bundeswehr und deutsche Bergetechnik, Modern German Army Armoured Recovery Vehicles by Stefan Marx.
Here are some very good sources of on-line reference material:
PRIME PORTAL
Engine Removed
Bergepanzer
Bergepanzer
Bergepanzer
Bergepanzer
Bergepanzer and Gepard
PANZER-MODELL.DE
Home Page
Bergepanzer
Bergepanzer
CONCLUSION
The Bergepanzer 2 produced by Perfect Scale Modellbau is overall very impressive. The details and level of casting is very high and providing a full interior for the crew compartment really adds life and depth to this combat support Leopard variant. The inclusion of decals, photo etched parts, clear lenses, copper braided cables, and individual link tracks extend the commitment to level of detail in this kit. Fans of the Leopard will not be disappointed with this kit but they should be prepared to put the extra effort in to get all the details added. As with many multimedia kits this project will not fall together out of the box. It would have been nice for the kit to have included the powerpack frame and lifting device and to clarify the assembly and placement of some of the parts and decals in the instructions. Taking the time to study the instructions, checking out the parts, planning an approach to constructing and finishing the interior, and seeking out good reference material will greatly benefit a modeler wanting to dedicate time and effort to making this an eye catching project. Given the large amount of Bergepanzer 2 users around the world there are many possibilities for finishing beyond Bundeswehr markings.
I hope that Gerold Betzler and Perfect Scale Modellbau are very proud of this kit and that we will see further Leopard variants such as the Pionierpanzer 2 Dachs and even the Biber Armoured Vehicle Launched Bridge (AVLB). I am sure the detail and accuracy will be equally as good.
I highly recommend this kit. It certainly fits into the realm of very high quality multimedia kits.


Comments