In 1943 whilst the Allies were preparing for the long awaited invasion of Europe the Department of Tank Design was asked to produce a new design for a heavy cruiser tank that was designated the A41. The requirement was for a tank that would not exceed 40 tons, with the ability to withstand a direct hit from the much feared 88mm gun. The design came about by extending the suspension of the Comet, adding a sixth wheel along with changes to the suspension, a partially cast turret mounting the famous 17pdr gun, with a 20mm Polsten cannon. The power unit was a Rolls Royce Meteor engine, a variant of the Merlin that would offer excellent mobility.
The Centurion arrived too late to see service in World War 2, but after much development saw service in the Korean War, where with a Stabilized gunnery system allowing excellent fire on the move capability it outperformed the equivalent US and Soviet tanks by a large margin. Continued development saw the Centurion being continually being updated and culminated with the fitting of the famous 105mm L7 Gun.
There can be little doubt that the Centurion set the bench mark for many of the post-war tank designs and went on to serve with a great number of the worlds armed forces, seeing action in many conflicts and even now during the recent conflict in the Lebanon, could be seen in a highly modified form, as an APC, in the service of the Israeli Army.
The Contents
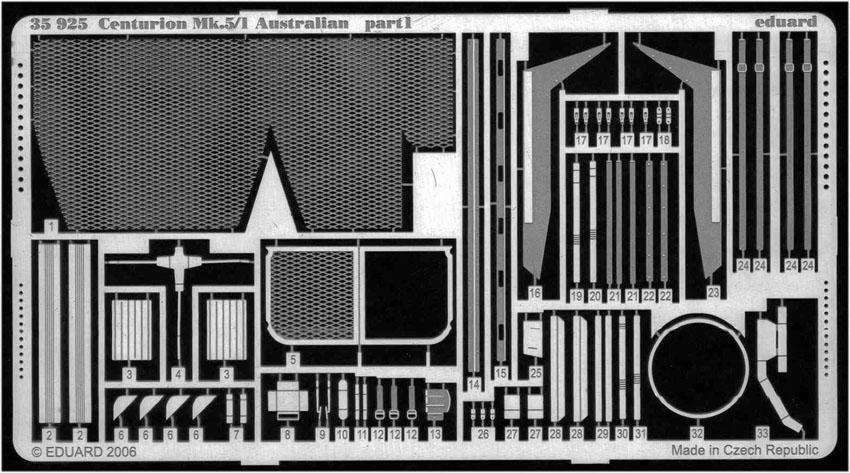
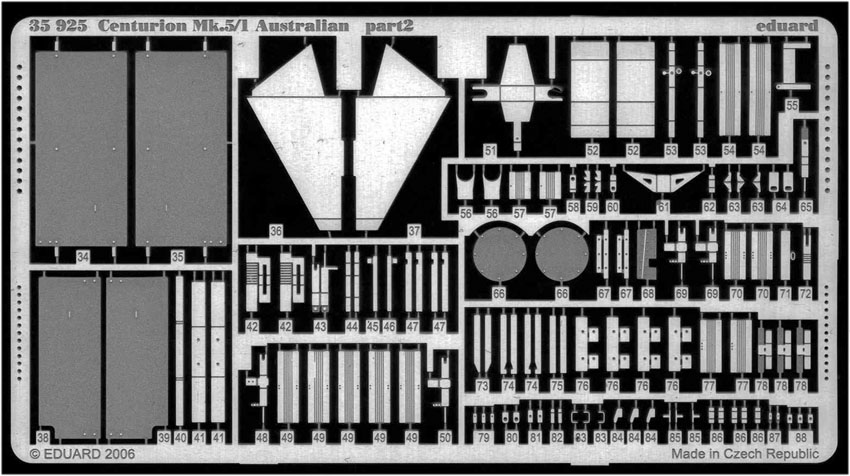
The set is presented in the usual Eduard re-sealable plastic envelope, with the frets being protected by enclosed cardboard backing sections. Upon removing the contents, the detail set comprises 3 frets of photo-etch, pre-marked acetate sheets for the sight optics and folded A4 sheets of instructions. The instructions are clearly presented with pictures of the both frets and a colour coded key which explains the modifications marks that are given alongside the construction notes.
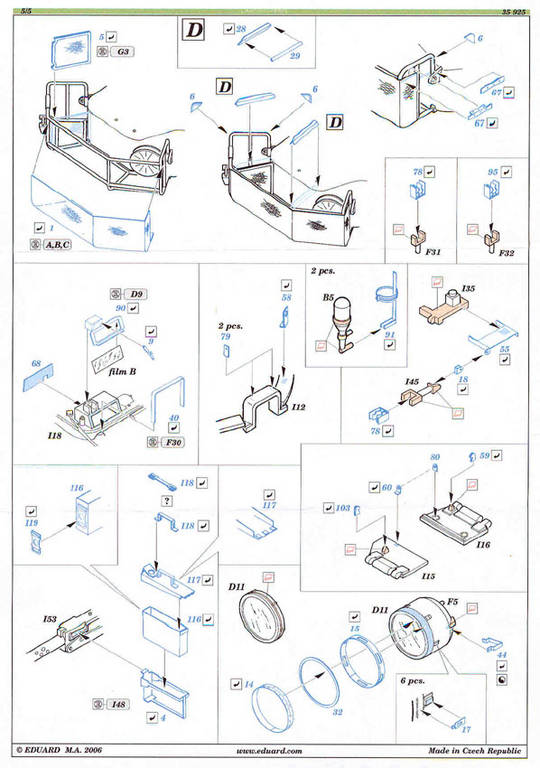
In following Eduards instructions the following sequence is given:
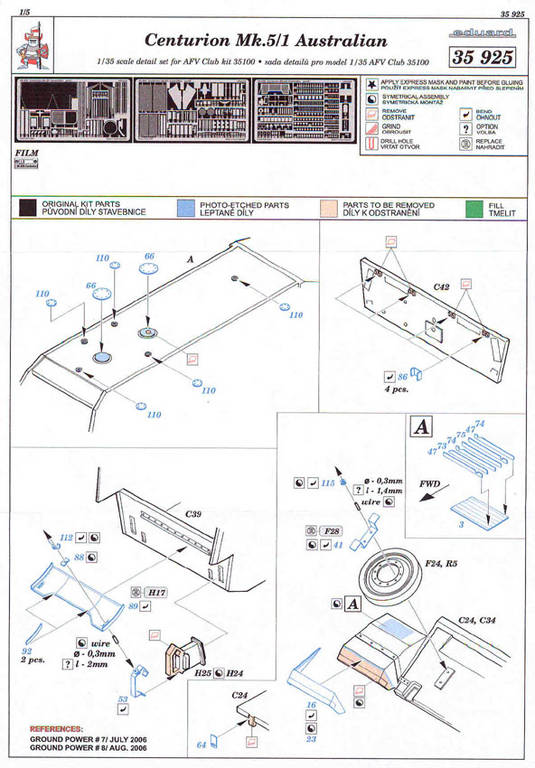
1 - This concentrates mainly on the lower hull, offering covers to make the belly access plates more realistic, various components for the rear of the hull, new mudguards for the front of the fenders, clamp for attaching the spare road wheel and even the metal boot scraper that was fitted to many Australian vehicles on the top of the fender.
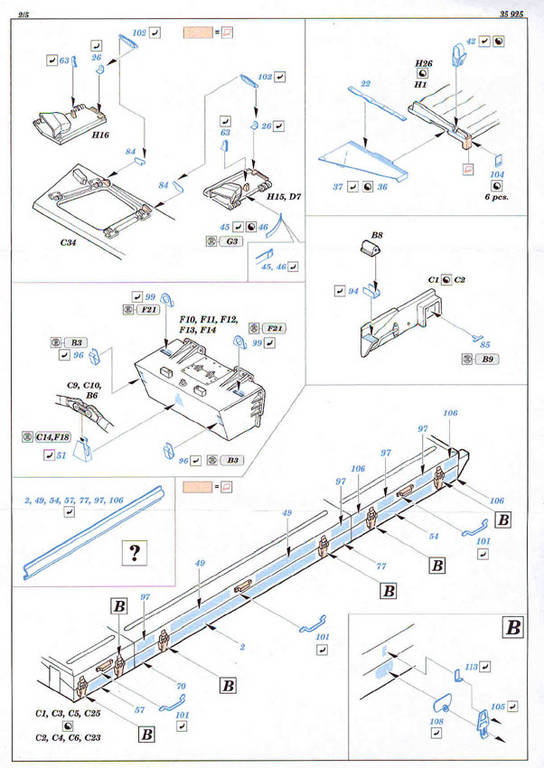
2 - Offers detail updates for the outside of the Driver and Radio Operator hatches, other items for the fenders, clamp for the towing cables, emergency fire extinguisher pull for the engine and finally a large number of the locks for the hull mounted stowage bins and finally the handles, all of which will make a marked improvement over the moulded items.
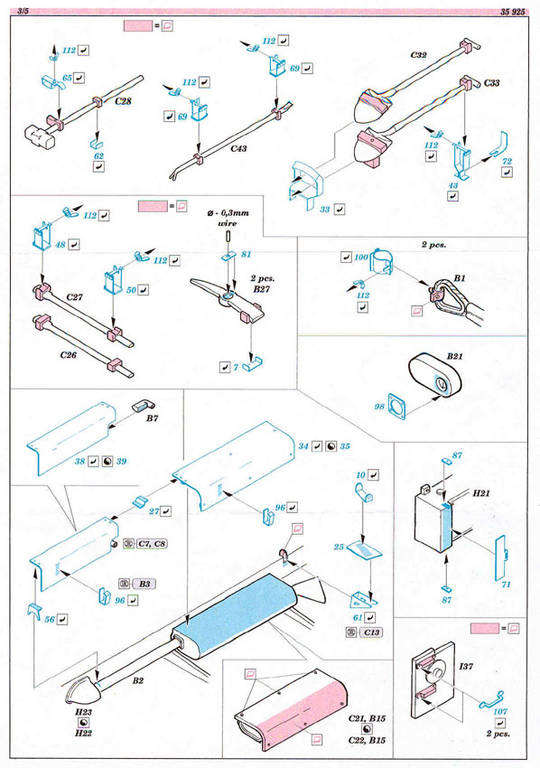
3 - Replacement of the moulded on tool clamps, towing cable clamps as well as replacement of the large heat shields that cover the exhaust boxes, as well as some other small parts.
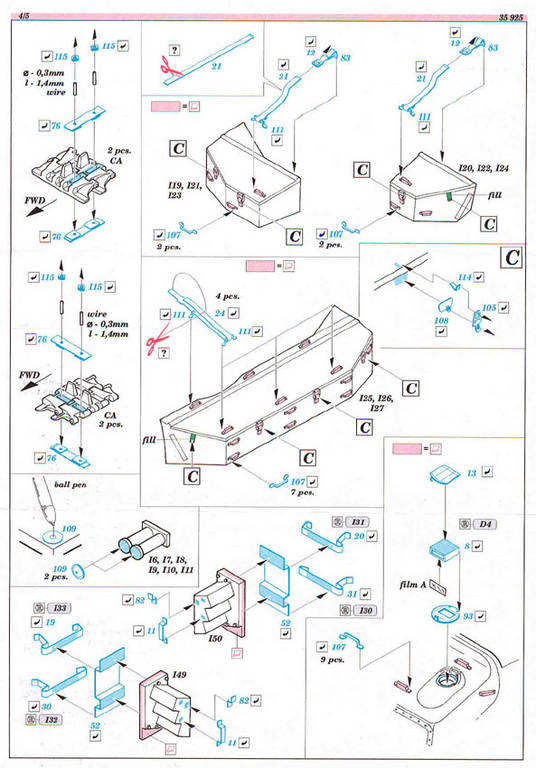
4 - This starts with making the clamps for retaining the spare track links and then moves on to the locks, handles and tie down cables on the turret stowage bins. The smoke grenade discharges are covered in great detail, even down to the rubber covers; these need the small dimple impressing with the tip of a ball point, which is used to press down on the marked location. This sheet finishes with some handles and optics which will need to be cut from, the supplied marked acetate sheet.
5 - The turret basket is lined with fine metal mesh; this means that you can dispense with the plastic representation that is supplied with the kit. The gunners sight is detailed with acetate sheet for the optics and other items including the small sight wiper. The hand extinguisher benefits from the addition of the PE clamp before moving on to the ammunition box and its mount for the commanders 30 calibre, ends with some excellent detail for the large turret mounted searchlight, which is so prominent.
In Detail
Having examined the kit in the box and being able to compare the moulded detail with that which is offered by the Eduard set, I have no doubt that by spending a little time reading the well laid out instruction sheet and following the build details, you will be able to add to and improve some of the significant and visible details on the model. Once these replacements and additions have been made you will have produced a high quality replica of the Centurion tank as was used in theatre by the Australian forces in Vietnam. Whilst there are many companies producing PE, Eduard offers a high quality series of sets that are very user friendly and are not so difficult as to put the less experienced modeller off. The instructions are easy to read; follow logical steps, with the individual components being easy to find on their frets. The identification of the parts which need to be removed or modified on the actual plastic parts is excellent, allowing somebody with less experience to enjoy, both the challenge and the results that can be achieved, in progressing to using after market parts.
Once the build is completed, by careful painting and weathering, this set can do nothing but enhance the kit and will show the hours of work and the skill that you have invested.
Conclusion
The Centurion has been well received by the modelling community and Eduard has responded with a series of sets to improve this kit of such an important vehicle in the development of the main battle tanks that we see today. This is the main update set in a series of four, which will be reviewed over the next few days, all of which can only add to the excellent model that can already be achieved, directly from the box.
As with all PE good planning is the key to obtaining a good result and you may find that you need to add some smaller parts later in the build, so as not to risk damaging them as you progress. It is worth mentioning that as this time Eduard is offering many discounts on their sets.
SUMMARY
Many modellers were overjoyed when it was announced that AFV Club was to produce a brand new model of the Centurion Tank. The first kit to be released is that of the Mk. 5/1 of the Royal Australian Armoured Corps and represents the vehicles that were used by Australian forces during their involvement in the Vietnam War.Eduard has produced a series of photo-etched products that are designed to refine further the already excellent model that can be built from the AFV Club kit.This set allows you to update many parts and fittings on the hull and the turret and will serve to add extra fine detail to those already provided in the basic kit.
Our Thanks to Eduard! This item was provided by them for the purpose of having it reviewed on this KitMaker Network site. If you would like your kit, book, or product reviewed, please contact us.
About John Murcutt (jlmurc) FROM: ENGLAND - EAST ANGLIA, UNITED KINGDOM
A modeller since about the age of five. A number of years in the Royal Armoured Corps working on both Chieftain and the CVR[T] series did not manage to dent my love of all things armoured. I do build some aircraft and other distractions but get pulled back to German Vehicles due to the variation i...


Comments