The Husky VMMD (vehicle-mounted mine detection) family of vehicles are blast-survivable, mission-configurable wheeled platforms employed around the world by specialized route clearance teams operating in high-explosive threat areas. Defined by their unique design characteristics of survivability, frangibility, and reparability, Husky vehicles enable personnel and payloads to safely operate in close proximity to sub-surface explosive hazards.
The US Army nomenclature for the Husky is the M1231. The Mk III is the modern single-occupant Husky model. The platform is integrated with pulse induction metal detector panels and overpass tires that enable operators to regulate tire air pressure in order to reduce the risk of initiating victim-operated, pressure-fused, anti-vehicle landmines without causing detonation. As with all Husky platforms, the Mk III has been engineered in a unique modular, frangible configuration. In the event of a mine or improvised explosive device detonation, vehicle components break apart in a predictable fashion, reducing damage to the platform and occupants, as well as facilitating fast in-field repairs using the systems RedPack, a towable asset comprising front and rear modules as well as a battle damage repair tool kit
Survivability: The sharp V-hull of the Husky dramatically reduces blast effect by increasing ground clearance and standoff from the blast, increasing structural hull rigidity, and diverting blast energy and fragmentation away from the platform and its occupants.
Frangibility: With three main components (a center cab with front and rear wheel modules) connected by sheering pins, the Husky is designed to break apart in a blast event, allowing energy to transfer to the detachable front and rear modules rather than transferring stress to the critical components of the vehicle or the occupants located in the cab.
Reparability: Critical components have been engineered to break apart in a predictable fashion, preventing catastrophic damage and enabling users to quickly replace modules on site. This approach increases the lifespan of the vehicle, maintains mission readiness, and limits the need for recovery teams to evacuate the vehicle to intermediate- or depot-level maintenance facilities.
The Model
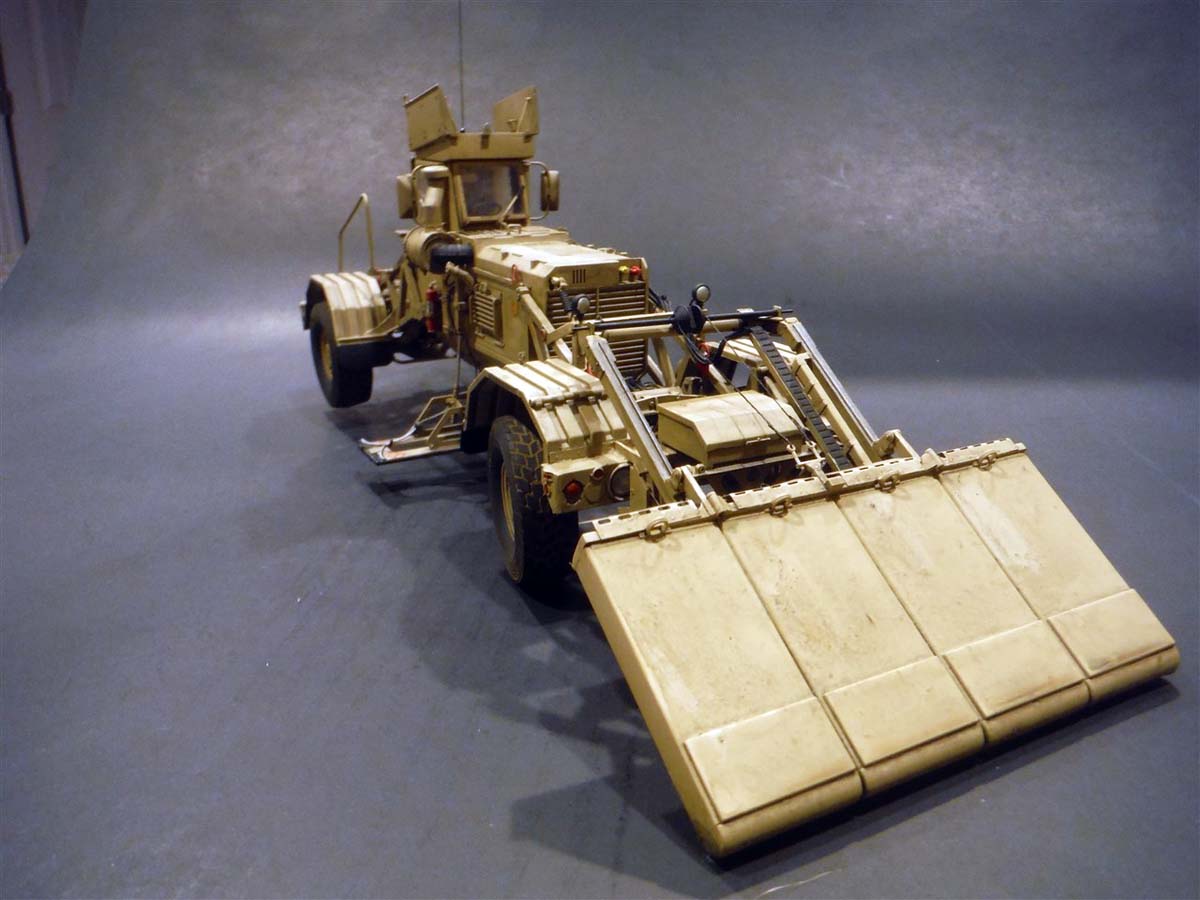
Panda Hobby has released its second version of the Husky Mk III. This kit is titled Husky Mk III VMMD with GPRS (Ground Penetrating Radar System), kit #PH35015. The only difference between this issue and the first issue is the addition of the front radar array, other than that it is the same exact kit.
The kit consists of 5 sprues in tan plastic, 1 clear sprue, 5 rubber wheels, 1 photo etch fret, and 1 sheet of decals. Paint call out and decal placement is on separate colored sheet. Not shown on the instruction parts lay out is a small amount of flexible wire/hose.
Different from this kit and kit #PH35014 is the addition of the front radar parts and different wheel frame parts that are on sprue E.
The Build
Starting with Step 1 and it is straight forward with no issues. The only thing I did was leave PE5 off until I attach the top of the main body, A24. Also, a small note, decide if you want to use part C37, the DUKE antenna. You can change it out for a regular SINCGAR radio antenna or nothing at all.
I skipped step 2, 3, and 4 because the radar panels will get cables added later and the tires can wait till the end. Once the two body halves are attached, I will come back to step 4 to add the cables and hoses for the hydraulic arms. So, I went ahead and jumped to step 5 and 6 to work on the front axle and frame.
I don't know what Panda used as reference for the steering gear box because it is totally incorrect, so I used AFV Club and reference pictures to scratch build new steering gear boxes. I also added missing nuts and bolts and the brake lines. Hoses that will go to the gear box will be added after the box is attached. I also scratched the steering arm that will be attached to the steering box by a rod. The steering knuckles are movable, but the tie rod is not, so I just carefully cut the tie rod off connection points and re-positioned the knuckles. At this time, you can add part E3 from step 10 and A16 from step 12 to add stability to the frame and something less fragile to hold on. After brake lines, hydraulic hoses, and electrical cables where added, I jumped to step 13, built just the frame of the Radar, and attached it to the front wheel frame.
Please forgive me if the underside is not 100% accurate. There is not too much as far as the underside of the Mk.III on the web. Brent Sauer has a nice walk around of the Mk.I on Prime Portal that I used on some very small bits. YouTube also provided some useful footage of the Radar. Robert Skipper came to my aid with his great walk around CDs/pictures.
Before receiving Robert's walk around pictures, I had already pretty much had the whole front axle frame completely built and waiting for hoses. I debated to go back and re-do the front axle, but decided it looked pretty close to the reference photos.
I turned my attention to the rear axle and frame unit. After receiving Robert Skipper's walk around photos, it turns out that Panda Models missed some very prominent parts. Two cross beams are missing, one going straight across and one going at a diagonal. Also missing is the steering gear box and tie rod and of course all the hoses. Upon examining more pictures, I found out that the shocks are positioned wrong. Instead of being located right above the axle per the instructions, they need to be moved more towards the back. The cross beam that is missing is the one that mounts the steering gear box. This was done with thin plastic stock. The tie rod will be added when I replace the shocks. On the real vehicle, the tie rod is locked in place since the rear is not used for steering. The brakes lines run from the wheels to under the rear most cross member before it goes into the cab area. The four hoses connect to brass fittings making them come out to just two hoses. There are only four hoses/cables connected to the rear bumper. Two are for the air brakes for towing trailers. One is for the trailer lights connector and the other is for the rear lights of the Husky.
On a vehicle that doesn't mount the Front Ground Penetrating Radar (GPR), the vehicle hoses run right under the cross members held in place by cable holders/brackets. On this vehicle, the vehicle hoses run under the whole frame and only the hoses connected to the bumper is held by a cable/hose bracket/holder. Everything else is "zip tied." Reason for this is because the box for the GPR and some other type of cover/box is mounted to the top of the frame. And all the cables to the GPR run directly under the top frame. All this GPR stuff that is supposed to go on the back of the vehicle is missing from the kit and needs to be scratched built. The spare tire will be omitted since there will be no room for it, but instead, nuts will be added to the top of the spare tire bracket. Somehow, I lost part C42. This is where the safety chains attach to when something is being towed. I replaced it with some plastic stock.
I scratched built the frame and cover that you see on the back of the Husky located right above the control box for the GPR. I also built the GPR control box that is located right below the frame and cover. Cables will be added to the control box once the front GPR is added.
Once the front and rear axle frames where complete, I turned my attention to the driver's compartment. The drivers compartment in both the AFV Club and the Panda Hobby kit are simplified according to pictures, more so the Panda Hobby kit. If you close up the driver's compartment, then there is no need to worry about it. But with such a big opening when you leave the hatch open, a lot of stuff that is missing can be seen.
First, I started with removing the left and right side of the seat of part A5. This is to accommodate the stuff that is missing behind the seat.
Next was to fix the rim around the hatch. In reference photos, the rim is higher than what the kit shows. I removed the hinge detail on the left and right side of the hatch. This will be added back later when I attach the hatch doors. I used 1mm x 1mm square plastic for this and it added the right amount of height.
Next was to fix the AC unit. It is too short, so I extended it by 10.5mm. I also added the access cover and bolt heads. The grab handles and AC piping was added after.
Now for some more missing items. To the right of the driver's seat seems to be AC conduits. I used laminated plastic card and round tubing to simulate this. Behind the seat looks to be like the air reservoirs for the tire inflation system. Round tubing, lead wire, and slice hex rod was used to detail out the canister. To the left of the driver's seat are some cables, hoses, and the piping for the canisters. Again, plastic rod and lead wire was used for this.
****NOTE: Installing the brake and gas pedal is missing from the instructions. Those are parts C41 and B34. According the reference pictures, the gas pedal is right next to the brake pedal. there are two connections points located on the floor of the driver's tub, disregard those. ****
Also, at this time, I added missing cables to the left and right side of the driver's compartment.
Right under the AC unit is an interior light unit and the control box for the tire inflation system. I had a spare light unit from an Academy M113 kit.
There are some components missing around the steering wheel/shaft. Some push buttons and toggles are missing from the front of the instrument cluster. To the left of the steering shaft is missing the connection box for the halon system. Cables where added using lead wire.
****NOTE: Also missing from the instructions is the installation of the instrument cluster that is located on the right front corner of the interior. This is part A18. ****
Last was the missing Halon bottle. I used a spare fire extinguisher bottle that I had in my spares box.
****NOTE: There is no decal provided for the "DO NOT STEP" located on top of the AC unit. I used Woodland Scenics red dry transfer letters for this. Also, there is no decal call out location for the instrument clusters. I used decal 19, 28 and 23 for the instruments next to the drive shaft and decals 24, 25, 26, 27, and 29 for part A18.
In step 1 I decided to go with a radio antenna instead of the DUKE antenna that the instructions call out, so a radio needs to be installed. With a radio antenna, you need a radio. I some of the real vehicles, a SINCGARS VRCU (Vehicle Remote Control Unit) is installed under the AC unit next to the tire inflation control box. In other vehicles, ASSIP radio is just sitting next to the driver with an antenna cable routed back to the antenna. I didnt have an ASSIP, so I just used a regular SINCGAR radio.
The interior had to be completed and painted before I can attach the upper hull to the lower hull. Along with painting, I added some small personal items like a MAXIM magazine, water bottle, and MRE.
Once the interior was dry, I glued the lower and upper hull together. I added all the remaining exterior parts to include the glass which was masked with Tamiya tape. I did leave off the window wiper, two hatches, and the two small GPR panels. I drilled all the holes for all the hoses to the front and rear of the vehicle. I also drilled the holes for the hydraulic hoses for the lifting arms for the small GPR panels. Next was to scratch build the area next to the left window where the small GPR panel cables run in to. I also added all the bolt connection points for the slat armor and some missing nuts and bolts.
Next was to wire up the small GPR panels. Each panel has three cables running to them. They are VELCROed and zip tied to the panels. After complete, I added the panels to the main hull and routed the cables to the rear next to the left window. Really thin ship rigging was used for the zip ties. Hydraulic lines were also added to the hydraulic arms.
Other small missing items where added. The engine cover was missing 3 latches. I had some photo etch tool latches that looked pretty close, so I used them. I also added the locking brackets to the back and front of the hatch access.
The front GPR was assembled per instructions with the exception of using part E27 instead of the photo etch part PE12. I also added the 4 cables that run all the way to the back.
Painting was done in 4 sub assembles, the front and rear axle frames, main hull, and front GPR. A primer coat of Tamiya Flat Brown was sprayed to all 4 assemblies. Then my mixture of Tamiya Desert Yellow and Flat White was sprayed all over for the desert sand color. Everything was gloss coated with Future for application of the decals. Once decals where dry, I assembled all 4 sub-assemblies together to make one complete vehicle. Thin ship rigging was used for the pully system to the front GPR and the cables routed to the back and connected to the control box. Touch up painting was done where needed and the entire completed vehicle was sprayed where clear flat to prepare for washes and pigments. Vallejo washes and pigments were used lightly to simulate a not so dirty vehicle.
Conclusion
Even though some of you all complain about the inaccuracies of Panda Hobby models, I still find them challenging. Correcting mistakes or added missing items is one of the things I love about modeling, and Panda Hobby kits provide this. Yes, the two Husky kits have major problems with missing items, but the person with good scratch building skills would find this kit to be fun to work on. O the other side. If your one who doesnt care about inaccuracies, then this kit could be built into a good-looking Husky Mk III.
Lastly, I want to thank Jim and Darren for the sample kit to do this build/review article. I would also like to thank Robert Skipper (18Bravo) for the great walk around pictures. His walk around has a wealth of info, so contact him to see what vehicles he has and how much the sets cost.
SUMMARY
Epifanio Becerra Reviews and builds the Husky Mk III VMMD from Panda in 1/35th scale. He also guides you through correcting the issues found to lift the model.
Our Thanks to Panda Hobby ! This item was provided by them for the purpose of having it reviewed on this KitMaker Network site. If you would like your kit, book, or product reviewed, please contact us.
About Pete Becerra (Epi) FROM: TEXAS, UNITED STATES
I am 48 years of age. I have been modeling since I was around 8 years old. As you can see from my signature, I am retired from the US Army and Texas Army National Guard. I served 6 years in active duty from 1989 to 1995 and in 1998 I joined the Texas Army National Guard and been serving up unt...


.jpg)
.jpg)
.jpg)
.jpg)
.jpg)
.jpg)
.jpg)
.jpg)
.jpg)
.jpg)
.jpg)
.jpg)
.jpg)
.jpg)
.jpg)
.jpg)
.jpg)
.jpg)
.jpg)
.jpg)
.jpg)
.jpg)
.jpg)
.jpg)
.jpg)
.jpg)
.jpg)
.jpg)
.jpg)
.jpg)

.jpg)
.jpg)
.jpg)
.jpg)
.jpg)
.jpg)
.jpg)
.jpg)
.jpg)
.jpg)
.jpg)
.jpg)
.jpg)
.jpg)
.jpg)
.jpg)
.jpg)
.jpg)
.jpg)
.jpg)
.jpg)
.jpg)
.jpg)
.jpg)
.jpg)
.jpg)
.jpg)
.jpg)
.jpg)
.jpg)
.jpg)
.jpg)
.jpg)
.jpg)
.jpg)
.jpg)
.jpg)
.jpg)
.jpg)
.jpg)
.jpg)
.jpg)
.jpg)
.jpg)
.jpg)
.jpg)
.jpg)
.jpg)
.jpg)
.jpg)
.jpg)
.jpg)
.jpg)
.jpg)
.jpg)
.jpg)
.jpg)
.jpg)
.jpg)
.jpg)
.jpg)
.jpg)
.jpg)
.jpg)
.jpg)
.jpg)
.jpg)
.jpg)
.jpg)
.jpg)
.jpg)
.jpg)
.jpg)
.jpg)
.jpg)
.jpg)
.jpg)
.jpg)
.jpg)
.jpg)
.jpg)
.jpg)
.jpg)
.jpg)
.jpg)
.jpg)
.jpg)
.jpg)
.jpg)
.jpg)
.jpg)
.jpg)
.jpg)
.jpg)
.jpg)
.jpg)
Comments