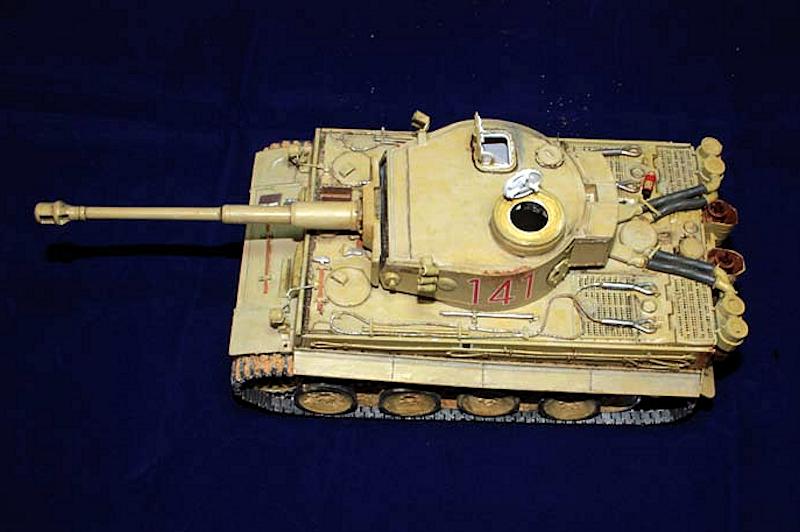
The Tiger 1 was a heavy German tank of World War II deployed from 1942 in Africa and Europe in heavy tank battalions. Its final designation was Panzerkampfwagen VI Tiger Ausf.E. But was shortened to Tiger. The Tiger I gave the Wehrmacht its first armoured fighting vehicle that mounted the KwK 36 88mm gun. Only 1,347 were built between August 1942 and August 1944, when Production was phased out in favour of the Tiger II.
In the North African theatre, the Tiger first saw action during the Tunisia campaign on 1 December 1942, east of Teboura.
Contents
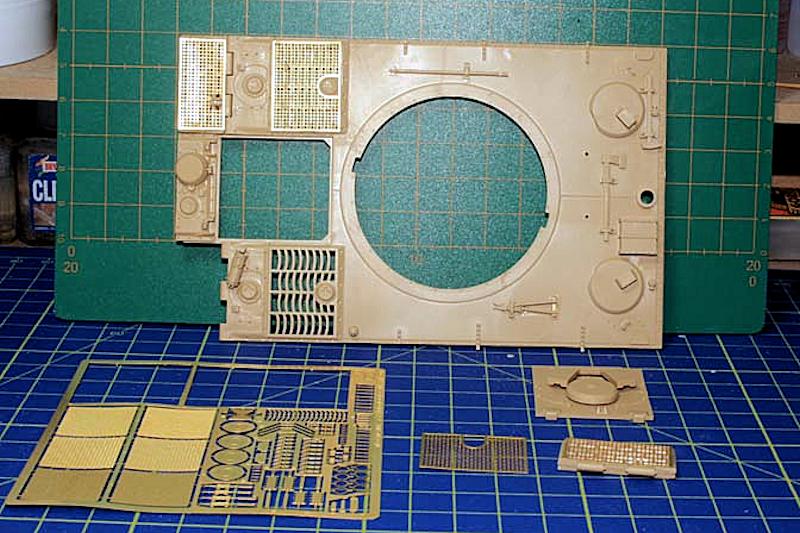
The first thing you will notice when you open the box is the amount of plastic that you get, it really is full to the brim:
19 different sprues moulded in sandy colour.
1 Clear sprue
1 Clear box containing dark grey moulded individual track links
3 Dark grey moulded sprues containing track pins and extra tracks
1 Decal sheet
1 Sheet of etch
1 Piece of string
1 Instruction book
Review
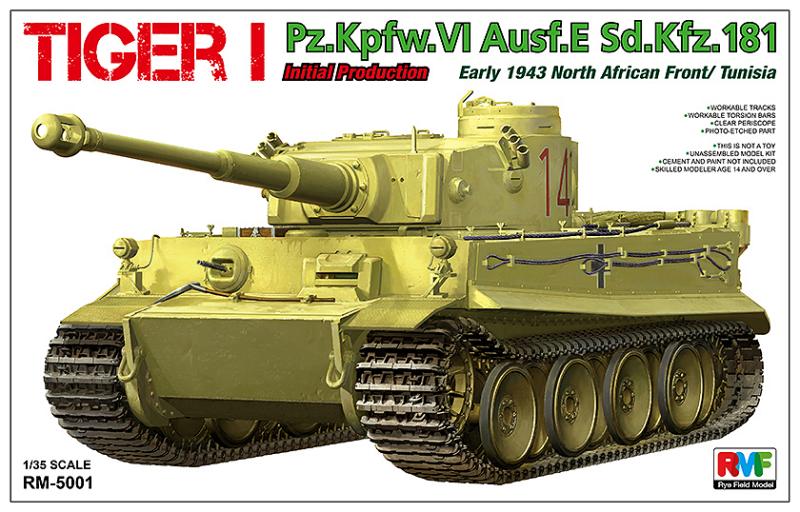
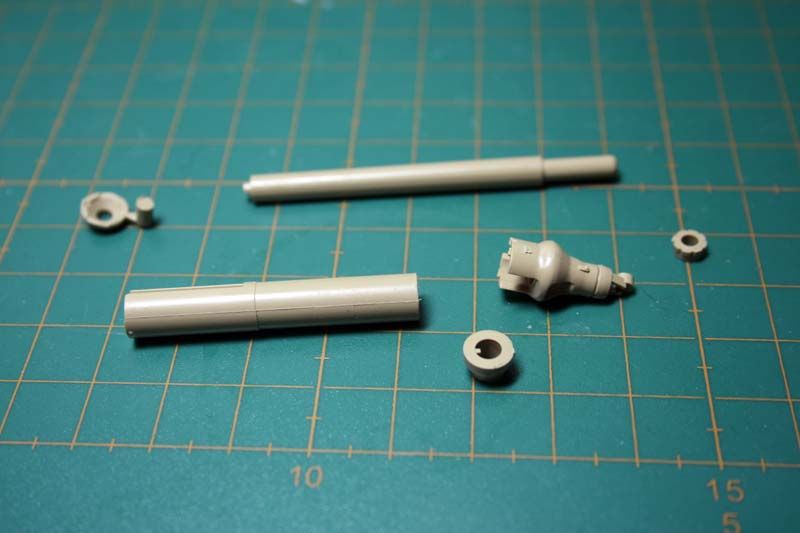
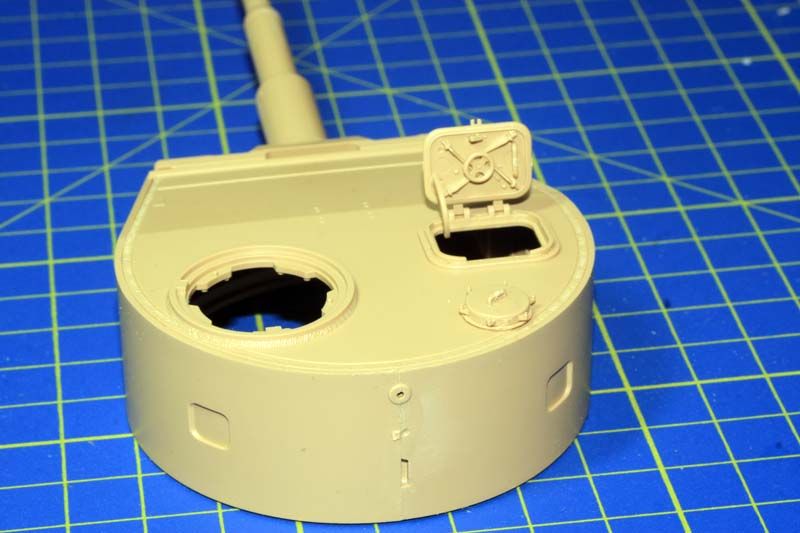
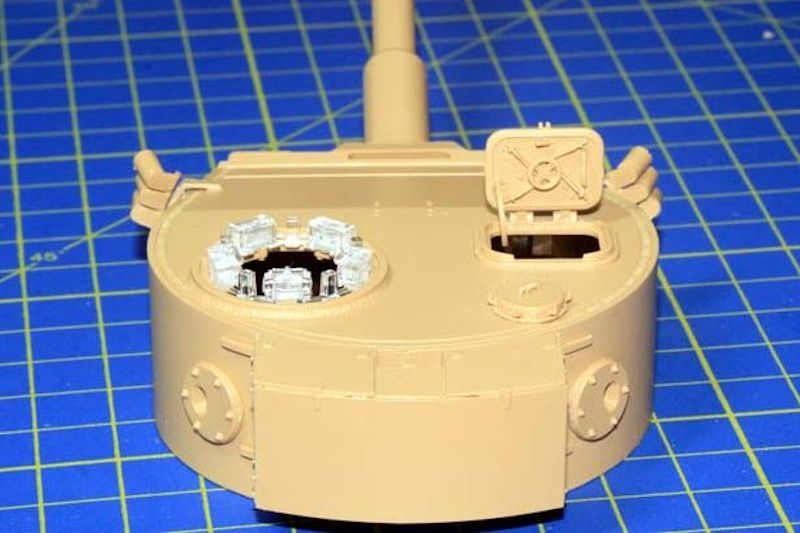
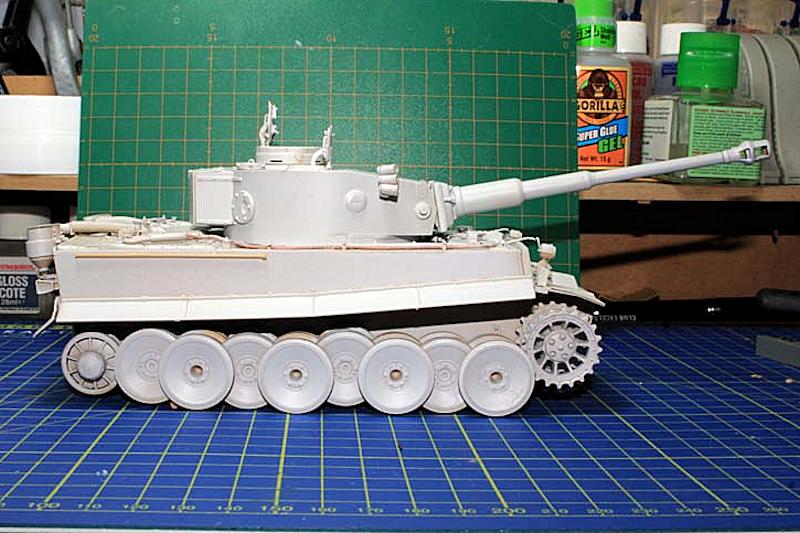
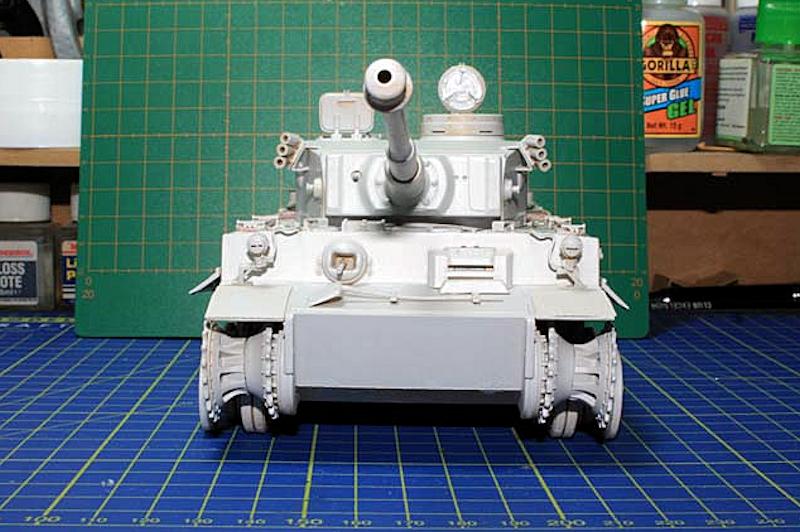
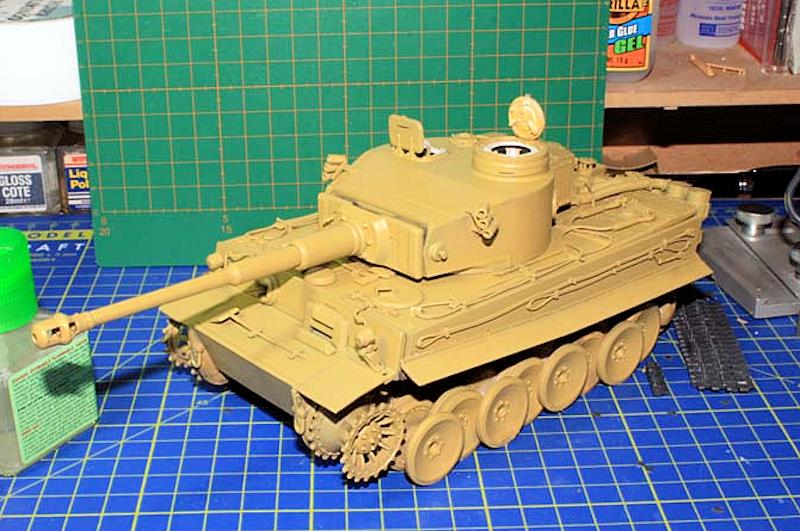
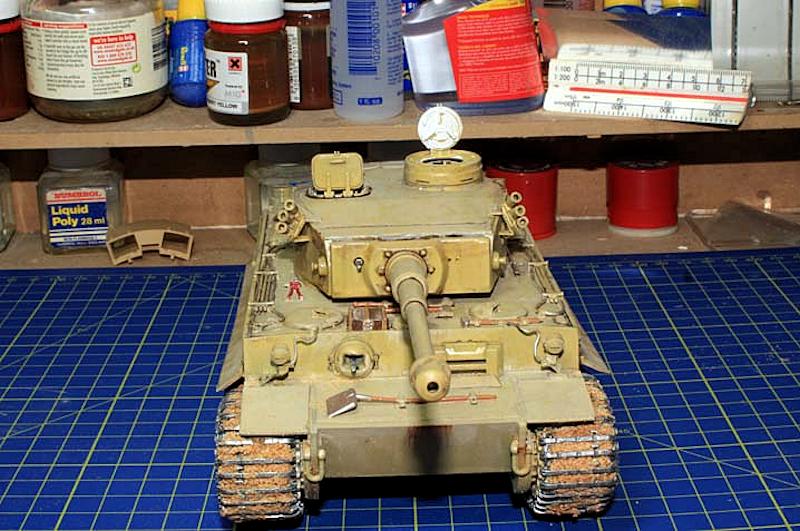
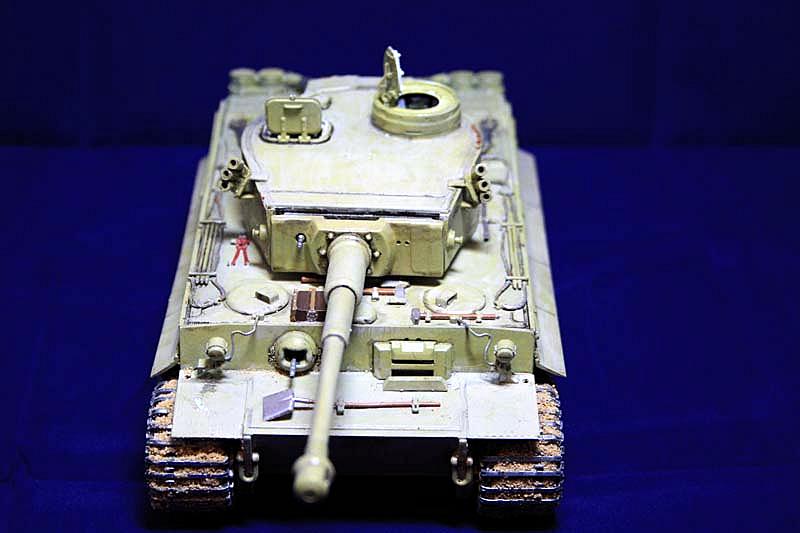
Stage one of the build centres around the barrel; having cut the pieces required from the sprue there are some small seam lines that just need cleaning up before you can start to put it all together. The fit on the barrel is good with all parts going together without any problems and fitting onto the hull pieces with ease. At this point you are given three different options for the barrel, fitting into the turret insertion plate I chose the first plate, at this point I came across the first instructional era. The internal mounted machine gun is meant to be put into the turret build from the inside, however this is wrong and you are better manipulating the front panel to allow it to fit in, as it then fits perfectly into its position with the machine gun being clearly visible.
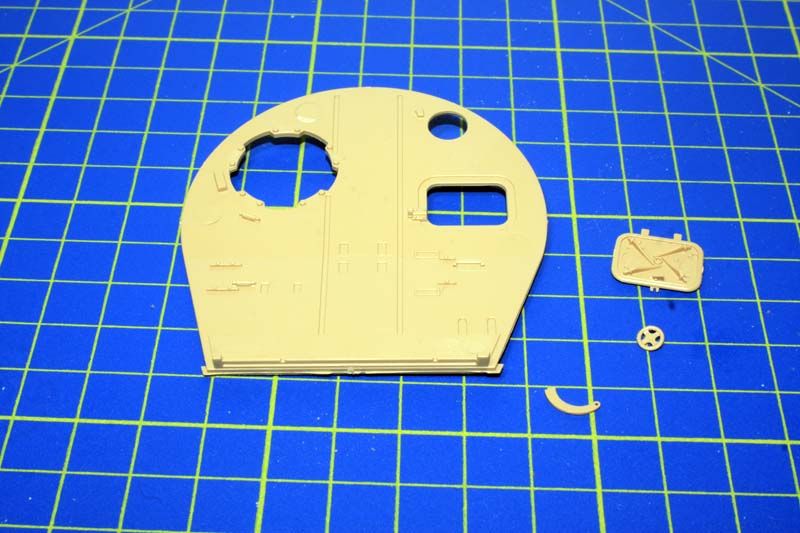
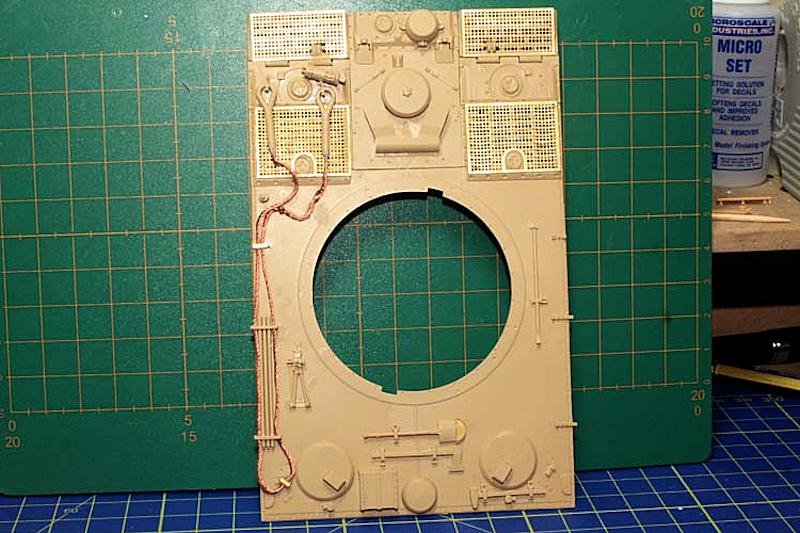
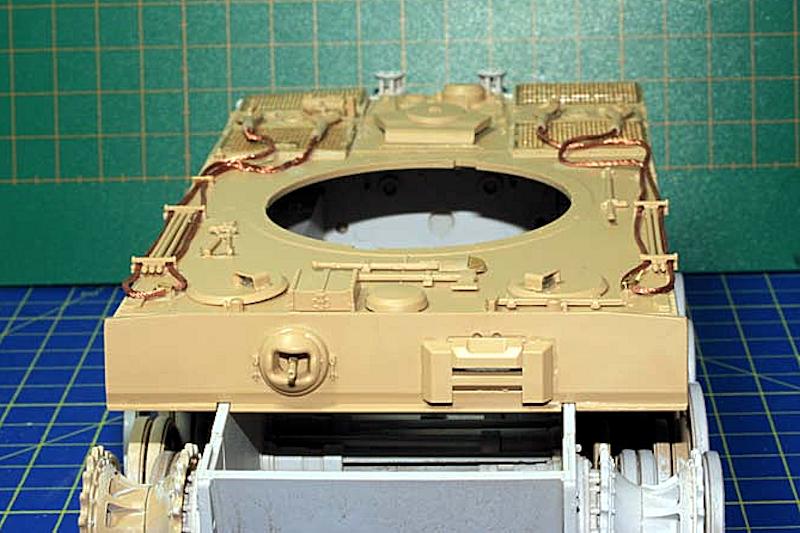
Stage two of the build, you have the choice of having your hatches open or closed; I opted for open for the little dio I have in mind, so then you get to put some stunning detail on the inside of the hatch which includes a closing wheel and handles in a closed position, otherwise you would not see these. Then you place the top of the hull onto the turret. I have to say so far so good with only very minimal fit issues that you may find in any kit now and then.
Stage three, and this is where I hit my first minor problem on the instruction sheet, page 4 instruction 3 in one of the windows refers to parts on A sprue when in fact they are on B sprue - sent me a bit around the bend as I searched A several times before checking other sprues.
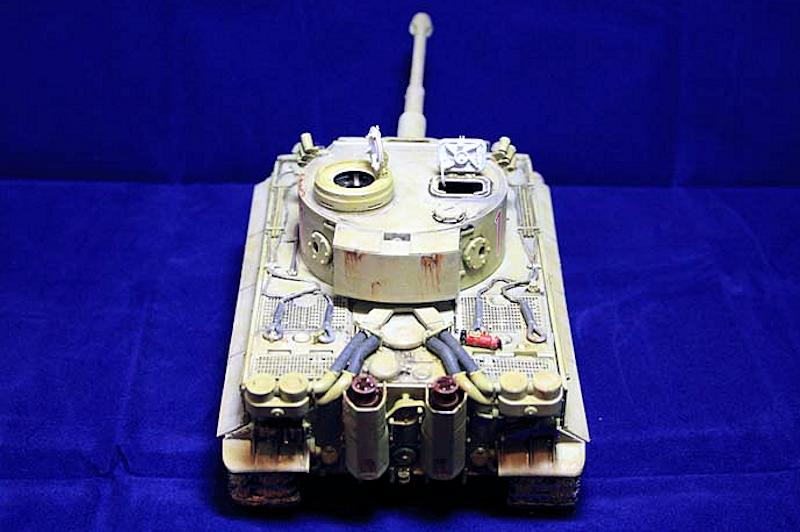
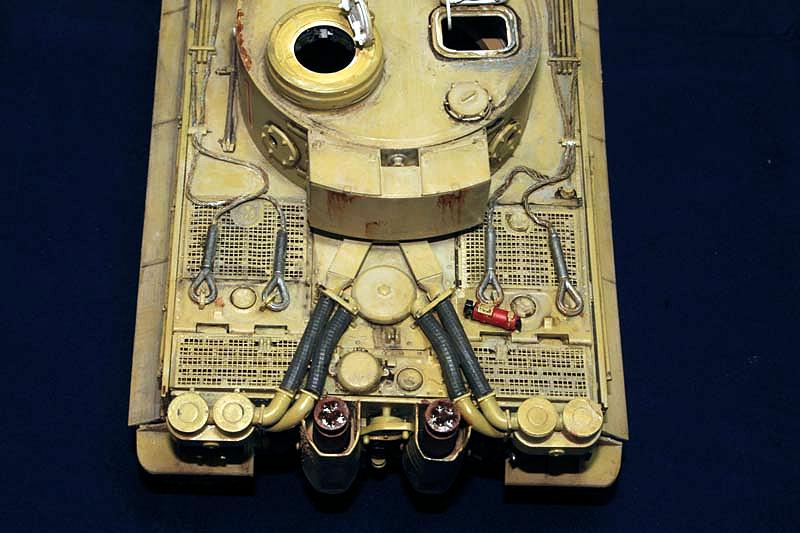
After adding the rest of the hatches and detail to the turret you get to work with the clear sprue for the glass periscopes around the top of the commanders hatch. The detail on the clear parts is very good, although I found the plastic to be quite brittle and noticed that the main part had already broken. I carefully removed it from the sprue and used Micro Kristal Klear to stick it back together. I never fitted this to the tank at this time, leaving the whole commanders hatch; the reason for this was to prime the turret so that I can then paint the interior. There are so many small parts to the clear part with some having to be painted and some left clear that, I decided not to prime this but to apply several thin layers of paint rather than mask it off as it was so small and fragile.
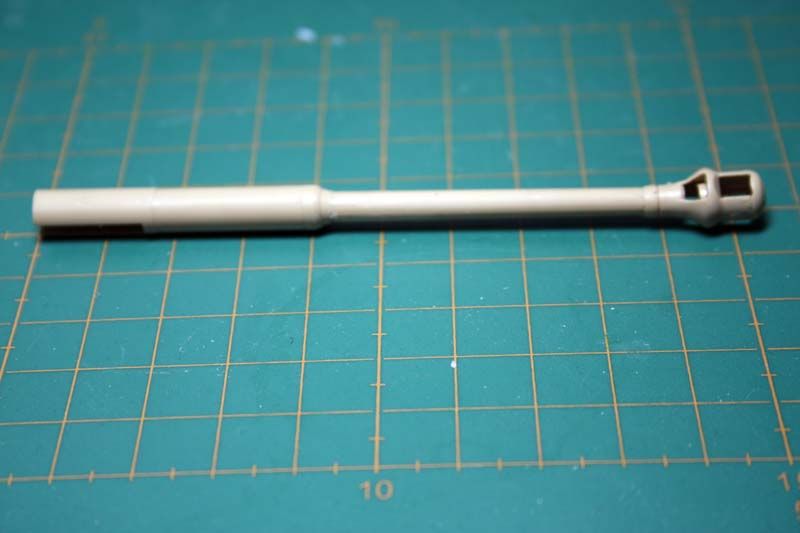
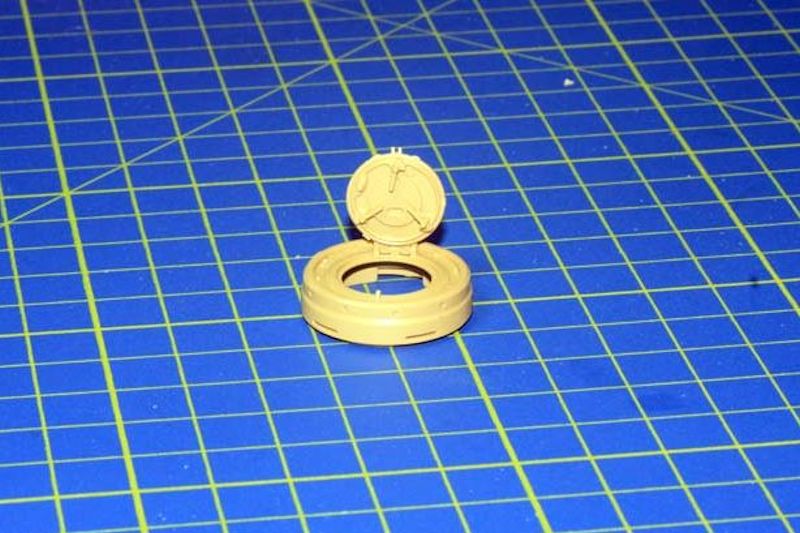
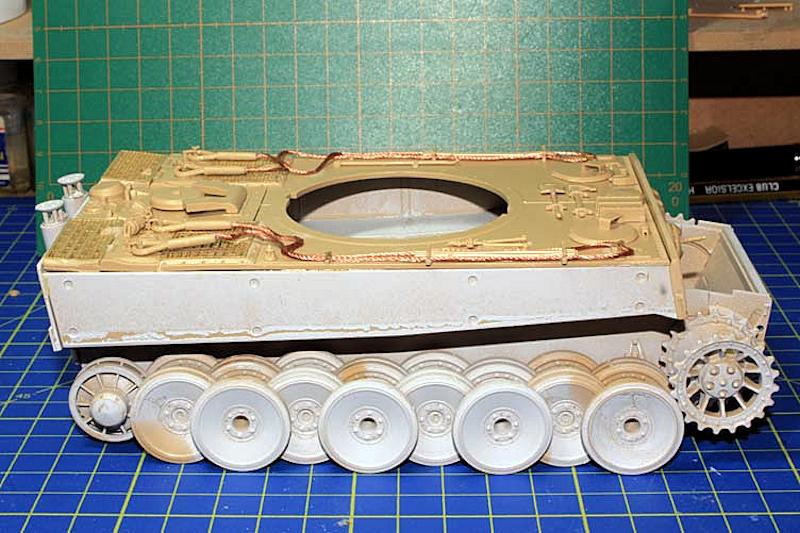
Stage four was a very simple stage, fitting the bottom of the turret thus allowing it to turn on the hull, then on to the last part of the turret which was the fitting of the stowage boxes to the rear of the turret.
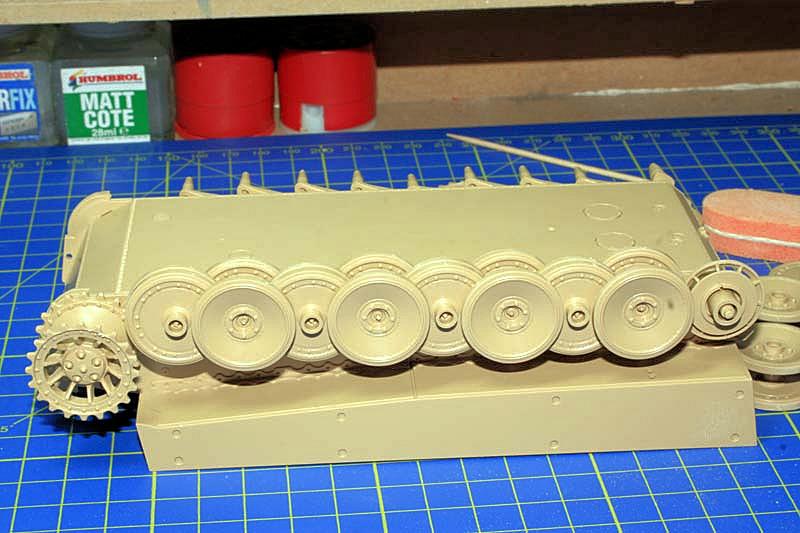
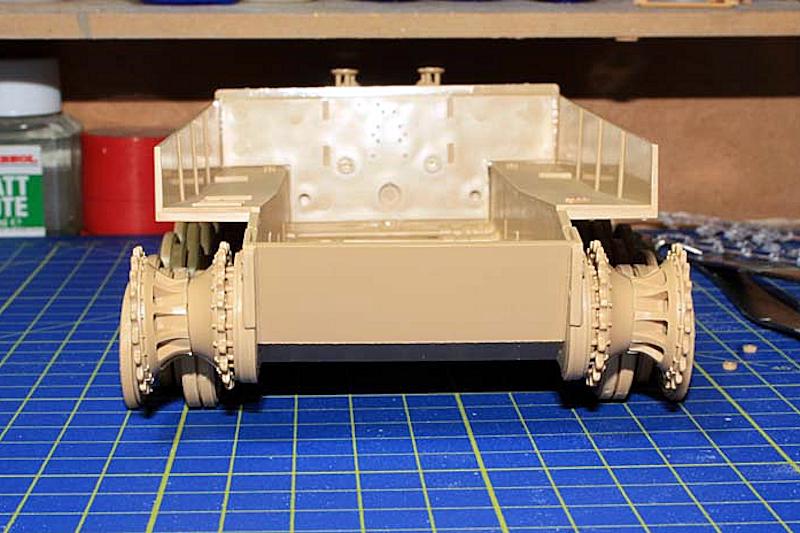
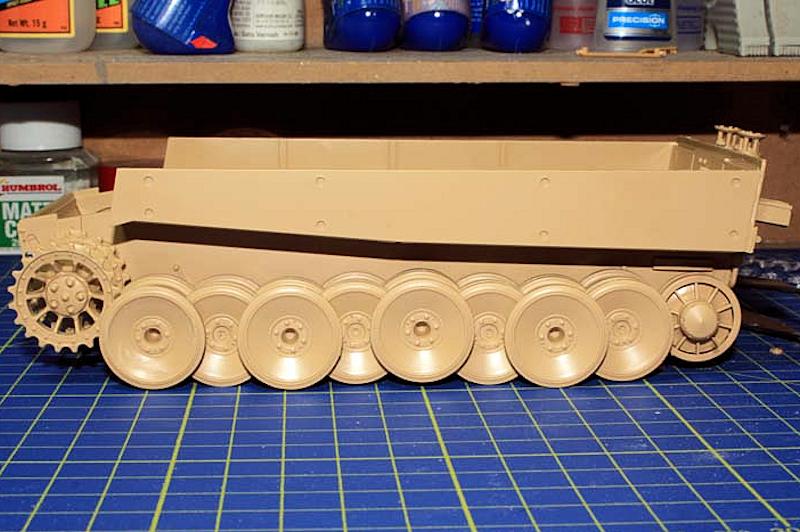
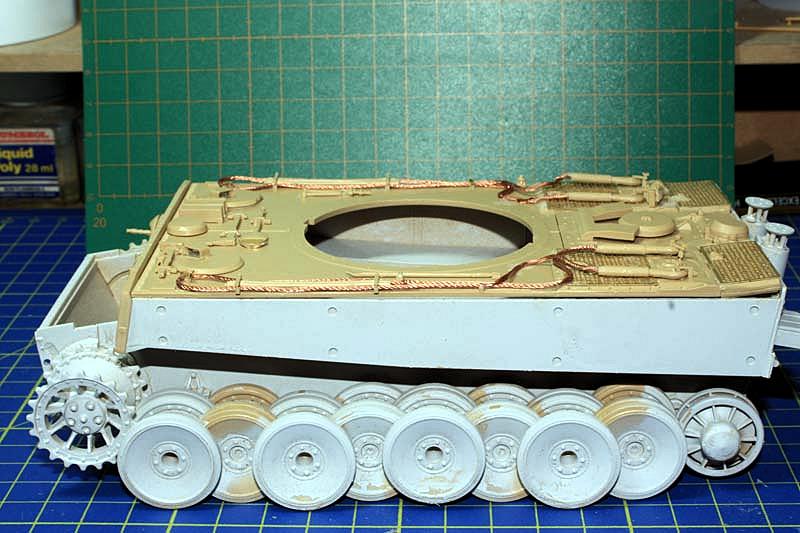
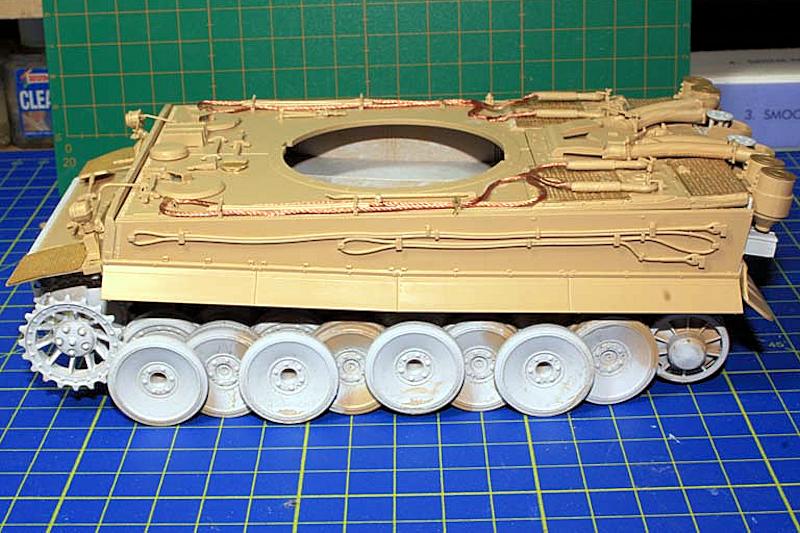
Stage five. You now start on the bottom of the hull, placing the torsion bars into the hole: twist and push, this way you have some movement on them, the rear guide wheels are placed on an already moving bar allowing you to get movement on the tracks for taut or slack tracks.
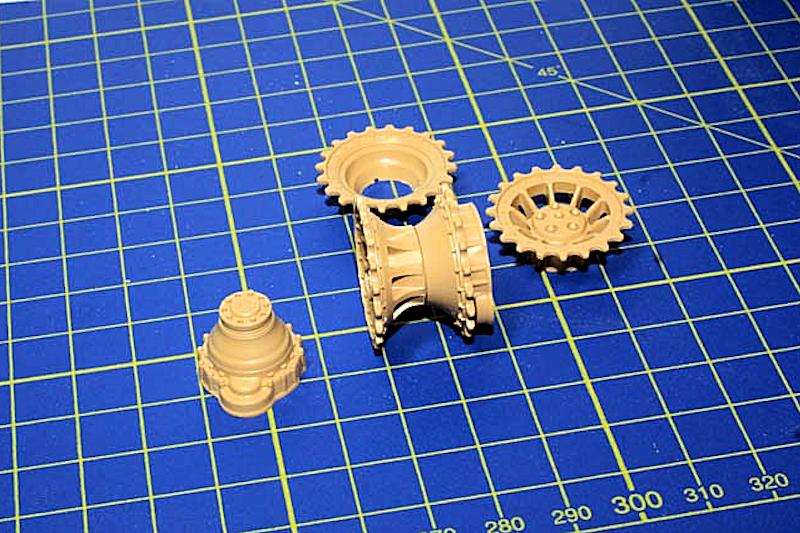
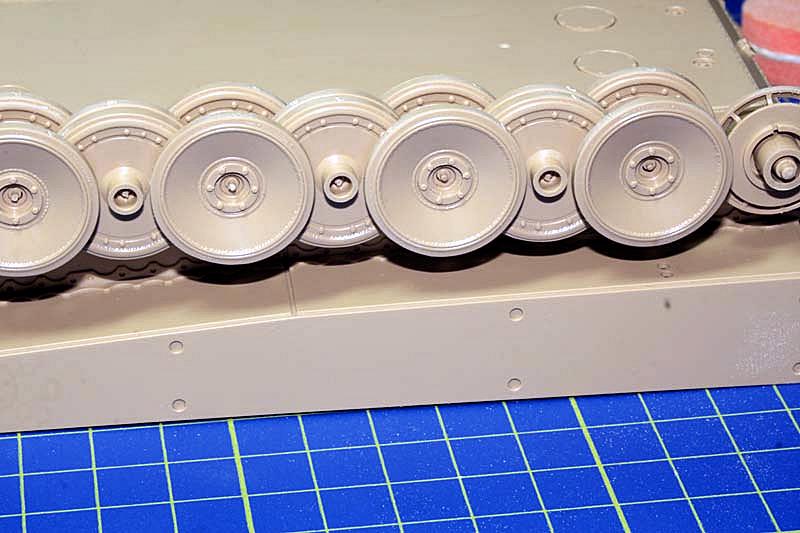
Stage six. The drive wheels are in five pieces, the panel with the drive shaft that fits onto the front of the hull, there is a small locking circle of plastic which allows you to turn the drive wheels. The detail on the drive wheels and the different parts to it are really quite amazing and I have to say slightly different to any of the other Tiger tanks that I have built in the past. The next little mistake to the instructions follows on the rest of the wheels: it tells you to put the wheels together and then place them on the torsion bar. Anyone new to building tanks will quickly learn that it will be very difficult to then put the wheels onto the tank as some of them fit in between each other. I build the wheels and place the singular rear wheels on first, putting them on every other torsion bar thus leaving enough space to then place the double wheels and then the front singular ones making sure you have no fit issues.
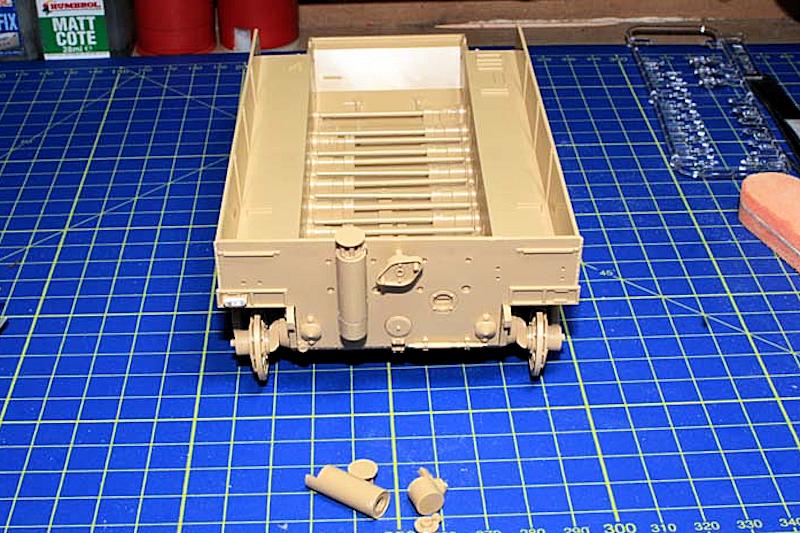
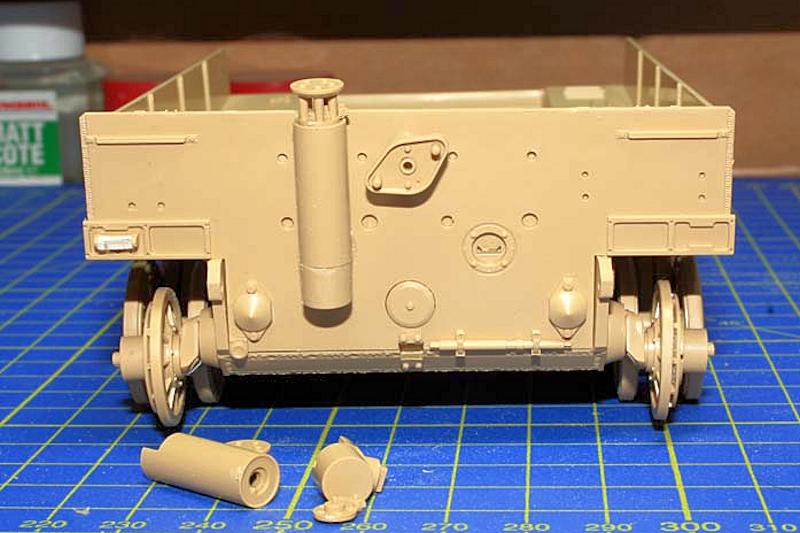
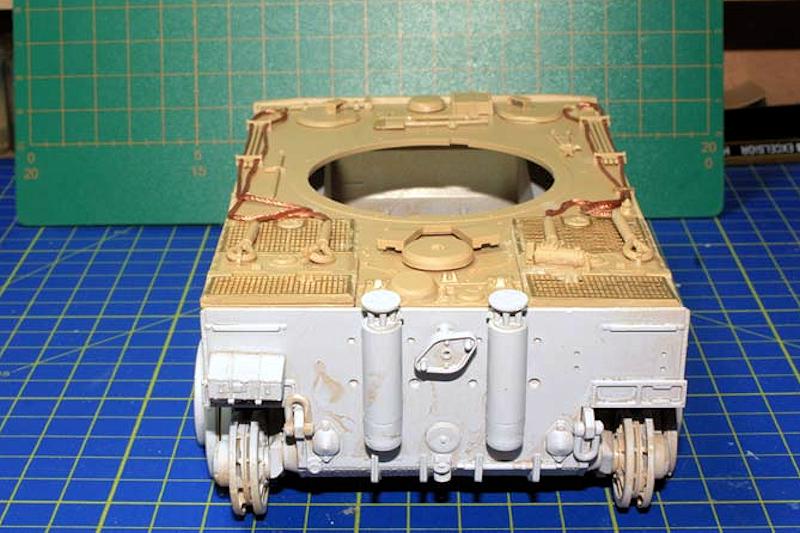
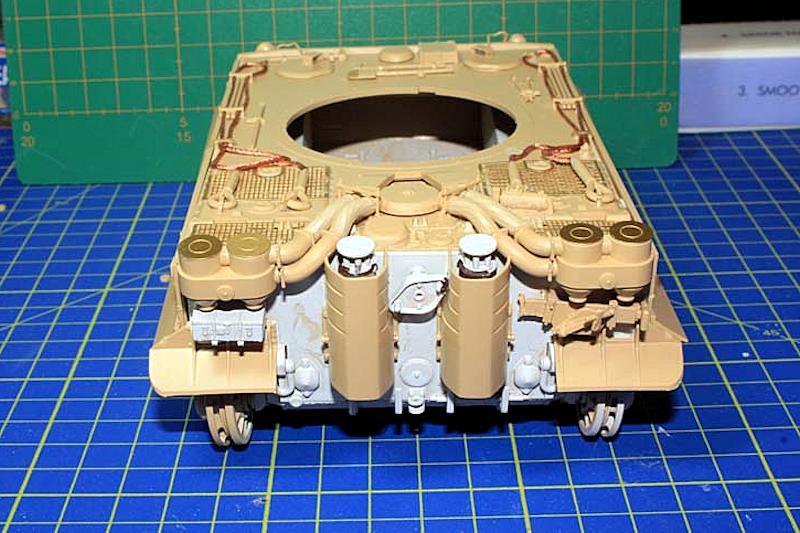
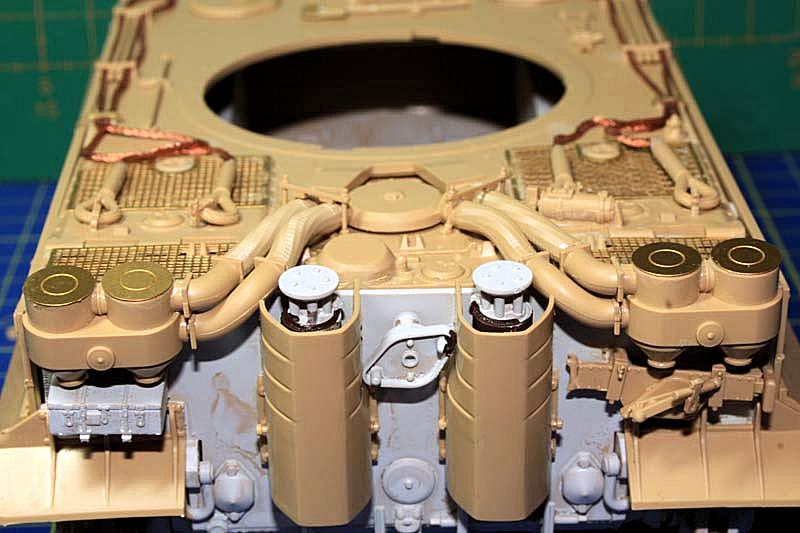
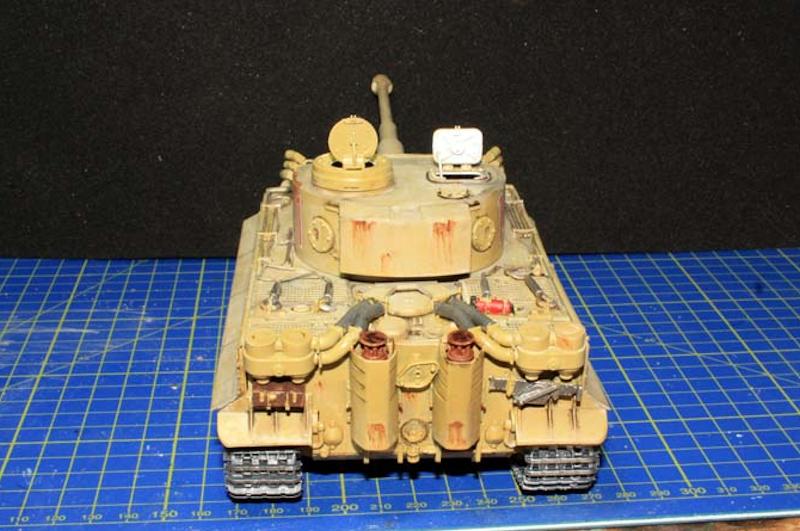
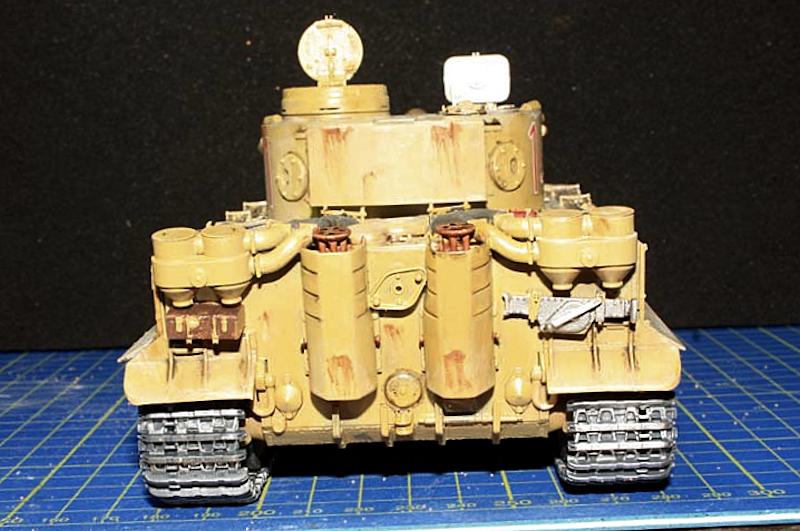
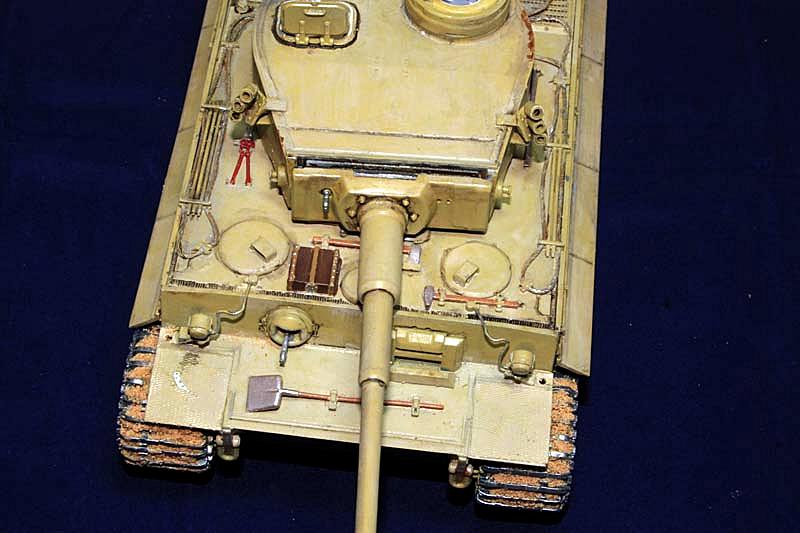
The back panel is the last part of the build, and again the detail is really very good even straight out of the box. The amount of parts just in the exhausts is amazing and the build is very easy, real minor parts of rubbing down, and filling is nearly non-existent. The fit of the rear panel to the main hull was without issue, some more detail is added, including tool storage and clear parts all of which is very good.
Stage seven is the fitting of the exhaust guards towing hook, another box and two large hitching points, four brackets on the bottom of the back panel, then sixteen circular plastic wheel stops.
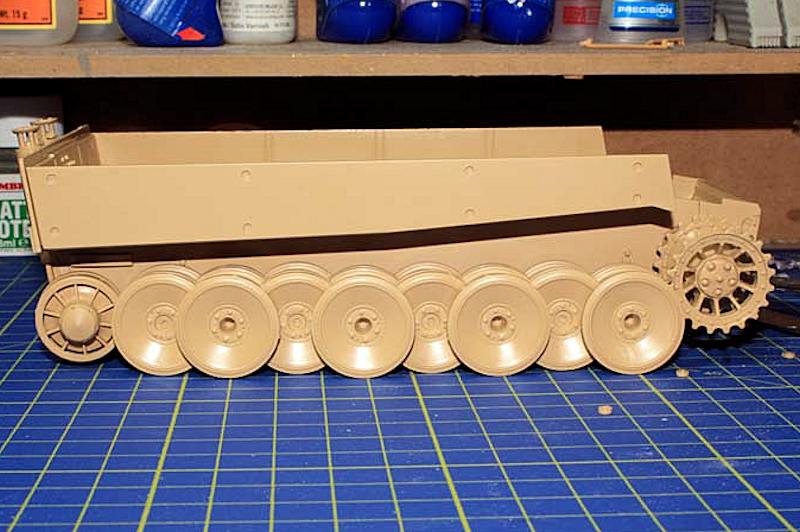
Stage eight is the fitting of the last wheels side panels, mud guards on the back, road tires on the front wheels, and jack, all of which is in real nice detail.
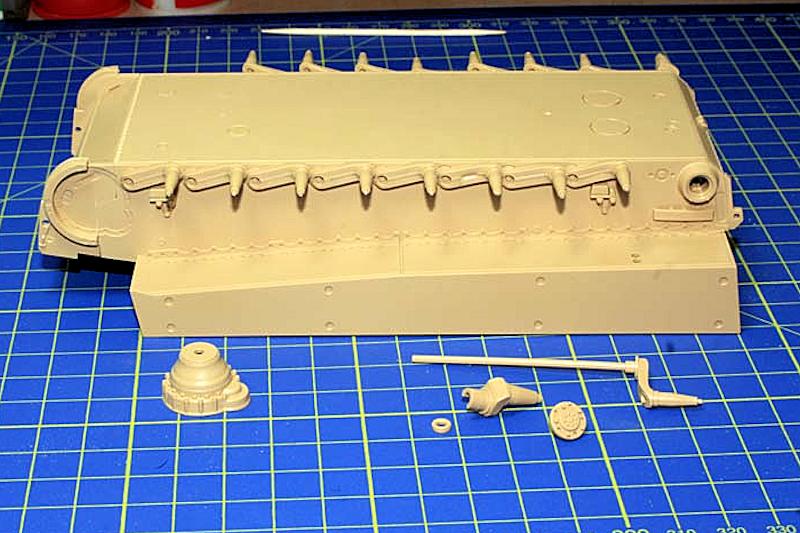
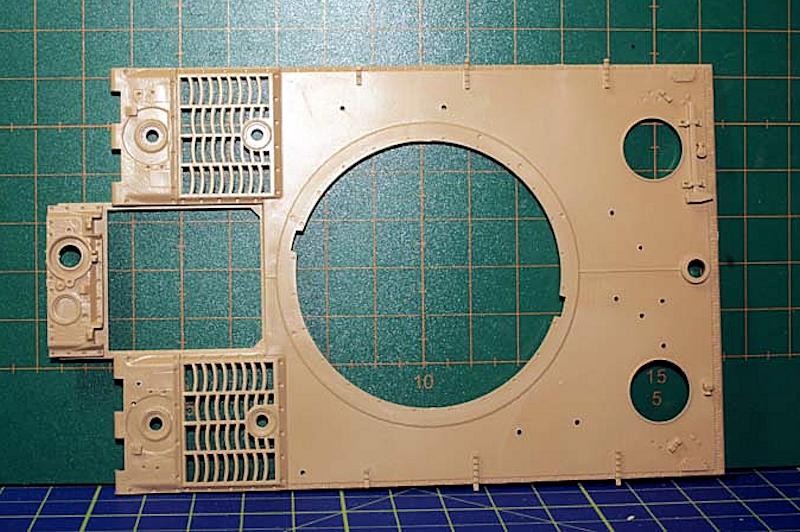
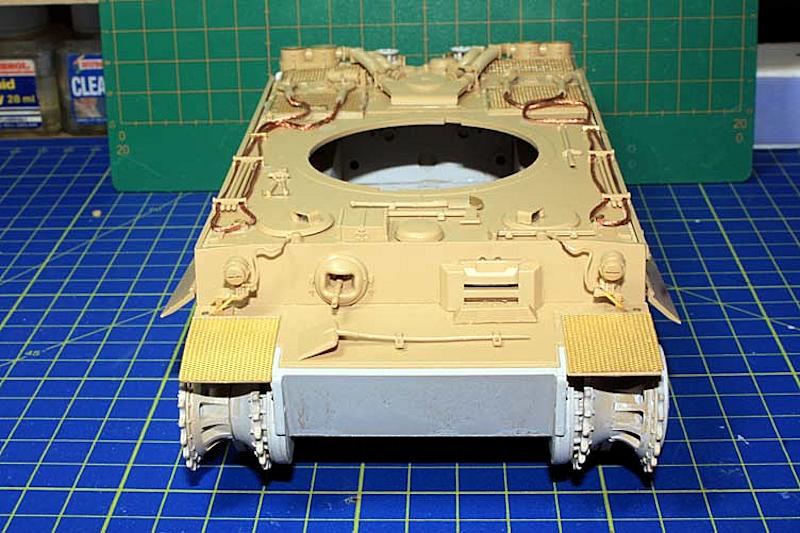
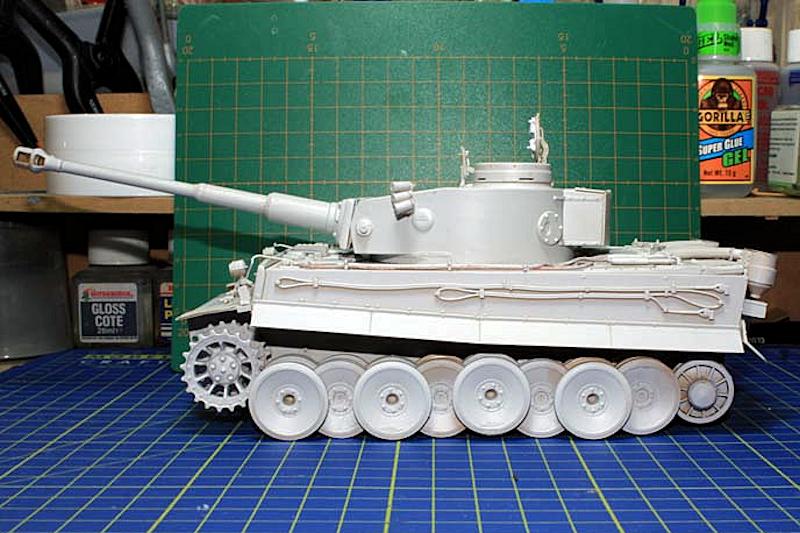
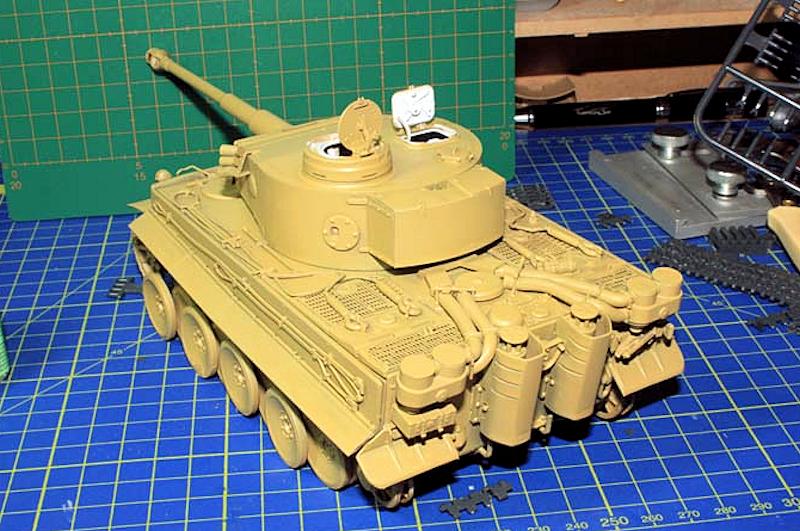
Stage Nine is the painting of the tools and the use of etch to hold them in place on the top hull of the tank. I decided to use some of the moulded plastic which was not that much larger than the etch. The top of the hull I have to say has a lot of detail, from the welded seams to the engine covers, it is all very good. At this point of the build you have to drill out a number of holes for the different attached parts, this is not as difficult as it first appears if you turn the top of the hull over there are some predrilled holes that just need finishing. This is where you get to use the first large parts of the etch sheet. I personally found this to be much thinner than other etch that I have worked with recently, although it was also easier to work with. On the down side some of the moulded tools, in particular the cutters, are very fine and broke several times when trying to separate them from the sprue, some of the moulded plastic in these tools was very bendy and fragile. The engine grille etch covers were then fixed in place, giving a much better finish than the moulded ones and the fit is very good.
Once the predrilled holes are finished you then start to put some stowage and tools onto the top of it; as I have already said some parts are very fragile but detail on them is very good. You then have to make a decision on whether you want the drivers hatch open or closed - I chose closed for this build, still, even closed, there is a lot of detail on the hatches.
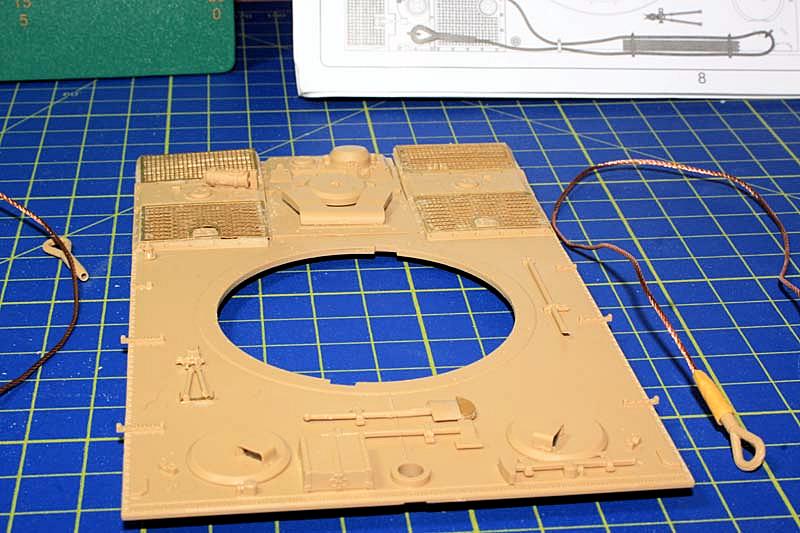
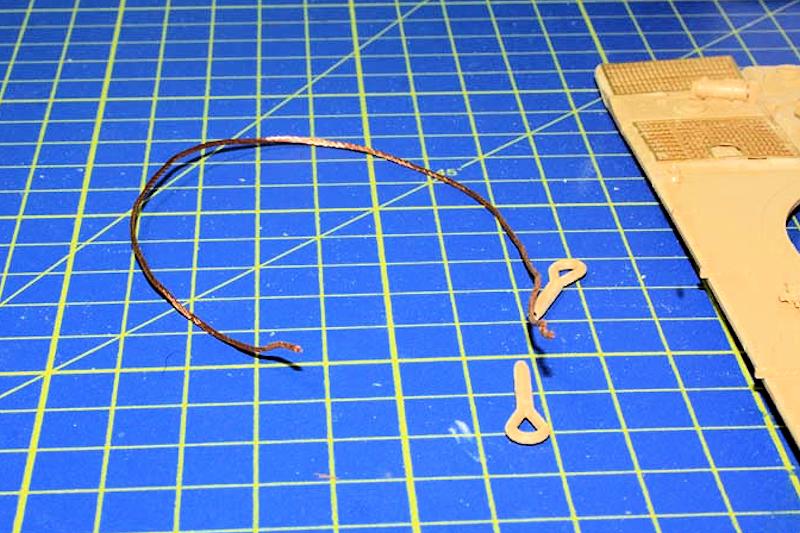
Stage ten begins with the wire which you have to cut into two 20cm pieces; all of the detail on this is of high quality and you also have the choice of using etch or leaving it to the moulded plastic. I did use both in the end, just trying to get some extra detail from it. Some further etch was then placed on the opening engine covers and further etch was used on the spade for holding the spade end onto the tank with minute rivets.
Stage eleven: the front panel of the main hull, some details for around the machine gun and drivers view enhancing the overall detail. The front panel is then glued in place and the top of the hull placed into position, sitting just on top of the front panel and on the edge of the tanks side panels. Slightly misleading again with the instructions is the fact the picture shows it being placed on the inside of the side panels - unless you want to rebuild your tank again please just rest it on the top. The last part of stage eleven is the fixing of the two fixing / towing points to the front of the lower hull.
Stage twelve is the front lower hull section which includes putting the shovel into its mounting and two photo etch non slip mud guards which fit with ease, and can be bent to any shape to show any damage.
Stage thirteen is the fitting of the air filters and some pipe work on and around the exhausts and air cleaning system. The quality in the moulded plastic pipes is quite possibly the best I have ever seen; there is four pieces of etch to fit onto the feifel air cleaners.
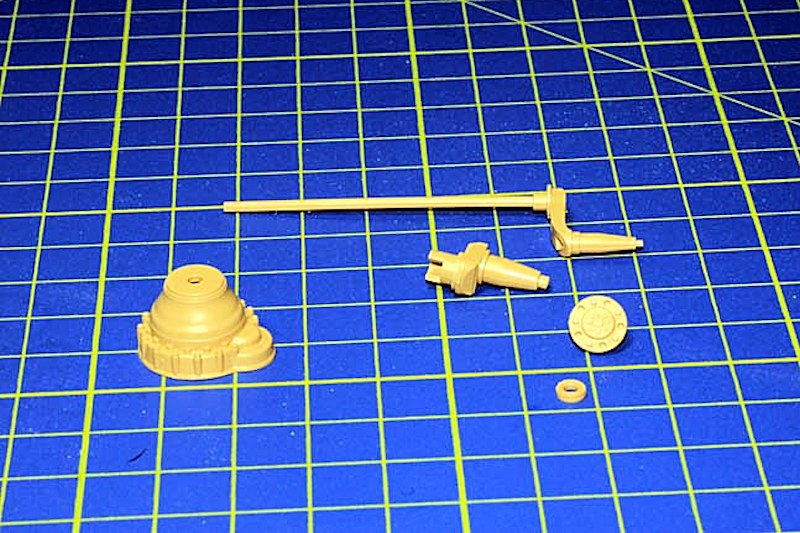
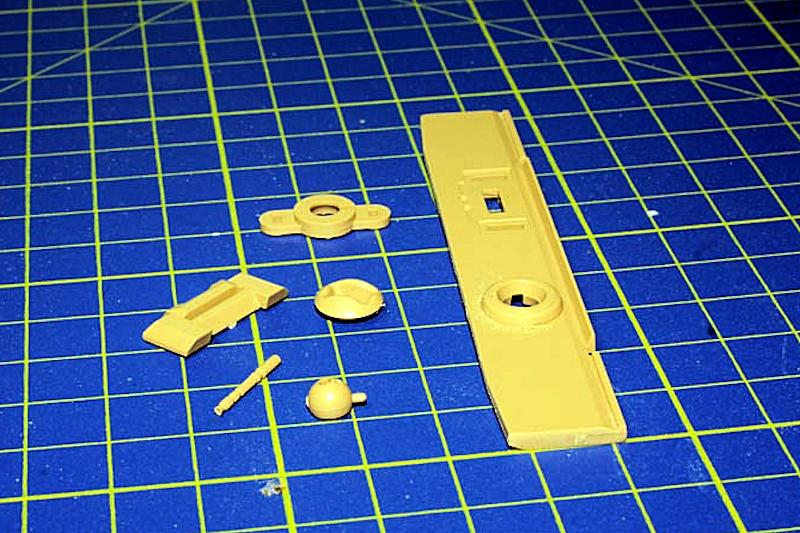
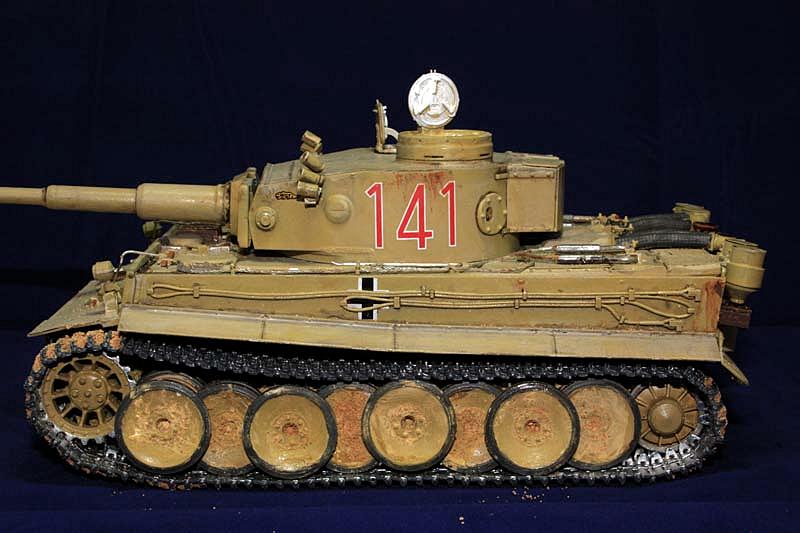
Stage fourteen is making the headlights; on this early production there are two headlights placed on either side of the tank. The build of these is in seven parts, two being etch, these do look well thought out and add a realistic finish to the tank. The two side fenders or track protectors are next, followed by the turret itself.
Stage fifteen. Perhaps the most fiddly bit of the whole build to begin with is the track making, which is single linked tracks with guides and pins to hold them together. A nice touch is the track holding tool that they also put in the box for you, which I have to say really does help, as it would be ridiculous trying to do it without them, but not impossible. So with each single track held in place by the track tool, I was fitting ten at a time, then you have to place the pins in the hole jamming them in so that they break off cleanly, holding each link together - so far so good. Now on picking them up they all moved independently, looking superb, but before I could turn them over to place the alignment wheel pieces into place, I ended up with seven single track links and only three still together because the pins do not stay in place. After several retries, placing the pins 1 and 2 into the opposite ends, but with no further forward steps, I decided to try some glue - though first time was a nightmare as my tracks were in ten but were solid?
In the end using Tamiya thin cement and carefully, and I do mean carefully, I found best way to do this is to literally dab the end of each pin after you have placed them in the track, as in put them in dry and then glue the end that just sticks out. But please be careful, or like me at the beginning, several times, you end up with solid tracks. With patience and taking your time the track movement and slack (not much) looks truly realistic. It does tell you in the instructions not to use glue and use 96 single links per track, however I did find it easier and have some slack using 97 on each side.
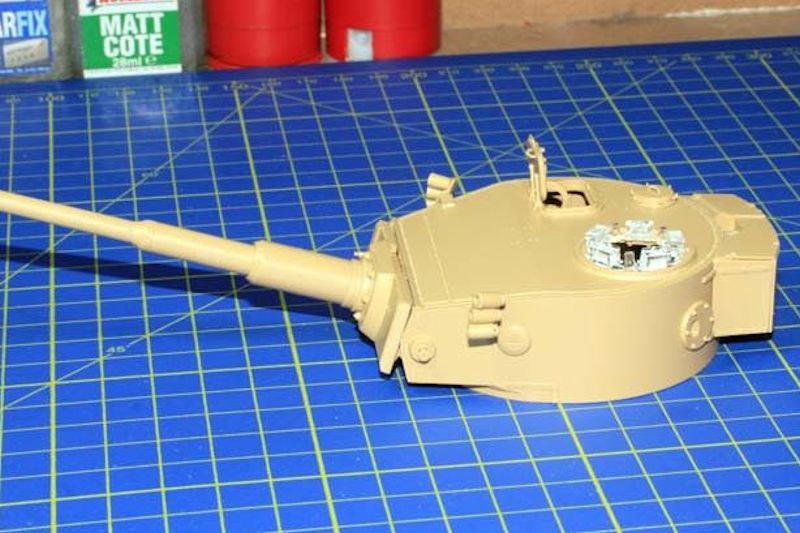
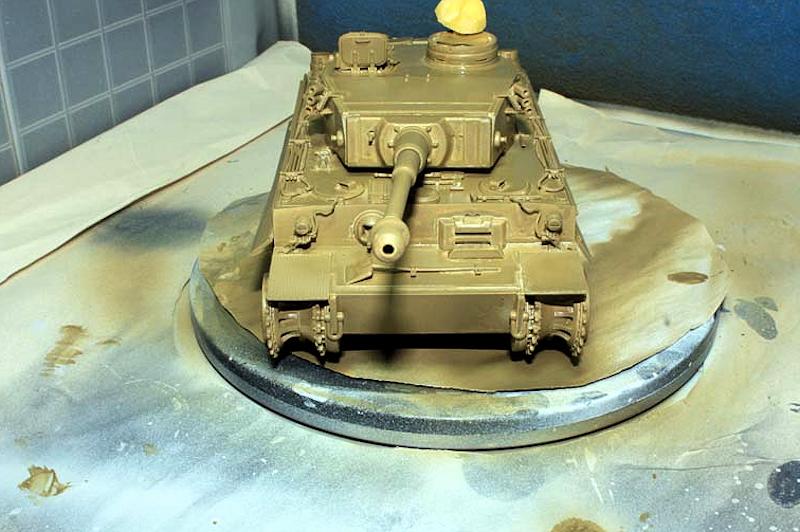
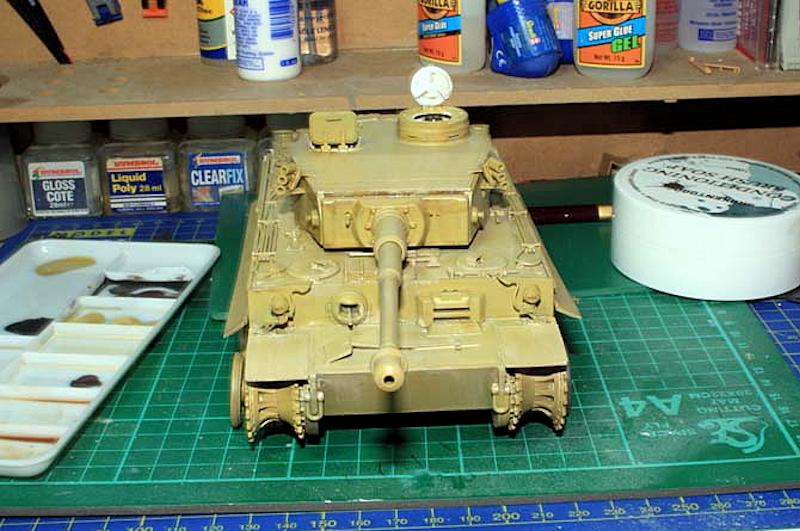
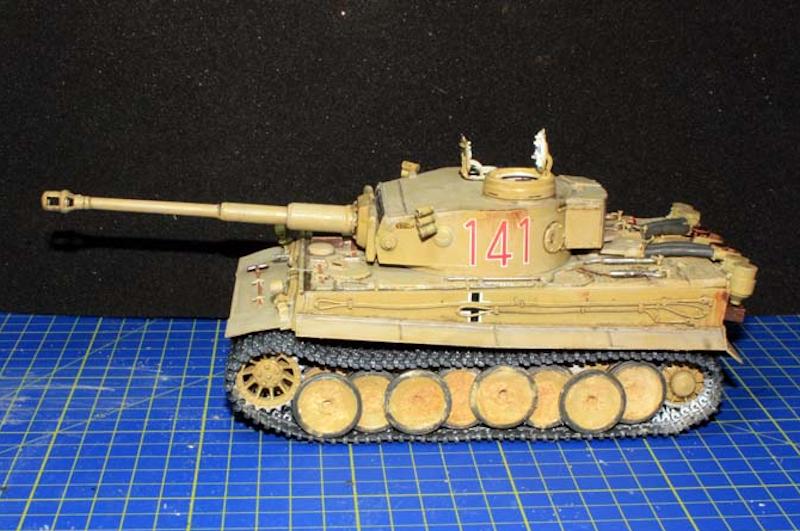
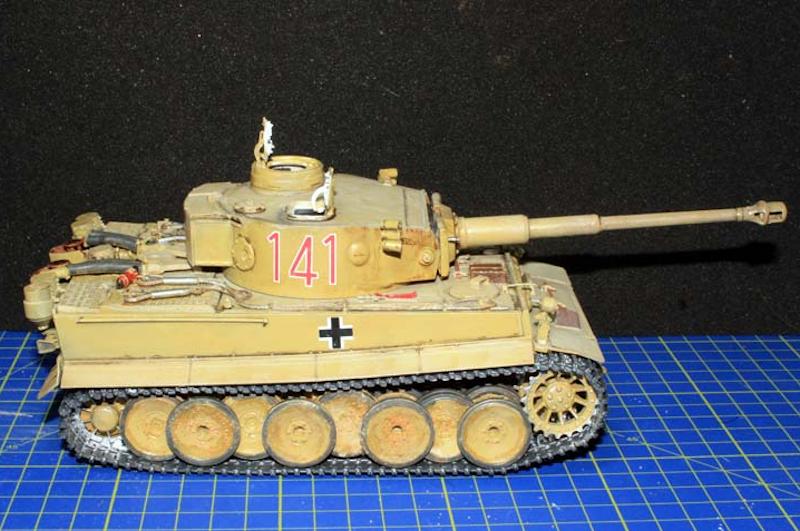
Onto the painting: first I hand painted the interior of the turret before placing the turret back onto the hull and priming the whole thing using Vallejo Acrylic-Polyurethane surface primer in grey, allowing over night for it to dry. Rye Field Models Tiger instructions tell you to use Mr Color Aqueous hobby colour, though I personally do not have any of this paint so to begin with looked for some alternative colours in my Panzer Aces. However in the end I turned to an AK Interactive set, using AK 006 and 007 mixed with a little RAL8020 from the AK Interactive Afrika Korps colours set, because the first Tigers that arrived in the Desert, came in RAL 8020 colour. Most of this was changed by the tanks crew as time went on, they were also this colour because Tunisia is not just sand and is much more Mediterranean than desert. I did one coat of the base paint then a second in a lighter shade, modulating it slightly as I went along. Once dried I used some Sin filters picking out panel lines and equipment.
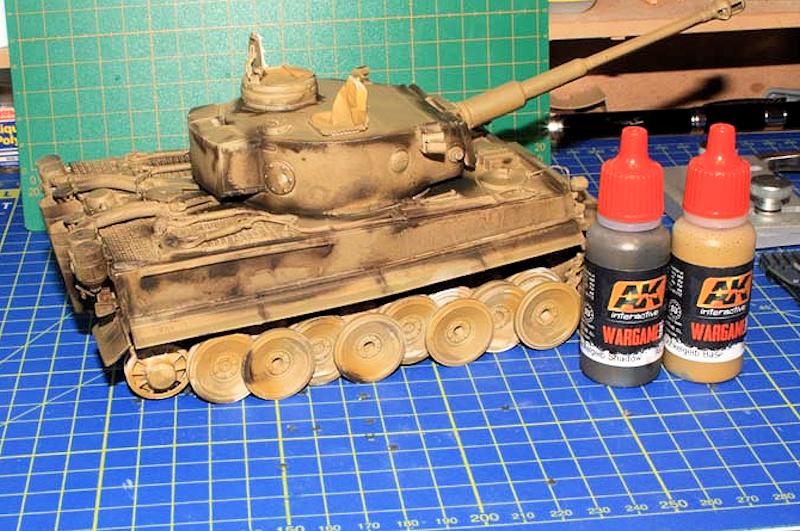
Once I had the colours how I wanted them, I then used Mig Productions Oil colour Abt35 buff; this I painted on all flat surfaces using AK Odourless turps. I thinned the oil paint so much that it was barely visible until it dried where it visually looked like a light dusting of sand on top of the tank. I repeated this a second time making sure to get it into places where sand would collect. Then came one of my favourite parts of weathering using some Mig dark grime and some AK rust streaks; the grime again was thinned down and the rust left to dry before running thinners through it to create the streaks. I then used AK True metals wax paint to do the tracks: first I lay a layer of steel on the inside and outside of the tracks, once it has dried I put a thin dark wash over the top of the tracks then add some rust effects, minimal for this build as it is an early production first run Tiger with little work done to it. I then added some very fine beach sand to the tracks and once set I used a Mig pigments mix of European light dust and beach sand adding it to the wheels and under the tracks round the underside of the wheels.
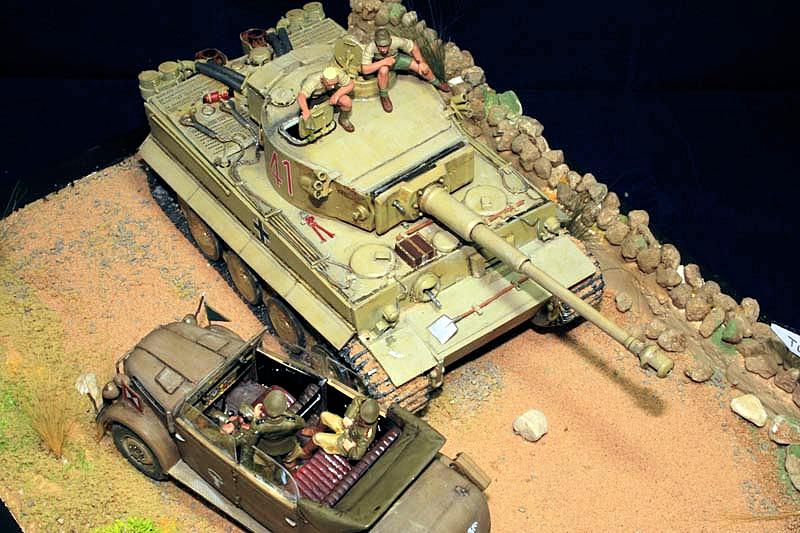
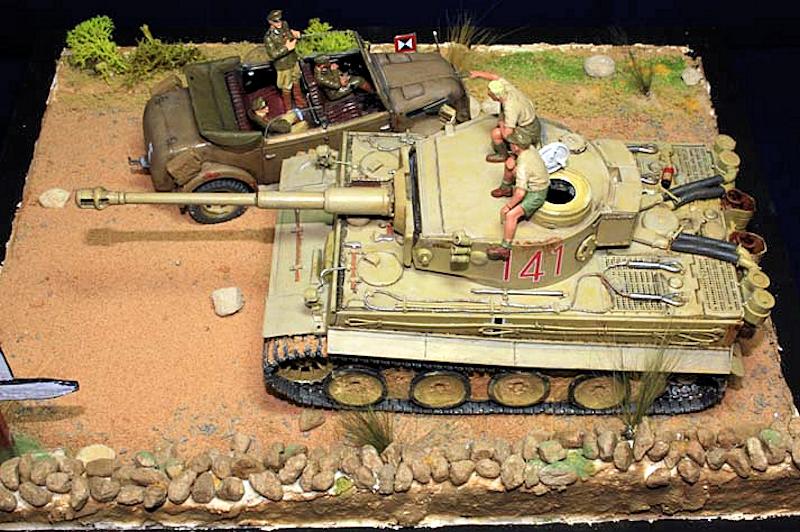
For the diorama I had looked online and in my AK D.A.K. profile book, one picture stuck out to me, one with a Tiger 1 stopped on the side of a road with a Kommandeurwagen German Steyr . I decided to change it just slightly and made the Tamiya Kommandeurwagen a Steyr Type 1500A.
So I built the base in an old frame, first laying some polystyrene down and gave it a coat of PVA glue so any paint I used on top of it would paint and not sink, put down a layer of plaster of Paris cutting it into lengths and making some more shapes to it like bed rock.
Now after reading some books and looking at the terrain I realised that it was not all sand but actually was gravel and rocks, boulders in some cases, then sand on top. With this in mind I painted the bottom of the plaster of Paris with some artists acrylic paints, a mixture of yellow peach and brown till I had a good base mix in case any of it be noticeable under the other materials that I was going to use. I got some gravel, the type used on model railways, I laid down a good depth where I wanted the road to be, I then airbrushed this with AK RAL 7008 and using some of my reptile beach sand, a very fine mixture of natural beach sand was laid over the top. I placed some of the talon stones by Woodland Scenics glued into place, adding a bit more sand around them making it look as natural as possible.
While that was drying I had already built a wall as a boundary and decided to make a dry stone wall top to it, and some rocks; I was very surprised how this looked and with some manipulation I made it look like some of the mud walls with rocks in them that are out in that region. At the other side of the road I made a verge and some more Mediterranean looking plants, adding some colour and breaking down the desert sand, finishing with some camel grass lichen and Javis countryside scatter. I made a sign in one corner just to lose the space there, this was done very basically using balsa wood and a lick of paint.
SUMMARY
Highs: I enjoyed building this Rye field Model Tiger 1 Early, a really nice kit with a great deal of detail and with some nice etch.
Lows: Some minor filling and a couple of the instructions I found quite misleading, namely the commanders cupola, the bits on the wrong sprue and the tracks.
Verdict: Excellent, apart from minor flash and minor errors in the instructions. Plenty of very detailed parts, good fit with only minor work needed, and plenty of spares left over.
About Adie Roberts (In_War_and_Peace) FROM: ENGLAND - SOUTH WEST, UNITED KINGDOM
I am disabled after a terrorist bomb I have in the past made models for TV and film and work with local museums making new models for display. I also take on commission builds for people
I didn't have many issues with it, maybe just the turret halves fitting with the roof. You have to sand one or the other, but this kit went together pretty easy for me. I found 5003 (Which I will post my review of here in the next few days) a bit more trying. But still doable. I have something called an "After Action Report" I filmed of it over on my YouTube channel.
Again, I may have just gotten a bad kit. It wouldn't be the first time. It's definitely not going to be the last. It's all fixable, but very annoying. It seemed like everytime a cut a part off a sprue it didn't fit.
You know, a couple problems on a build is whatever. That's model building. But on every step, that leaves me not interested in finishing this or in building anything else from Rye.
Hi Guys
Thank you all for your comments about the build I did on the Rye Field Tiger 1 Early D.A.K. I have read through them all several times. So if I answer some of you in turn.
MZ3 Jason; I am very sorry that you experienced the difficulties with your build, I truly am. I did not experience many if any at all of the ones you mentioned I did have some issues for which I mention in my review. It is a shame that you did have such issues as now you will be probably reluctant to purchase anything else from Rye Field which is understandable considering the issues you experienced. I built this kit and reviewed it how I did see it I know how much difference there is especially when it comes to a Tiger Tank. But I wanted to do a build and review completely fresh trying very hard to give everyone here something to take from the build.
I love building models and genuinely try hard to express my work by doing dioramas I am not the best in the world I would like to be one day lol. I made several mistakes on the tank with the paint which I tried to research as best I could in the short time I had. The paint colour scheme I chose was from a picture in the AK Interactive's profile D.A.K. book I then spent hours online reading forum posts and seeing loads of different points of views I did decide to go with the RAL 8020. I am not an expert on Tigers or any other German armour and certainly not a rivet counter (not that I have an issue with rivet counters) I just try to build something and ultimately bring it to life by way of a diorama that is my passion dioramas.
SDavis; thank you for your comments and glad you liked the review I can see and understand why you would be disappointed in the kit, But please have a go with one it is not an expensive kit it may not be the most accurate one in the world either but I did enjoy it and compared to some tigers I have seen comes with a lot to offer (just not the instructions) well not all of them anyway. When I was asked to do the review on the Rye Field Tiger I have to say I felt very honoured, when Darren turned up and gave it to me I was over the moon I am a humble man who is disabled after a terrorist bomb that took its toll on me over the years and modelling for me is a way of being as creative as I can be and being able to do the reviews that Jim Stark and Darren Baker and others who I don't know it felt like a chance to feel worthy again. I am not looking for sympathy just trying to explain my review and where it came from.
Byrden, MZ3, SDavies, Biggles2 and Mannloon I really do appreciate your comments MZ3 please don't give up on them (Rye Field Models) I am not working for them but I do feel looking back again at your experience that you had a bad kit
Mannloon; loved your after action you tube review and your knowledge and I have learnt a lot from this build and review I typed how I found the experience and build.
Lastly I would like to thank Jim Stark, Darren Baker and the other editors and staff for allowing me to do some reviews and builds for you it really is an honour for me.
I agree with both Adie and David. The old Tamiya panther is a fine example of the same thing. A non Panther person buys the kit without reading the reviews and builds it and is happy that the kit went together well and looks fine when finished. A panther person who has read the reviews grumbles that the bottom of the sponsons are open and the turret doesn't match the drawings in Xyz's book, and those holes in the bottom of the hull!!! One person enjoyed the build and the other was frustrated at the inaccuracies. I agree it is nice to see someone enjoy the build without having to repair every inaccuracy other than to make sure the parts fit. When I build a kit I decide early on just how accurate I want to be. I try to do a couple fun builds to every serious attempt. For the others that had issues, I'm sorry your kit had issues. I know how frustrating that can be to power through to finish a tough kit.
Thanks Thirian24 and MZ3, and I agree with TopSmith too. As a matter fact back in 2009/10 that old Panther was the first kit I built, and I didn't know what was what. I think people who have made it a point to know the accuracy of a subject are one resource, but certainly not the only one. It's a very esoteric line we walk, and at times it's nice to be reminded not everyone cares as much as we do. And frankly they look like they're having more fun because they're still in the infatuation stage with the hobby.


Comments